tldr
If you are familiar with GitHub Actions you may want to jump directly to the workflow descriptor build.yml and figure everything out by yourself. If not I invite you to read the text below.
Introduction
The BPMN Visualization, open source project, has been launched to develop a TypeScript Library for process visualization. In this article, I’ll explain how we are using GitHub actions to create a build workflow which we’ll use for this BPMN Visualization project.
But first, some definitions.
BPMN is a graphical notation standard published by the Object Management Group that is used to model executable business processes.
BPMN Visualization is a TypeScript library designed so you can visualize process execution data on BPMN diagrams.
It is in the early development stage, and so is subject to changes prior to the 1.0.0 release. Check out the code from our GitHub: repository.
GitHub Actions allow you to automate, customize, and execute software development workflows directly in a repository.
Read more about this amazing tool here: GitHub Actions marketplace.
Useful GitHub terms and glossary
Although I recommend you check the GitHub Actions documentation, I have described below the basic elements needed to understand the main principles of GitHub Actions.
What is Action? Action is an individual task that can be combined with other tasks to create a job. For example, “check out the repository,” or “set up a working environment.” There are plenty of GitHub Actions available - you can easily search for them on the GitHub Actions marketplace. There are actions developed by the GitHub team, and also some from third party vendors. If you feel something is missing you can develop your own action as well.
A job consists of one or more actions.
A workflow consists of one or more jobs.
A trigger is an event that triggers a specified workflow (for example, a push to the master branch).
You can define multiple workflows in your project. A workflow definition resides in a YAML file.
Expectations from the Build workflow.
It automatizes repetitive tasks by:
installing dependencies,
building the project, and
testing the project
after every new feature is pushed to the repository and a Pull Request is created.
The Build workflow permits you to automatically run a set of steps to:
check if the application can be built on multiple platforms
-
validate that incoming code changes are of good quality, using:
- lint
- unit tests
- e2e tests
GitHub Actions - Build workflow
To show the power and simplicity of GitHub Actions I’ll show you the Build workflow which we use for our new, emerging open source project: BPMN Visualization.
Feel free to preview the original workflow configuration file (build.yml) directly in the GitHub repository.
Build workflow consists of two GitHub Actions. They are fairly simple - you can check their respective documentation pages for more information:
Below is the content of the aforementioned build.yml along with the comments. It is divided into 2 parts for readability purposes.
The first part shows the upper portion of the file. The name of the workflow is followed by definitions of events on which the jobs defined in this workflow will be triggered.
You can see from the code that there are 2 triggers: push to branch master and pull request creation with the master as its base.
Triggers will not work if the changes occur in the files specified under the key: paths-ignore.
Build workflow part 1/2.
    name: Build

    on:
      push:
        branches:
          - master
        paths-ignore:
          - '.path1'
          - '.path2'
      pull_request:
        branches:
          - master
        paths-ignore:
          - '.path1'
          - '.path2'
The second part shown below defines the job Build. We make the job run on 3 different Operating Systems (Ubuntu, macOS, Windows) to make sure it can be launched on the majority of the available devices.
actions/checkout@v2 - First, check out the repository
actions/setup-node@v1 - Then, setup node environment with the specified version
-
next steps are simply node commands that install dependencies and execute quality assurance checks on the codebase:
- npm ci - install dependencies
- npm run lint-check - lint the code
- npm run build - build the application
- npm run test:unit - run unit tests
- npm run test:e2e - run e2e tests
Build workflow part 2/2.
    jobs:
      build:
        runs-on: ${{ matrix.os.name }}
        strategy:
          # we want to run the full build on all os: don't cancel running jobs even if one fails
          fail-fast: false
          matrix:
            # we define the matrix of systems on which we want to perform the build job
            os:
              - { name: ubuntu-latest}
              - { name: macos-latest }
              - { name: windows-latest }
        steps:
          - uses: actions/checkout@v2
          - name: Setup node
            uses: actions/setup-node@v1
            with:
              node-version: 12.x
          - name: Verify node, npm version
            run: |
              node --version
              npm --version
          - name: Install dependencies
            run: npm ci
          - name: Lint check
            run: npm run lint-check
          - name: Build Application
            run: npm run build
          - name: Test Application
            run: npm run test:unit
          - name: Test Application End to End
            run: npm run test:e2e
Conclusion
As you can see, using GitHub Actions is very simple and it’s well documented. The creation of the basic workflow that really does the job is a matter of minutes and saves us hours of time normally lost on repetitive tasks. I hope this is clear enough but if you have any questions don’t hesitate to pose them in the comment section.
As this is an open source project, our team invites you to join the community and contribute: https://github.com/process-analytics/bpmn-visualization-js.
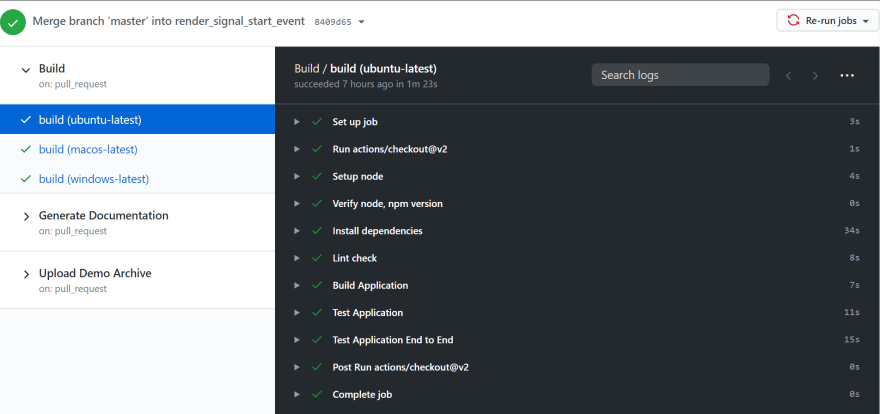
As a bonus here is the preview of the execution of the Build workflow in GitHub:

I wish you all passing builds and good test coverage.


Top comments (0)