
Hello there 👋
This is the first time ever I post anything on Dev.to. I've been lurking in the shadow, reading all kind of interesting posts here and finally I think it's time to write my own post to contribute something to the forum.

What I planned was to create my own portfolio and put it on the internet, so HR and other developers can find me easily. Howerver, since I was lazy busy at work, it stayed on my backlog for a long time. Until last week, I finally decided to start working on it after reading this nice article on the forum. Shout out to Naomi for the motivation and inspiration.
How I choose techs for my portfolio 👀
I decided to start working on the portfolio with my most favourited framework: NextJS. The reason why I chose NextJS instead of writing my portfolio using normal React is the ability to SEO. Also since I kinda hate to do the routing in React using react-router-dom, NextJS routing system is my go-to. For now, my portfolio only have one route, but I'm planning to add a new blog page to my website, so it's better to get prepared first.
Also, let's not forget about TailwindCSS. The first time I used it, I felt in love with the library almost immediatetly. TailwindCSS helps me to create a very well-structured CSS in the codebase, and I'm using it in almost every projects I'm working on.
Steps to make my dream portfolio comes true
Let's get started by running the command to create the initial project
yarn create next-app

By default, NextJS will come with eslint pre-installed. I will add another library called prettier and use it along with eslint to control my code's quality. Also, I install a plugin called prettier-plugin-tailwindcss to auto sort my TailwindCSS classes.
yarn add --dev prettier eslint-config-prettier prettier-plugin-tailwindcss
This step here is my own preference, you can skip it or follow it. But I think it's always good to have a barrier preventing you from falling into the abyss.
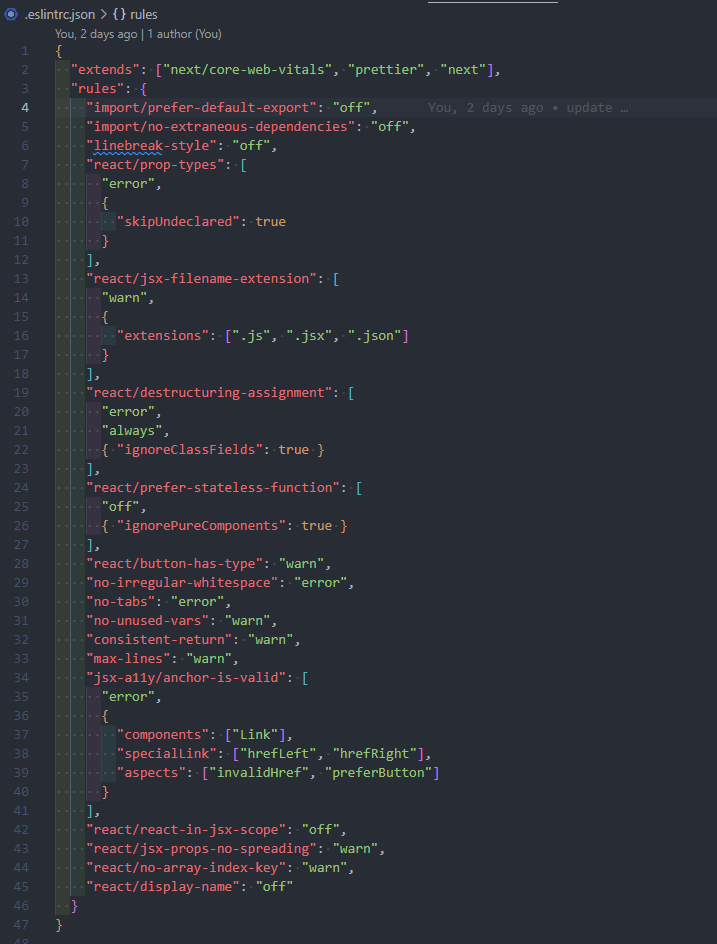
My Prettier and ESlint configuration will look like this:

Next step we need to install TailwindCSS. More commands 👀
yarn add --dev tailwindcss postcss autoprefixer
npx tailwindcss init -p
The first command will add the library into devDependencies inside your package.json file. You can check out the different between dependencies and devDependencies here. The second command will create 2 files: tailwind.config.js and postcss.config.js. We need to add some lines of code into tailwind.config.js file and import @tailwind directive into the global css file to make it works.

Also, I will add property darkMode: 'class' into tailwind.config.js to control my portfolio's dark mode using classes.
Let's talk about the font. I found that the font Inter looks attractive and clear, so I used it as the main font for my portfolio. Let's open google font and grab the font we need, created a file called _document.js inside our project and put the tags into our file.


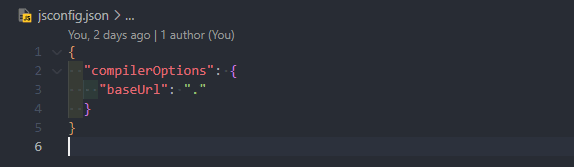
After that, we can setup the absolute import function for our project to prevent ugly ../../../../components/OurNiceComponent.js thingy. Luckily, NextJS starts automatically support jsconfig.json "paths" and "baseUrl" options since Next.js 9.4, so we just need to create a new file called jsconfig.js, add the configuration like this and it will work nicely.
The result after we have absolute import working

This looks much nicer in general, isn't it?
Now, we start coding. I won't dive too deep in my codebase, since you can check it out in my Github repo. However, I do have some points that I found they are quite interesting, and will share with you guys how I handled them.
- Flash of unstyled content
- Website optimization
Flash of unstyled content
The most important thing you need to do when setup dark mode for your website is to keep the theme selected by the user. Normally, you can save a key to localStorage to identify the selected theme.
const [darkMode, setDarkMode] = useState(false)

const initDarkMode = () => {
  const isDarkMode = localStorage.getItem('your-theme')
  if (isDarkMode === 'dark') {
    setDarkMode(true)
  } else {
    setDarkMode(false)
  }
}

useEffect(() => {
  initDarkMode()
}, [])

const changeThemeHandler = (theme) => () => {
  if (theme === 'dark') {
    document.documentElement.classList.add('dark')
    setDarkMode(true)
  } else {
    document.documentElement.classList.remove('dark')
    setDarkMode(false)
  }
  localStorage.setItem('your-theme', theme)
}

return (
  <button type="button" onClick={darkMode ? changeThemeHandler('light') : changeThemeHandler('dark')}>
    Change theme
  </button>
)
The code block above will help you to set the theme base on the value of the key your-theme in localStorage. However, when you refresh the browser, you will start notice a problem: Your website will flash a white screen before it changes to dark theme. This problem happens because the function initDarkMode() is being placed inside useEffect(), which runs after the content has been rendered.

The solution for this problem is quite simple. Open the file _document.js and add the script below inside the <Head /> tags.
<script
  dangerouslySetInnerHTML={{
    __html: `
      (function () {
        const themeKey = 'your-theme';
        const classNameDark = 'dark';
        const classNameLight = 'light';

        function setClassThemeOnDocumentBody(darkMode) {
          if (darkMode === 'dark') {
            document.documentElement.classList.add(classNameDark);
          } else {
            document.documentElement.classList.remove(classNameDark);
          }
        }
          let localStorageTheme = null;
          try {
            localStorageTheme = localStorage.getItem(themeKey);
          } catch (err) {}
          const localStorageExistsTheme = localStorageTheme !== null;

          // Determine the source of truth
          if (localStorageExistsTheme) {
            // source of truth from localStorage
            setClassThemeOnDocumentBody(localStorageTheme);
          } else {
            // default theme is light theme
            localStorage.setItem(themeKey, 'light');
          }
      }());
    `,
  }}
/>
By adding this small script, we are able to block the browser rendering and set the theme before browser paints our page. No more flashing 👌.
Website optimization
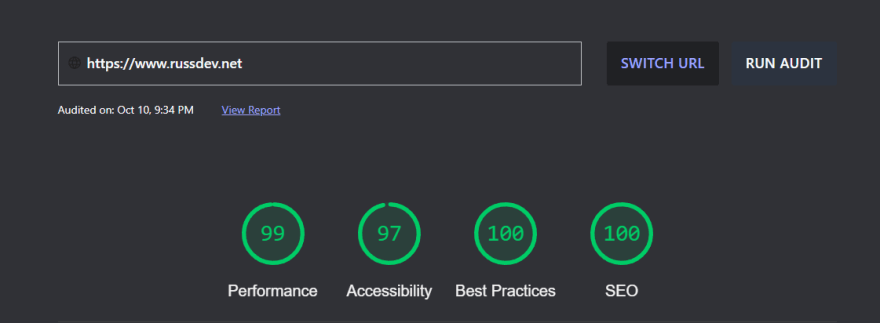
There are plenty of ways to check how optimized your website are, but my favourite way is using Google Audit. The tool will give you an insight about your website, including website's Performance, Accessibility, Best Pratice and SEO. On my first audit, the performance score for my portfolio was 84, which was kinda bad for a simple page.
The first thing I did is to compress my images. But since my portfolio only have one image, there was no significant change. Back to the audit report, I noticed that my First Contentful Paint (FCP) time was long, and the tool said I should avoid chaining critical requests. A little bit more inspection and I found out that the font size downloaded from Google Font is too large. In fact, the requests size for this font was more than 136kB per font type, added up to more than 340kB in total!
As every normal developers, I started begging Google for help. I bumped into this article, and after applied this method to my portfolio.
<link
  rel="preload"
  href="https://fonts.googleapis.com/css2?family=Inter:wght@400;600;700;800&display=swap&text=1234567890qwertyuiopasdfghjklzxcvbnmQWERTYUIOPASDFGHJKLZXCVBNM%22%27%28%29%2C%2D%2E%3A"
/>
<link
  href="https://fonts.googleapis.com/css2?family=Inter:wght@400;600;700;800&display=swap&text=1234567890qwertyuiopasdfghjklzxcvbnmQWERTYUIOPASDFGHJKLZXCVBNM%22%27%28%29%2C%2D%2E%3A"
  rel="stylesheet"
/>
By adding text query to the url and use only needed characters for the font, my total requests size for the font was less than 40kB in total. It means I have reduced nearly 90% of requests size. Stunning result! 😳
Here is my portfolio audit score after the optimization:
Put the portfolio on the Internet
I bought a cheap domain and used Vercel to host my portfolio. The integration was quite easy and fast, I just updated the CNAME and IP Address of Vercel to my domain and it did the rest of the works for me. Thanks Vercel for bringing such an amazing deployment experience to the developers!
Final words
Thank you for spending time to read my long article 🙇♂️.
You can checkout my portfolio here.
If you want to find the codes, please checkout my Github repository


Top comments (5)
I don't mean to rain on your parade, but after reading the above and looking at the site, the first word that springs to mind is "over-engineered". It looks great, but could be achieved with plain HTML and CSS with maybe a tiny sprinkling of JS. It baffles me why anyone would build such a simple site with such a complex process.
Hi Jon, thank you for your feedback! Yes you are totally right, the portfolio could have been done easily using only HTML, CSS and a very little JS. However, as I said in the post, the project structure is my own preference to ensure my coding quality. Also, I'm planing to add more features inside it, such as a CV previewer, an email sender with rate limit function to prevent spammers, a blog section with revalidate function, etc. Another thing is this coding structure gives me more spaces and provides easy ways to build features. My point is, all the jobs can be archieved with simple and basic thing, but it will not gives me a good DX because a lot of small things will need to be done manually. For example, if I build the UI with pure CSS, I will need to think about how to name my classes. If I want to deploy the code with a high performance score, I will need to manually using a code bundler to minify my codebase on building process. Hope my long answer can satisfy you 😄
Your portfolio looks nice. Nice clean design. The dark/light mode toggle works well, and both themes look nice. Perhaps it might be good to add a link to your GitHub profile.
Thank you for your kind words. I have updated my Github bio with the link 😄 glad you mention about it, I’ve completed forgot to add my link there until I read your comment.