
What is GridFs ?
GridFs is the mongodb specification for storing large files such as audios, videos or images… It is mostly useful for storing files that excide mongodb document size limit of 16MB. Futhermore, regardless of files size, it is also useful when you want to store files for which you want access without having to load the entire file into memory.
How does GridFs works ?
When you upload a file into GridFs bucket, instead of storing the file in a single document, GridFs divides it into small pieces called chunks and stores each chunk as a separate document, each with a maximum size of 255kB except for the last chunk which can be as large as needed.

For the purpose of storing the chunks and the file’s metadata (filename, size, time when the file was uploaded, and so on) , GridFS by default uses two collections, fs.files and fs.chunks. Each chunk is identified by its unique _id ObjectId field. The fs.files serves as a parent document. The files_id field in the fs.chunks documents establishes a one to many relationship between the fs.files and fs.chuncks collections documents.
How to use GridFs with Node.js & mongodb?
Prerequisites
NodeJS LTS installed
Knowing how to connect a MongodB Atlas account
A Code Editor
What are we going to do in this tutorial ?
- Create a GridFS Bucket
- Upload Files
- Download Files
- Rename Files
- Delete Files
this is a light version of the tutorial. To read the details part of all the section, you can follow the tutorial on my blog
Lest’s code
Installation
First things first, you need a node project. Let’s get things started by initializing a new folder.
mkdir gridfs-tutorial; cd gridfs-tutorial; npm init -y
This will create a package.json file with the standard defaults. Our project folder is ready to start working in but let’s install a few dependencies first
npm i express morgan body-parser mongoose multer-gridfs-storage multer dotenv
Express: Express js is a node.js routing and middleware web framework that provides a robust set of features for web and mobile applications.
Morgan : Morgan is an HTTP request logger middleware for node.js
Body-parser: body-parser is a Node. js middleware that parses incoming request bodies in a middleware before you handle it
Mongoose: Mongoose is an Object Data Modeling (ODM) library for MongoDB and Node.js. It provides schema validation, manages relationships between data, and is used to convert between objects in code and representations of those objects in MongoDB.
Multer: Multer is a node. js middleware for handling multipart/form-data , which is primarily used for uploading files
Multer-gridfs-storage: Multer-gridfs-storage is a Multer engine for GridFS that allows to store uploaded files directly to MongoDb
Dotenv: Dotenv is an npm package that automatically loads environment variables from a .env file into the process.env object.
Developement dependency
Let’s install Nodemon as a development dependency to automatically restart the server after file change
npm install --save-dev nodemon
```
**Setting up Express Server**
Create a file called **index.js**, this will be our express server and paste in the following code:
```javascript
const express = require("express");
const bodyParser = require("body-parser");
const logger = require("morgan");
const dotenv = require("dotenv");
dotenv.config();
const app = express();
// Connect to database
// Connect to MongoDB GridFS bucket using mongoose
// Middleware for parsing request body and logging requests
app.use(bodyParser.json());
app.use(logger("dev"));
// Routes for API endpoints
// Server listening on port 3000 for incoming requests
const port = process.env.PORT || 3000;
app.listen(port, () => {
console.log(`Server listening on port ${port}`);
});
```
**Configure server launch**
From the **package.json** file, change the scripts section to
```json
"scripts": {
"dev": "nodemon index.js"
}
```
That will allows the server to be automatically restarted after file change.
**Run the server**
Launch the server with :
```bash
npm run dev
```
You should see the following message in your terminal :
```
Server listening on port 3000
```
**Connect our Node.js/Expressjs project to our mongodb database**
— Create a **.env** file at the root of your project, then add the following variables
**MONGO_DB**: you can give as value to this variable, your mongodb existing database, otherwise a new database will be generated in your mongodb project' s cluster with the same name
**MONGO_USER**: this variable takes the username you created on mongodb atlas to get access to your database
**MONGO_USER_PWD**: the value of this variable must be the password you created with the username below to get access to your mongodb atlas database
— Create a **database** folder from the root of your project then create a **config.js** file inside that folder and past in the following code:
```javascript
//config.js
const mongoose = require("mongoose");
const connectDB = async () => {
try {
await mongoose.connect(`mongodb+srv://${process.env.MONGO_USER}:${process.env.MONGO_USER_PWD}@cluster0.vlhig1a.mongodb.net/${process.env.MONGO_DB}?retryWrites=true&w=majority`,);
console.log("MongoDB connected");
} catch (err) {
console.error(err.message);
process.exit(1);
}
};
module.exports = connectDB;
```
— Update your **index.js** file
```javascript
const express = require("express");
const bodyParser = require("body-parser");
const logger = require("morgan");
const dotenv = require("dotenv");
const connectDB = require("./database/config");
dotenv.config();
const app = express();
// Connect to database
connectDB();
// Connect to MongoDB GridFS bucket using mongoose
// Middleware for parsing request body and logging requests
app.use(bodyParser.json());
app.use(logger("dev"));
// Routes for API endpoints
// Server listening on port 3000 for incoming requests
const port = process.env.PORT || 3000;
app.listen(port, () => {
console.log(`Server listening on port ${port}`);
});
```
— When you server restarts, you should see the following messages:
```
Server listening on port 3000
MongoDB connected
```
Greatttttt !!!!!
**Setting up GridFs bucket**
— Le’s create an instance of our GridFs Bucket
Update your **index.js** file by importing **mongoose** and add the following code just after **connectDB()** invokation :
```javascript
let bucket;
(() => {
mongoose.connection.on("connected", () => {
bucket = new mongoose.mongo.GridFSBucket(mongoose.connection.db, {
bucketName: "filesBucket",
});
});
})();
```
Here we’re creating an instance our bucket in order to make some actions on files (Get, update, delete, rename…), if the no bucket exists with the same name, a bucket will be created with that name.
Restart your server, you should see the following messages :
```
Server listening on port 3000
Bucket is ready to use
MongoDB connected
```
— Let’s manage file storage
Create a utils folder at the root of your project then create a upload.js file inside it.
```javascript
//upload.js
const multer = require("multer");
const { GridFsStorage } = require("multer-gridfs-storage");
// Create storage engine
export function upload() {
const mongodbUrl= `mongodb+srv://${process.env.MONGO_USER}:${process.env.MONGO_USER_PWD}@cluster0.vlhig1a.mongodb.net/${process.env.MONGO_DB}?retryWrites=true&w=majority`;
const storage = new GridFsStorage({
url: mongodbUrl,
file: (req, file) => {
return new Promise((resolve, _reject) => {
const fileInfo = {
filename: file.originalname,
bucketName: "filesBucket",
};
resolve(fileInfo);
});
},
});
return multer({ storage });
}
module.exports = { upload };
```
Replace _**mongodbUrl**_ by your own mongodb URL as you did previously above.
Here is the workflow of uploading a file:
**Express** is the framework for uploading the files into MongoDB
**Bodyparser** retrieves essential content from HTML forms
**Multer** handles the file upload
**Multer-gridfs** storage integrates GridFS with multer to store large files in MongoDB.
Here, as arguments of _**new GridFsStorage(…)**_, we have an object that has two properties :
**url** : it refers to the url of our mongodb Atlas cluster’s url
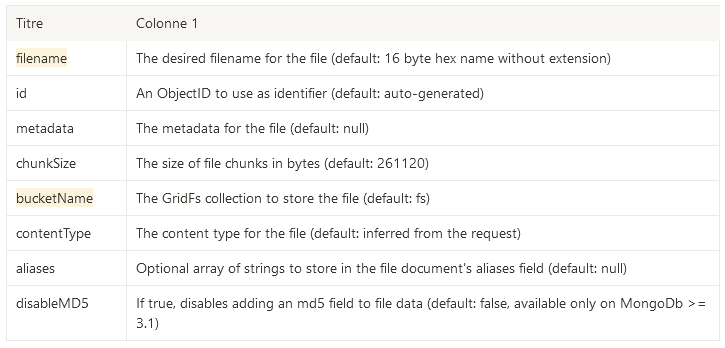
**file** : the file propety’s value is a function that controls the file storage in the database and it is invoked per file (for instance in case of multiple files upload) with the parameters _**req**_ and _**file**_, in that order. It returns an object or a promise that resolves to an object with the following properties.
**Upload a single file**
Add the following code after //Routes for API endpoints comment:
```javascript
const { upload } = require("./utils/upload");
//...
// Upload a single file
app.post("/upload/file", upload().single("file"), async (req, res) => {
try {
res.status(201).json({ text: "File uploaded successfully !" });
} catch (error) {
console.log(error);
res.status(400).json({
error: { text: "Unable to upload the file", error },
});
}
});
```
Here you might say what is that but don’t worry, let me explain :
First Express is a middleware framework that means it will first execute our _**upload()**_ function then will execute the array function.
— Let’s see in details the _**upload().single(”file”)**_.
_**upload()**_ returns a Multer instance that provides several methods for generating middleware that process files uploaded in _multipart/form-dataformat_. The _**single(...)**_ method is one of those it returns middleware that processes a single file associated with the given form field. Its argument **“file”** must be the same as the name of your client side form input that handle file upload.
Once the file is uploaded, our second function (array function) will be called and give a response to client request.
**Upload multiple files**
Update the **index.js** file with following code :
```javascript
// Upload multiple files
app.post("/upload/files", upload().array("files"), async (req, res) => {
try {
res.status(201).json({ text: "Files uploaded successfully !" });
} catch (error) {
console.log(error);
res.status(400).json({
error: { text: `Unable to upload files`, error },
});
}
});
```
The **array(…)** method of Multer returns middleware that processes multiple files sharing the same field name.
**Download a single file**
To retrieve a file from GridFs bucket, one can use the openDownloadStream.
— It takes two arguments :
**id**: The ObjectId of the file you want to download
**options**: an object that describe how to retrieve the data, it has two properties

_— It returns the file as a readable stream that you can pipe to the client request response._
Here is how you can download a file by its id :
```javascript
// Download a file by id
app.get("/download/files/:fileId", async (req, res) => {
try {
const { fileId } = req.params;
// Check if file exists
const file = await bucket.find({ _id: new mongoose.Types.ObjectId(fileId) }).toArray();
if (file.length === 0) {
return res.status(404).json({ error: { text: "File not found" } });
}
// set the headers
res.set("Content-Type", file[0].contentType);
res.set("Content-Disposition", `attachment; filename=${file[0].filename}`);
// create a stream to read from the bucket
const downloadStream = bucket.openDownloadStream(new mongoose.Types.ObjectId(fileId));
// pipe the stream to the response
downloadStream.pipe(res);
} catch (error) {
console.log(error);
res.status(400).json({error: { text: `Unable to download file`, error }});
}
});
```
What we did here is straightforward :
- First we get a file ID “fileId” from the request paramters then we search the file that has it _id property equal to fileId
- As find(…) method of the bucket returns an array, we check that it has at least one item otherwise we tell the client we didnt find any file that has this id
- In case we find a file, we set some paramters to the response header such as the file type
- Then we download the file as a readable stream
- And pipe that stream to the response
**Download multiple files**
You will barely see tutorial explaining you how to retrieve and send multiple files to client. Here i will show two approaches to achieve that. Let’s start with the first approach :
— Using [archiverjs](https://www.archiverjs.com/)
Archiverjs is a nodejs streaming interface for archive generation. You can install it like this :
```javascript
npm install archiver --save
```
We will use **_archiverjs_** here to gather our data then compress them as a **_zip_** file before sending them to the client. Here is how that works:
```javascript
Import _**archiver**_ at the top of your _**index.js**_ file:
const archiver = require("archiver")
//...
app.get("/download/files", async (req, res) => {
try {
const files = await bucket.find().toArray();
if (files.length === 0) {
return res.status(404).json({ error: { text: "No files found" } });
}
res.set("Content-Type", "application/zip");
res.set("Content-Disposition", `attachment; filename=files.zip`);
res.set("Access-Control-Allow-Origin", "*");
const archive = archiver("zip", {
zlib: { level: 9 },
});
archive.pipe(res);
files.forEach((file) => {
const downloadStream = bucket.openDownloadStream(
new mongoose.Types.ObjectId(file._id)
);
archive.append(downloadStream, { name: file.filename });
});
archive.finalize();
} catch (error) {
console.log(error);
res.status(400).json({
error: { text: `Unable to download files`, error },
});
}
});
```
What we do here is straightforward : first we retrieve all the files metadata from our _**filesBucket.file.collection**_ then with that array of files metadata, throught a foreach loop we download each file as a readable stream and append that stream to the archive data that was piped to the response object. When all the files are gathered to the archive we finalizes the archiver instance and prevents further appending to the archive structure.
Now you might wonder how you can read this zip data from the client side. For that you can use the **[jszip](https://www.npmjs.com/package/jszip)** package. If interessed, tell me in the comment i will make a tutorial on that.
— Converting each file data to a base64 string
Here we dont need to install any their part library. We will be using nodejs builtin modules.
```javascript
Import **_Transform_** class from nodejs bultin stream module at the top of your _**index.js**_ file :
const { Transform } = require("stream");
//...
app.get("/download/files2", async (_req, res) => {
try {
const cursor = bucket.find();
const files = await cursor.toArray();
const filesData = await Promise.all(
files.map((file) => {
return new Promise((resolve, _reject) => {
bucket.openDownloadStream(file._id).pipe(
(() => {
const chunks = [];
return new Transform({
// transform method will
transform(chunk, encoding, done) {
chunks.push(chunk);
done();
},
flush(done) {
const fbuf = Buffer.concat(chunks);
const fileBase64String = fbuf.toString("base64");
resolve(fileBase64String);
done();
// use the following instead if you want to return also the file metadata (like its name and other information)
/*const fileData = {
...file, // file metadata
fileBase64String: fbuf.toString("base64"),
};
resolve(fileData);
done();*/
},
});
})()
);
});
})
);
res.status(200).json(filesData);
} catch (error) {
console.log(error);
res.status(400).json({
error: { text: `Unable to retrieve files`, error },
});
}
});
```
We have almost the same workflow as the previous approach. We first retrieve all the files metadata from our _**filesBucket.file.collection**_ then from that array of files metadata, we create a new array using the map function by downloading each file as a stream then pipe the stream to a transform class that transform the stream into a base64 string and return the transformed data back to the new array through _**Promise.resolve()**_ and send the data to the client.
Now you know how to retrieve a single file and multiple files from the GridFs bucket in different ways. Let’s see how to rename and delete a file.
**Rename a file**
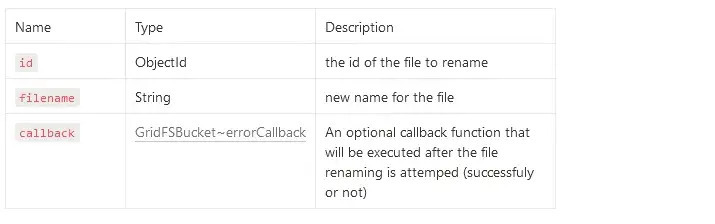
To rename a file, we can use the **rename(…)** method of the GridFs bucket. The method takes three arguments:
```javascript
// Rename a file
app.put("/rename/file/:fileId", async (req, res) => {
try {
const { fileId } = req.params;
const { filename } = req.body;
await bucket.rename(new mongoose.Types.ObjectId(fileId), filename);
res.status(200).json({ text: "File renamed successfully !" });
} catch (error) {
console.log(error);
res.status(400).json({
error: { text: `Unable to rename file`, error },
});
}
});
```
To test the file renbaming feature, copy the ID of a file from your mongodb database and paste it as following:
**Delete a file**
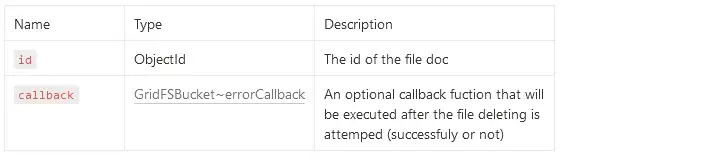
To remove a file from the bucket, we can use the **delete(..)** method of the GridFs bucket. The method takes three arguments:
You can test how to delete a file with a given Id as following with postman:
**What’s next ?**
Only practice can help you improve your knowledge and skills. Apply the knowledge gained in this tutorial in a concrete project. You can subscribe and also follow me on [Twitter](https://twitter.com/mr_nkt223) and [Github](https://github.com/mamadou-niakate) for new tutorials to come. Here is also my [Blog](https://www.beingdev.online/) you can read other tutorials.

Top comments (2)
i am getting images on frontend frontend but these images are not displaying , like const fetchFiles= async()=>{
try{
const data = await res.json();
}catch(err){
}
}
{files.map((data:string)=>{
return <img src={`data:image/jpeg;base64,${data}`} alt="Sample" height={40} width={40} />
})
}
can you post about connecting this to the frontend. thank you