
Why Mock APIs?
As a mobile / front-end developer, have you ever been blocked due to a dependency on a back-end API that is not readily available for consumption? This scenario is very frequent in fast paced development teams where multiple front-end and back-end teams work in parallel whilst striving to resolve dependencies with one another.
What is Mockatron
I am building Mockatron - a simple tool that helps front-end / mobile developers setup a quick Mock HTTP API Server without having to wait for actual back-end APIs to be available.
The goal is to help parallelize development efforts of teams so that once the actual APIs are available, consumers can simply switch to the original implementation without having to make a whole lot of changes.
By defining a simple set of configuration rules, you can stand up a portable mock HTTP server that can return **static **as well as **dynamic **response data. Some of the features that are offered today include:
Handlebars style templates to support dynamic generation of responses from object templates.
Proxy support to mock specific routes and redirect others to your actual back-end server.
Support for static responses (e.g plain old JSON data).
Example
Let us assume that we are going to build a mobile / web application like Amazon that will list products from a back-end API. Our goal is to use Mockatron and setup a mock API server that will return mock products each time a call to /api/products is called from the front-end / mobile app.
Install Mockatron
Pre-requisities:
Make sure that you have Node and npm installed.
$ npm install -g mockatron
Setup your mock definitions
Create an empty folder for us to configure our mock server. Give it an arbitrary name (e.g products).
Inside the products folder, create a configuration folder named config. We will be configuring our mock end points and constraints (more on this later) in this folder.
Inside the config folder, create a main.json file. Here is my folder structure that I have created
products
└── config
    ├── main.json
Let us start by writing a simple config in our main.json file.
{
     "contextPath": "/api",
     "routes": [
         {
             "path": "/products",
             "method": "GET",
             "responses": [
                 {
                     "body": "'no results found'",
                     "statusCode": 200
                 }
             ]
         }
     ]
}
The above configuration should be straightforward. The contextPath key specifies where the defined routes will be mounted while running our mock server. For e.g if we are hosting our mock server at localhost:8080, http://localhost:8080/api/products would match the /products route that we have defined above.
The responses array specifies the different response bodies that this route can potentially return. In this case, we are going to return a simple string body with a status code of 200.
Generate a mock server
Now that we have setup our configuration, go ahead and run the below command inside the products directory.
$ mockatron --config config --out output
If everything went well without errors, an output directory will be created in the specified path.
Run the mock server
-
cdinto theoutputpath -
$ npm i- This will install all dependencies for the mock server -
$ npm start- This will run a mock server on port8080
Ideally, you should see the following messages in stdout
> mockatron_server@1.0.0 start
> node index.js

Started application on port 8080
Open a tab in your browser or send a curl request to http://localhost:8080/api/products and you should get no results found as the response with a status code of 200.
And that's it! We have a mock API server up and running in less than 10 lines of code.
Dynamic responses
The above config returns the same static text every time we hit /api/products. However, most of the time while building a front-end or mobile app, we would need to generate variability in our responses to simulate a real world scenario. To achieve this go back to the configuration folder and create another file named products.json
products
└── config
    ├── main.json
    ├── products.json
Inside the products.json file, we will try to create a template for our response.
{
    "productList": [
            {{#array 5 20}}
            {
                "price": "{{float 50.0 5000.0}}",
                "rating": {{int 1 5}},
                "id": {{@index}},
                "sku": "{{uuid}}",
                "name": "{{word 2}}"
            }
            {{/array}}
    ]
}
We will use the productList object to return an array of products based on the template that we have defined above.
The #array helper generates a random number of objects (between 5 & 20) that it encompasses. The array is closed out with the {{/array}} tag.
Each object in the array can again be randomized. The float and int helpers take min and max arguments and generate a random number in between. Similarly there are helpers for generating a random uuid, random text using the word helper and so on. A complete list of response helpers can be found here.
To hook up the productList definition array to our /api/products route, head back to our main.json file and modify the existing config like so.
{
     "contextPath": "/api",
     "routes": [
         {
             "path": "/products",
             "method": "GET",
             "responses": [
                 {
                     "body": "{{{def 'products' 'productList'}}}",
                     "statusCode": 200
                 }
             ]
         }
     ]
}
We have only changed the body to load the productList definition that we defined in the products.json file instead of static text. For this, we use the {{{def <json-file-name> <definition>.
Now, lets rebuild our mock server. Go back to the root folder (the products directory) and run the following command
$ mockatron --config config --out output

$ cd output

$ npm i && npm start
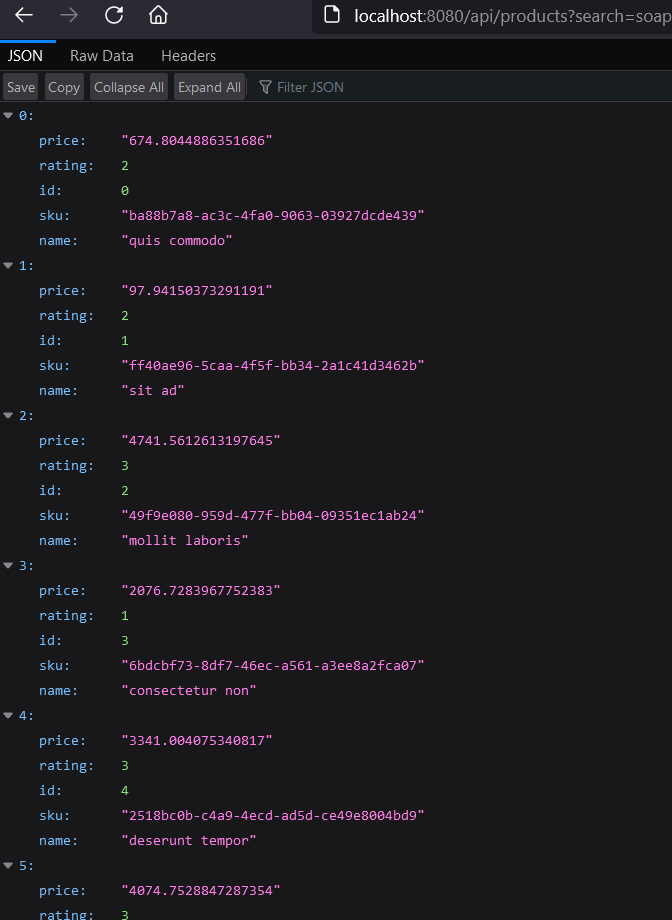
Now open a browser and try hitting http://localhost:8080/api/products multiple times. You will see that you get a different response each time!

Adding Constraints to Routes
Now that we are able to generate dynamic response data, let us look at adding constraints that determine when the response should be generated.
Constraints are synonymous to if (condition) then return response in Mockatron. Think of a constraint as logical blocks that we will put inside an if block.
Constraints can be added to each element of the responses key inside a route.
As an example, assume that the products API that we are building mandates a search query parameter in the URL and we should return a response only if the search query parameter is not null.
Let's head back to our main.json file and add the above rule as a constraint.
{
  "contextPath": "/api",
  "routes": [
    {
      "path": "/products",
      "method": "GET",
      "responses": [
        {
          "constraint": "{{neq (query 'search') undefined}}",
          "body": "{{{def 'products' 'productList'}}}",
          "statusCode": 200
        },
        {
          "body": "'No Results found'",
          "statusCode": 200
        }
      ]
    }
  ]
}
We see that the responses array now contains 2 elements. The first element contains a constraint key that evaluates if the incoming request's query parameter - search !== undefined. Only if this condition is satisfied, will the body get executed.
Otherwise, Mockatron will fall back to the next object in the responses array which basically returns a static string like before.
Remember: Contents in the responses array are evaluated in the order in which they are listed in the configuration
A full list of Mockatron constraint helpers are available here .
Nesting Constraints
We can nest multiple constraints into a single constraint. For e.g what if we want to return the response only if the search query param is not null and the price param > 0?
Modify the constraint section like so.
"constraint": "{{and
                    (neq (query 'search') undefined)
                    (gt (query 'price') 0)
               }}",
Static Response Data
Sometimes we may not want to deal with templating or needing dynamic response data for all our routes and a simple plain JSON object would be sufficient. To return static JSON content as response, use the {{file <json_file_name>}} helper instead of the {{def}} helper that we were using till now.
Let's assume that we add a new route called /static-product to our list of routes. In main.json, lets add the following configuration to the existing routes array.
{
  "path": "/static-product",
  "method": "GET",
  "responses": [
     {
       "statusCode": 200,
       "body": "{{file 'static-products'}}"
     }
   ]
}
All you need is a valid JSON response defined in a file named static-products.json in the config folder alongside the main.json file.
What's next
Try adding multiple routes, responses and constraints and see what works for you. If you want to report a bug / discuss a new feature request, reach out to me / raise an issue in Github.
In the next post, I will talk about configuring proxy support in Mockatron. This could be really powerful if you want to use Mockatron as a proxy server that will mock only specific routes while proxying other requests to your actual back-end APIs. Stay tuned!

Top comments (0)