RecyclerView is a ViewGroup that helps us to display a scrollable list of elements. It is one of the most used UI components in the Android apps and it involves having a data source, an adapter, and the RecyclerView. Other than displaying the content, RecyclerView is efficiently reusing the views that have scrolled off the screen by recycling them.

📃Components Overview
- Data source — list of objects that could be obtained from a local database, or as a result of a http request, or even it could be a list with some predefined values.
- RecyclerView is a scrolling list for list items and to have access at it we must add some dependencies in the gradle file
- Layout for one item of data — XML file
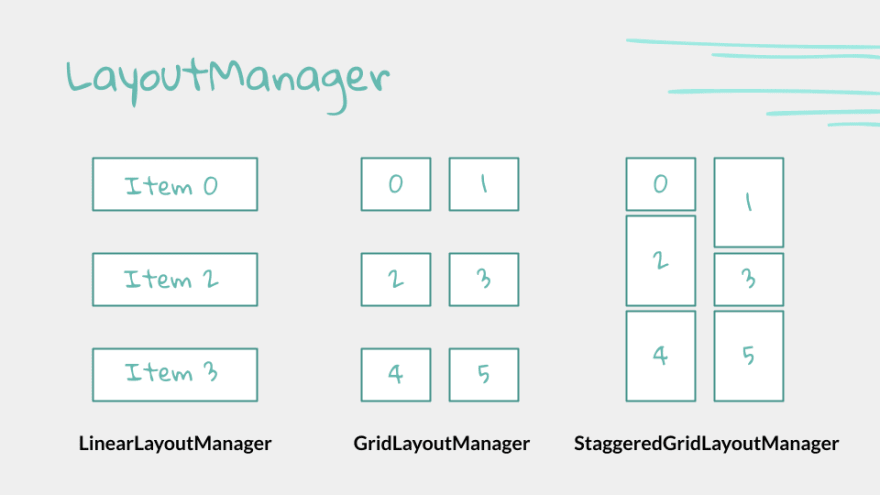
- Layout manager handles the organization of UI components in a view (there are 3 predefined ways to display the items)
- View holder has view information for displaying one item
- Adapter connects data to the RecyclerView
- Set the Adapter to the RecyclerView and we are done 🙂

LayoutManager
Adapter
- We are talking about applying the adapter design pattern as an intermediary between the source data we want to display and the view
- Adapter is a structural design pattern that allows objects with incompatible interfaces to collaborate
- Responsibile to create, updade, add and delete items from the list
- It suppose to implement the abstract class RecyclerView.Adapter
ViewHolder
- Used by the adapter to prepare one item view for each element from the datasource
- The layout of the item is specified in an XML resource file, it’s like a 1:1 relation between the view and the element from the list of objects provided as a datasource
- Can have clickable elements and it is placed by the layout manager
- We must implement the abstract class RecyclerView.ViewHolder
👩🏻💻Implementation steps
- Get the data by creating a new object class (data source)
- Add the RecyclerView dependency to app/build.gradle file and add RecyclerView to layout
- Create XML layout for item
- Define the LayoutManager in activity
- Extend RecyclerView.ViewHolder in a separated class
- Extend RecyclerView.Adapter in a separated class
- In onCreate of activity, create a RecyclerView with adapter and layout manager
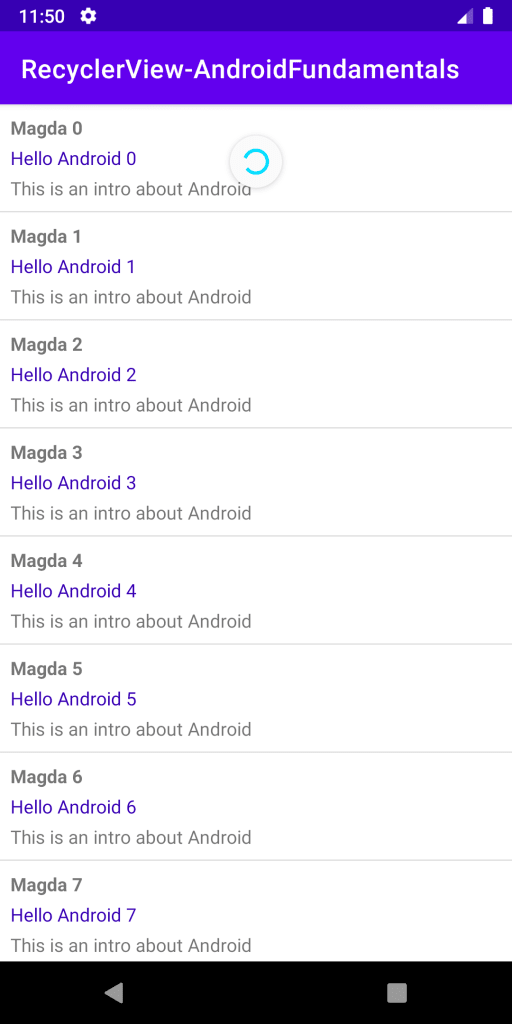
To cover the implementation steps we will display a list of emails. The data source is hardcoded, right now we are focusing on learning how to use RecyclerView.
Step 1: Get the data by creating a new object class (data source)
Step 2: Add the RecyclerView dependency to app/build.gradle file and add RecyclerView to layout
Step 3: Create XML layout for item
Step 4: Define the LayoutManager in activity
Step 5: Extend RecyclerView.ViewHolder in a separated class
Step 6: Extend RecyclerView.Adapter in a separated class
Step 7: In onCreate of activity, create a RecyclerView with adapter and layout manager
🔔Notify the Adapter

To not impact the speed of rendering the UI elements for a RecyclerView make sure that you’re not calling notifyDataSetChanged(), setAdapter(Adapter), or swapAdapter(Adapter, boolean) for small updates. [official recommendation] The solution is to use SortedListor DiffUtilto create minimal updates when the data source has changed.
✨Item decorators
We could set dividers between the items using DividerItemDecoration

💫Swipe to refresh
Step 1: Add a new dependency in the gradle file
Step 2: Wrap the RecyclerView in a SwipeRefreshLayout
Step 3: Update the code in the Adapter
Step 4: Setup SwipeRefreshLayout
You could check the full source code here. (different branches for each section)
📚Learn more
- Android Vitals — Slow Rendering
- Create dynamic lists with RecyclerView
- RecyclerView ins and outs — Google I/O 2016
- Yigit Boyar: Pro RecyclerView
Enjoy and feel free to leave a comment if something is not clear or if you have questions. And if you like it please share!
Thank you for reading! 🙂
Follow me on: Twitter | Medium | Dev.to
Originally published at http://magdamiu.com on December 28, 2020.

Top comments (0)