If you are trying to follow along, please know that SwiftUI requires XCode 11 and macOS 10.15, all of which is in developer beta right now.
This post will walk you through how to make a basic iOS app that counts how many times a button is tapped.
1. Create a new project
The first step is to launch XCode and create a new single page iOS application. When creating the iOS app, make sure Use SwiftUI is checked.

2. Create a variable and make the app output that variable
Next, we need to create a @State variable so that it can dynamically change when a button is tapped. Inside the ContentView struct, add @State var totalClicked: Int = 0 and change the string inside Text() to "\(totalClicked)").
Your struct should look like this now.
struct ContentView : View {

    @State var totalClicked: Int = 0

    var body: some View {
          Text("Hello World")
    }
}
3. Embed the Text() in a Verticle Stack
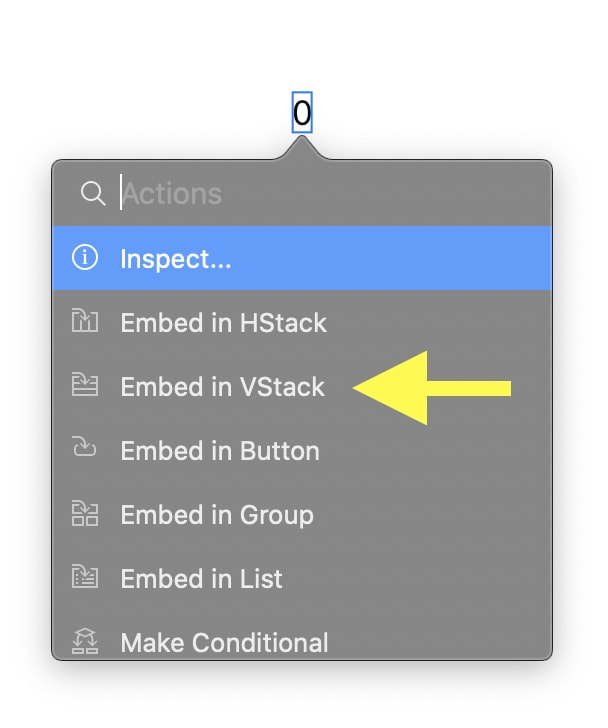
Now, we need to embed the text in a verticle stack to place the button below the Text(). To do this Command + Click on the 0 in the live preview and choose Embed in VStack.
By embedding in a VStack, the struct now looks like this:
struct ContentView : View {

    @State var totalClicked: Int = 0

    var body: some View {
          VStack { // this was added
            Text("Hello World")
          }
    }
}
4. Add a Button with an action
It's time to add a button. A way to do this is by first adding a Text(). Add the following to your struct:
// more stuff above
VStack {
    Text("\(totalClicked)")
    Text("Increment Total) // <- This is what to add
}
// more stuff below
Now, let's use the live preview to embed the Text() in a button. Command + Click on Increment Total in Live Preview and select Embed in Button.

We need to adjust the Button code that is now in ContentView.swift. Adjust button to look like the following:
var body: some View {
    VStack {
        Text("\(totalClicked)")
        Button(action: {self.totalClicked = self.totalClicked + 1}) {
        Text("Increment Total")
        }
    }
}
Now, if you run the app it will work!
5. (OPTIONAL) Add some style to the app!
Currently, the button and the text have no space between each other and the size of the total is quite small. In SwiftUI, you can adjust this pretty easily.
First, let's adjust the font size of the total by adding .font(.title) after the Text call.
Text("\(totalClicked").font(.title)
Next, we will add some space between the button and the text. To do this, we need to add Spacer() between the text and the button.
Text("\(totalClicked)").font(.title)
Spacer()
Button(action: {self.totalClicked = self.totalClicked + 1}) {
    Text("Increment Total")
}
The touch target on the button is a little small, so to make it bigger we will add padding to it.
Button(action: {self.totalClicked = self.totalClicked + 1}) {
    Text("Increment Total")
} .padding(.all)
The .all is adding padding to all sides of the button instead of just to the top, bottom, left, or right.
Finally, let's add padding to the entire Vstack so that the app will fill the screen of the device.
var body: some View {
    Vstack {
        Text("\(totalClicked)").font(.title)
        Spacer()
        Button(action: {self.totalClicked = self.totalClicked + 1}) {
            Text("Increment Total")
        }.padding(.all)
    }.padding(.all, 40)
}
The .padding(.all, 40) will tell this VStack to have a 40 point distance to it's closest members on the top, left, right, and bottom.
Here is the finished repo
 maeganwilson
/
totalClicked_tut
maeganwilson
/
totalClicked_tut
A tutorial for using a button in SwiftUI
SwiftUI Button Tutorial
A tutorial for using a button in SwiftUI
Places to read the tutorial
Did you like it?
If you liked the tutorial and project, please consider being a sponsor of this project and others like it by clicking the sponser button at the top of the repo, or by going directly to my Patreon.
If you enjoyed this article and want more, please consider subscribing to my Patreon and checking out my other posts!
If you don't like having more subscriptions, consider buying me a coffee by clicking the image below! ![]()

Oldest comments (10)
This looks so much like Flutter 😯
It does look similar! I haven't used Flutter, but just browsing the docs they look pretty close.
Yes, swiftui is exactly what flutter is but just for iOS. Also swift makes the code look slightly cleaner, but the idea is the same
Do you know how to add, say a border color and / or background color?
I decided to give swiftUI a shot. I just began learning UIKit and AppKit earlier this week 😅 so I am still trying to soak in all the differences from all 3 frameworks.
Yes to the border and border color! I'll put a gist together at lunch and link it here. Unfortunately, I'm still playing around with the background color stuff. That's been a little trickier for me to figure out.
Oh fun! Since I don't do any of this for work, I just try to focus on the new stuff and have fun. Hopefully, an app I write will make money some day.
Here is the code sample:
woohoo. thanks for the example :-)
I just realized you're also from Austin. Hello, and thanks, neighbor!
You're welcome!
Ah that's cool! Howdy!!
Awesome thanks! For some reason the apple documentation for border was buried beneath a bunch of links and I missed it. Glad you posted though!
I have a hard time with the Apple Documentation, so I like to share when I find something like that!