
Android & iOS Push Notifications with Stream Chat and React Native
Stream Chat allows you to add push notifications to your React Native application very easily. In this tutorial, we will show you how to create a sample React Native application from scratch with native push notifications that work both on Android and iOS devices.
Note:This tutorial is not supported in Expo applications. We need access to the native code to get the device tokens required to send push notifications for Stream Chat. If you are hoping to integrate this into an existing Expo application, you will need to eject.
If you would like to see the code for this tutorial - or even clone and follow along yourself, you can find it in this repo: https://github.com/GetStream/react-native-chat-example-push
First things first, make sure you've created an account with Stream and created an app within the dashboard.
To make things easier, we are going to disable auth so that we can easily test push messages. Please note that this only suitable for test/dev environments. While in development mode, you can go to the Chat tab in the dashboard for your app, scroll down to Chat Events and enable the toggle for Disable Auth Checks. This means we don't need to send a valid user token - usually, we need to generate a valid user token from a server); You can find more details on generating a valid token for a production application using Stream here.
Once you’re all set up, make sure you have your API key and secret in a safe spot for use later on this tutorial.
Next, initialize your new project with the react-native init chat-push-example command in your terminal. You can rename chat-push-example to whatever you would like.
Note: if you are adding this to an existing React Native project created with Expo or CRNA, you will need to eject. Please note that ejecting is irreversible; however, it is required to access native iOS and Android capabilities._ eject
We’ll start by installing all the dependencies we need:
$ yarn add stream-chat react-native-push-notifications react-native link react-native-push-notifications
iOS Setup
For iOS, we will be using Apple’s APN service to power the push functionality, rather than Expo or Firebase Cloud Messaging.
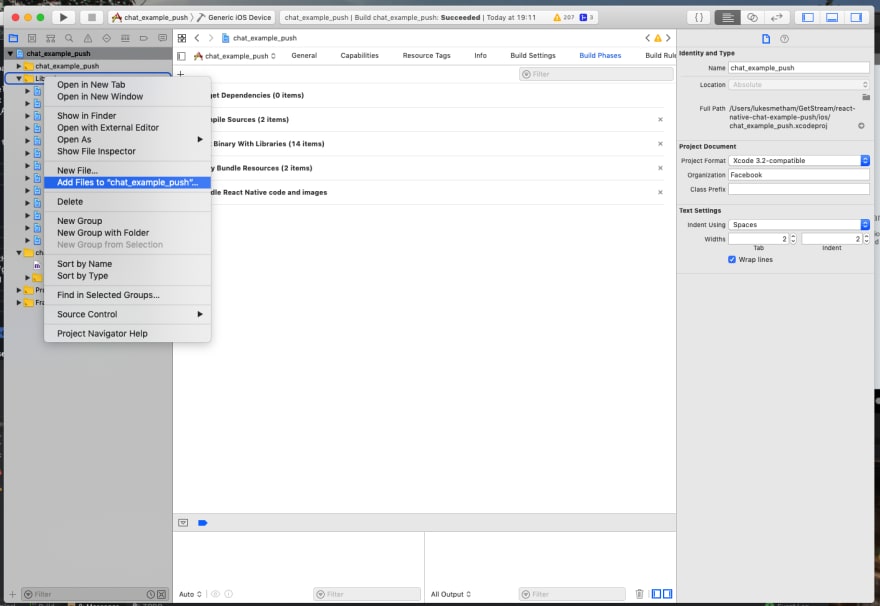
You also need to link PushNotificationIOS which is exported from React Native. Open Xcode and in the sidebar on the left, make sure you’re in the Project Navigator tab (the folder icon). Right click on the Libraries directory within your project name and select Add files to <Project_Name_Here>.
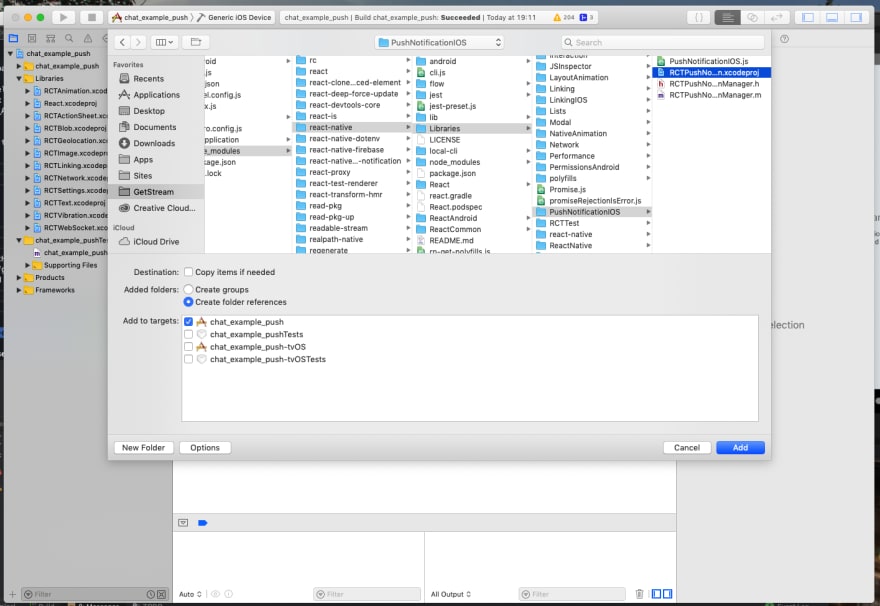
A file dialog will pop-up. Navigate to the root of your project, then to your node_modules directory and to the path as shown below. Click Add.
./node_modules/react-native/Libraries/PushNotificationsIOS/RCTPushNotification.xcodeproj
Now, click the root of your applications Xcode project in the navigator sidebar and click Build Phases in the tabs at the top of the middle pane. On the next screen, there are five dropdowns. Find the dropdown labeled Link Binaries with Libraries, expand it, and click the plus icon in the bottom left.

Then, focus on the search box and type RCTPushNotification. You should see a file named libRCTPushNotification.a in the list. Select it and click Add.

Last, add the following snippet to the bottom of your AppDelegate.m file which can be found here:

// Required to register for notifications

 - (void)application:(UIApplication *)application didRegisterUserNotificationSettings:(UIUserNotificationSettings *)notificationSettings

 {

  [RCTPushNotificationManager didRegisterUserNotificationSettings:notificationSettings];

 }

 // Required for the register event.

 - (void)application:(UIApplication *)application didRegisterForRemoteNotificationsWithDeviceToken:(NSData *)deviceToken

 {

  [RCTPushNotificationManager didRegisterForRemoteNotificationsWithDeviceToken:deviceToken];

 }

 // Required for the notification event. You must call the completion handler after handling the remote notification.

 - (void)application:(UIApplication *)application didReceiveRemoteNotification:(NSDictionary *)userInfo

fetchCompletionHandler:(void (^)(UIBackgroundFetchResult))completionHandler {

    [RCTPushNotificationManager didReceiveRemoteNotification:userInfo fetchCompletionHandler:completionHandler];

 }

 // Required for the registrationError event.

 - (void)application:(UIApplication *)application didFailToRegisterForRemoteNotificationsWithError:(NSError *)error

 {

  [RCTPushNotificationManager didFailToRegisterForRemoteNotificationsWithError:error];

 }

 // Required for the localNotification event.

 - (void)application:(UIApplication *)application didReceiveLocalNotification:(UILocalNotification *)notification

 {

  [RCTPushNotificationManager didReceiveLocalNotification:notification];

 }
Note: This code hooks up your iOS application to React Native’s_ RCTPushNotificationMananager, allowing us to retrieve the device token and handle push notifications in our JavaScript code.
Running on Your Device
Unfortunately, push notifications do not work in the iOS simulator, so you’re going to need a physical iOS device to be able to see the fruits of your labor. If you want to run your React Native application on a device, you’re going to have to edit the Xcode project to include code signing and push capabilities.
Open up Xcode and from the navigation bar on the left make sure your project is selected. Navigate to the General tab and under Signing, make sure you are logged in with your Apple Developer Account. Once logged in, select your development team and be sure to check Automatically Manage Signing.

In the General tab, under Identity, make sure your Bundle Identifier matches the one you used to configure push notifications with Stream. If you haven’t done this yet, please head on over to https://getstream.io/chat/docs/#push_ios and then return to this tutorial.
Lastly, navigate to the Capabilities tab and make sure Push Notifications are enabled:

You’re all set! Plug in your iOS device, select it from the run menu in Xcode and press Run.

Android Setup
For Android, we’ll be using Firebase Cloud Messaging to power push notifications. So first up, you’ll need to go to the Firebase Console , create a new application OR select an existing project. Then, go to Project Settings and under the General tab. Click on Your Apps, add an Android application and download your google-services.json file – you need to put this in the root of your projects android directory.
Now make sure google-services.jsonfile is included in your Android project’s dependencies by navigating to your project level build.gradle file (._android_build.gradle), opening it, and copying the following code into your dependencies like so:
buildscript {

    // ...

    dependencies {

        // ...

        classpath 'com.google.gms:google-services:+'

        // ...

    }

    // ...

}
Then, in the same directory, find the settings.gradle file and copy the following file if it isn’t already there.
Note: When you previously ran react-native link, it should have added the necessary files; however, it’s best to always double check. Linking can be temperamental at times.
include ':react-native-push-notification'

project(':react-native-push-notification').projectDir = file('../node_modules/react-native-push-notification/android')
Next, navigate to ._android_app/src and check you have the res directory. If not, create it and inside create another directoy named values. Then create a new file named colours.xml whose content is the following:
<resources>
        <color name="white">#FFF</color>
</resources
Linking may have also taken care of the next step, but once again, navigate to MainApplication.java in your projects android directory within android_app_src/main.
And check it has these two parts, as highlighted with comments:
import com.dieam.reactnativepushnotification.ReactNativePushNotificationPackage;  // <--- THIS

public class MainApplication extends Application implements ReactApplication {

  private final ReactNativeHost mReactNativeHost = new ReactNativeHost(this) {
      @Override
      protected boolean getUseDeveloperSupport() {
        return BuildConfig.DEBUG;
      }

      @Override
      protected List<ReactPackage> getPackages() {

      return Arrays.<ReactPackage>asList(
          new MainReactPackage(),
          new ReactNativePushNotificationPackage() // <---- & THIS
      );
    }
  };
  ....
}
And last but most certainly not least – go to android_app_src_main_AndroidManifest.xml and copy the following (the comments below will help guide you for your particular setup):
<!-- < Only if you're using GCM or localNotificationSchedule() > -->

  <uses-permission android:name="android.permission.WAKE_LOCK" />

  <permission
    android:name="${applicationId}.permission.C2D_MESSAGE"
    android:protectionLevel="signature" />
   <uses-permission android:name="${applicationId}.permission.C2D_MESSAGE" />

   <!-- < Only if you're using GCM or localNotificationSchedule() > -->
   <uses-permission android:name="android.permission.VIBRATE" />
   <uses-permission android:name="android.permission.RECEIVE_BOOT_COMPLETED"/>

<!-- Then, within the <application> block, place the following -->

    <receiver
    android:name="com.google.android.gms.gcm.GcmReceiver"
    android:exported="true"
    android:permission="com.google.android.c2dm.permission.SEND" >
    <intent-filter>
        <action android:name="com.google.android.c2dm.intent.RECEIVE" />
        <category android:name="${applicationId}" />
    </intent-filter>
  </receiver>

  <receiver android:name="com.dieam.reactnativepushnotification.modules.RNPushNotificationPublisher" />
  <receiver android:name="com.dieam.reactnativepushnotification.modules.RNPushNotificationBootEventReceiver">
    <intent-filter>
      <action android:name="android.intent.action.BOOT_COMPLETED" />
    </intent-filter>
  </receiver>

  <service android:name="com.dieam.reactnativepushnotification.modules.RNPushNotificationRegistrationService"/>

  <service android:name="com.dieam.reactnativepushnotification.modules.RNPushNotificationListenerServiceGcm" android:exported="false" >
    <intent-filter>
      <action android:name="com.google.android.c2dm.intent.RECEIVE" />
    </intent-filter>
  </service>

  <service
android:name="com.dieam.reactnativepushnotification.modules.RNPushNotificationListenerService"
        android:exported="false" >
    <intent-filter>
        <action android:name="com.google.firebase.MESSAGING_EVENT" />
    </intent-filter>
  </service>
And that’s it! We’re ready to start writing some plain old React Native and booting up our Stream Chat client prepared to send Push Notifications.
Now is a good time to boot your application on your preferred platform, if you haven’t already, to check everything is going to plan without any dreaded red screens.
Sending Push Notifications
Thanks to react-native-push-notifications, we are provided a platform agnostic experience while still using native push on each platform! So first, before we send a notification, we’ll quickly hook up the Stream client.
Open your App.js file in the root of your project. Check that componentDidMount exists. If the file does not exist add an async componentDidMount method to the class.
Note: This is where you’ll need your Stream application key from earlier. You’ll also want to generate a user token at this step if you’re not in development mode. If you are in production, see here:
If you went with development mode, check the note in the code below, uncomment the call to
changeAppSettings, and then you can pass any string value as the token.
import React, { Component } from 'react';
import StreamChat from 'stream-chat';
import { API_KEY, USER_ID, USER_TOKEN } from 'react-native-dotenv';

class App extends Component {
  async componentDidMount() {
    const client = new StreamChat(API_KEY, null);
    await client.setUser({ id: USER_ID }, USER_TOKEN);

    PushNotification.configure({
      onRegister(token) {
        client
          .addDevice(token.token, token.os === 'ios' ? 'apn' : 'firebase')
          .then(() => {
            console.log(`registered device with token ${token}`);
          })
          .catch((e) => {
            console.error(`registering device failed: ${e}`);
          });
      },
      onNotification(notification) {
        notification.finish(PushNotificationIOS.FetchResult.NoData);
      },
      senderID: "1069091084846",
      requestPermissions: true
    });
  }
  // ...
}
For the sake of this tutorial, we created a .env file to store these values and grab them using react-native-dotenv as shown above – a good idea for your API_KEY in any case, but your USER_ID and USER_TOKEN will likely come from elsewhere in a real-world setting, depending on your use-case.
Now all that’s left is to hook up react-native-push-notifications .
Below your client.setUser call in componentDidMount, add the following config (and remember toimport PushNotification from ‘react-native-push-notification’; at the top).
Below are the iOS and Android parts respectively, however, you can use both at the same time if your application is cross-platform:
PushNotification.configure({
  onRegister(token) {
    client
      .addDevice(token.token, token.os === 'ios' ? 'apn' : 'firebase')
      .then(() => {
        console.log(`registered device with token ${token}`);
      })
      .catch((e) => {
        console.error(`registering device failed: ${e}`);
      });
  },
  onNotification(notification) {
    // iOS only
    notification.finish(PushNotificationIOS.FetchResult.NoData);
  },
  senderID: "1069091084846", // (Android Only) Grab this from your Firebase Dashboard where you got google-services.json
  requestPermissions: true
});
This is the bare minimum configuration to get react-native-push-notification handling push notifications within your application. You should have a look at their GitHub repo for a full reference to configuration options and settings.
Try It Out
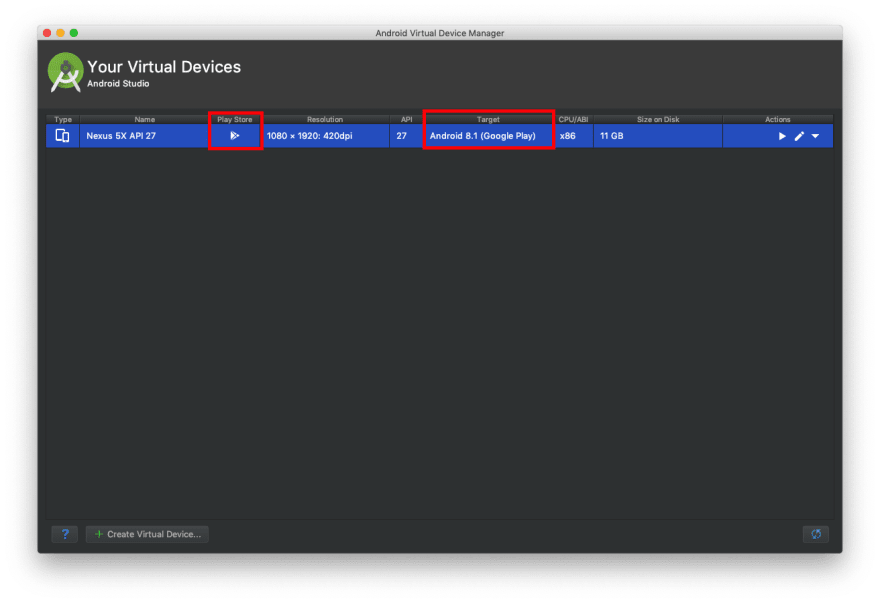
For this section, if your building for iOS you’ll need to plug in a real iOS device – push notifications won’t work within the simulator. However, the Android emulator does support push notifications - just make sure you use an emulator with Google Play Services install (shown by the Play Store Icon in the AVD Manager)
If you enable the Remote JS Debugging when you boot your application, you should see the registered device with token log appear in the console once you accept the permissions to allow notifications.
Once your device is registered, ensure sure you have the getstream-cli installed and configured with your API key and secret (along with the other required arguments):
$ stream config:set
After the configuration is complete, you can safely run the following command in your terminal:
$ stream chat:push:test
First, the CLI will prompt you for the ID of the user you want to send notifications to (you can find this in your .env – or wherever you stored it from earlier) – you then leave each remaining step blank to send a default notification to the devices registered to said user. For details information on the push CLI options, see here .
If all is well, you just heard a ding or a chime of some sort, and you’re notification appeared on your device. Congrats! 😎

Top comments (3)
Thank you for this tutorial and I encountered some errors when I followed this code,
1) first error is that about using Arrays.<ReactPackage>asList and there is no import statment of Arrays. So I import this import java.util.Arrays;
2) second error is that about new MainReactPackage() and there is no import statement of MainReactPackage() at the top of the file. So I commented out this new MainReactPackage().
3) finally, the app can build without errors, BUT a new error occurs on the app displaying AppState is not available in this app..
And please let me know if you know some solutions. Thank you.
you can try add
"import com.facebook.react.shell.MainReactPackage;"
in your MainApplication.java
Great tutorial! For the Firebase alternative, here's a similarly detailed Firebase React Native Push Notifications article.