
Edit: Stray let me know in the comments that this will only work on the computer you install the Digistump Drivers on, unfortunately. Still looking for a workaround!
Wait, what is a Rubber Ducky?
A Rubber Ducky is an awesome USB keystroke injector. Basically, you can write whatever scripts you want containing clicks/keystrokes, and they are run immediately when plugged into Linux/Windows/Mac machines. This is super useful for many pentesting activities, and even pranks!
However, not many of us want to pay $49.99 for the tool, so some smart folks out there (not me) have devised a way to make one using a $3 Digispark microcontroller. Here's how to make your own.
What do I need?
Digispark ATTINY85 microcontroller (the only purchase)
Arduino IDE software
Digistump Drivers
Duckyspark software
Arduino IDE
The Arduino IDE will allow us to write, compile, and upload code to our Digispark
- You can download the Arduino IDE for Windows, Linux, or Mac for free from their software page
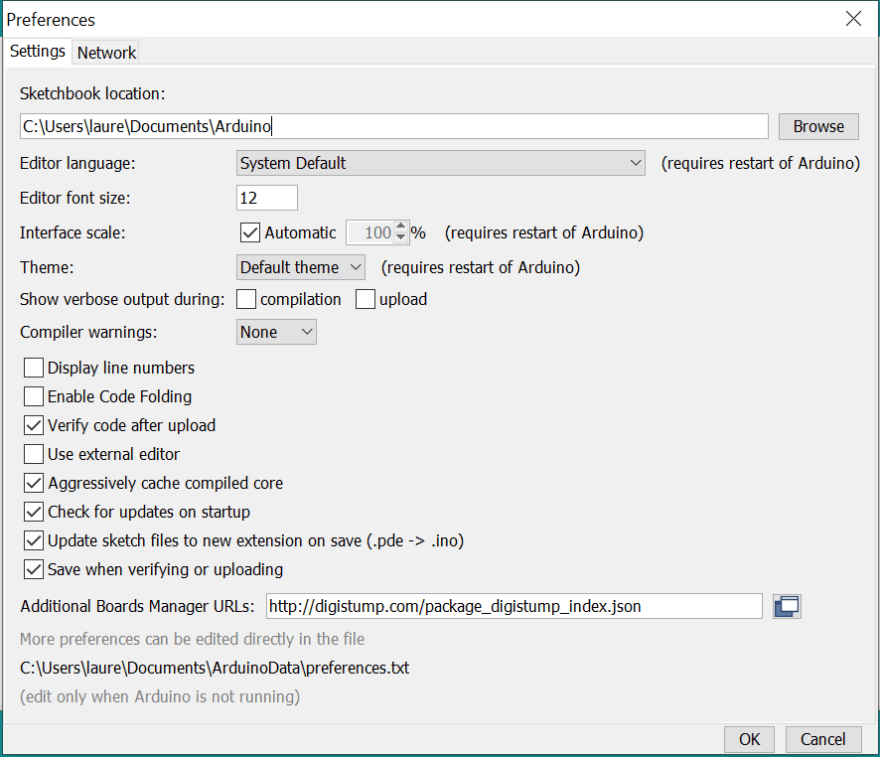
- Once opened, go to File -> Preferences, and in the Additional Boards Manager URLs input, enter http://digistump.com/package_digistump_index.json
- Go to Tools -> Board -> Boards Manager and search for Digistump AVR Boards (you'll want the one authored by Digistump) and click install

- If any other installations are prompted (like drivers) accept them
- Finally, go to Tools -> Board and select Digispark (Default - 16.5mhz)

Digistump Drivers
- Download the driver zip file and unzip it
- Enter the directory and run the Install Drivers file, then go through the installation wizard and accept
Duckyspark
The Duckyspark Python script lets us translate Ducky code to Digispark code. There are a lot of scripts people have made that we want to use!
- Clone the Duckyspark repository from their GitHub page to wherever you want it
Putting it All Together
Now that we have everything we need, it's time to try it out.
- Find a ducky script you want to use, for a harmless one that's good for testing I recommend the Notepad Demo by Cloudcompany.at

- Open the demo and either click Encode Payload and download it as duckycode.txt, or copy and paste the code into a txt file
- Move your newly made txt file into the Duckyspark repo we cloned. Open a terminal and cd to the repo then run
py Duckyspark_translator.py nameofyourfile.txt - You should get a 'Success!' message and a new file called digipayload.ino in the repo

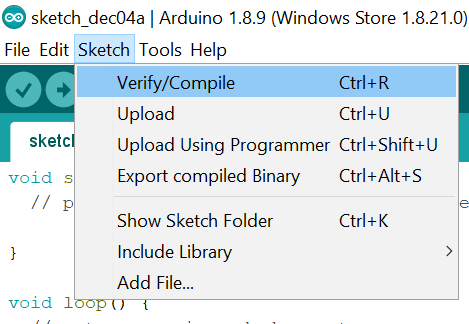
- Double-click the ino file, or open it in the Arduino IDE, then go to Sketch -> Verify/Compile

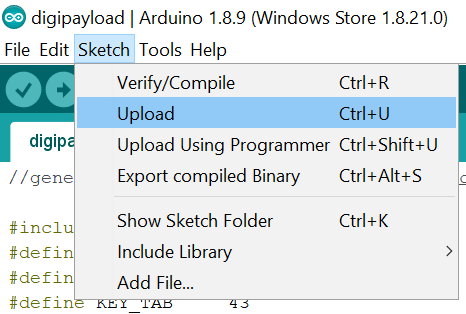
- Finally, go to Sketch -> Upload and plug in your Digikey when prompted.

- Once it is successfully uploaded, remove the Digikey and re-insert it. Your script should run!

Common Errors
- If you get this error at compile: "DigiKeyboard.h: No such file or directory", your board was likely changed when the Arduino IDE was reopened. Go back to Tools -> Board and select Digispark (Default - 16.5mhz)
- If you have any other errors and/or their fixes, please leave them in the comments :)
What now?
Now that you have everything installed, you can either write your own scripts in the DigiKeyboard language, or in Ducky and translate it with Duckyspark. Also as you've seen, there are tons of scripts out there for Ducky that you can translate. But be careful, many of them are for pentesting and other security applications, so don't make yourself vulnerable.
Thanks for reading!

Top comments (8)
Thanks for the write up! :)
Am I missing something or is this pretty much useless for real world application? If you need the drivers for the digispark to even be recognized then the rubber ducky payload will never run. Tried this on 3 different PCs and the only one it actually worked on was the one I installed the drivers and converted/programmed the payload on.
This is a solid point I did not think about, I was mostly just using it for fun on my own pc. Gonna look into it and see if I can find a solution, I'll post back if I do. Thanks for letting me know!
Lol yeah I was all excited and into my 5th payload when I was thinking about testing on another computer and went "waaait a minute" and then went to test. Still a fun exercise but here I was thinking I'd get a cheap rubber ducky lol.
This is still the best guide I found for getting it to work right though so kudos and thanks!
Man sorry to hear you went through all of that! I'll edit the post and hopefully find a solution, please let me know if you figure it out, too. And thank you!
If you have a raspberry pi zero w laying around or want to pick one up you can do the above and more. Found this while traveling down the rabbit hole and figured I would double back :)
github.com/mame82/P4wnP1_aloa
Very cool! I don't have the zero but it might be worth picking up for this. Thanks for letting me know about it
This is great!
Hey thanks!