
1-What is XAMPP
XAMPP is a free and open-source tool used by web developers in the Windows family and other platforms to set up the development and testing environment. XAMPP server comes with the XAMPP control panel to manage all its components easily.
XAMPP stands for (X) Cross-platform, (A) Apache, (M) MySQL, (P) PHP, (P) Perl and with some additional modules including phpmyadmin (for the database), FileZilla, Mercury, and Tomcat.
Once you have installed and configured the XAMPP server in your system, you can easily work with any CMS like WordPress, Joomla, Drupal and more. XAMPP server works like a local server in your system that is generally used by PHP developers to test the websites (web-projects).
This document will show you the various steps on how to install and configure the XAMPP server on Windows 10.
2-Installation Process of the XAMPP Server
Step 1
To download the XAMPP server, visit the Apache Friends website in your web browser URL: https://www.apachefriends.org/download.html.

Step 2
Click on "XAMPP for Windows". Then, navigate the downloading location and the file will be automatically downloaded.

Step 3
Double-click the downloaded file to launch the XAMPP installer.
Step 4
Setup window will appear on the screen. Then, click on the "Next" button.

Step 5
Select the components that you want to install and click on the "Next" button. By default, all components are selected in your XAMPP installation.

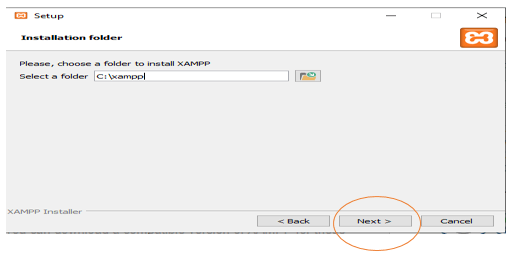
Step 6
Choose a folder to install the XAMPP and click on the "Next" button.
Step 7
Uncheck or Check the "Learn more about Bitnami for XAMPP" option and click on the "Next" button.

Step 8
"Ready to Install" window will appear on the screen, then click on the "Next" button.

Step 9
Xampp installation process

Step 10
Click on the “Finish” button when the installation is completed

Step 11
Start the XAMPP control panel through the "Run as administrator" option.
Step 12
"XAMPP Control Panel" will appear on the screen and click on "Start" action to start the "Apache" and "MySQL" modules.

Conclusion
By following the above methods, you can install and configure the XAMPP server on Windows 10.
I hope you enjoyed this document.
Thanks for reading.

Top comments (1)
thanks