Creating a database server and SQL database in Azure is a relatively straightforward process that can be completed in a few simple steps. In this article, I will guide you through the process of creating a database server and SQL database in Azure and connecting it to Azure Studio.
Step 1: Create a Resource Group
The first step is to create a resource group. A resource group is a logical container for your Azure resources, and it helps you manage your resources as a single unit. To create a resource group, follow these steps:
- Login to the Azure Portal and select "Resource Groups" from the left-hand menu.
- Click on the "Add" button to create a new resource group.
- Enter a name for your resource group and select your desired subscription and region.
- Click "Review + create" and then "Create" to create your resource group.
Step 2: Create a Database Server
The next step is to create a database server. A database server is a logical container for your SQL databases. To create a database server, follow these steps:
- Click on the "Create a resource" button in the Azure portal.
- Search for "SQL Server" and select the "SQL Server" option.
- Click on the "Create" button to start creating your database server.
- Fill in the required information, such as the server name, server admin login, and password.
- Select the appropriate subscription and resource group.
- Choose the location where you want to deploy your database server.
- Select the desired performance level and pricing tier for your database server.
- Click on the "Review + create" button and then click on "Create" to create your database server.

Step 3: Create a SQL Database
The next step is to create a SQL database. A SQL database is a database that is based on the SQL language. To create a SQL database, follow these steps:
- Click on your newly created database server in the Azure portal.
- Click on the "Databases" option in the left-hand menu.
- Click on the "Add" button to create a new database.
- Fill in the required information, such as the database name and collation.
- Select the appropriate pricing tier for your database.
- Click on the "Review + create" button and then click on "Create" to create your SQL database.


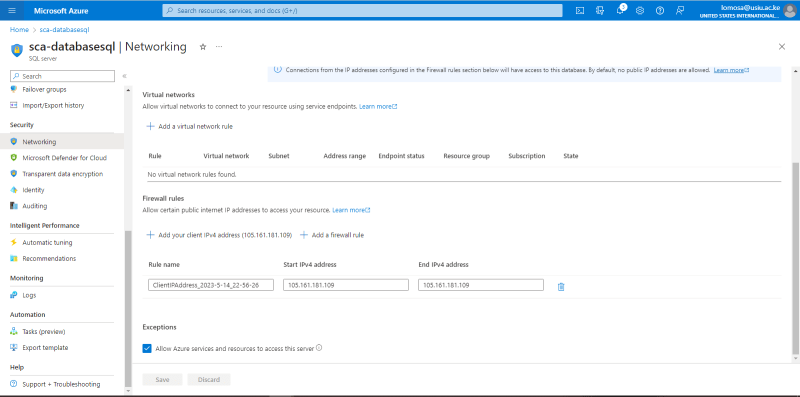
Step 4: Connect to Azure Studio
The final step is to connect to Azure Studio. Azure Studio is a web-based management tool that allows you to manage your SQL databases in Azure. To connect to Azure Studio, follow these steps:
- Click on your newly created database server in the Azure portal.
- Click on the "Firewalls and virtual networks" option in the left-hand menu.
- Add your client IP address to the allowed IP addresses list.
- Click on the "Save" button to save your changes.
- Click on the "Connection strings" option in the left-hand menu.
- Copy the connection string for your SQL database.
- Open Azure Studio in your web browser and sign in to your Azure account.
- Click on the "New Query" button to create a new query.
- Paste your connection string into the query window and press enter. You should now be connected to your SQL database in Azure Studio.


Conclusion
In conclusion, creating a database server and SQL database in Azure is a simple process that can be completed in just a few steps. By following the steps outlined in this article, you should be able to create your own database server and SQL database in Azure and connect it to Azure Studio.
Happy Learning Everyone!!!

Top comments (0)