
We all need a little encouragement from time to time, especially when computers insist on doing exactly what we tell them. Fortunately, you can manufacture your own cheerleader to deliver those small affirmations all developers need. Let’s look at how you can create a small application hosted on Heroku that sends text messages to developers that might appreciate a little encouragement.
The app allows users to sign up for messages, get encouraging texts (such as “You are not your failing test suite” and “You’re bigger than your bugs”) once a week, and then stop the messages if the users no longer want to receive them.
We’ll build the app using Ruby on Rails, Postgres, and the Twilio API, and we’ll use Heroku pipelines and Heroku CI to run our tests and manage our deployment.
Prerequisites
First let’s walk through what you’ll need to get the app running. This is an intermediate-level tutorial, which may not be suitable for complete beginners. To follow along, you should:
- be comfortable writing Ruby on Rails and have it installed.
- be comfortable using the terminal (or IDE, though I’ll be referring to a terminal in this tutorial).
- have Bundler installed.
- have Postgres installed.
- have ngrok installed.
You’ll need:
- a Twilio account (the free account is fine)
- a Heroku account (the free account is fine for hosting, but we’ll also use Heroku CI and scheduler, which has a cost)
Setup
First we need to set up Ruby, Postgres, and Twilio.
Rails & Gems
I’ve provided a starter project which you should clone to your local directory. To get started, run bundle install.
Postgres
If you’ve never run Postgres on your machine (or you’ve stopped it), you’ll need to start the process by running postgres -D /usr/local/pgsql/data. If you get any errors, check out the PSQL start-up guide.
You may also need to make sure that your database for the project has been created. To do this, you’ll need to run rails db:create to create the test and development databases.
Twilio
Follow the prompts to create a new project on Twilio and when you’re done, you’ll see your dashboard:

On the left-hand side, you want to click the three dots in the circle and choose Programmable Messaging. I won’t go into all the details of getting set up on Twilio, as they have a great walk-through guide that does just that. The important thing to make sure you do is get a phone number as the guide prompts you to do.
ENV
Next we need to connect our app to our Twilio account. In your application, create a .env file at the root of your file structure and add the following to it:
You want to make sure you add this file to the .gitignore. That way, you avoid checking sensitive information into git.
Models & Data
There are three models we’ll need for this app:
- Developers (our users)
- Affirmations (the messages we send)
- SentAffirmations (keep track of if we've sent the affirmation to each user)
Let's take a detailed look at each one.
Developers
These will be our main users. Usually for user objects, I’d use something like Devise to help manage authentication; however, that’s overkill for what we need. So we can simplify things by running:
rails g model Developer phone_number:string confirmed:boolean uuid:string
This is the bare-minimum data that we need to create our developers. The phone_number will be used to send users messages, confirmed is needed to get their confirmation for consent to store their details, and uuid is a unique, difficult-to-guess identifier.
Once your migration file looks as you'd expect it to, run rails db:migrate.
Then, in your developer model you want to add the following:
We add a validation to the phone_number field to make sure there’s always one when a developer is created. We also want to add a scope so that we can easily access confirmed developers.
We also want to ensure that a uuid gets generated when a developer is created. We can write a test to check this. In spec/models you should see a file called developer_spec.rb. This is where you’re going to write this test:
This small test confirms that, when we create a developer, the uuid isn’t nil (we can then assume that the developer has uuid). In your terminal, run rspec spec/models/developer to run the test. It should fail.
To make it pass, we’ll need to add the following code to our model:
before_create is a Rails callback to which we can send methods to be invoked. In this case, we’re sending our private method generate_uuid. It’s private so that only this object has permission to invoke it. Ruby gives us the SecureRandom class, which we can use to call the handy uuid method that creates uuids for us. self is the instance of the class. Using our test as an example, self would be d since d is an instance of Developer. So we’re setting the uuid on self to be whatever SecureRandom.uuid gives us, then we’re invoking that method right before the object is created. If you’re new to callbacks, roughly this is what’s happening:
Now when you run rspec spec/models/developer_spec, your tests should pass.
Affirmations
These are the messages we’re going to send out. The migration command you want to run is: rails g model Affirmation body:string
To keep things simple, we only need the body for the affirmation. Run the migration once you’re happy with the file.
In the Affirmation model, make sure that you validate the presence of the body by adding: validates_presence_of :body to the top of the file.
Sent Affirmations
This will act as a join table between Developers and Affirmations, so that we can keep track of which developers have gotten which affirmations.
rails g model SentAffirmation developer_id:integer affirmation_id:integer sent_at:datetime
Once you’ve checked that your migration file looks as you expect, run the migration.
Here, we also want to set up the following relationships:
Make sure the right file has the right relationship.
Controllers
Now let's look at the controllers. We'll need two: one for Developers and one for Affirmations.
Developers Controller
The developer controller is going to be the longest one since it handles the sign-up process. We’re also going to deviate from convention a little; there won't be any views for our controllers. We'll also create some custom endpoints for this controller.
First let’s run rails g controllers Developers. This will give us the developers_controller.rb file, where we want to add the following to the very top of the file:
skip_before_action :verify_authenticity_token
This will remove the CORS authentication so that we can receive params from outside the application, i.e. Twilio. From here, we want to add the following:
Let's look at the interesting parts of this code.
receive will be the endpoint we use to receive the texts from our developers which Twilio forwards to us in a webhook. Here, we want to check the body of the request to guarantee we call the right method. In the config/routes.rb file, add get 'twilio/receive', to: developers#receive so that we have a defined route and can add it as a webhook in Twilio. To do this, you’ll need to run ngrok in your terminal for the appropriate port number where your rails server will be running. For me, that’s 3000 so it’d be ngrok http 3000. This will give us a forwarding host.
Add this host to your config/application.rb with config.hosts << '<YOUR HOST>.ngrok.io'. In Twilio, you’ll need to click the three dots in the Twilio menu and select Phone Numbers. Doing so should show you a page with your active numbers. Select your number and you’ll be redirected to a page that allows you to configure the number. If you scroll down to the Messaging section, you’ll see the input for the "A MESSAGE COMES IN" webhook. There, you want to add <YOUR NGROK HOST>.ngrok.io/twilio/recieve. This will enable Twilio to send the data that reaches the webhook directly to your local app. Use this to test the delivery of texts as you continue to build.
create will create our developer object/record using the phone number in the params. When the developer is created, we’re using the Twilio TwiML to send a confirmation text to the developer. Within the text, make sure to include the url for their confirmation link #{preconfirm_url(dev.uuid)} within the text string. The render xml: twiml.to_xml makes sure we render the correct file format which is sent to the Twilio API.
delete finds and deletes a user should they want to be deleted. Since phone numbers may be less unique than uuids, we could tighten this process by using uuid to find developers. But for now, this is fine.
preconfirm just acts as a GET placeholder for confirm. In the routes file, add the corresponding route get: 'developers/:developer_uuid/confirm', to: 'developers#preconfirm, as: 'preconfirm' This will allow us to set and collect the uuid as a param and also use preconfirm_url as we’ve given it a name.
confirm is a private method that updates the confirmed field when a developer clicks the link in our text. It also renders a plain-text confirmation message in the browser. Add the matching route patch 'developers/:developer_uuid/confirm', to: 'developers#confirm' to the routes file. Notice that it’s a PATCH HTTP method.
Affirmations Controller
Our affirmations controller is going to be simpler by comparison since we only need two methods and endpoints. First, let’s create it: rails g controller Affirmations. We’re also going to be breaking Rails convention here, since we don’t need all the endpoints and also want to include a static page here too.
Let's look at this code.
landing will act as our root path and just renders the static HTML page. In the routes file, you’ll first need to add root affirmations#landing to the top of the file and then, in views/affirmations, you'll create a HTML file called landing.erb.html with some markup you want people to see when they visit /.
new instantiates an affirmation which will be available to us in the view. Similar to the landing action, you’ll need to create a view, but this time it’ll be a form with space for a flash notice:
create creates an affirmation, then redirects to the new affirmation path with a success notice.
affirmation_params is the private method that whitelists and accepts the correct params. We pass it to Affirmation.create in the create method.
Add resources :affirmations, only: %i[new create] to the routes file to ensure you’ve got the correct endpoints.
Lib, Task & Job
Composing and sending the affirmation text is going to happen in a lib file, rake task, and job. Rake is a library that allows developers to create and manage tasks.
First, we’ll create the lib.
Lib
The affirmation text should be a small self-contained class. This is where we’ll be using a bulk of the Twilio API. Before we get started, we want to make sure the lib folder is auto loaded for when the project starts up, so make sure your config/application.rb file has config.autoload_paths<< Rails.root.join('lib'). Now in the lib folder, you want to create an affirmation_text.rb file. This will be our class for composing the affirmation text.
initialize will set our client to be the Twilio client, to which we’re passing the environment variables we defined earlier.
messages takes the developer’s phone number and an affirmation. The Twilio client gives us messages.create which allows us to dynamically create SMS messages with our own values.
Job
Instead of sending the messages as we call the method, we actually want to put them in a job queue. By using a job queue here, the server can still accept incoming requests without having to wait for the text to be sent. We can create a job by running rails g job SendAffirmation . This will give us a send_affirmation_job.rb file in app/jobs. In there, we want to do a few things:
Let's walk through this code.
First, we want to define the queue we're using by including queue_as: default at the top of the file.
deliver is where we’ll tell it what to do when the job is run. It accepts developer and affirmation objects which will be used to send the text message. Since we don’t want to call the actual Twilio API when we’re testing, we can create a mock object. The code checks for the Rails environment. If it’s a test environment, it uses the mock method, if not, it uses the production method.
send_prod calls the lib we created in the previous step, which then calls the real Twilio API endpoint.
send_test calls our mock object.
MockAffirmationText is the mock object, with a message method to mimic AffirmationText.
We can also write a test for this job. In our spec/jobs/ you should see a corresponding job file. In that job file, add:
Given that we have some test data (which is what confirmed_dev and affirmations are) and we’re using the test queue adapter, when we call SendAffirmationJob.new.deliver(confirmed_dev, affirmations.first) a job should be queued.
Task
Because this will be run on a scheduler, we want to make a rake task that’ll be called at various intervals. In lib/tasks, create a rake file called send_affirmation_task.rb. Your rake file should look like this:
This will allow us to call rake affirmation:send_text when we need to. In this block, we’re using the count to create an offset so that we can pick a random affirmation to send. Then for all the confirmed developers (confirmed comes from our previously defined scope) we trigger the job and create a SentAffirmation to keep track of our affirmations.
Heroku
For deployment, we’re going to use Heroku. Heroku is a Platform-as-a-Service (PaaS) provider that makes it easy to deploy and host applications. Using Heroku keeps us from worrying about the details of hosting, building, scaling, etc. We'll use Heroku pipelines to create our staging and production apps, and CI to run the tests before each deploy.
First, we want to make sure we’ve got an app.json file at the root of our project. Mine looks like this:
You’ll need to make sure that the database cleaner environment variables are set so that the tests run properly on Heroku CI. You’ll also need to make sure you have a Procfile at the root of your app. The Heroku Procfile allows us to set the necessary commands for running our web and worker processes. It also allows us to decide what command we should run on each release of the app:
Push this up to your GitHub repo.

In your Heroku account, we'll create a new pipeline. This pipeline will allow us to manage the different environments (i.e. staging and production) for our app. Click New in the right-hand corner and then choose "Create new pipeline". Follow the prompts and connect it to the correct GitHub repo. Once everything has been created, your tests will run in the Tests tab and should look like this:

Now we can create our staging and production apps. In Pipeline under staging and production, you’ll see the option to "add app". Click this and create a new app under each. Once this is done, we'll also use the Heroku UI to provision a database for each and a scheduler instance for the production app. You do this by clicking on the app name > "Resources". In the search box search for "Heroku Postgres" and "Heroku Scheduler". Even though you've provisioned the databases for each app, you still need to run the migrations. So for each app, go to More > Run Console
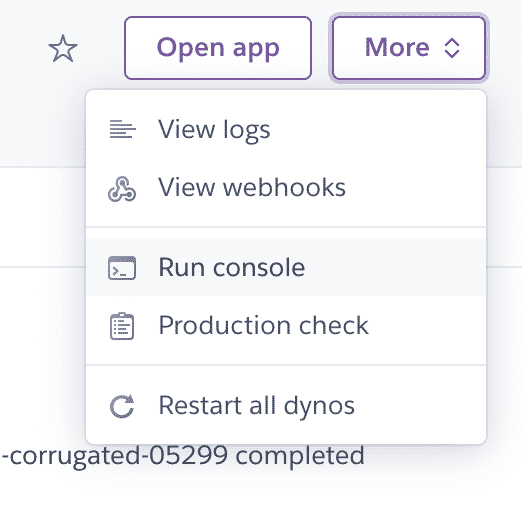
In the modal that appears, run rake db:migrate. Remember to do this for both your staging and production apps.
To configure the scheduler, create a scheduled job that runs the rake task we created, so rake affirmation:send_text which should look like:

For each of the apps, we want to enable automatic deploys when the CI passes. The arrows on the right-hand side of the app components in the Pipeline will show more options. For example:

You want to click "Configure automatic deploys" which will show this modal:

Ensure that "Wait for CI to pass before deploy" is checked, then hit "Enable Automatic Deploys".’ Now whenever you hit "push to master", your tests will run. Once they pass, your app will be deployed. And because we’re using the Heroku release phase to manage our migrations, they’ll also run automatically with every release.
The last thing you want to ensure is that your environment variables are set up properly. We don’t want to add the secret variables to our app.json since that would make them public. But in the settings for each of your staging and production apps, you can add config variables, so set the variables we defined in our .env here too:

For the staging app, the variables should be the same as in our .env. But for the production app, you want to make sure that you’re using the production Twilio SID and Token which you can find in your Twilio account.
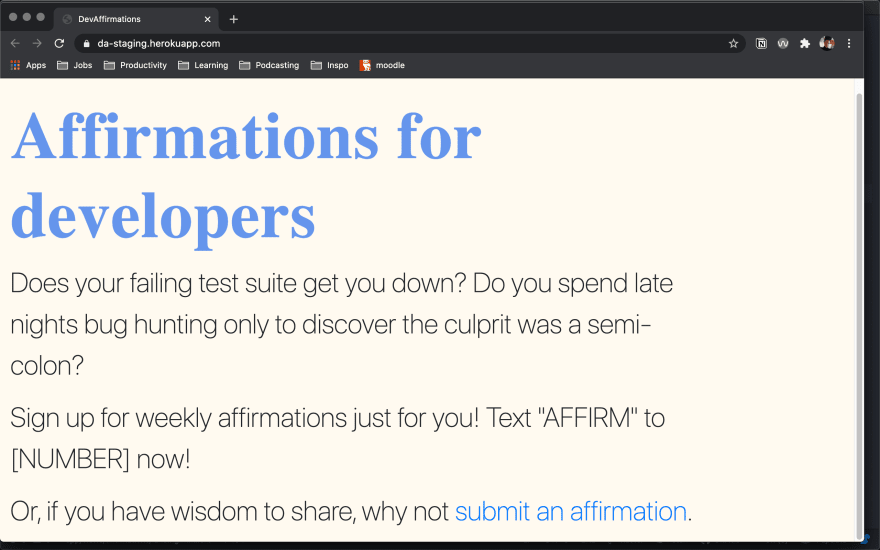
The App in Action
Now we're ready to run the app! Let's see what it looks like in action:


Notes on Costs
- You can host basic apps on Heroku for free. However, Heroku CI costs $10 a month to use
- Heroku Scheduler has a free tier, but the dynos it uses to run are only paid dynos, so you’ll have to pay for the usage costs of those too.
- Twilio gives you a free $20 to test with, however you'll need to top up your account when you move to a production environment.
Conclusion
I've used Heroku's pipeline and CI in other production apps, but in those places everything was already set up. I've always found this aspect of Heroku a bit intimidating, but creating this fun little app allowed me to get familiar with the features, particularly the CI. There's still some work to be done to move this app to production. For example, a moderation feature is necessary to stop people from submitting weird affirmations, and some type of limitation on the texts would be good to limit costs. There's a lot of scope to play around with, so have fun!

Top comments (0)