
Written by Mucahit Gurbuz ✏️
A primary concern for frontend developers is to establish a secure and fast authorization and authentication structure. Also top of mind is the user experience, which is impacted greatly by the authentication process.
Do you remember the last time you entered login credentials to Google, Facebook, LinkedIn, or some other app or website? Probably not. That’s because many apps and web services nowadays use persistent login to provide a smooth user experience.
In this tutorial, we’ll show you how to use refresh tokens in React to facilitate infinitely long login sessions. We’ll cover the following:
- What is a refresh token?
- What is refresh token rotation?
- What is refresh token reuse detection?
- Where to store refresh tokens
- Configuring a React app with persistent login using refresh token rotation
What is a refresh token?
In simple terms, an access token enables users to obtain resources from your app.
For security reasons, access tokens often have a very short lifetime. When an access token expires, a refresh token can be used to get a new access token without entering login credentials again.

Refresh tokens have a long lifetime. If they are valid and not expired, clients can obtain new access tokens. This long lifetime may lead to vulnerability for protected resources.
What is refresh token rotation?
Refresh token rotation is a technique to secure refresh tokens. When a new access token is requested with the refresh token, a new refresh token is also returned and the old one is invalidated. The purpose of refresh token rotation is to eliminate the vulnerability risk posed by long-lasting refresh tokens.
Until recently, using refresh tokens was not recommended in single-page web applications (unlike mobile applications) because SPAs have no secure mechanism to store tokens. Refresh token rotation and refresh token reuse detection (which we’ll get to later) increase the security of this high-value information.
The following diagram explains how the refresh token rotation mechanism works. You can accept Auth0 as an identity provider:  Refresh Token Rotation Mechanism (Source: https://auth0.com/docs/tokens/refresh-tokens/refresh-token-rotation)
What is refresh token reuse detection?
Refresh token reuse detection is a mechanism that supports refresh token rotation. When an access token expires, the client gets a new set of tokens (access and refresh token) using a refresh token. Then, the identity provider immediately invalidates the previous refresh token.
If the identity provider detects the use of that invalidated refresh token, it immediately invalidates all the refresh and access tokens making the client authenticate using login credentials again. This mechanism prevents your app from malicious attacks when there is a leakage of tokens.
The following two cases from the Auth0 docs are good examples of the possible scenarios for these attacks and how refresh token reuse detection works:
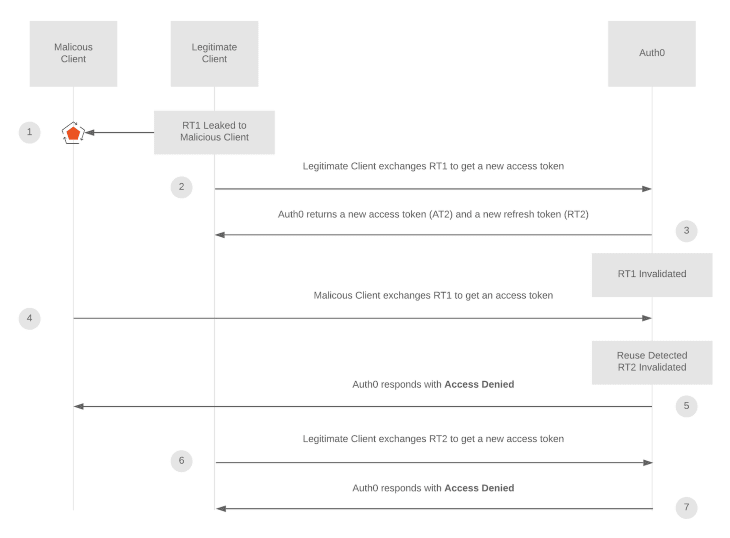
Refresh token reuse detection mechanism scenario 1

Refresh token reuse detection mechanism scenario 2
Where to store refresh tokens
There are several ways to store tokens within client sessions: in memory, via silent authentication, and in the browser’s local storage.
Storing tokens in memory
You can store refresh tokens in memory. However, this storage will not persist across page refreshes or new tabs. Therefore, users should enter login credentials every page refresh or on new tabs, which negatively impacts the user experience.
Silent authentication
Storing refresh tokens via silent authentication involves sending a request to the identity server to get an access token whenever there is an API request or during page refresh. If your session still remains, the identity provider will return a valid token. Otherwise, it redirects you to the login page.
This is a much safer structure, however: whenever the client sends a silent authentication request, it blocks the application. This might be on page render or during an API call.
In addition, I have experienced unwanted behaviors, such as login loops, in incognito mode.
Storing tokens locally
The suggested practice for persistent login is to store tokens in the browser’s local storage. Local storage provides persistent data between page refreshes and various tabs.
Although storing refresh tokens locally doesn’t eliminate the threat of cross-site scripting (XSS) attacks entirely, it does significantly reduce this vulnerability to an acceptable level. It also improves the user experience by making the app run more smoothly.
Configuring a React app with persistent login using refresh token rotation
To demonstrate how refresh tokens and refresh token rotation work, we’re going to configure a react app authentication mechanism with a refresh token. We’ll use Auth0 for refresh token rotation and refresh token reuse detection. Auth0 is one of the most popular authentication and authorization platforms.
To integrate Auth0 into our React app, we’ll use auth0-react to connect the app with Auth0 and a hook called useAuth0 to get authentication state and methods. However, it is challenging to reach authentication states and methods outside the components.
Therefore, I have transformed the library [@auth0/auth0-spa-js](https://github.com/auth0/auth0-spa-js), which is another official Auth0 client library, to have an authentication hook and methods that can be accessible outside the components.
I created an auth0.tsx file (you can go with JSX, of course) like this:
import React, { useState, useEffect, useContext, createContext } from 'react';
import createAuth0Client, {
  getIdTokenClaimsOptions,
  GetTokenSilentlyOptions,
  GetTokenWithPopupOptions,
  IdToken,
  LogoutOptions,
  PopupLoginOptions,
  RedirectLoginOptions,
} from '@auth0/auth0-spa-js';
import Auth0Client from '@auth0/auth0-spa-js/dist/typings/Auth0Client';
import { config } from '../config';
import history from '../history';
import { urls } from '../routers/urls';

interface Auth0Context {
  isAuthenticated: boolean;
  user: any;
  loading: boolean;
  popupOpen: boolean;
  loginWithPopup(options: PopupLoginOptions): Promise<void>;
  handleRedirectCallback(): Promise<any>;
  getIdTokenClaims(o?: getIdTokenClaimsOptions): Promise<IdToken>;
  loginWithRedirect(o: RedirectLoginOptions): Promise<void>;
  getAccessTokenSilently(o?: GetTokenSilentlyOptions): Promise<string | undefined>;
  getTokenWithPopup(o?: GetTokenWithPopupOptions): Promise<string | undefined>;
  logout(o?: LogoutOptions): void;
}

export const Auth0Context = createContext<Auth0Context | null>(null);
export const useAuth0 = () => useContext(Auth0Context)!;

const onRedirectCallback = appState => {
  history.replace(appState && appState.returnTo ? appState.returnTo : urls.orderManagement);
};

let initOptions = config.auth; // Auth0 client credentials

const getAuth0Client: any = () => {
  return new Promise(async (resolve, reject) => {
    let client;
    if (!client) {
      try {
        client = await createAuth0Client({ ...initOptions, scope: 'openid email profile offline_access', cacheLocation: 'localstorage', useRefreshTokens: true });
        resolve(client);
      } catch (e) {
        reject(new Error(`getAuth0Client Error: ${e}`));
      }
    }
  });
};

export const getTokenSilently = async (...p) => {
  const client = await getAuth0Client();
  return await client.getTokenSilently(...p);
};

export const Auth0Provider = ({ children }): any => {
  const [isAuthenticated, setIsAuthenticated] = useState(false);
  const [user, setUser] = useState<any>();
  const [auth0Client, setAuth0] = useState<Auth0Client>();
  const [loading, setLoading] = useState(true);
  const [popupOpen, setPopupOpen] = useState(false);

  useEffect(() => {
    const initAuth0 = async () => {
      const client = await getAuth0Client();
      setAuth0(client);
      if (window.location.search.includes('code=')) {
        const { appState } = await client.handleRedirectCallback();
        onRedirectCallback(appState);
      }
      const isAuthenticated = await client.isAuthenticated();
      setIsAuthenticated(isAuthenticated);

      if (isAuthenticated) {
        const user = await client.getUser();
        setUser(user);
      }

      setLoading(false);
    };
    initAuth0();
    // eslint-disable-next-line
  }, []);

  const loginWithPopup = async (params = {}) => {
    setPopupOpen(true);
    try {
      await auth0Client!.loginWithPopup(params);
    } catch (error) {
      console.error(error);
    } finally {
      setPopupOpen(false);
    }
    const user = await auth0Client!.getUser();
    setUser(user);
    setIsAuthenticated(true);
  };

  const handleRedirectCallback = async () => {
    setLoading(true);
    await auth0Client!.handleRedirectCallback();
    const user = await auth0Client!.getUser();
    setLoading(false);
    setIsAuthenticated(true);
    setUser(user);
  };

  return (
    <Auth0Context.Provider
      value={{
        isAuthenticated,
        user,
        loading,
        popupOpen,
        loginWithPopup,
        handleRedirectCallback,
        getIdTokenClaims: (o: getIdTokenClaimsOptions | undefined) => auth0Client!.getIdTokenClaims(o),
        loginWithRedirect: (o: RedirectLoginOptions) => auth0Client!.loginWithRedirect(o),
        getAccessTokenSilently: (o: GetTokenSilentlyOptions | undefined) => auth0Client!.getTokenSilently(o),
        getTokenWithPopup: (o: GetTokenWithPopupOptions | undefined) => auth0Client!.getTokenWithPopup(o),
        logout: (o: LogoutOptions | undefined) => auth0Client!.logout(o),
      }}
    >
      {children}
    </Auth0Context.Provider>
  );
};
As you can see on line 44, cacheLocation is set to localStorage, useRefreshToken is set to true, and offline_access is added to the scope.
In the main App.tsx file, you should import the Auth0Provider HOC to wrap all routes.
I also wanted to be sure about each API request sent with a valid token. Even though the API response says unauthorized, it redirects the client to the authentication page.
I used the interceptors of Axios, which enable you to insert logic before sending requests or getting a response.
// Request interceptor for API calls
axios.interceptors.request.use(
  async config => {
    const token = await getTokenSilently();
    config.headers.authorization = `Bearer ${token}`;
    return config;
  },
  error => {
    Promise.reject(error);
  }
);

// Response interceptor for API calls
axios.interceptors.response.use(
  response => {
    return response.data;
  },
  async function(error) {
    if (error.response?.status === 401 || error?.error === 'login_required') {
      history.push(urls.authentication);
    }
    return Promise.reject(error);
  }
);
The authentication page component only includes the loginWithRedirect method, which redirects clients to the Auth0 login page and then redirects to the desired page.
import React, { useEffect } from 'react';
import { useAuth0 } from '../../../auth/auth0';
import { urls } from '../../../routers/urls';

const Login: React.FC = () => {
  const { loginWithRedirect, loading } = useAuth0();

  useEffect(() => {
    if (!loading) {
      loginWithRedirect({ appState: urls.orderManagement });
    }
  }, [loading]);
  return null;
};
export default Login;
Go to your application in the Auth0 dashboard. In the settings, you will see the Refresh Token Rotation setting. Turn on the rotation and set the reuse interval, which is the interval during which the refresh token reuse detection algorithm will not work.

That's it! Now, our app has a persistent and secure authentication system. This will make your app more secure and improve the user experience to boot.
Special thanks to my colleague Turhan Gür who supported me on this journey by providing crucial feedback.
Full visibility into production React apps
Debugging React applications can be difficult, especially when users experience issues that are hard to reproduce. If you’re interested in monitoring and tracking Redux state, automatically surfacing JavaScript errors, and tracking slow network requests and component load time, try LogRocket.

LogRocket is like a DVR for web apps, recording literally everything that happens on your React app. Instead of guessing why problems happen, you can aggregate and report on what state your application was in when an issue occurred. LogRocket also monitors your app's performance, reporting with metrics like client CPU load, client memory usage, and more.
The LogRocket Redux middleware package adds an extra layer of visibility into your user sessions. LogRocket logs all actions and state from your Redux stores.
Modernize how you debug your React apps — start monitoring for free.


Top comments (0)