
Written by Clara Ekekenta✏️
Application development methodologies are continually evolving. Among the most groundbreaking shifts we've seen recently is the transition toward serverless architecture.
At its core, serverless architecture enables developers to focus on writing code without the overhead of managing server infrastructure. Concerns like allocating resources, maintaining server health, or scaling based on demand, are handed over to cloud service providers. The result is a more streamlined, efficient, and cost-effective development process.
React Native brings the "write once, run anywhere" magic, while serverless offers nimble deployments without the fuss of server management. Together, they're changing the game, offering speed, scalability, and cost savings.
This tutorial will explore how these two technologies intersect and why this combination is more relevant now than ever. We'll explore using serverless architecture and React Native to handle data synchronization and enable offline functionality Let’s get started and see how to harness the collective strsngths of these technologies in your next project!
Jump ahead:
- Prerequisites
- Understanding serverless architecture
- Benefits of serverless architecture in React Native
- React Native serverless tutorial
Prerequisites
To get the most out of this tutorial, you’ll need:
- An active AWS Free Tier account
- Node.js installed on your machine and a basic understanding of npm for package management
- Familiarity creating and running React Native apps, using components like
View,Text, andStyleSheet - A working development environment for React Native, including tools like the React Native CLI, Android Studio (for Android), and Xcode (for iOS)
- Amplify CLI version 4.21.0 or later installed; you can install it by running:
npm install -g @aws-amplify/cli - A basic understanding of cloud services, how they operate, and their benefits
The code for this tutorial is available on GitHub repository; feel free to clone it to follow along with the tutorial.
Understanding serverless architecture
Before we dive deeper into this tutorial, let's demystify the concept of serverless. "Serverless" isn't about ditching servers but reshaping our interaction with them. Like living in a serviced apartment, developers focus on living (coding), while cloud giants like AWS or Azure handle the maintenance (server management).
The motto? Code, deploy, and let the cloud do the heavy lifting.
At the heart of serverless is the reaction to events. Imagine a photo upload in a React Native app that springs a serverless function into action, resizing and storing the image. It's like a chef waiting for an order; they cook upon request and then patiently wait for the next.
Forget paying for idle server time; with serverless, you're billed for active compute time only. It’s a pay-as-you-go model, like paying for a cab only when it’s moving, ensuring efficiency, scalability, and genuine cost savings.
Benefits of serverless architecture in React Native
Serverless architecture offers several advantages, especially when paired with React Native:
- Scalability: As a React Native application gains traction and more users, the last thing a developer wants to worry about is whether the backend can keep up. Serverless takes the guesswork out of scaling. It dynamically adjusts its resources, ensuring the app remains responsive, regardless of user count
- Cost efficiency: Traditional server setups often come with overhead costs. There are charges for uptime, even if the resources aren't fully utilized. Serverless flips this model on its head. The mantra here is simple: "If it's not running, you're not paying”
- Rapid development: Cutting down backend infrastructure chores means developers can hit the ground running. Iteration and deployment becomes significantly faster, leaving more time to focus on crafting an impeccable user experience
- Enhanced productivity: Dealing with server maintenance can be a drain, both on time and energy. Serverless removes these operational burdens, resulting in fewer interruptions and a streamlined workflow and proving more time for innovating
- Flexibility: The modular nature of serverless architecture is a developer's dream. Need to integrate third-party services or tap into cutting-edge technologies like machine learning? Serverless helps make React Native apps both robust and future-ready
React Native serverless tutorial
Now that we have an understanding of what we are building, it's time to roll up our sleeves and get started. We’ll set up the React Native app, build the screens and components, and then create the navigation. Then, we’ll configure the serverless architecture, integrate the cloud functions, and add offline data management and synchronization.
Setting up a new React Native app
To start, we’ll initiate our React Native project. There are several approved methods for this, but for this tutorial, we'll harness the simplicity and efficiency of the Expo package:
npx create-expo-app --template
The above command will prompt us to select the preferred template for the project. Let’s select the Blank option and wait while Expo installs the required packages to run the application: 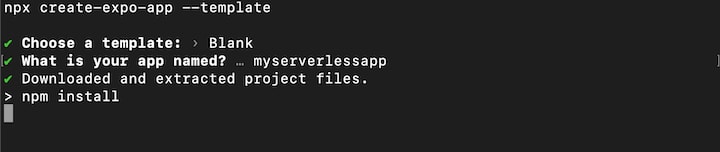 Once the installation is completed,
 cd into the project folder and use the below commands to run the project:
- cd myserverlessapp
- npm run android
- npm run ios
- npm run web
 Now that our React Native project is up and humming, let's familiarize ourselves with its folder structure:
📦myserverlessapp
┣ 📂src
 ┃ ┣ 📂components
 ┃ ┃ ┣ 📜BookList.js
 ┃ ┃ ┗ 📜Navbar.js
 ┃ ┣ 📂screens
 ┃ ┃ ┣ 📜AddBookScreen.js
 ┃ ┃ ┗ 📜HomeScreen.js
 ┣ 📜App.js
 ┣ 📜app.json
 ┣ 📜babel.config.js
 ┣ 📜metro.config.js
 ┣ 📜package-lock.json
 ┗ 📜package.json
Now, let’s install the following packages:
npm install @react-navigation/native-stack react-native-vector-icons
We’ll use the @react-navigation/native-stack and react-native-vector-icons packages to add navigation to our React Native project and add icons to our React Native Views, respectively.
Building the screens and components
For our tutorial, we'll build a digital bookstore. To kick things off, let’s structure our project's components and screens.
In our project's root directory, we create a new folder named components. Within this folder, we create two component files: BookList.js and Navbar.js.
In the same root directory, we set up another folder, screens. Inside that folder, we create two screen files: AddBookScreen.js and HomeScreen.js.
Now, let’s add the below code snippets to the components/Navbar.js file:
import { Button, StyleSheet, Text, View } from "react-native";
import Icon from "react-native-vector-icons/FontAwesome";
export default Navbar = ({ navigation }) => {
  return (
    <View style={styles.navbar}>
      <Text style={styles.navIcon}>
         <Icon name="shopping-cart" size={25} color="#fff" />
      </Text>
      <Text style={styles.storeName}>Bookstore</Text>
      <Button
        style={styles.addbtn}
        title="Add New"
        onPress={() => navigation.navigate("AddBook")}
      ></Button>
    </View>
  );
};
const styles = StyleSheet.create({
  navbar: {
    flexDirection: "row",
    justifyContent: "space-between",
    alignItems: "center",
    padding: 10,
    backgroundColor: "rgb(34, 117, 150)",
    height: 50,
  },
  addbtn: {
    border: "1px solid white",
    color: "rgb(255, 255, 255)",
  },
});
In the above Navbar component, we create a view for our app’s navbar. We accept navigation props; we’ll set these up later in this tutorial. We also add an onPress event to the Add New button, enabling us to navigate to the AddBook screen by calling the navigate method from the navigation props.
Next, let’s add the below code snippet to the screens/HomeScreen.js file:
import React from "react";
import { View } from "react-native";
import Navbar from "../components/Navbar";
const HomeScreen = ({ navigation }) => {
  return (
    <View style={{ flex: 1 }}>
      <Navbar navigation={navigation} />
    </View>
  );
};
export default HomeScreen;
Now, we’ll update the App.js file to import and render the HomeScreen:
import { StatusBar } from "expo-status-bar";
import { StyleSheet, View, SafeAreaView } from "react-native";
import HomeScreen from "./screens/HomeScreen";

export default function App() {
  return (
    <SafeAreaView>
      <View>
        <HomeScreen />
        <StatusBar style="auto" />
      </View>
    </SafeAreaView>
  );
}
const styles = StyleSheet.create({
  container: {
    flex: 1,
    backgroundColor: "#fff",
    alignItems: "center",
    justifyContent: "center",
  },
});
Next, let’s add the below code to the AddBookScreen.js file:
import React, { useState } from "react";
import { View, TextInput, Button, StyleSheet } from "react-native";
import Navbar from "../components/Navbar";

const AddBookScreen = () => {
  const [name, setName] = useState("");
  const [price, setPrice] = useState("");
  const [author, setAuthor] = useState("");
  const [image, setImage] = useState("");
  return (
    <>
      <Navbar />
      <View style={styles.container}>
        <TextInput
          style={styles.input}
          placeholder="Name"
          value={name}
          onChangeText={setName}
          placeholderTextColor="#666"
        />
        <TextInput
          style={styles.input}
          placeholder="Price"
          value={price}
          onChangeText={setPrice}
          keyboardType="numeric"
          placeholderTextColor="#666"
        />
        <TextInput
          style={styles.input}
          placeholder="Author"
          value={author}
          onChangeText={setAuthor}
          placeholderTextColor="#666"
        />
        <TextInput
          style={styles.input}
          placeholder="Image URL (optional)"
          value={image}
          onChangeText={setImage}
          placeholderTextColor="#666"
        />
        <View style={styles.buttonContainer}>
          <Button title="Add Book" color="#34A853" />
        </View>
      </View>
    </>
  );
};
const styles = StyleSheet.create({
  container: {
    flex: 1,
    padding: 16,
    backgroundColor: "#F5F5F5",
  },
  input: {
    padding: 12,
    marginBottom: 10,
    backgroundColor: "#fff",
    borderRadius: 5,
    borderWidth: 1,
    borderColor: "#E5E5E5",
    fontSize: 16,
  },
  buttonContainer: {
    marginTop: 12,
  },
});
export default AddBookScreen;
In the above code snippets, we also imported the Navbar component. We need the navigation bar to render in all our app’s screens: 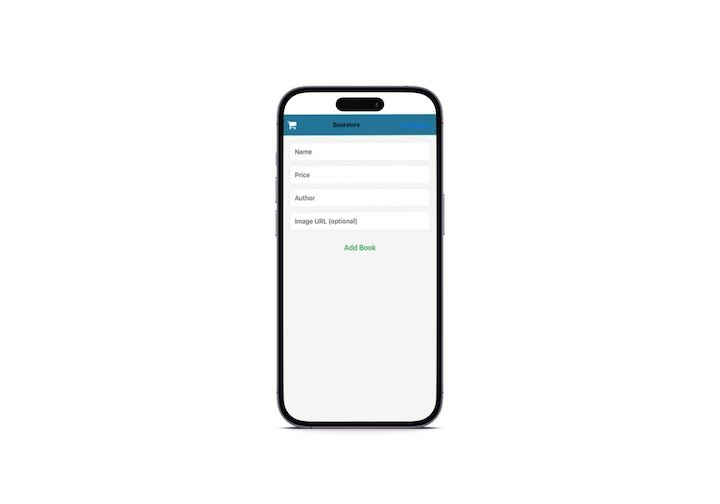
Creating the navigation
Now that we’ve created the components and screen, let’s add navigation to our project so users can navigate the screens. To start, we’ll update the App.js file with the below code:
import React from "react";
import { NavigationContainer } from "@react-navigation/native";
import { createNativeStackNavigator } from "@react-navigation/native-stack";
import AddBookScreen from "./screens/AddBookScreen";
import HomeScreen from "./screens/HomeScreen";
const Stack = createNativeStackNavigator();
const App = () => {
  return (
    <NavigationContainer>
      <Stack.Navigator initialRouteName="AddBook">
        <Stack.Screen name="Home" component={HomeScreen} />
        <Stack.Screen name="AddBook" component={AddBookScreen} />
      </Stack.Navigator>
    </NavigationContainer>
  );
};
export default App;
Here, we set up a native stack navigation structure for our React Native app using React Navigation. Within the navigation container, we define two screens, Home and AddBook, with HomeScreen and AddBookScreen components, respectively. We set AddBook as the initial screen to be displayed.
Configuring serverless with React Native
Now we’re getting into the interesting part of this tutorial: configuring and integrating AWS cloud functions into the project. To get started, let’s use Amplify to initialize a project with the command below:
amplify init
This command prompts us to choose the configurations for the project. For this tutorial, we’ll select the following options: 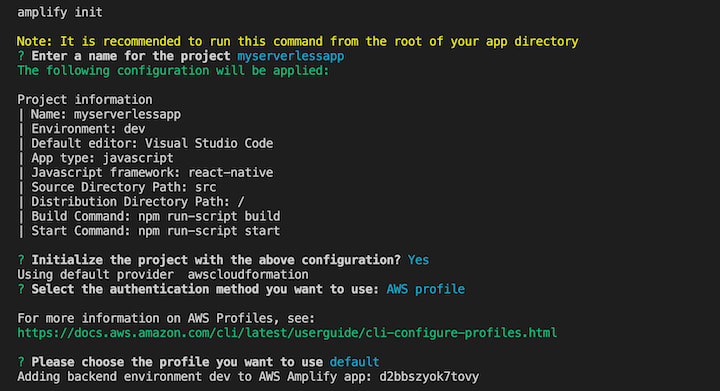 Now, let’s create a new serverless API, like so:
amplify add api
This command prompts us to select our preferred service, GraphQL, and our schema template: 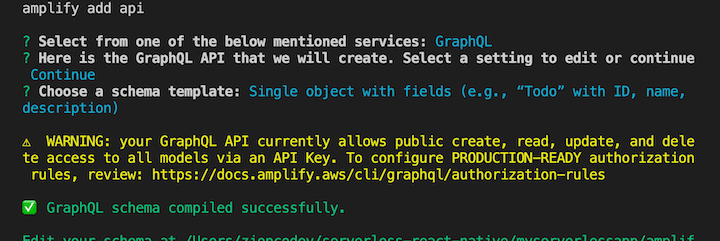 For the
 Do you want to edit the schema now? prompt, we select Y to open the schema file. Next, let’s update the schema file with following Book schema:
type Book @model {
  id: ID!
  name: String!
  price: Float!
  author: String!
  image: String
}
Now, let’s deploy the serverless function:
amplify push
During the deployment process, we’re prompted to answer a number of questions. The answer that we’ll select for each prompt is provided below:
-
Do you want to generate code for your newly created GraphQL API?select Yes -
Choose the code generation language targetselect JavaScript -
Enter the file name pattern of GraphQLqueries, mutations,and subscriptions src/graphql/**/*.jsclick Enter -
Do you want to generate/update all possible GraphQL operations - queries, mutations,and subscriptions?select Y -
Enter maximum statement depth (increase from default if your schema is deeply nested)enter 2
When deployment is completed, a GraphQL endpoint and GraphQL API KEY are generated for our project and a graphql folder is created within the src folder with the following files:
📦graphql
 ┣ 📜mutations.js
 ┣ 📜queries.js
 ┣ 📜schema.json
 ┣ 📜subscriptions.js
 ┗ 📜types.js
Here are some additional details about these files:
-
mutations.js: Contains GraphQL mutations that are used to modify or create data on the server -
queries.js: Holds GraphQL queries that are used to retrieve data from the server -
schema.json: Typically contains the schema for the GraphQL API. It defines the types of data that can be queried and the structure of these queries -
subscriptions.js: Contains GraphQL subscription queries that enable real-time data updates by subscribing to specific events or changes on the server -
types.js: Defines custom GraphQL types or type-related logic for the application
Integrating cloud functions with React Native
At this point, our serverless GraphQL API functions are ready. Let’s integrate them into our React Native project.
First, we install the following dependencies:
npm install aws-amplify @react-native-async-storage/async-storage @react-navigation/native-stack
Then, we update the root App.js file to import and configure AWS Amplify in our project:
...
import awsExport from "./src/aws-exports"
import { Amplify } from 'aws-amplify'
Amplify.configure(awsExport);
...
Here, we import the aws-exports file, which is generated by Amplify when generating our GraphQL API. This file contains the configurations and keys that allow our React Native application to interact seamlessly with AWS serverless functions and other resources.
Next, add the following code snippets to the components/BookList.js file to fetch the books from our serverless function and render them in our application:
import { StyleSheet, FlatList, View, Image, Text, Button } from "react-native";
import { useEffect, useState } from "react";
import { API, graphqlOperation } from "aws-amplify";
import { listBooks } from "../src/graphql/queries";
import { onCreateBook } from '../src/graphql/subscriptions';

export default BookList = () => {
  const [books, setBooks] = useState([]);
  useEffect(() => {
    const fetchInitialBooks = async () => {
      try {
        const bookData = await API.graphql(graphqlOperation(listBooks));
        const fetchedBooks = bookData.data.listBooks.items;
        setBooks(fetchedBooks);
      } catch (error) {
        console.error("Error fetching books:", error);
      }
    };
    fetchInitialBooks();
  }, []);
  // Setting up the subscription for new books
  useEffect(() => {
    const subscription = API.graphql(graphqlOperation(onCreateBook)).subscribe({
      next: (bookData) => {
         setBooks(prevBooks => [...prevBooks, bookData.value.data.onCreateBook]);
      }
    });
    return () => subscription.unsubscribe();  // Cleanup subscription on unmount
  }, []);
  return (
    <FlatList
      data={books}
      renderItem={({ item }) => (
        <View style={styles.bookItem}>
          <Image source={{ uri: item.image }} style={styles.bookImage} />
          <View style={styles.bookDetails}>
            <Text style={styles.bookTitle}>{item.name}</Text>
            <Text style={styles.bookAuthor}>{item.author}</Text>
            <Text style={styles.bookPrice}>${item.price}</Text>
            <Button title="Buy Now" onPress={() => {}} />
          </View>
        </View>
      )}
      keyExtractor={(item) => item.id}
    />
  );
};
const styles = StyleSheet.create({
  container: {
    flex: 1,
    backgroundColor: "#F5F5F5",
  },
  storeName: {
    fontSize: 18,
    color: "#FFF",
    fontWeight: "bold",
  },
  bookItem: {
    flexDirection: "row",
    padding: 10,
    borderBottomWidth: 1,
    borderColor: "#E0E0E0",
    backgroundColor: "#FFF",
  },
  bookImage: {
    width: 80,
    height: 110,
  },
  bookDetails: {
    marginLeft: 10,
    flex: 1,
    justifyContent: "space-between",
  },
  bookTitle: {
    fontSize: 16,
    fontWeight: "bold",
  },
  bookAuthor: {
    color: "#666",
  },
  bookPrice: {
    color: "#E91E63",
    marginBottom: 10,
  },
});
There are two primary components in the BookList component. FlatList is responsible for rendering the list of books, and several sub-components like View, Image, and Text. Button is used to display and interact with book details.
In the above code, the first useEffect Hook fetches the initial list of books when the component loads by making an API call with GraphQL. The second useEffect Hook sets up a real-time subscription to listen for new book creations. When a new book is created, it updates the list of books with the newly added book data, ensuring that the component remains synchronized with the backend data.
Now let’s update the AddBook.js screen to allow users to add new books to the store. To do this, we’ll create a handler function that makes an API call to our GraphQL serverless function to create a new book:
...
import { API, graphqlOperation } from "aws-amplify";
import { createBook } from "../src/graphql/mutations";

const AddBookScreen = () => {
...
 const addBook = async () => {
    try {
      if (name === "" || price === "" || author === "") return;
      const input = {
        name,
        price: parseFloat(price),
        author,
        image,
      };
      const result = await API.graphql(graphqlOperation(createBook, { input }));
      if (result.data.createBook) {
        alert("Book added successfully!");
        setName("");
        setPrice("");
        setAuthor("");
        setImage("");
      } else {
        alert("Error saving book. Please try again.");
      }
    } catch (error) {
      console.error("Error saving book:", error);
      alert("Error saving book. Please try again.");
    }
  };
...
return (
    ...
    <View style={styles.buttonContainer}>
          <Button title="Add Book" onPress={addBook} color="#34A853" />
    </View>
    ...
)
Now we can add new books to our application!
Building data management and synchronization
The AWS Amplify DataStore offers a streamlined approach to offline data management and synchronization. Instead of directly querying the GraphQL API, we can seamlessly access data offline by querying the local DataStore. This allows our application to function without an internet connection.
When our app regains internet connectivity, any changes made to the local data, whether offline or online, are automatically synchronized with the backend through AppSync. This synchronization process ensures that our data remains up to date and consistent across devices.
In the event of conflicting changes, AppSync employs our defined conflict resolution strategy, such as AUTOMERGE or OPTIMISTIC_CONCURRENCY, to intelligently resolve discrepancies and maintain data integrity. This robust synchronization mechanism simplifies data management and enhances the offline user experience while preserving data consistency.
Adding offline functionality
To add offline functionality to our React Native application, we need to generate a model based on our GraphQL schema, like so:
amplify codegen models
The above command creates a models folder in the src directory and generates the following files:
📦models
 ┣ 📜index.d.ts
 ┣ 📜index.js
 ┣ 📜schema.d.ts
 ┗ 📜schema.js
Here are some additional details about each of the files:
-
index.d.ts: This TypeScript declaration file provides type definitions for the models generated from our GraphQL schema. It allows us to work with these models in a type-safe manner when writing TypeScript code -
index.js: This JavaScript file exports generated models, making them accessible within our JavaScript code. We can import and use these models to interact with our GraphQL API and perform CRUD (create, read, update, delete) operations on our data -
schema.d.ts: This TypeScript declaration file provides type definitions specifically for our GraphQL schema. It defines the structure of our GraphQL types, queries, mutations, and subscriptions, enabling type checking and autocompletion when working with GraphQL operations in TypeScript -
schema.js: This JavaScript file exports our GraphQL schema definition. It contains the schema that defines the structure of our GraphQL API, including the types, queries, mutations, and subscriptions. This file is crucial for setting up the GraphQL server and client
These files are essential for developing our React Native application with GraphQL data access and synchronization, ensuring type safety and consistency throughout the codebase.
Next, let’s update the fetchInitialBooks handler and the useEffect Hooks in the BookList.js component to fetch the data from the Amplify DataStore:
...
import { DataStore, Predicates } from "aws-amplify";
import { Book } from "../src/models";
...
export default BookList = () => {
    ...
    const fetchInitialBooks = async () => {
        const items = await DataStore.query(Book, Predicates.ALL);
        setBooks(items);
      };
      useEffect(async () => {
            await this.loadBooks();
            DataStore.observe(Book).subscribe(fetchInitialBooks);
      }, []);
...
}
Here we use the AWS Amplify library to interact with a local DataStore and retrieve a list of books. When the component mounts, it uses the DataStore.query method with a Predicates.ALL filter to fetch all records of the Book model. It also sets up a subscription to observe changes in the Book model, ensuring that the list of books is updated whenever a new Book is created or modified.
Now let’s modify the addBook handler in the AddBookScreen.js screen to save new books to the DataStore:
 const addBook = async () => {
    try {
      if (name === "" || price === "" || author === "") return;
      const input = {
        name,
        price: parseFloat(price),
        author,
        image,
      };
      await DataStore.save(new Book(input));
      setName("");
      setPrice("");
      setAuthor("");
      setImage("");
    } catch (error) {
      console.error("Error saving book:", error);
      alert("Error saving book. Please try again.");
    }
  };
We have successfully migrated our React Native application to work both online and offline.
Conclusion
Implementing serverless architecture for React Native applications offers a slew of advantages, including the ability to scale easily, sidestep the complexities of infrastructure management, and keep operational costs in check.
Serverless technology helps React Native developers create more robust, adaptable, and efficient mobile applications that meet the demands of today's dynamic digital landscape. By seamlessly integrating cloud functions from providers like AWS Lambda or Azure Functions, developers can tap into a world of possibilities to enrich their mobile apps.
In this article, we explored effective strategies for handling data synchronization and enabling offline functionality, both of which are important for delivering a seamless user experience.
LogRocket: Instantly recreate issues in your React Native apps.

LogRocket is a React Native monitoring solution that helps you reproduce issues instantly, prioritize bugs, and understand performance in your React Native apps.
LogRocket also helps you increase conversion rates and product usage by showing you exactly how users are interacting with your app. LogRocket's product analytics features surface the reasons why users don't complete a particular flow or don't adopt a new feature.
Start proactively monitoring your React Native apps — try LogRocket for free.


Top comments (0)