
Written by Rishabh Rawat✏️
Building projects that don’t scale doesn’t scale well for business; every project goes through growing pains, and it’s not uncommon for an application to drop dead in the face of a sudden traffic surge.
Building a resilient application is very important when it comes to delivering value to your users. A circuit breaker is one of many ways you can ensure that. In this article, we'll explore what a circuit breaker is, learn how it can improve your application, and implement it in a Node.js application. Let’s get started!
Jump ahead:
- What is a circuit breaker?
- Why is a circuit breaker important?
- How does a circuit breaker work?
- How to use a circuit breaker in Node.js
- Using Opossum: A Node.js circuit breaker
- Real-world applications
- Opossum quickstart snippet
What is a circuit breaker?
Imagine one of your external vendor APIs is temporarily down, causing failures in your application and disturbing your SLAs. Would you want to keep firing requests to that dead vendor API? Doing so wouldn’t be productive. Since all of your requests to that vendor will fail, it's better to save time and compute resources by using them somewhere worthwhile.
This is exactly the problem that a circuit breaker solves. Without it, your application will continue to hit requests that are bound to fail, wasting time and resources. The circuit breaker prevents that, failing fast and early.
Why is a circuit breaker important?
A circuit breaker saves you a lot of wasted time and resources, thereby saving you money and helping you efficiently deliver value to your users. Considering the upsides, implementing a circuit breaker is a no-brainer. It’s a step towards a reliable, performant, and resilient application.
You can even set up monitoring for your circuit breaker, which will help you to stay on top whenever any of your partner APIs go south. You can learn more about monitoring from the official docs.
How does a circuit breaker work?
To understand the circuit breaker pattern, let’s first consider the inner workings of a circuit breaker. A circuit breaker has three definite states:
-
Closed -
Open -
HalfOpen
The circuit observes your asynchronous operations, responding based on that value. Each of these states has a different meaning and is at the core of what a circuit breaker is.
Taking the analogy of a usual electrical circuit, a Closed circuit has zero disturbance, and currents can flow through it. Contrary to this, the current cannot flow through an Open circuit since there is at least one disturbance in the path of the circuit, for example, an incomplete circuit due to a cut wire.
Closed state
When the circuit is Closed, the circuit breaker allows all requests to go through. A Closed state means there are either no failures or only failures under acceptable limits: 
Open state
When the failures exceed the acceptable limit, the circuit shifts to an Open state: 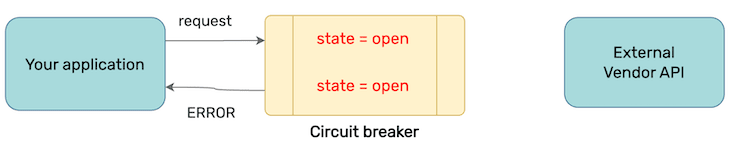
HalfOpen
A half-open state occurs after the circuit has been in the Open state for a predefined amount of time.
When in a HalfOpen state, the circuit allows a request to go through to determine if the issue at the other end is resolved. If it is, the circuit goes back to the Closed state, and normal operations continue. If it still observes failure from the vendor, the circuit returns to the Open state: 
How to use a circuit breaker in Node.js
We want to provide a wrapper for our requests, which can determine the failures and automatically trip the circuit to prevent wasting of resources. To understand how to leverage it, we’ll build our own circuit breaker.
We‘ll implement a CircuitBreaker class that has the following methods:
-
Fire: To make requests -
Success: Triggered on success -
Fail: Triggered on a failure
The core idea is simple, let’s understand it with the help of a flowchart: 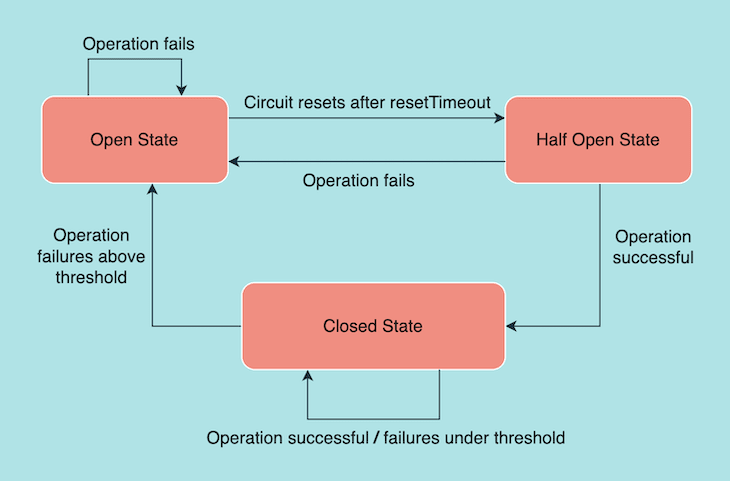
We start with a Closed state, meaning requests are going through. If the number of failures is more than a failureThreshold, the circuit shifts into the Open state, meaning no more requests can go through.
After a certain predefined time, set by resetTimeout, the circuit moves into a HalfOpen state. In the HalfOpen state, it allows requests to go through to determine if failures are still happening. If it encounters a failure, it goes back to the Open state. Otherwise, it goes into the Closed state.
With this understanding, let’s build our own circuit breaker:
const axios = require('axios');
const CircuitBreakerStates = {
  OPENED: "OPENED",
  CLOSED: "CLOSED",
  HALF: "HALF"
}

class CircuitBreaker {
  request = null;
  state = CircuitBreakerStates.CLOSED;
  failureCount = 0;
  failureThreshold = 5; // number of failures to determine when to open the circuit
  resetAfter = 50000;
  timeout = 5000; // declare request failure if the function takes more than 5 seconds

  constructor(request, options) {
    this.request = request;
    this.state = CircuitBreakerStates.CLOSED; // allowing requests to go through by default
    this.failureCount = 0;
    // allow request to go through after the circuit has been opened for resetAfter seconds
    // open the circuit again if failure is observed, close the circuit otherwise
    this.resetAfter = Date.now();
    if (options) {
      this.failureThreshold = options.failureThreshold;
      this.timeout = options.timeout;
    }
    else {
      this.failureThreshold = 5; // in ms
      this.timeout = 5000; // in ms
   }
  }

  async fire() {
    if (this.state === CircuitBreakerStates.OPENED) {
      if (this.resetAfter <= Date.now()) {
        this.state = CircuitBreakerStates.HALF;
      } else {
        throw new Error('Circuit is in open state right now. Please try again later.');
      }
    }
    try {
      const response = await axios(this.request);
      if (response.status === 200) return this.success(response.data);
      return this.failure(response.data);
    }
    catch(err) {
      return this.failure(err.message);
    }
  }

  success(data) {
    this.failureCount = 0
    if (this.state === CircuitBreakerStates.HALF) {
      this.state = CircuitBreakerStates.CLOSED;
    }
    return data;
  }

  failure(data) {
    this.failureCount += 1;
    if (
      this.state === CircuitBreakerStates.HALF ||
      this.failureCount >= this.failureThreshold
    ) {
      this.state = CircuitBreakerStates.OPENED;
      this.resetAfter = Date.now() + this.timeout;
    }
    return data;
  }
}
For simplicity, we defined only three methods in the class. In a real world use case, you can extend this idea and introduce more methods for granular control.
To use the circuit breaker above, we’ll wrap our requests within it. Let’s take a look:
// sample request to fetch data asynchronously
const request = axios fetchDataFromExternalVendor();
// wrap the request within a circuit breaker object
const circuitBreakerObject = new CircuitBreaker(request, { failureThreshold: 4, timeout: 4000 });
// fire the request
circuitBreakerObject.fire()
  .then((data) => console.log(data))
  .catch((err) => console.log(some error occurred = ${err.message}`);
With this code, you have taken a step towards making your Node.js application more resilient. But, you don’t have to build the circuit breaker entirely by yourself. In the next section, we’ll learn how you can use Opossum to achieve the same outcome without reinventing the wheel.
Using Opossum: A Node.js circuit breaker
Opossum is a circuit breaker implementation for Node.js applications. It does the heavy lifting of maintaining the execution states of your asynchronous operations at its end. Whenever it observes failures, it declares a dead participant, deciding based on config, and prevents hitting the dead end. As the GitHub repository eloquently explains, it fails fast.
Opossum allows listening to the circuit Open event by providing a fallback function. The fallback function is invoked whenever the circuit opens and starts failing fast. This function continues to be invoked for every request after the circuit opens. Once the circuit closes, it lets the requests through and normal operations start again.
Opossum emits a variety of events for every scenario. Some useful ones include:
-
reject: Emitted when you trigger a request while the circuit is open -
timeout: When a request times out -
success: When the request completes successfully -
failure: When the operation performed during the request errors out -
open: Circuit breaker state changes toOpen -
close: Circuit breaker state changes toClosed -
halfOpen: Circuit breaker state changes tohalfOpen -
fallback: When a fallback function executes on failure
If you need to use Opossum in a serverless environment, it allows initializing custom states as well. You can fine-tune the behavior of the circuit breaker using the configs. Let’s take a look.
timeout
As the name suggests, you can use timeout to customize the allowed time for an async operation. If it takes longer than that, Opossum triggers a failure.
errorThresholdPercentage
With errorThresholdPercentage, you can specify how many failing requests to observe before opening the circuit. This can be helpful if you want to set a threshold and allow a few intermittent ones through.
resetTimeout
resetTimeout helps you set the time duration after which the circuit breaker will let the request through, meaning it enters a halfOpen state. If the request passes successfully, the circuit closes, and normal operations will resume. If the request fails again, the circuit goes back to the Open state.
Real-world applications
You can use a circuit breaker anywhere you want to avoid cascading and recurring failures and control the interaction of your Node.js application with the external world.
Below are some of the common situations where a circuit breaker can improve your application:
- During the maintenance of any of your partner’s APIs
- Temporary disruptions or system difficulties in any of the connecting APIs
- Intermittent rejections from external services due to rate limit breach
- Saving resources by intentionally avoiding low-priority API calls to compensate for a high-load operation. For example, YouTube prioritizes loading video over fetching comments during initial load
Opossum quickstart snippet
You can give Opossum a spin without too much hassle. Just copy the snippet below and paste it into any of the async controllers of your Node.js application.
First, install Opossum using the command below:
npm install opossum
Wrap the circuit breaker object around any async function, and it’s good to go. We’ll take the following code snippet from the README.md of the repository:
const CircuitBreaker = require('opossum');
function asyncFunctionThatCouldFail(x, y) {
  return new Promise((resolve, reject) => {
    // Do something, maybe on the network or a disk
  });
}
const options = {
  timeout: 3000, // If our function takes longer than 3 seconds, trigger a failure
  errorThresholdPercentage: 50, // When 50% of requests fail, trip the circuit
  resetTimeout: 30000 // After 30 seconds, try again.
};
const breaker = new CircuitBreaker(asyncFunctionThatCouldFail, options);
breaker.fire(x, y)
  .then(console.log)
  .catch(console.error);
Conclusion
In this tutorial, we learned what a circuit breaker is, how it functions internally, and how you can leverage it in your Node.js application to ensure scalability and resiliency. We also took a quick look at Opossum, a popular circuit breaker implementation for Node.js, reviewing some of its useful events.
If you have any questions or feedback, be sure to leave a comment. Thanks for reading!
200’s only ✔️ Monitor failed and slow network requests in production
Deploying a Node-based web app or website is the easy part. Making sure your Node instance continues to serve resources to your app is where things get tougher. If you’re interested in ensuring requests to the backend or third party services are successful, try LogRocket.

LogRocket is like a DVR for web apps, recording literally everything that happens on your site. Instead of guessing why problems happen, you can aggregate and report on problematic network requests to quickly understand the root cause.
LogRocket instruments your app to record baseline performance timings such as page load time, time to first byte, slow network requests, and also logs Redux, NgRx, and Vuex actions/state. Start monitoring for free.


Top comments (0)