Written by Chidume Nnamdi ✏️
Blockchain is taking over the world. Bitcoin, the most popular virtual currency right now, is a product of blockchain technology. Ethereum is a byproduct of blockchain. It came into existence following the surge of Bitcoin.
While Bitcoin relies only on currencies, Ethereum goes a step further by providing a virtual machine and smart contracts that enable users to deploy their tokens, which is similar to Bitcoin.
A token can represent a virtual currency, an ounce of gold, a lottery ticket, etc. You can develop all kinds of tokens on the Ethereum blockchain, but for this tutorial, we’ll focus on how to create and deploy an ERC-20 token.
We’ll cover the following in detail with practical examples:
- What is blockchain and how does it work?
- What is Ethereum?
- How does Ethereum work?
- What are smart contracts?
- What are ERC-20 tokens?
- The ERC-20 body
- Creating an ERC-20 token
- Deploying a token on the Ethereum testnet
You might be wondering, "Why should I create my own token?" Blockchain, Ethereum, and tokens are becoming a huge part of the software development landscape. By learning how to create a token on the Ethereum blockchain, you’ll discover how blockchain technology works under the hood and stay ahead of the curve.
To follow along with this tutorial, you should have at least a fundamental understanding of blockchain technology, Solidity, and how Ethereum works. If you need a refresher, not to worry; we’ll review the basics before we start building our token.
What is blockchain and how does it work?
In simple terms, a blockchain is a record of transactions in a ledger or database that is distributed across many participants in a network. This ledger contains records of transactions made in the network.
A transaction is the transfer of a currency or a certain amount of money from one user to another in the network. For example, let’s say Alice transferred 30BLC to Bob. This transaction is cryptographically hashed and recorded in the ledger from a certain node in the network.
This node sends this transaction to other nodes in the network — i.e., it broadcasts the transaction to the network. The other nodes receive this transaction, verify the transaction using a standard verification method, and then add the transaction to their ledger.
Nodes in the network listen to new transactions broadcast or emitted in the network, then perform the work of adding the transaction to their ledgers. We can see that each node in the network possesses or has a copy of the ledger. This is responsible for the blockchain’s distributed nature.
The word "blockchain" comes from the fact that the transactions or records are linked in a chain inside the ledger. A transaction, as we already know, is an exchange of currency between two parties in the node. It can be represented in JSON like this:
{
  "to": "0xalice",
  "from": "0xbob",
  "amount": "30BLC"
}
This is a simple record or transaction. It tells us that bob transferred 30BLC to Alice.
Now, this transaction is recorded inside a block. Let's represent a transaction inside a block in JSON, like this:
[
  {
    "to": "0xalice",
    "from": "0xbob",
    "amount": "30BLC"
  }
]
A block is like an array that contains objects of transactions. So this block can contain many transactions:
[
  {
    "to": "0xalice",
    "from": "0xbob",
    "amount": "30BLC"
  },
  {
    "to": "0xtheresa",
    "from": "0xarinze",
    "amount": "5BLC"
  }
]
You can see where the block comes in. The chain means that these blocks are linked to each other. Each blockchain initially starts with a genesis block that the creator adds and is broadcast to the network.
Each block also has a cryptographic hash, which serves as a unique identifier in the network; no two blocks can have the same hash.
When a block is verified by the nodes and set to be added to the network, this block has a pointer that points to the hash of the last block in the network.
[
  {
    "hash": "0x0",
    "prevHash": "",
    "txns": [
      {
        "to": "0xalice",
        "from": "0xbob",
        "amount": "30BLC"
      },
      {
        "hash": "0x1",
        "prevHash": "0x0",
        "to": "0xtheresa",
        "from": "0xarinze",
        "amount": "5BLC"
      }
    ]
  },
  {
    "hash": "0x1",
    "prevHash": "0x0",
    "txns": [
      {
        "to": "0xalice",
        "from": "0xbob",
        "amount": "30BLC"
      },
      {
        "to": "0xtheresa",
        "from": "0xarinze",
        "amount": "5BLC"
      }
    ]
  }
]
The first block with hash 0x0 is the genesis block. The next block with hash 0x1 has a prevHash that points to 0x0. This points to the first block in the network.
This way, any new block being consolidated to the network points to the immediate latest block. This is how the "chain" in the blockchain is formed.
What is Ethereum?
Ethereum is a blockchain with a digital currency called Ether (ETH). Just like a generic blockchain, transactions are stored in a ledger.
What sets Ethereum apart from other blockchains is its flexibility. Whereas many blockchain platforms only support transferring currencies, Ethereum enables you to transfer any data through the blockchain and pay the price with Ether.
How does Ethereum work?
As mentioned above, in the Ethereum blockchain, we can transfer any data and pay the price with Ether.
Just like we transacted with BLC currency in the above example, the Ethereum blockchain facilitates ETH transactions. Let’s say Alice transfers 1 ETH to Bob. This transaction is verified by the nodes in the network and the transactions are added to the blocks in the blockchain.
There is an activity called mining, which entails working for an Ether. This work involves solving a hard computation by trial and error. This can be done by any node in the network. A node that successfully solves the computation is awarded a certain amount of ETH. The difficulty of the work increases as more transactions are mined.
Whenever a transaction is initiated in the Ethereum blockchain, the transaction is mined by a mining node in the network. The sender of the transaction must agree to pay a certain amount of ETH to the node that will mine the transaction. This is called the gas price.
What are smart contracts?
Ethereum has a thing called smart contracts. Smart contracts contain code that is executed in the Ethereum blockchain.
Smart contracts are written in the Solidity language and compiled into an ABI code. This ABI code is deployed to the Ethereum blockchain. The smart contract takes the externally owned address of the sender plus the nonce mixed in to form its address in the Ethereum blockchain.
Smart contracts enable us to create digital contracts. These digital contracts, just like contracts in the real world, allow transactions to be set up by two or more parties in the Ethereum blockchain.
A smart contract is a type of account in Ethereum. This means it is not controlled by a user and they can send transactions in the blockchain. Being an account, smart contracts have balances and they contain an EVM code.
What are ERC-20 tokens?
Ethereum Virtual Machine (EVM) is a virtual machine in which the compiled Solidity ABI code is run. These smart contracts in Ethereum have become a world standard in creating several tokens. These standards came to be known as Ethereum Request for Comment (ERC) standards.
Ethereum has many standards, but the most popular and widely used are ERC-20 and ERC-721. ERC-20 is used for creating tokens while ERC-721 is used to develop non-fungible tokens (NFTs).
ERC-20, a standard proposed by Fabian Vogelsteller, is a smart contract that contains a set of APIs. ERC20 defines a set of rules that apply to all token that choose the ERC-20 standard.
As mentioned above, ERC-20 can be used to create virtual currencies like Bitcoin and Ether. Among the most well-known tokens build using the ERC-20 standard are Binance Coin BNB and Shiba Shabu.
ERC-20 tokens can be sent and received. They are fungible tokens, meaning their value is the same everywhere in the blockchain.
According to Blockchain.com support, wallets and exchanges use the standard to integrate various ERC-20 tokens onto their platforms and facilitate exchanges between ERC-20 tokens and other cryptocurrencies.
Now that we understand what the ERC-20 standard is, let’s look at the body of an ERC-20 token.
The ERC-20 body
The body of an ERC-20 token contains the methods and events an ERC-20 token must have.
An ERC-20 token must be able to:
- Transfer tokens from one account to another
- Return the balance of an account
- Return the total tokens available in the token
- Transfer tokens to an account
In practice, an ERC-20 would look something like this in Solidity:
function name() public view returns (string)

function symbol() public view returns (string)

function decimals() public view returns (uint8)

function totalSupply() public view returns (uint256)

function balanceOf(address _owner) public view returns (uint256 balance)

function transfer(address _to, uint256 _value) public returns (bool success)

function transferFrom(address _from, address _to, uint256 _value) public returns (bool success)

function approve(address _spender, uint256 _value) public returns (bool success)

function allowance(address _owner, address _spender) public view returns (uint256 remaining)
The following methods can be available in an ERC-20 token:
-
namereturns the name of the token (e.g., Binance Coin) -
symbolreturns the symbol of the token (e.g., BNB) -
decimalsreturns the number of decimals the token uses -
totalSupplyreturns the total number initially supplied to the token -
balanceOfreturns the balance of an account -
transfertransfers a certain amount of tokens to an address -
transferFromtransfers a certain amount of tokens from a beneficiary address to a recipient address -
approvewithdraws tokens from the owner's address up to a certain amount of tokens -
allowancereturns the number of tokens withdrawable from the owner's account
Events can also be registered on our token to capture certain events when they are emitted.
ERC-20 tokens have the following events:
event Transfer(address indexed _from, address indexed _to, uint256 _value)

event Approval(address indexed _owner, address indexed _spender, uint256 _value)
-
Transfer, which must be triggered when tokens are transferred -
Approval, which must be triggered when an account is approved to collect a certain amount of tokens
Creating an ERC-20 token
With the background info out of the way, let's write a simple token. We’ll call it ND Coin 😀
// SPDX-License-Identifier: GPL-3.0
pragma solidity >=0.7.0 <0.9.0;

contract NDCoinERC20 {

    event Transfer(address indexed from, address indexed to, uint tokens);
    event Approval(address indexed tokenOwner, address indexed spender, uint tokens);

    string public constant name = "ND Coin";
    string public constant symbol = "NDN";
    uint8 public constant decimals = 18;

    mapping(address => uint256) balances;

    mapping(address => mapping (address => uint256)) allowed;

    uint256 totalSupply_;

    constructor(uint256 total) {
      totalSupply_ = total;
      balances[msg.sender] = totalSupply_;
    }

    function totalSupply() public view returns (uint256) {
      return totalSupply_;
    }

    function balanceOf(address tokenOwner) public view returns (uint) {
        return balances[tokenOwner];
    }

    function transfer(address receiver, uint numTokens) public returns (bool) {
        require(numTokens <= balances[msg.sender]);
        balances[msg.sender] -= numTokens;
        balances[receiver] += numTokens;
        emit Transfer(msg.sender, receiver, numTokens);
        return true;
    }

    function approve(address delegate, uint numTokens) public returns (bool) {
        allowed\[msg.sender\][delegate] = numTokens;
        emit Approval(msg.sender, delegate, numTokens);
        return true;
    }

    function allowance(address owner, address delegate) public view returns (uint) {
        return allowed\[owner\][delegate];
    }

    function transferFrom(address owner, address buyer, uint numTokens) public returns (bool) {
        require(numTokens <= balances[owner]);
        require(numTokens <= allowed\[owner\][msg.sender]);

        balances[owner] -= numTokens;
        allowed\[owner\][msg.sender] -= numTokens;
        balances[buyer] += numTokens;
        emit Transfer(owner, buyer, numTokens);
        return true;
    }
}
With the code above, we wrote our own crypto token using the ERC-20 standard. You’ll notice that we implemented all the methods in the ERC-20 standard.
Let’s break it down step by step.
In the first line of the code, we set the license identifier and the version of Solidity the code was written for. Here, our Solidity code is for Solidity v0.7.0–0.9.0.
In the next two lines, we declared the events Transfer and Approval:
  event Transfer(address indexed from, address indexed to, uint tokens);

  event Approval(address indexed tokenOwner, address indexed spender, uint tokens);
Next, we set the name of our token, its symbol, and the decimal to use:
  string public constant name = "ND Coin";
  string public constant symbol = "NDN";
  uint8 public constant decimals = 18;
Our token name is ND Coin and our symbol is NDN.
Next, we have two mappings declared:
  mapping(address => uint256) balances;

  mapping(address => mapping (address => uint256)) allowed;
A mapping in Solidity is similar to a key-value pair. So in the balances, an address is the key while the unit256 (unsigned integer of 256 bits) is the value.
According to the Solidity docs, an address type is a 160-bit value that does not allow any arithmetic operations. It is suitable for storing addresses of contracts, or a hash of the public half of a key pair belonging to external accounts.
The balances maps an address to a unit256 int:
| Address | unit256 | | --------------- | ------------- | | 0x01 | 23 | | 0x02 | 10 | | 0x03 | 2 |
An address refers to its balance. The allowed mapping is also, a key-value pair that maps addresses to another mapping. This last mapping maps addresses to their unit256 values. It allows you to store the number of tokens that can be transferred to a recipient.
The next line of code is as follows:
uint256 totalSupply_;
This stores the number of tokens that are available in our contract.
Next, we have the constructor. We know that constructors are called when the class is being created. In smart contracts, the constructor is called when the contract is deployed to the network.
    constructor(uint256 total) {
      totalSupply_ = total;
      balances[msg.sender] = totalSupply_;
    }
Here, the constructor is called with the total number of tokens we want to be in our contract (total). The total is set to totalSupply_, and the balance of the deploying address is set to the total tokens. The msg.sender contains the Ethereum account of the currently executing contract function.
In the next line, we have the balanceOf method:
    function balanceOf(address tokenOwner) public view returns (uint) {
        return balances[tokenOwner];
    }
This method has an argument, tokenOwner. This argument is the address of the token owner to whom we want to return the balance of the token in the contract. So the method gets the balance by referencing the tokenOwner address from the balances.
The next method is transfer:
    function transfer(address receiver, uint numTokens) public returns (bool) {
        require(numTokens <= balances[msg.sender]);
        balances[msg.sender] -= numTokens;
        balances[receiver] += numTokens;
        emit Transfer(msg.sender, receiver, numTokens);
        return true;
    }
This method has the following arguments:
-
receiver, the address of the account that will receive tokens -
numTokens, the number of tokens that will be sent to thereceiveraccount.
In the body of the method, we see that a check is made to verify that the number of tokens to be sent to the recipient is enough according to the deployer's address balance.
Next, the numTokens is subtracted from the deployer's balance and credited to the receiver's balance. Then, a Transfer event is emitted. Finally, the boolean true is returned.
The next method is approve:
    function approve(address delegate, uint numTokens) public returns (bool) {
        allowed\[msg.sender\][delegate] = numTokens;
        emit Approval(msg.sender, delegate, numTokens);
        return true;
    }
This method has args called delegate and numTokens.
-
delegateis the address we want to set the number of tokens that the deployer can send to it -
numTokensis the number of tokens the deployer can send to thedelegate
In the method body, we reference the delegate map in the allowed mapping to set the number of tokens to it. Then, we emit the Approval event and return true.
The next method is allowance:
    function allowance(address owner, address delegate) public view returns (uint) {
        return allowed\[owner\][delegate];
    }
This method has the following arguments: owner and delegate. owner is the address to return the number of tokens transferable to the recipient in the delegate.
The last method is transferFrom:
    function transferFrom(address owner, address buyer, uint numTokens) public returns (bool) {
        require(numTokens <= balances[owner]);
        require(numTokens <= allowed\[owner\][msg.sender]);
        balances[owner] -= numTokens;
        allowed\[owner\][msg.sender] -= numTokens;
        balances[buyer] += numTokens;
        emit Transfer(owner, buyer, numTokens);
        return true;
    }
transferFrom has args called owner, buyer and numTokens.
owner is the address of the balances from which we will transfer the numTokens buyer is the address in the balances that we will credit the numTokens numTokens is the number of tokens to be transferred from owner to buyer
In the method body, we first check whether the balance in the owner is enough and whether the owner is approved to send that amount of tokens to the buyer.
Next, the transfer is made by subtracting the number of tokens from the owner's balance and allowed balance. Then, the number of tokens is added to the buyer's balance. The Transfer event is emitted and the boolean true is returned.
Deploying a token on the Ethereum testnet
Now, let's deploy our contract to the Ethereum network — well, not actually the Ethereum network, but an Ethereum test network. We can’t deploy our contract on the real Ethereum network because it would cost real money. Since we’re only practicing, we’ll use this test network and transfer a free ETH to deploy our contract.
We’ll deploy our token to the Ropsten test network and compile our smart contract on Remix, We’ll also use MetaMask to create a wallet on the Ethereum test network.
Install the MetaMask extension on your desktop browser. Create an account and leave it for now; we’ll come back to it later.
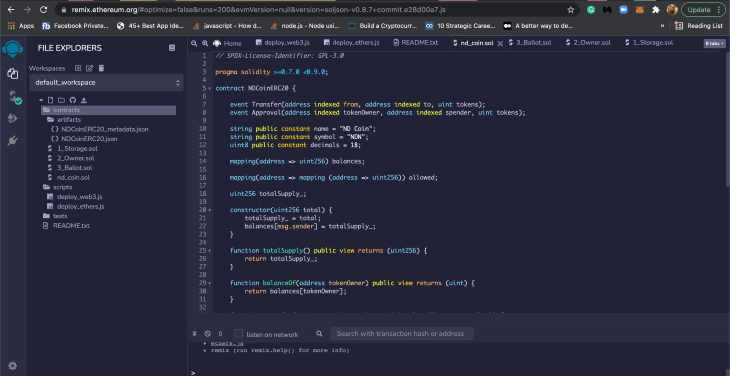
Next, go to Remix and create a new .sol file. We’ll name it nd_coin.sol and paste our smart contract in the above section there:
Now let's get some free ETH!
If we open our MetaMask extension, we’ll see that we have 0 ETH. But we can get free ETH from Ropsten Test network. We will have to copy our account address from MetaMask, then paste it on the https://faucet.ropsten.be page and click on the Send me test Ether.

Our request will be queued, and after approximately three minutes, we’ll see 0.3 ETH in our MetaMask ETH account.

Now, we can deploy our smart contract to the Ropsten test network.
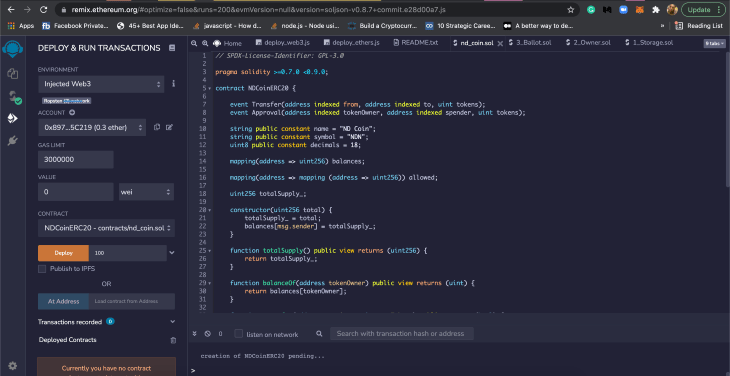
Go back to the Remix dashboard and click on the Ethereum logo in the dashboard. This will load a page where we can deploy and run transactions.
On the left sidebar, we’ll see that our nd_coin.sol contract is already selected and the account in our MetaMask is already set as the deploying address. In the ENVIRONMENT, we’ll see that JavaScript VM (London) is selected for us.

Let’s change it so our deploying network will be our Ropsten network. Click on the dropdown and select Injected Web3. We should see (0.3 ether) in the ACCOUNT section right beside our deploying address. Now we’re ready to deploy our smart contract.
We need to enter the original amount of tokens that will be traded in our token. Enter this in the input beside the Deploy button. Enter 100 and click the Deploy button.
This will open our MetaMask extension and ask us to confirm the pending transaction. Click the Confirm button on the MetaMask popup.
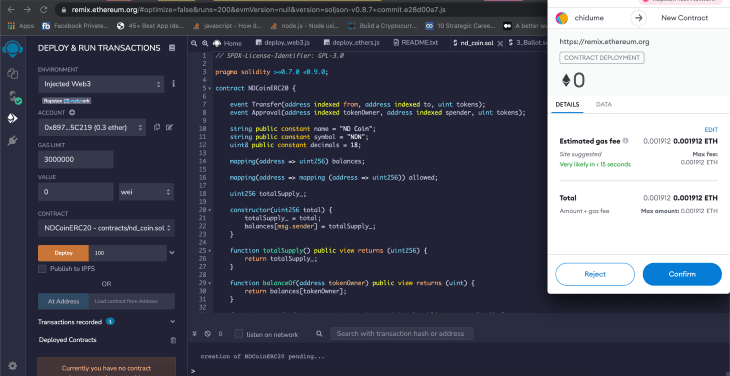
This will deploy our smart contract on the Ropsten test network.

Now, on our Remix page, if we scroll down on the left sidebar, we will see the names of methods in our smart contract and an input beside them.

This is where we can run the methods in our smart contract and get the results.
As you can see below, we checked the balance of our deploying address and it returned 100:

We have successfully created and deployed an ERC-20 token on an Ethereum network.
Conclusion
This tutorial took us on a fun ride. We started by introducing blockchain and Ethereum, then delved into ERC-20, exposing in detail what it is and how it came into being.
Later, we analyzed the ERC-20 body and discussed the methods and events found in an ERC-20 token and what they do.
Finally, we created a simple token in Solidity and deployed it to the Ropsten test network.
There is so much more to explore, but this tutorial should give you a head start as you foray into the world of ERC tokens.
LogRocket: Full visibility into your web apps

LogRocket is a frontend application monitoring solution that lets you replay problems as if they happened in your own browser. Instead of guessing why errors happen, or asking users for screenshots and log dumps, LogRocket lets you replay the session to quickly understand what went wrong. It works perfectly with any app, regardless of framework, and has plugins to log additional context from Redux, Vuex, and @ngrx/store.
In addition to logging Redux actions and state, LogRocket records console logs, JavaScript errors, stacktraces, network requests/responses with headers + bodies, browser metadata, and custom logs. It also instruments the DOM to record the HTML and CSS on the page, recreating pixel-perfect videos of even the most complex single-page apps.


Top comments (0)