
Written by Taofiq Aiyelabegan✏️
Next.js is one of the easiest and most popular ways to build production-ready React applications. Over recent years, Next.js has experienced exponential growth, and many companies have adopted it to build their applications. In this article, we will learn how to add pagination to a Next.js application. We’ll talk about how to set up a Next.js project, data fetching from an API endpoint with getStaticProps method, and implementing the pagination itself.
Jump ahead:
- Initiating our Next.js project
- Data fetching with
getStaticProps - Implementing the
Paginationcomponent - Adding the
pagination helperfunction
Initiating our Next.js project
First, we will create a new Next.js app with the command npx create-next-app next-pagination. Then, we can go into the project directory with the command cd next-pagination and run yarn dev or npm run dev to start the project on a development server. For this project, we will use vanilla CSS for styling as it focuses more on functionality.
Data fetching with getStaticProps
The data that will be used to implement our pagination will come from the JSON Placeholder API. The data will be fetched using the getStaticProps function.
The getStaticProps function always runs on the server, and Next.js will pre-render the page at build-time using the props returned by getStaticProps. The Fetch API will be used to get data from the previously mentioned API endpoint:
import Head from "next/head";
import Image from "next/image";
import styles from "../styles/Home.module.css";
import Pagination from "../src/components/Pagination";
import { useState, useEffect } from "react";
import { paginate } from "../src/helpers/paginate";

export default function Home({ data }) {
console.log(data)
  return (
   <div className={styles.container}>
     <Head>
       <title>Create Next App</title>
       <meta name="description" content="Generated by create next app" />
       <link rel="icon" href="/favicon.ico" />
     </Head>

     <p>NextJS X Pagination</p>

export const getStaticProps = async () => {
 const res = await fetch("https://jsonplaceholder.typicode.com/todos");
 const data = await res.json();

 return {
   props: { data },
 };
};
The data returned from the props will be destructured in the home component so it can be logged in the console. This will confirm that the data has been fetched. So, in the console, we should have a post with an array of 100 objects as it was specified in the JSON Typicode website:  Now, we can render this data on the webpage and see how they look on the UI:
import Head from "next/head";
import Image from "next/image";
import styles from "../styles/Home.module.css";
export default function Home({ data }) {
 return (
   <div className={styles.container}>
     <Head>
       <title>Create Next App</title>
       <meta name="description" content="Generated by create next app" />
       <link rel="icon" href="/favicon.ico" />
     </Head>

     <p>
       <strong>NextJS x Pagination</strong>
     </p>
     {data.map((item) => {
       return <p key={item.id}>{item.title}</p>;
     })}
   </div>
 );
}

export const getStaticProps = async () => {
 const res = await fetch("https://jsonplaceholder.typicode.com/todos");
 const data = await res.json();

 return {
   props: { data },
 };
};

Implementing the Pagination component
For the Pagination component implementation, we will create an src and component folder. Inside component, we will create a Pagination.js file, which will be rendered in the index.js file:
const Pagination = () => {
 return (
   <div>Pagination</div>
 )
}
export default Pagination
The Pagination rendered in index.js will have four props: items, currentPage, pageSize, and onPageChange. The items will be the length of the data we are getting from the API, which in this case, is 100:  The
The pageSize will be set to 10 since we want to have pagination from 1-10, and the currentPage will be stored in a state with a default value of 1 since the page will start from page one.
The onPageChange will be a function to set the current page we are in, for example, moving from page one to two:
import Head from "next/head";
import Image from "next/image";
import styles from "../styles/Home.module.css";
import Pagination from "../src/components/Pagination";
import { useState } from "react";

export default function Home({ data }) {
 const [currentPage, setCurrentPage] = useState(1);
 const pageSize = 10;

 const onPageChange = (page) => {
   setCurrentPage(page);
 };

 return (
   <div className={styles.container}>
     <Head>
       <title>Create Next App</title>
       <meta name="description" content="Generated by create next app" />
       <link rel="icon" href="/favicon.ico" />
     </Head>

     <p>
       <strong>NextJS x Pagination</strong>
     </p>
     {data.map((item) => {
       return <p key={item.id}>{item.title}</p>;
     })}
    <Pagination
       items={data.length} // 100
       currentPage={currentPage} // 1
       pageSize={pageSize} // 10
       onPageChange={onPageChange}
        />
   </div>
 );
}

export const getStaticProps = async () => {
 const res = await fetch("https://jsonplaceholder.typicode.com/todos");
 const data = await res.json();

 return {
   props: { data },
 };
};
Then, we will destructure these four props in Pagination and use them for the pagination implementation:
import styles from "../../styles/Home.module.css";

const Pagination = ({ items, pageSize, currentPage, onPageChange }) => {
 const pagesCount = Math.ceil(items / pageSize); // 100/10

 if (pagesCount === 1) return null;
 const pages = Array.from({ length: pagesCount }, (_, i) => i + 1);
console.log(pages)

 return (
   <div>
     <div>Pagination</div>
   </div>
 );
};

export default Pagination;
The items will be divided by the pageSize and stored in a pagesCount variable. The Array.from() static method will be used to create a new Array instance from the pagesCount length, which is 10.
Let’s log the pages in the console and see what we have: ![]() Now, we can map over the
Now, we can map over the pages array and render the value (1-10) inside it. There will be an anchor element for each of the values where the onClick function will be implemented:
const Pagination = ({ items, pageSize, currentPage, onPageChange }) => {
 const pagesCount = Math.ceil(items / pageSize); // 100/10

 if (pagesCount === 1) return null;
 const pages = Array.from({ length: pagesCount }, (_, i) => i + 1);

  return (
   <div>
     <ul className={styles.pagination}>
       {pages.map((page) => (
         <li
           key={page}
           className={
             page === currentPage ? styles.pageItemActive : styles.pageItem
           }
         >
           <a className={styles.pageLink} onClick={() => onPageChange(page)}>
             {page}
           </a>
         </li>
       ))}
     </ul>
   </div>
 );
};

export default Pagination;
The styling of the pagination boxes will be done in the Home.module.css:
.container {
 padding: 0 2rem;
}

.pagination {
 display: flex;
 justify-content: space-between;
 align-items: center;
 list-style: none;
}

.pageLink {
 cursor: pointer;
}

/* pagination pageItem */
.pageItem {
 display: flex;
 justify-content: center;
 align-items: center;
 width: 2rem;
 height: 2rem;
 border: 1px solid #eaeaea;
 border-radius: 0.5rem;
 cursor: pointer;
}

/* pagination page item when active */
.pageItemActive {
 display: flex;
 justify-content: center;
 align-items: center;
 width: 2rem;
 height: 2rem;
 border: 1px solid #eaeaea;
 border-radius: 0.5rem;
 cursor: pointer;
 background-color: red;
}
Once we scroll down to the end of the posts data, we should see boxes from 1-10 being rendered. The onPageChange function is passed to the anchor element with the argument of page(1-10), so when any part of the box is clicked, it will set the current page to the page number clicked.
Remember, the onPageChange function in the index.js file:
 const onPageChange = (page) => {
   setCurrentPage(page);
 };
Now, let’s see what we have: 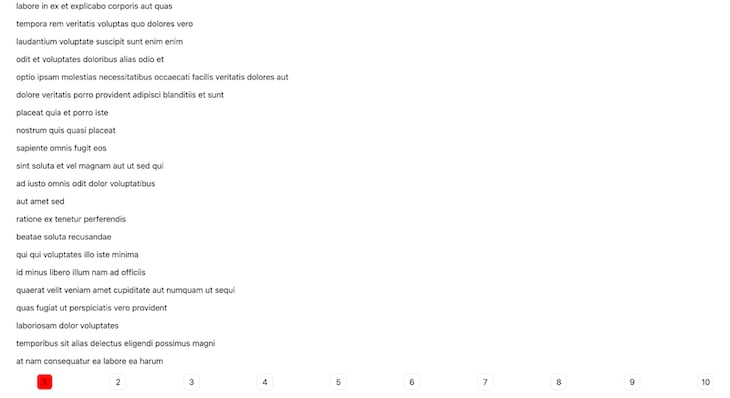
Adding the pagination helper function
Now, we have been able to implement the pagination in our app, but we still have 100 posts being rendered for the first page instead of 10. To implement this, we will create a helper function in the paginate.js file:
export const paginate = (items, pageNumber, pageSize) => {
 const startIndex = (pageNumber - 1) * pageSize;
 return items.slice(startIndex, startIndex + pageSize);
};
The paginate file will have three arguments: items, pageNumber, and pageSize. This function will be called in the index.js file and the argument will be passed as follows:
const paginatedPosts = paginate(data, currentPage, pageSize);
Here, the data is passed as the items, the array of data coming back from the API endpoint. The currentPage represents the pageNumber, and the pageSize is passed in as the pageSize.
In the pagination function, the startIndex is first extracted by subtracting the currentPage number from 1 and multiplying it by the pageSize(10). Then, we slice the items. This is the array of data from the startIndex that we got initially until we got the startIndex+ pageSize value.
For example, on the first page, the pageNumber will be 1, so startIndex will be: 1-1 * 10 gives 0.
Then, startIndex (0) + pageSize (declared in index.js as 10) will result in 10. So, the slicing starts from the Array length of 0 till 9.
Let’s log the paginatedPosts to the console to see what we have: 
We can check what we now have on the webpage: 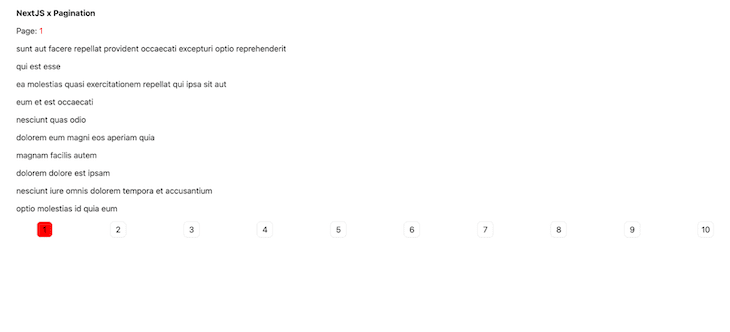 And, we can paginate through all the pages:
There we have it!
Conclusion
Thank you for reading! I hope this tutorial gives you the knowledge needed to add pagination to your Next.js app. You can customize the styling to your use case, as this tutorial majorly focuses on the logic of implementing the functionality. You can find this project's complete code in my repository and the deployed project on Vercel here. Happy coding!
LogRocket: Full visibility into production Next.js apps
Debugging Next applications can be difficult, especially when users experience issues that are hard to reproduce. If you’re interested in monitoring and tracking Redux state, automatically surfacing JavaScript errors, and tracking slow network requests and component load time, try LogRocket.

LogRocket is like a DVR for web and mobile apps, recording literally everything that happens on your Next app. Instead of guessing why problems happen, you can aggregate and report on what state your application was in when an issue occurred. LogRocket also monitors your app's performance, reporting with metrics like client CPU load, client memory usage, and more.
The LogRocket Redux middleware package adds an extra layer of visibility into your user sessions. LogRocket logs all actions and state from your Redux stores.
Modernize how you debug your Next.js apps — start monitoring for free.


Top comments (0)