
Written by Emmanuel Odioko✏️
The introduction of artificial intelligence tools, like ChatGPT, has had a tremendous impact on the tech community. AI helps intermediate developers evolve into experts and enables professional developers to develop features faster than ever. But, to use AI effectively, it’s essential to balance its power with careful use.
AI is not perfect; it will occasionally produce incorrect code. That’s why the technology’s true potential is best realized by developers who have good skills and a clear understanding of each tool’s limitations. Developers of this caliber will be able to easily spot and fix any mistakes that occur.
In this article, we’ll explain how you can extend VS Code using the Continue extension to seamlessly integrate and leverage the features of ChatGPT in your IDE. This reference guide covers the installation process and configuration settings for Continue, and explores practical use cases that may be helpful for optimizing your coding workflows.
Jump ahead:
- Prerequisites
- Getting to know Continue
- Installing VS Code
- Installing and configuring Continue
- How to use Continue
- Practical use cases for Continue
- Limitations
Prerequisites
In order to follow along with this tutorial, you should have the following:
- Working knowledge of software development and coding
- Foundational understanding of how VS Code editor works
- Familiarity with installing and configuring extensions within VS Code is beneficial, but not required
- Basic knowledge of ChatGPT and its capabilities is recommended, but not required
Getting to know Continue
The artificial intelligence market and the number of AI tools available for developers continues to grow exponentially. Many of these tools offer remarkable features and capabilities but often come with a hefty price tag to their services. This is where Continue stands out. Continue not only brings the features of ChatGPT directly to your IDE, enhancing your coding experience, it is also open source and free to use.
Developers who rely on ChatGPT, generally deal with a considerable amount of copying and pasting code between tabs. This process is manageable and enables them to get many tasks done faster, but being able to access everything directly within the code editor is a far better experience. I believe most developers will agree that integrating such convenience and efficiency into the workflow is highly beneficial, potentially boosting productivity and speed.
Installing VS Code
In this tutorial, we’ll use VS Code, a great code editor that offers support for development operations like debugging, task running, and version control. It is available for Windows, macOS, and Linux.
Follow the below instructions to install VS Code on Windows, macOS, or Linux operating systems:
Windows
- Navigate to the VS Code download page and download the installer for Windows
- Run the installer and follow the on-screen instructions to complete the installation
macOS
- Navigate to the VS Code download page and download the installer for macOS
- Open the downloaded file and drag VS Code into the
Applicationsfolder
Linux
- Navigate to the VS Code download page and download the .deb or .rpm package, depending on your distribution
- Open a terminal and navigate to the directory containing the downloaded package. To install VS Code, run
sudo dpkg -i .deborsudo rpm -i .rpm
Installing and configuring Continue
To install and configure Continue, complete the following four steps:
Step 1: Navigate to the VS Marketplace
To start the installation process, navigate to the Continue extension located in the VS Marketplace. You can do this by running the search “Continue” as shown below. From there, select the first option; this will lead you to the extension’s dedicated page within VS Code: 
Step 2: Confirm the installation
Once you reach the Continue extension page within the VS Code Marketplace, select Install to finalize the installation process. Upon a successful installation, the Continue logo will appear in the left sidebar of VS Code (see below): 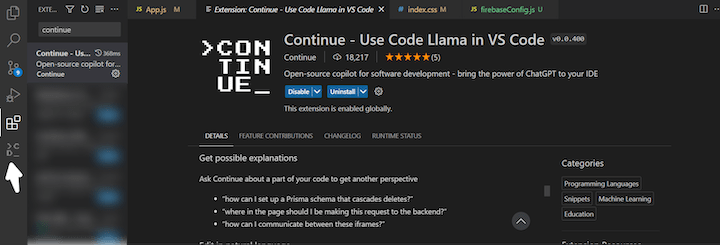
Access and utilize the Continue extension
To utilize the Continue extension, click on its logo. This action will activate the extension, enabling you to integrate and leverage the features of ChatGPT within your IDE: 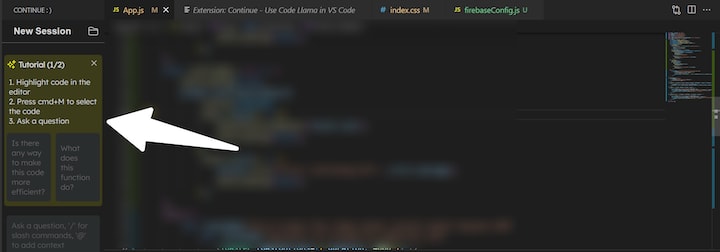
Troubleshoot and seek support
If you experience any difficulties during the installation, refer to the detailed troubleshooting guide provided by Continue. For further assistance and inquiries, consider joining the Continue Discord community, where you can interact with other users and receive faster support.
How to use Continue
Continue uses slash commands to generate code and execute edits. Here’s how it operates: slash commands serve as quick triggers, activated by preceding your input with a /. For instance, the inbuilt /edit slash command lets you channel modifications straight into your editor seamlessly.
Practical use cases for Continue
Continue leverages several features of ChatGPT, such as code writing and editing, error debugging, code review, and multiple program support. It is very effective when used to generate code, make edits, or give explanations, but you should proceed with some degree of caution.
LLMs sometimes provide inaccurate suggestions or invent syntax that doesn’t exist. It’s always best to double-check any suggestions that seem odd or are not working. Continue can assist with many tasks, especially those that are relatively straightforward and do not require multiple steps to complete. Let’s take a look at a few practical use cases.
Generating code
It’s easy to create use Continue to create React components, Python scripts, and more. Let’s take a look at an example.
We’ll use React for this example, so open your VS Code and run the following command in the terminal:
npx create-react-app Continue-todo app
Next, clean up your VS Code, as shown below: 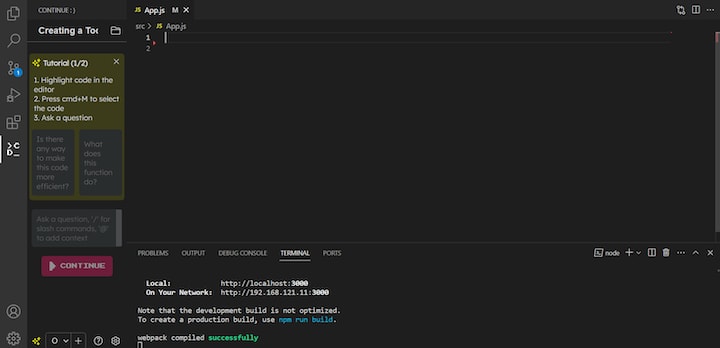 To utilize the power of Continue let’s prompt it to create a boilerplate and a functional
 todo application using the following prompt:
/edit react boilerplate and create a todo application afterward
Here’s what the application looks like:  In this example, Continue launches a new tab and builds the
 todo application. Once completed, it provides a detailed explanation about the app. Here’s the generated code:
import React, { useState } from 'react';
function App() {
const [todos, setTodos] = useState([]);
const [input, setInput] = useState('');
const handleAddTodo = () => {
setTodos([...todos, input]);
setInput('');
};
const handleDeleteTodo = (index) => {
const newTodos = [...todos];
newTodos.splice(index, 1);
setTodos(newTodos);
};
return (
<div>
<input value={input} onChange={(e) => setInput(e.target.value)} />
<button onClick={handleAddTodo}>Add Todo</button>
<ul>
{todos.map((todo, index) => (
<li key={index}>
{todo}
<button onClick={() => handleDeleteTodo(index)}>Delete</button>
</li>
))}
</ul>
</div>
);
}
export default App;
Next, you’ll need to decide whether to Accept All, Reject All, or make Further Edits to the code:**** 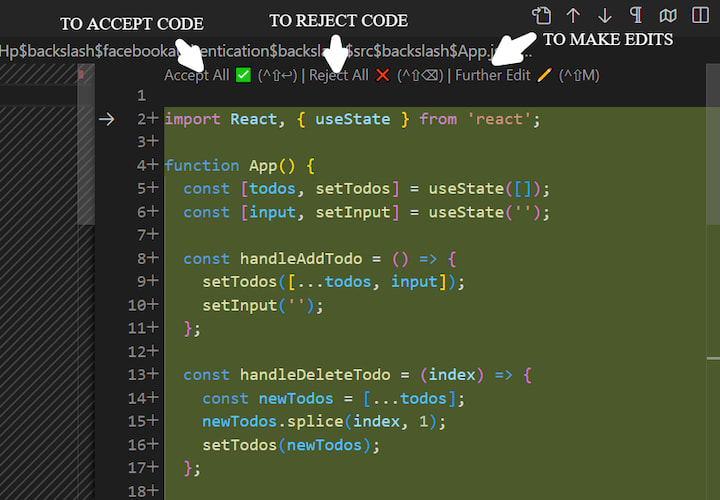 For this example, let’s select Accept All, and then execute the code using
 npm start. This enables us to operate the app in our browser at https://localhost:3000/.
Now we can use the Todo functionality to demonstrate the power of Continue for performing tasks: 
Making laborious edits
With Continue you can make laborious edits to components with ease. For example, let’s say we want the above code to use more descriptive function names, like so:
/edit Make this use more descriptive function names
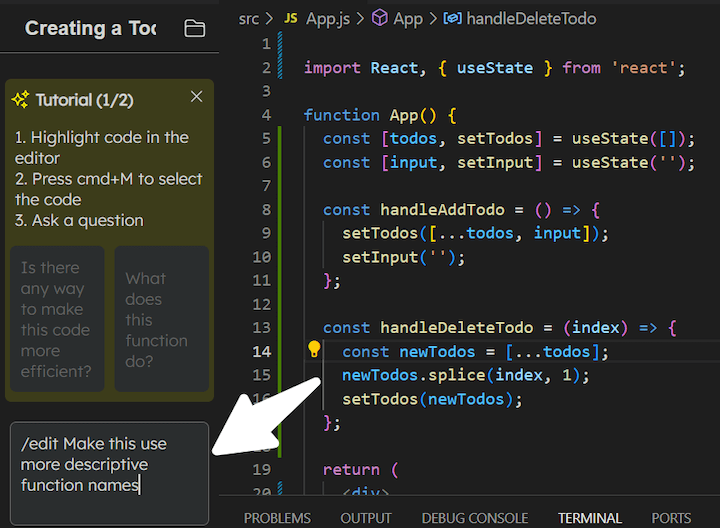 There was an update to this particular function:
//The Function
const handleDeleteTodo = (index) => {
const handleRemoveTodo = (index) => {
const updatedTodos = [...todos];
updatedTodos.splice(index, 1);
setTodos(updatedTodos);
};
newTodos.splice(index, 1);
setTodos(newTodos);
};
After giving the function a more descriptive name, there’s an error. Let's take a look at how we can use Continue to handle it.
Understanding complex code
Understanding how code works is helpful for optimization and debugging. It’s like having a guidebook to navigate through the complexity of a code base.
Continue helps break most code that may be too complex to understand. ChatGPT has provided this feature for some time now.
For example, the below code has an error: 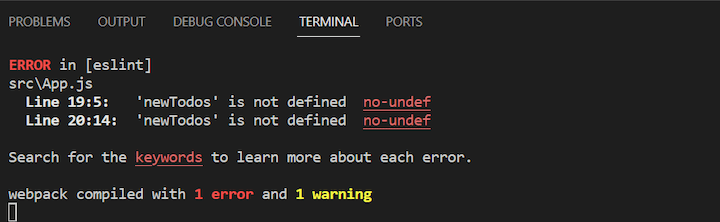 Now, ask Continue, "How does this code work?"
Here’s the resulting explanation:
This code is a function called handleDeleteTodo that takes in an index as a parameter. This function seems to be used to delete a todo item from a list of todo items.
The function handleRemoveTodo is defined inside handleDeleteTodo, but it is never called, so it doesn't actually do anything in this context.
The main functionality is provided by the last two lines of handleDeleteTodo. It assumes that there is a variable newTodos that is a copy of the original todos array. It uses the splice method to remove the todo item at the given index from the newTodos array.
Then, it calls a function setTodos with newTodos as a parameter. This is a typical pattern in React where setTodos is a state setter function from a useState hook. It updates the todos state with the new array which has the todo item removed.
However, this code seems to be incorrect or incomplete. It refers to newTodos which is not defined anywhere in the given code. It should probably be using updatedTodos from the handleRemoveTodo function or directly manipulating the todos array.
Here's a corrected version of the code:
const handleDeleteTodo = (index) => {
const updatedTodos = [...todos];
updatedTodos.splice(index, 1);
setTodos(updatedTodos);
};
This version creates a copy of todos, removes the item at the given index, and then updates the todos state with the modified copy.
In this example, Continue did an excellent job explaining how the code works, picking up on errors, and providing an immediate solution. Let’s try the solution to see if it works: 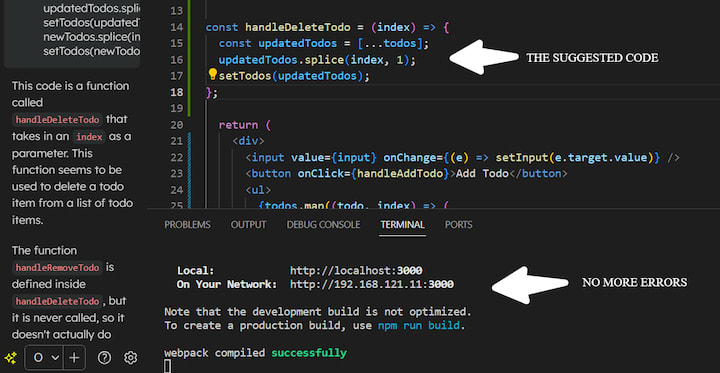 As shown above, the suggested solution was decent code and works.
Fixing highlighted code
In addition to asking about a particular block of code and getting an explanation and a suggested fix, there’s another way to use Continue for troubleshooting errors. Just highlight the code with Ctrl+Shift+M if you’re using Windows or Cmd+Shift+M if you’re on a mac, and ask Continue to fix the error.
Editing small files
In addition to fixing errors, Continue can also be used to improve small files. This feature works best if the file isn’t too large.
Just highlight the file using Ctrl+Shift+M if you’re using Windows or Cmd+Shift+M if you’re on a mac, and ask Continue to edit the file.
This feature is handy for making quick improvements. If you need to edit a large file, try breaking it down into smaller chunks and asking for improvements to the smaller pieces instead.
With this approach, it will be easier to manage and understand the changes made. Keep it simple, and you’ll find that Continue makes it a breeze to enhance your code!
Using context from other files
Continue lets you focus on modifying one file at a time, much as you would manually. If there are critical pieces of information located in different files that concern the task at hand, you can highlight those specific sections of code.
Continue will consider the highlighted sections from those files as additional context while making changes or suggestions, ensuring more accurate and relevant edits.
To see this in action, let’s use a sample code, which is available on GitHub, that’s an implementation of Google authentication with Firebase. Navigate to the App.js component:
App.js
import { auth, provider } from './FirebaseConfig';
import { useState } from 'react';
import { signInWithPopup } from 'firebase/auth';
const App = () => {
const [user, setUser] = useState(null);
const [error, setError] = useState(null);

const handleGoogleSignIn = async () => {
 //WHERE EDITS ARE TO BE MADE
};
const renderUserDetails = () => (
<>
<button className='btn btn-secondary btn-md' onClick={handleLogout}>
Log Me Out
</button>
<h3>Welcome Esteemed User {user.displayName}</h3>
<p>{user.email}</p>
<div className='photo'>
<img src={user.photoURL} alt="User Display Picture" referrerPolicy='no-referrer' />
</div>
</>
);
const renderLoginButton = () => (
<button className='btn btn-danger btn-md' onClick={handleGoogleSignIn}>
Sign In With Google Account
</button>
);
return (
<div className="wrapper">
<div className='box'>
{user ? renderUserDetails() : renderLoginButton()}
{error && <p className="error">{error}</p>}
</div>
</div>
);
};
export default App;
Now, let’s prompt Continue to generate a handleGoogleSignIn() function, telling it to refer to the FirebaseConfig.js component for additional context when making edits.
Highlighting provides Continue with additional context from other files, and focuses on specific methods or sections in your main file where the edits will take place. Here’s a visual representation of the prompt and the result: 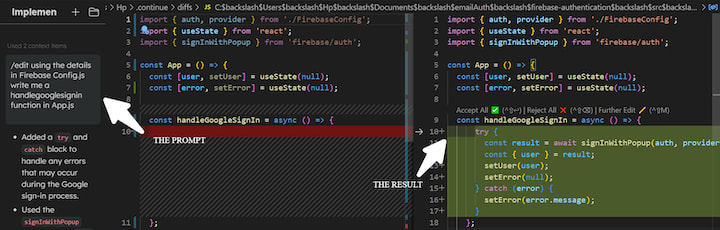 After accepting the suggested changes in this example, here’s the resulting code:
const handleGoogleSignIn = async () => {
try {
const result = await signInWithPopup(auth, provider);
const { user } = result;
setUser(user);
setError(null);
} catch (error) {
setError(error.message);
}
};
Here’s what a user will see in the browser:  Here’s what a user will see after signing in:
 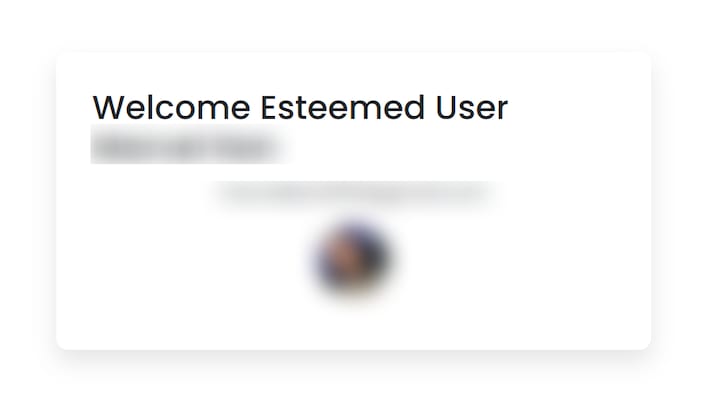 The code works perfectly fine!
Answering single-turn, open-ended questions
Continue has an inbuilt conventional pattern, so it relates to you almost as a human would. This makes sense, as it uses ChatGPT features. This feature enables users to converse with Continue, asking open-ended questions in a conversational manner.
Limitations
At the time of writing, Continue is still in beta, and has certain limitations beyond the occasional installation error mentioned earlier. It does not currently support in-depth debugging and is unable to perform edits across multiple files simultaneously, restricting edits to one file at a time.
It also struggles with highlighting excessively long lines of code. A practical solution to this last limitation is to simply break down the code into smaller chunks. This will enable you to more effectively leverage Continue for assistance.
Conclusion
Continue is a game changer for high development productivity. By leveraging its capabilities, developers can optimize their coding workflows and also elevate the overall development experience, achieving enhanced productivity and efficiency.
To read more about Continue, check out the official documentation.
A big thank you for reading this guide, Happy coding!
Get set up with LogRocket's modern error tracking in minutes:
- Visit https://logrocket.com/signup/ to get an app ID.
- Install LogRocket via NPM or script tag.
LogRocket.init()must be called client-side, not server-side.
NPM:
$ npm i --save logrocket

// Code:

import LogRocket from 'logrocket';
LogRocket.init('app/id');
Script Tag:
Add to your HTML:

<script src="https://cdn.lr-ingest.com/LogRocket.min.js"></script>
<script>window.LogRocket && window.LogRocket.init('app/id');</script>
3.(Optional) Install plugins for deeper integrations with your stack:
- Redux middleware
- ngrx middleware
- Vuex plugin

Top comments (1)
Thanks a lot, its very usefull for me!