
Written by Tharaka Romesh✏️
Routing is one of the essential aspects of single-page applications (SPAs), but because React doesn't come with a routing solution, React developers must integrate third-party libraries to implement routing into their applications.
There are several routing libraries available, such as React Router, which is one of the most popular libraries used for server-side or client-side React applications. Even though React Router was the go-to library used for routing, there are several limitations to it, such as:
- Search-based route matching
- Route data caching
- Route loader pre-fetching
To address these issues, React Query creator Tanner Linsley has developed a new routing library called React Location, which includes some neat features that make life easier for React developers.
What is React Location?
React Location is a powerful, enterprise-grade routing tool for React applications. React Location was built as a wrapper for the React Router v6 beta release that patched some limitations, but it has since evolved into a fully-fledged routing solution.
React Location offers asynchronous features that are not built into the other routing solutions:
- Promise-based data loaders
- Async route loaders
- Threshold-based pending route elements
- Post-render async loader APIs
React Location is inspired by full-stack React frameworks like Next.js and Remix, which come with built-in routing and offer a fresh take on concepts like data loader and search params.
Benefits of using React Location
React Location introduces some unique features that are incredibly helpful, which I’ll go into detail about below.
Data loaders
React Location offers a new method to execute asynchronous functions before rendering each route. You can use this method to fetch data using something like Axios, fetch, etc., from the server so the data will be available before rendering the component.
In a traditional application, you will need to fetch data after loading the route or rendering the component using a lifecycle method Hook like componentDidmount or useEffect. The data loaders will delay the loading of the route until the asynchronous functions execute.
React Location Devtools
Unlike React Router or any other React routing library, React Location provides Devtools, which enables you to visualize what happens behind the scenes of your application. In addition, this is quite helpful for debugging your application. To enable React Location Devtools, install the plugin and add the component to your React components tree.
Code splitting
Implementing code splitting with React Location is relatively easy. First, you need to pass a dynamic import of a React component as the element and define a loader for the component.
With react-router, you will need to install additional plugins like babel/plugin-syntax-dynamic-import and loadable-components or use the React experimental Suspense to achieve code splitting.
Search params
React Location unlocks the power of URL search params by enabling us to store states in the URL. React Location provides the ability to match, consume, and manipulate URL search params. As a result, the URLs are more shareable, can be bookmarked, and are more consistent.
Search params use the JavaScript JSON API (JSON.parse and JSON.stringify), which comes in handy when handling complex values and objects in the URL query parameters. React Location also allows you to use plugins like JSURL or custom methods (for stringifySearch and parse search API methods) to extend search param capabilities.
Even if you use a plugin or the default search param implementation, React Location will guarantee that search parameters will behave as an immutable object stored in your application's memory.
Nested routing
Defining nested routes is quite clear and easy to maintain.
Route Elements
After defining your routes and data loaders, you can render pages based on the state of your loader or routes. React Location allows you to handle or render your pages with:
-
Element: this renders the default component that you need to render when your route is matched -
errorElement: this allows you to render a component when there is an error with your route or with your data loaders -
pendingElement: this allows you to render a component when your data loaders are in action, making it ideal for rendering loading pages or loaders. It also comes with more properties that allow you to define how long you need to render the pending state component
Exploring the React Location API
Let's dive into the React Location API. If you are familiar with React Router, you’ll find that most of React Location's APIs look quite similar.
Router is the the root provider component that behaves similar to the provider component in React Router. Link will behave similarly to React Router’s link API but has more functionalities built within it, such as the ability to update search parameters and hash. It also supports events like “Open in new tab” and “Open in new window” and has an active prop, which shows that link is in an active state.
Navigate will navigate to the route upon render, and useNavigate behaves similar to the useNavigate API method in React Router, enabling you to navigate your application programmatically.
Next,useRouter is a Hook used to access the parent component's state or the <Route>. It returns the current transition state of location or the next transition state of location.
useMatchRoute returns relative and absolute paths against the current or pending route. If the paths match, it will return an object with the route params. This is helpful when finding a specific deep-route match and if a particular route is the next pending location when navigation occurs. useMatch returns the nearest route that has been matched and is used to get route params, route data, and the next child match.
useSearch lets you access the search parameters and state of the application's current route. First, you will need to define the pieces of information you need to gather by declaring a JSON object via the MakeGenerics API method. Then, in your React component, you can use useSearch with JSON to gather the details. This generic object is immutable from render to render, so we can use it to detect changes in the search params.
useResolvePath provides a function that we can use to check the path (returns the name) relative to the route where you invoke this. With this Hook, you can retrieve the name of the current, previous, child, or parent’s route name.
Finally, you’ll probably need usePrompt for a page that has forms, as it allows you to programmatically prompt a dialog to the user, like when a user starts to route to another route before submitting the form.
Best tools and plugins for React Location
React Location provides you the flexibility to use several plugins so you can extend its features. Here are some plugins that may come in handy for you when working with React Location.
- React Location Simple Cache provides you with the functionality to cache the data loader values of your routes, so, if you move through the same routes, it will maintain a cache and reduce load time. This plugin also provides features to deal with the cache, like fetch policies and manual cache invalidation
- React Location Devtools is one of the best and most unique features you can enable with this plugin, as it helps you visualize all the inner workings of React Location and makes it easy to debug the application
- React Location JSURL is useful when you need to extend the search params features. It uses JSURL, an alternative to JSON and URL encoding (or JSON and base64 encoding), and with it, you can easily pass complex values via URL query parameters
Building an app with React Location
Let’s see how to use React Location by building a React application. We will use the REST Countries REST API. First, let's create an application using create-react-app through the following command:
npx create-react-app react-location-router --template typescript
We will need several other libraries as well, including Material UI and Axios to build components fetch data:
yarn add axios @mui/material @mui/styled-engine-sc @emotion/react @emotion/styled
Let's create several components for our application: card, select, and navigation(HOC) components, and home, countries, country components. You can find the code example for them using the links provided. Now that we have several components, let's install React Location and configure the routes:
yarn add @tanstack/react-location
Now it's time to define the routes in App.tsx.
import { Outlet, ReactLocation, Router } from "@tanstack/react-location";
import Home from "./pages/Home";
import Error from "./components/error/Error";
import Countries from "./pages/Countries";
import Country from "./pages/Country";
import Loader from "./components/loader/Loader";
import Navigation from "./components/navigation/Navigation";
import { getCountries, getCountry } from "./services";

// Set up a ReactLocation instance
const location = new ReactLocation();

function App() {
  return (
    <Router
      location={location}
      routes={[
        { path: "/", element: <Home /> },
        {
          path: "countries",
          element: <Countries />,
          loader: async () => {
              let { data } = await getCountries();
              return {
                countries: data,
              };
           },
          pendingElement: async () => <Loader />,
          pendingMs: 1000 * 2, // 2 seconds
          errorElement: <Error />,
          children: [
            { path: "/", element: <div>Select Country</div> },
            {
              path: ":code",
              element: <Country />,
              loader: async ({ params: { code } }) => {
                let { data } = await getCountry(code);
                return {
                  country: data,
                };
              },
              errorElement: <Error />,
            },
          ],
        },
      ]}
    >
      <Navigation>
        <Outlet /> {/* Start rendering router matches */}
      </Navigation>
    </Router>
  );
}

export default App;
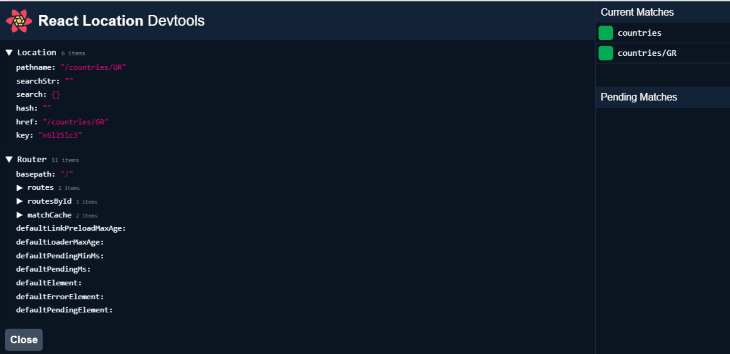
You can see the pending matches with the current matched paths, as well as the data provided through the data loaders. Now, let's access the data loader:
import { MakeGenerics } from "@tanstack/react-location";

export interface Country {
  name: {
    common: string;
    official: string;
  };
  borders: string[];
  population: number;
  cca2: string;
}

export type CountryGenerics = MakeGenerics<{
  LoaderData: {
    countries: Country[];
    country: Country;
  };
}>;
To access the data, we will use the MakeGenerics API and define the JSON object to retrieve the data that we want. In this example, the data we will fetch is an array of countries and a single object of country details. Let's consume the data inside the components using useMatch.
import { useMatch } from "@tanstack/react-location";

// hook should be called inside the functional component
const { data } = useMatch<CountryGenerics>();
We need to de-structure and access the properties to get the data:
let { countries, country } = data;
For ease of debugging, install the react-location-devtools plugin:
yarn add @tanstack/react-location-devtools
Next, configure and import React Location Devtools inApp.tsx.
import { ReactLocationDevtools } from "@tanstack/react-location-devtools";
Now add the ReactLocationDevtools component:
      <Navigation>
        <Outlet /> {/* Start rendering router matches */}
        <ReactLocationDevtools /> {/* enable Devtools */}
      </Navigation>
Open up your browser to see a small React Location logo at the left bottom of the screen.
![]()
Click it to see the routing details and how easy it is to debug your app.
Next, add some data caching as well through a simple cache plugin. You can install it with the following command.
yarn add @tanstack/react-location-simple-cache
Let's configure the simple cache now by importing it and initiating a cache instance.
import { ReactLocationSimpleCache } from "@tanstack/react-location-simple-cache";

// Set up a ReactLocation SimpleCache instance
const routeCache = new ReactLocationSimpleCache();
We will define a cache expiration/invalidate time as well.
{
          path: "countries",
          element: <Countries />,
          loader: routeCache.createLoader(
            async () => {
              let { data } = await getCountries();
              return {
                countries: data,
              };
            },
            {
              maxAge: 1000 * 10, // 10 seconds
            }
          ),
  …..
}
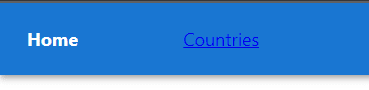
Let's see how we can navigate through the Link component and useNavigation..
Let’s use the Link component in our Navigation(HOC), which will comprise a navigation bar with several links.
import React from "react";
import AppBar from "@mui/material/AppBar";
import Grid from "@mui/material/Grid";
import Toolbar from "@mui/material/Toolbar";
import { Link } from "@tanstack/react-location";

const getActiveProps = () => {
  return {
    style: {
      fontWeight: "bold",
      color: "white",
      textDecoration: "none",
    },
  };
};

const Navigation = ({
  children,
}: {
  children: React.ReactNode;
}): JSX.Element => {
  return (
    <Grid container spacing={4}>
      <Grid item xs={12}>
        <AppBar position="static">
          <Toolbar>
            <Grid container spacing={1}>
              <Grid item xs={1}>
                <Link
                  to="/"
                  getActiveProps={getActiveProps}
                  activeOptions={{ exact: true }}
                >
                  Home
                </Link>
              </Grid>
              <Grid item xs={1}>
                <Link to="countries" getActiveProps={getActiveProps}>
                  Countries
                </Link>
              </Grid>
            </Grid>
          </Toolbar>
        </AppBar>
      </Grid>
      <Grid item xs={12} />
      <Grid item xs={12}>
        {children}
      </Grid>
    </Grid>
  );
};

export default Navigation;
If you look closely, you can see that we have defined getActiveProps with some style properties that help us identify the current route.
You can go through the full demo project source code through this GitHub repo or play around with the deployed link.
React Location vs. other React routing solutions
React Location and React Router have many similarities, but React Location offers many features that provide a better developer experience. Here is a detailed feature comparison of React Location with React Router and Reach Router:

Conclusion
React Location is an excellent routing solution for React applications. With features like advanced search params, dev tools, code splitting, route loaders, and async routes, React Location is a worthy alternative to React Router.
You can easily integrate React Location with external caches and storage like React Query, Apollo, SWR, and RTKQuery. The only downside of React Location is that it doesn't support SSR route matching or loading and hydration yet, but these features will be available soon.
React Location certainly needs more attention in the React community. React Location also has a grooving community you can find on StackOverflow, Discord, and GitHub discussions. Finally, I invite you all to try out React Location and see how fantastic a routing solution is.
Full visibility into production React apps
Debugging React applications can be difficult, especially when users experience issues that are hard to reproduce. If you’re interested in monitoring and tracking Redux state, automatically surfacing JavaScript errors, and tracking slow network requests and component load time, try LogRocket.

LogRocket is like a DVR for web and mobile apps, recording literally everything that happens on your React app. Instead of guessing why problems happen, you can aggregate and report on what state your application was in when an issue occurred. LogRocket also monitors your app's performance, reporting with metrics like client CPU load, client memory usage, and more.
The LogRocket Redux middleware package adds an extra layer of visibility into your user sessions. LogRocket logs all actions and state from your Redux stores.
Modernize how you debug your React apps — start monitoring for free.


Top comments (0)