
Written by Josh Collinsworth ✏️
A while back, I built a little liquid unit conversion app in CodePen to convert between ounces, teaspoons, cups, etc. I didn’t think anyone would actually use it in real life — it was mostly just for fun and learning with Vue:
But, surprisingly, I’ve found the app quite useful. As I began cooking and mixing cocktails at home over the last couple of years (you know why), I found myself repeatedly reaching for that handy liquid converter app.
There was just one problem, though: accessing the app on my phone was a pain. I could bookmark it, sure, but that experience wasn’t great, and it didn’t seem that much better than just Googling what I needed. There were plenty of great alternatives, of course, but they just weren’t as much fun as using something I’d built.
I found myself wishing my CodePen app was an actual app that lived on my phone, and that I could pull it up as easily as, say, tapping Twitter or Slack.
There’s good news: this is very doable, thanks to progressive web apps!
What is a progressive web app?
Defining the term progressive web app (PWA) in detail would be enough for its own post (or even its own book), but to briefly hit the highlights: a progressive web app is a website with features that make it look, feel, and behave like a native app.
Essentially, it’s an enhanced website! How? Unlike traditional websites, you can install a PWA on your device. You can even prompt users to install your PWA when they visit your site, as shown in this screenshot from Quina, my word game app, which is also a PWA (and also built with Vue):
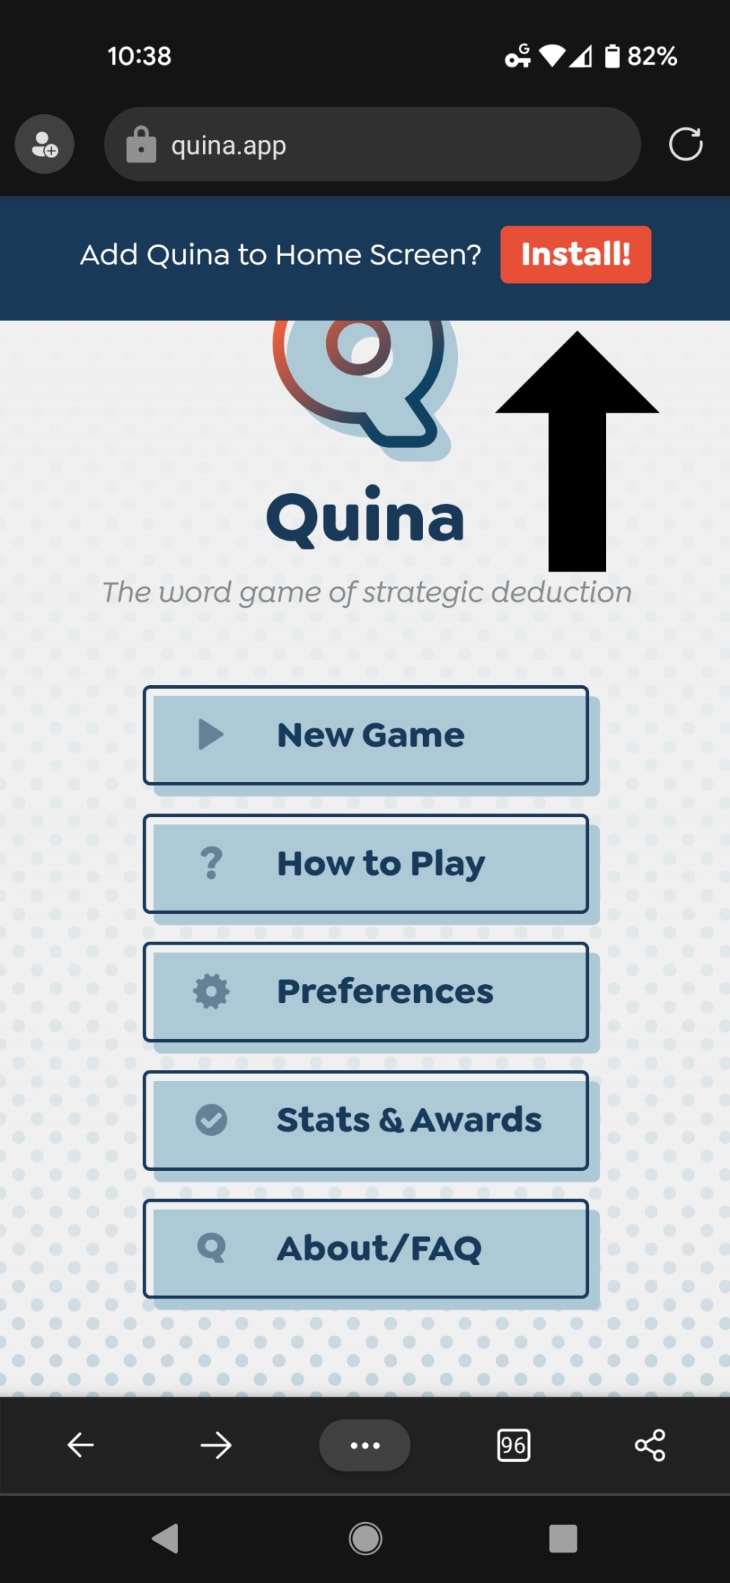 You can prompt a user to install your PWA as soon as they visit the URL.
Once the PWA is installed, you can open it with an icon from your dock or home screen, just like a native app.
![]() Once installed, a PWA will show up alongside all the rest of your apps.
Once installed, a PWA will show up alongside all the rest of your apps.
Once opened, a PWA becomes a standalone, full-screen experience instead of opening in the device’s browser, just like a native app would. Notice the custom status bar color. Nifty!
 A PWA opens in its own fullscreen window — no browser bar, just like a native app!
Progressive web apps can run even while the device is not connected to the internet, and can store their own data locally on the device.
Thanks to recent improvements to browser APIs, PWAs are even capable of things like device vibration, accessing the device’s camera and Bluetooth connections, and even creating push notifications. (It should be noted that iOS restricts several features, however, including push notifications. One bad Apple, as they say.)
Any website can be a PWA. Despite the name, it doesn’t actually have to be what you might call an “app,” exactly. A static blog, one-pager, an eCommerce store, or a simple brochure site could be a PWA. Twitter and Starbucks are among companies offering a PWA experience.
It doesn’t matter how the site was built, either. Many PWAs are made using modern JavaScript frameworks (like Vue, which we’ll be focusing on here), but that’s just because they’re convenient.
When it comes to PWAs, there’s nothing special about Vue specifically, or even frameworks in general.
To put it simply: if it loads in a browser, it can be a progressive web app.
That groundwork laid, let’s talk specifically about how to build a PWA with Vue, one of my personal favorite tools for web development.
How to turn an app into a PWA using Vue.js
PWAs have a few requirements, including:
- A JavaScript service worker (to allow the site to load offline and store data locally)
- A valid JSON manifest of the app’s info, with the correct info filled in
- A set of properly named icons, at multiple sizes
- A secure, HTTPS connection
Most hosts provide SSL certificates for free these days (many even do so automatically), so we won't go into the HTTPS requirement here. That should be the easiest part.
The rest may not sound like a lot, but there’s a good deal of boilerplate that goes into creating all of that stuff, both in terms of the files and the code itself. If you were to go about it manually, it would be a tedious task, to say the least.
Fortunately, there’s an easier way with Vue, thanks to Vue CLI!
Vue CLI offers a convenient PWA plugin, and, even better, it can be added to an existing or new project.
Adding the PWA plugin to an existing Vue project
If you’d like to turn an existing Vue project into a PWA, the plugin to do so can easily be installed on its own. The command to install the PWA plugin (assuming you already have Vue CLI installed) is simply:
vue add pwa
Run this on the command line in your project folder, and Vue CLI will install all the files and config you need to transform your project into a progressive web app.
The original project doesn’t even need to be created with Vue CLI, although you may need to make some adjustments, depending on your project structure.
If you’ve run that command successfully in an existing Vue project, you can skip ahead past the next section, and we’ll talk about what the plugin actually did and how to customize it after that.
Note that if your original project is built with Nuxt (a Vue meta-framework), you have a better-suited solution readily available in the Nuxt PWA module. Nuxt and its ecosystem of plugins are a bit much to tackle in the scope of this post, but the same PWA general principles we’ll cover here apply there, too. The difference is how the config options are entered. So, while the concepts translate, if you’re using Nuxt, I’ll refer you to the Nuxt PWA module docs for the details.
Creating a new project with Vue CLI
First, install Vue CLI.
npm install -g @vue/cli
# OR
yarn global add @vue/cli
With Vue CLI installed, enter this command in your terminal (the name my-vue-pwa can be changed if you prefer):
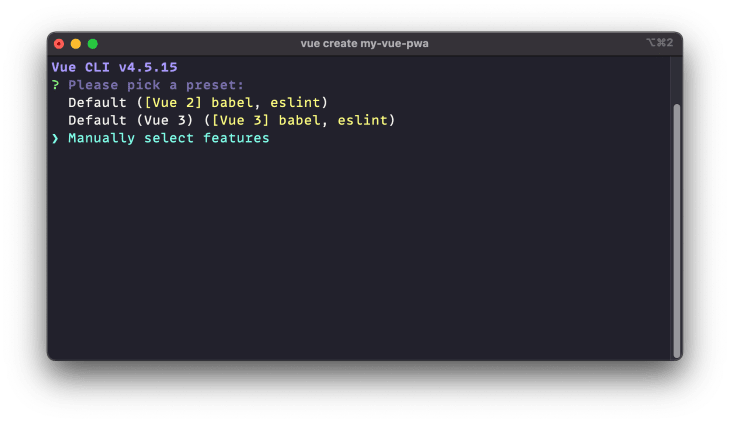
vue create my-vue-pwa
You should see a prompt asking what kind of project you’d like to create:
Choose Manually select features, and you’ll see a list of à la carte options for your new app, including Progressive Web App (PWA) Support.
Use your arrow keys to move down to that option, and press space to enable it. You can also add or remove other features if you like, but other than the PWA option, I’ll be sticking with the defaults shown.
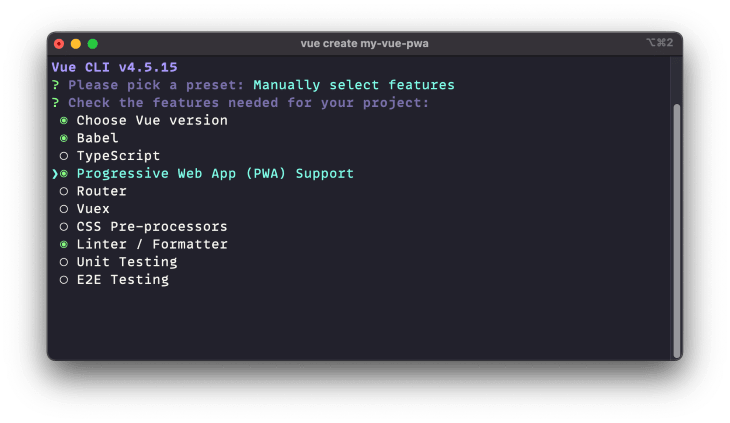 Be sure the Progressive Web App (PWA) Support option is checked.
Hit enter when you’re happy with your choices, and you’ll be prompted to choose Vue 2 or 3. Go with whichever you prefer.
Vue CLI will then ask you a few more questions about your project, and unless you have a reason not to, I’d recommend using the default for each one. When the installation is finished, you should see something like this:
 Our Vue project has been successfully created.
Now that we have our project set up, let’s open the project folder in VS Code (or your preferred text editor).
How the Vue PWA plugin works
When you peek at the folders and files in the project Vue CLI generated for us, you’ll see a file named registerServiceWorker.js. As the name implies, this file will help to create a service worker, which will store the site’s data locally.
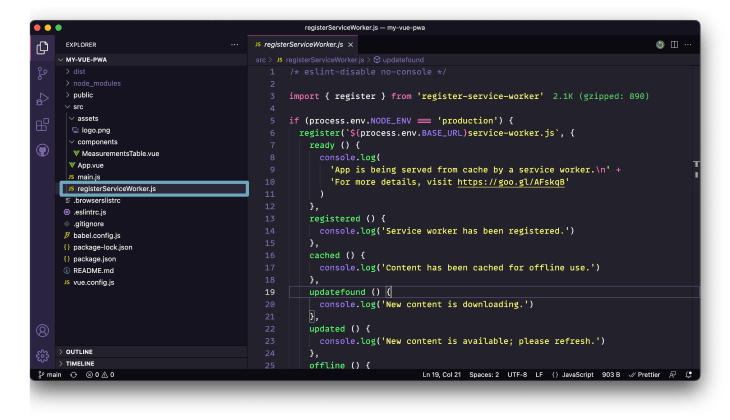
The actual service worker is created automatically during the build step, but you can see some of the work that Vue CLI did for us when we chose the “progressive web app” option.
This means we won’t see our service worker during development, which is actually a good thing. Service workers do much more to get in the way than to be helpful during the development process, as they serve cached files aggressively rather than show our most recent changes.
That being the case, let’s talk about how to actually see and use our PWA, as a user might.
Testing a PWA
For building the actual code of our app, Vue’s default npm run serve will serve us well (pun fully intended). While developing our components, code, and the functional bits of the app itself, this will continue to be our go-to.
Both the service worker and manifest file—critical to PWA functionality—are generated during the production build, and not fully functional in the dev environment. To get around this, we’ll need to build the site, then serve it.
You can do this with a host like Netlify, Vercel, or Render. It’s perfectly viable to commit, push, and wait for the build to go live in order to see and interact with it.
With an app this simple, the build should take less than a minute. There’s also one unique upside to this method: you get an SSL certificate installed for HTTPS connection automatically.
That said: I usually prefer to build and serve locally. It’s faster and won’t cost you any build minutes on a host. This command will handle both in one line:
npm run build && npx http-server dist
Run that (you may be prompted to click y to approve temporarily installing the http-server package), and you’ll have a local domain ready to use to access your built site locally:
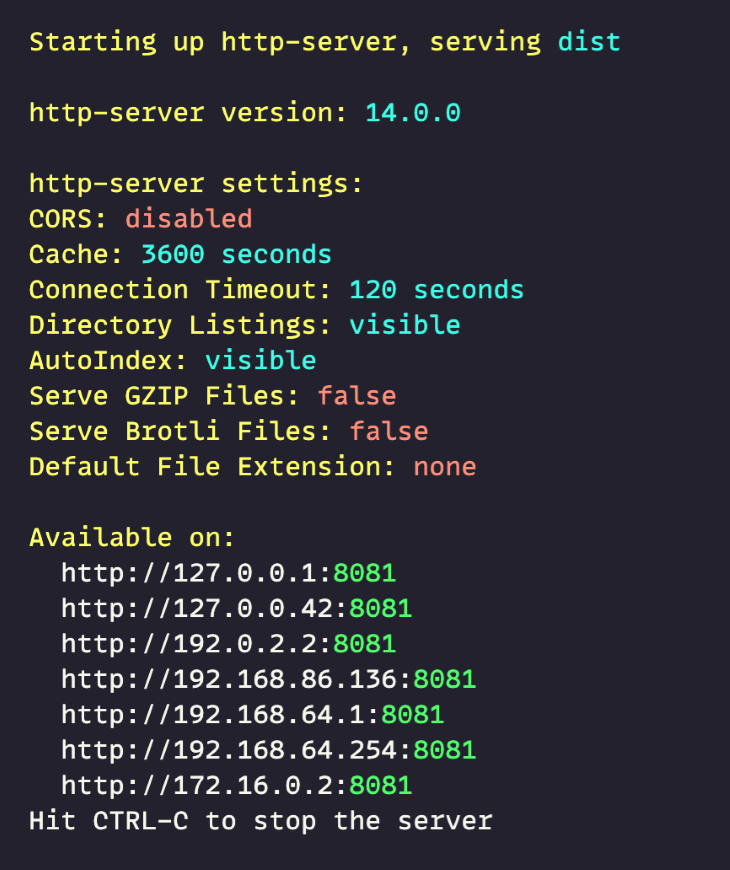
Note: there are many HTTP server packages available. I like
http-serverfor this purpose because, as you can see, it gives you a range of IPs and ports to use, so that if you’re running into caching issues on one, you can try another. But you’re welcome to use another package (and/or install the one you’re using permanently, rather than usenpxevery time).
Let’s open the first IP address in our browser. You can command-click in VS Code on Mac, control-click on Windows, or just good ol’ copy and paste.
If you open the site in Chrome, you might notice you can install the PWA from the browser bar now.
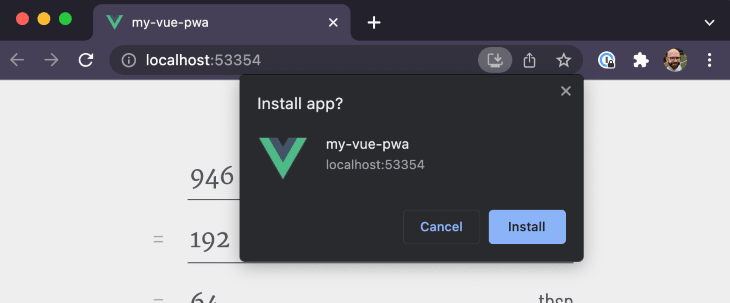
(Sadly, Firefox and Safari only support PWAs on Android and iOS, not on desktop.)
Go ahead and click Install. Your app will be installed and will open in a new standalone window.
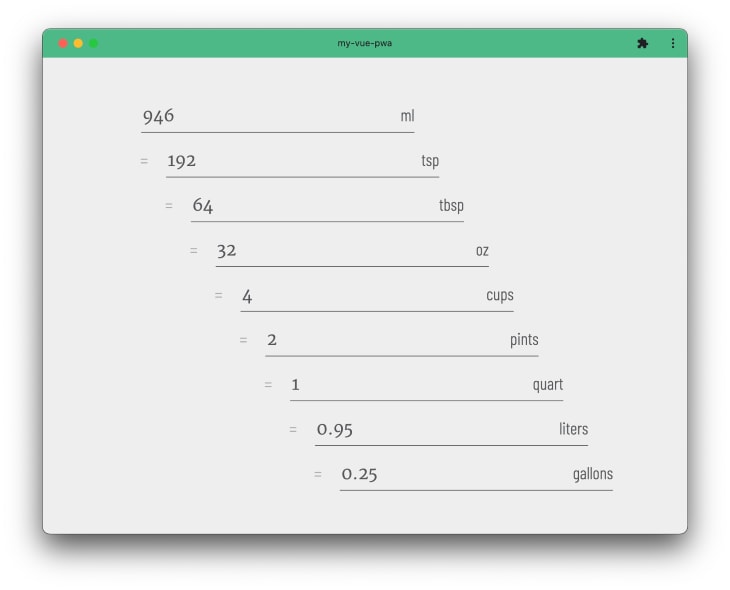
Notice that our PWA window looks just like an app window, and, if you look in your dock, you’ll see our app’s default Vue logo:
![]()
Pretty cool, right!?
The PWA can just as easily be installed on a tablet or smartphone as well and will load the same way there.
One word of warning: as long as you’re looking at the built production site in the browser, the service worker will kick in and cache assets pretty aggressively. Develop with the Network tab open and the Disable Cache checkbox checked.
I’d also recommend checking Application > Service Workers > Update on reload in Chrome, as shown.
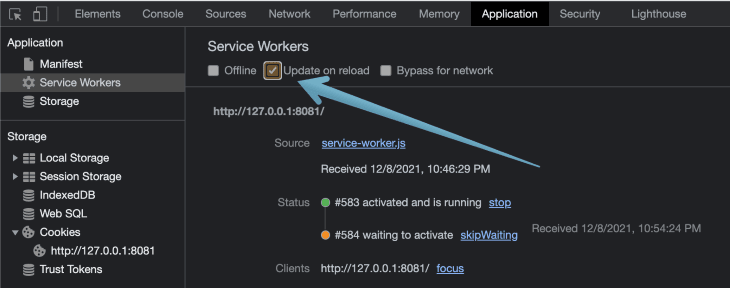 Be sure to configure your site’s service worker to avoid caching issues.
If all else fails, you can force a refresh by updating or unregistering the service worker from the same panel in the browser’s dev tools.
Finally, one last important thing to mention about service workers: they’re a complex topic all on their own. While the PWA plugin sets one up for us, it’s filled with standard defaults and may not be ideally configured for your app’s needs.
Customizing our PWA in Vue
The PWA plugin’s defaults are serviceable, but let’s customize our app’s colors and logo.
To override the defaults in our web app manifest, we’ll need to set up a vue.config.js file in the root of our project. You can check out the PWA plugin documentation for full details, but whatever is defined in our vue.config.js file will take precedence over the PWA plugin defaults and override them.
According to the docs, you can also define these settings in the project’s package.json file, but I find JavaScript a bit easier to write, and less syntactically strict than JSON.
The PWA plugin documentation has a full list of all the properties you can control, but there are a few worth highlighting.
Check out pwa.name, and pwa.themeColor, both found under the Config heading. Here’s a screenshot from the docs for reference:

Notice the defaults here. It’s handy to know what options will apply when we don’t choose anything. (In the cases above, the name field from package.json and Vue green.)
Go ahead and create a file named vue.config.js in the root of your project. Open it and add code, like so:
module.exports = {
  // ...Other Vue config options here, possibly
  pwa: {
    name: "Liquid Measurement Converter",
    themeColor: "#ffd100"
  }
};
Now, if we re-run our build and serve script, we can re-install the PWA. We should see our new title and theme color reflected.

Notice there are some required fields in the manifest — the PWA plugin just handles them all for us. Having a short name for your app (that’s just a handful of characters) is probably a good idea; “Liquid Measurement Converter” would be too long in some cases.
There are also other color options that are worth adjusting; again, see the plugin docs for more details.
Adding custom PWA icons
There’s one other nice thing the PWA plugin took care of for us: it generated a set of icons for our app in public/img/icons:
![]()
The names and sizes of these icons are important. Various browsers and operating systems will search for these icons to help identify our PWA.
We also have some control of our icon via our web app manifest. To change the icon we want our PWA to use, we need to add an icons property to the pwa options object inside of vue.config.js.
Here’s what the default looks like, just for reference:
module.exports = {
  // ...Other Vue config options here, possibly
  pwa: {
    // ...Other pwa config options
    icons: {
      favicon32: 'img/icons/favicon-32x32.png',
      favicon16: 'img/icons/favicon-16x16.png',
      appleTouchIcon: 'img/icons/apple-touch-icon-152x152.png',
      maskIcon: 'img/icons/safari-pinned-tab.svg',
      msTileImage: 'img/icons/msapplication-icon-144x144.png'
    }
  }
}
Anywhere our app is referenced in the UI, these icons will serve as our app’s logo. These will be used as favicons, app icons, status bar indicators, etc.
And again, just to emphasize: a PWA will not be installable if it doesn’t have the right icon files. Icons must be in the correct place, and named correctly, for universal support.
Fortunately, the PWA plugin already added all the icons we need. All we need to do is replace each image with an identically sized and named icon of our choosing.
There are several browser-based PWA icon generator tools available if you’d like to make one version and automate the rest. I found realfavicongenerator.net to be the most useful of these tools. Ideally, the original should be 512px by 512 px, as that’s the largest any OS or browser might use.
It may be helpful to know that after a build, you can open dist/manifest.json in your text editor (or visit /manifest.json in the browser window) to get a first-hand look at the manifest file the Vue PWA plugin is generating for your project, just to be sure what’s going into the vue.config.js file is coming out the other end correctly.
Other PWA options with Vue
There are several other config options available. Browse the list of options in the PWA plugin docs to get a sense of what’s possible.
When in doubt, I’d recommend sticking with the defaults unless you have a compelling reason to make a change. The documentation does a good job of linking to explainers where things get complex, too.
Prompting the user to install a PWA
Users can install a PWA directly from their browser (depending on the browser and OS), but the option is generally not highly visible. If we actually want users to install our PWA, then we should make it easy to do so.
Browser vendors are conscious to prevent annoying abuse of the PWA prompt, so there’s a specific way to accomplish this. Here’s a post on how to provide your own in-app install experience, but we’ll tailor the approach specifically for Vue.
We’ll wrap the code up in a Vue component that can be dropped into any PWA project:
<!-- PWAPrompt.vue -->
<template>
  <div v-if="shown">
    Add app to home screen?

    <button @click="installPWA">
      Install!
    </button>

    <button @click="dismissPrompt">
      No, thanks
    </button>
  </div>
</template>

<script>
export default {
  data: () => ({
    shown: false,
  }),

  beforeMount() {
    window.addEventListener('beforeinstallprompt', (e) => {
      e.preventDefault()
      this.installEvent = e
      this.shown = true
    })
  },

  methods: {
    dismissPrompt() {
      this.shown = false
    },

    installPWA() {
      this.installEvent.prompt()
      this.installEvent.userChoice.then((choice) => {
        this.dismissPrompt() // Hide the prompt once the user's clicked
        if (choice.outcome === 'accepted') {
          // Do something additional if the user chose to install
        } else {
          // Do something additional if the user declined
        }
      })
    },
  }
}
</script>
Now we need to import and use that component in our app wherever we want the prompt to show up, and it will take care of the rest for us.
We don’t have to do anything if the user clicks install; the browser handles that. We wait for the browser to fire the default beforeinstallprompt event, intercept it, and show our more visible prompt instead.
We can do something extra in the if/else above if we want to log the result, for example, or show another message, but we don’t have to.
We cannot force the prompt again, however, or create any other way for the PWA to be installed. The browser has full control over when that functionality can be used.
Note: I didn’t include any styles with this component; just the minimal functional bits. Here’s a guide to various approaches and best practices for the prompt.
Troubleshooting your PWA
If you’re having issues getting your install prompt to show up — or getting your PWA validated — here are some things to double-check.
Is your PWA loading over HTTPS?
PWAs require a secure HTTPS connection (unless loading locally).
Do you have a manifest?
You should be able to visit /manifest.json at your PWA URL and see it loaded in the browser.
Are there image 404s in the console?
If your PWA doesn’t have the right images named the right things in the right sizes and in the right place, it may not be installable. The console in dev tools should show errors if that’s the case.
Do you have a service worker?
The PWA plugin takes care of this for us, but it’s still worth verifying you see the worker loading. You should be able to see a service-worker.js file being loaded in the Network tab or see it registered in Application > Service workers in dev tools.
Is your service worker running?
If you’re dealing with changes not showing up as expected, you might need to try an incognito window, disable caching, and/or unregister the service worker in dev tools.
Is your prompt code correct?
Check the previous section to verify your prompt code is doing everything it needs to.
Does your current browser and OS support PWAs?
Remember, Firefox and Safari don’t support PWAs on desktop. iOS also restricts some PWA features, but PWAs should still be installable on iOS. Here are the install criteria for Chrome.
Conclusion
I went through the steps outlined in this article to convert the liquid measure conversion CodePen project to fully fleshed-out PWA.
You can see the finished product at vlmc.netlify.app. I made some noticeable adjustments from the original UI format to make it more friendly to use on a mobile phone, but the general idea is the same.

Here’s the finished GitHub repo, and here’s my finished PWAPrompt component, specifically, if you’d like to yoink it for your own repurposing. Just be sure to adjust the code as needed.
Personally, I had fun converting this project to a PWA, and I was re-energized by the possibilities PWAs offer along the journey. Progressive web apps are powerful, amazing, and exciting! I hope you’re inspired to try out the tech for yourself on your own project.
Experience your Vue apps exactly how a user does
Debugging Vue.js applications can be difficult, especially when there are dozens, if not hundreds of mutations during a user session. If you’re interested in monitoring and tracking Vue mutations for all of your users in production, try LogRocket.
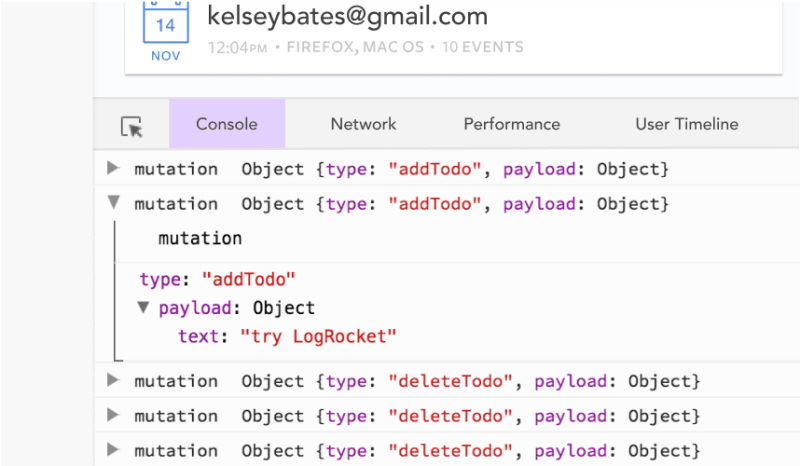
LogRocket is like a DVR for web apps, recording literally everything that happens in your Vue apps including network requests, JavaScript errors, performance problems, and much more. Instead of guessing why problems happen, you can aggregate and report on what state your application was in when an issue occurred.
The LogRocket Vuex plugin logs Vuex mutations to the LogRocket console, giving you context around what led to an error, and what state the application was in when an issue occurred.
Modernize how you debug your Vue apps - Start monitoring for free.


Top comments (1)
Vue-cli is set to maintenance mode and not recommended for new projects. HAve you plans to update your article to vitejs + vue3? Thank you in advance.