
Written by Lewis Cianci✏️
The new signals feature introduced in Angular 16 is an exciting update to how we handle async operations. However, observables already exist in Angular — so why should we care about signals?
As developers, we kind of have a love/hate relationship with learning new things. It’s great when new updates, features, or software can help us solve problems and code better. On the other hand, with so much software development information already out there, learning yet another new thing can be overwhelming.
It’s critical to get straight to the point about why something matters so we can avoid missing out on the possible benefits. Let’s do that now by exploring why signals and observables each exist in Angular, along with how and when to use each.
Understanding the role of signals and observables in Angular
The first question we have to answer is, what issues do signals and observables set out to solve? And the answer is simple: asynchronous operations.
Sometimes, when we request data or carry out an operation, the result may change over time. When this happens, we can refer to the source of these events as the emitter. When the emitter updates the value, subscribers can receive the new value.
To make it easier for us to understand, let’s consider a practical example. Imagine that our application receives real-time data from a WebSocket. In this simple example, it simply receives an incrementing number every second.
Over time, the WebSocket could emit the following data:
- No data (Connecting to WebSocket)
- Data received (1)
- Data received (2)
- Data received (3)
- Error (due to network disconnection or equivalent)
In all of the above cases, we need to tell our user what’s going on with the connection, what data has been received, and if any errors occurred along the way. This information allows the user to decide whether to try again or not.
For a long time, the only way to achieve this within Angular was to use an observable or something that implemented an observable. Usually, we could accomplish this with the “async pipe,” where an observable could be called like so and the bound variable within the template would update over time:
{{observableVariable | async}}
Now, with signals, using asynchronous data has changed. We should understand the differences between signals and observables, to make the best choice as to what to use within our application.
How Angular observables work
The Angular documentation describes observables as a technique developers can use for things like:
- Event handling
- Asynchronous programming
- Handling multiple values emitted over time
Observables don’t come from within Angular itself; rather, they are supplied to Angular by RxJS. An observable can emit more than once over time, so what do you do if you want to combine multiple emitters? What if you want to consolidate results from more than one source?
All of this is possible within RxJS, but none of it is necessarily easy. Even the Angular team admits that "RxJS has a steep learning curve and sometimes bewildering behavior.”
Processing signals occurs through the pipe operator in RxJS. The idea is that you can put emitted values through the pipe and set up a chained list of operators to massage the values as required.
This is very powerful, but given the sheer number of operators available, it’s also easy to reach for the wrong operator. Another common pitfall is unnecessarily chaining together too many operators, which can make code hard to read.
Simply put, observables can be very powerful, but they can also be easy to get wrong. Also, if they’re not cleaned up properly, they can introduce other problems like memory leaks. They are used within both the app’s UI and services to process and manage asynchronous operations.
Observables emit values over time, but they can also emit errors, or emit that they have completed.
Long story short — observables are very powerful, and there’s nothing inherently wrong with them. However, given how many operators exist and how complex the operations can be, they can be easy to get wrong or to use incorrectly.
Where Angular signals enter the picture
Let’s think about a simple value in our code. Imagine we want to have a variable, and we want to set the variable value to 0. That’s as simple as the following:
let theValue = 0;
We can reference this variable as much or as little as want to. But within the context of reactive applications, there’s a small wrinkle. This value isn’t reactive — we don’t know when it has been set or updated.
Signals, introduced in Angular 16, set out to resolve this problem. They are a wrapper around a value that can notify interested consumers when the value changes.
Compared to observables, signals are much simpler to create and use, so they make sense for a wide range of asynchronous operations within Angular. However, they don’t have the same power and flexibility as observables. Considering that RxJS can have “sometimes bewildering behavior”, this isn’t necessarily a bad thing.
Signals are mainly used within the UI and can have their value changed entirely via set or have their value updated based on a previous value with update.
Creating a signal is as simple as the following:
intSignal = signal(0)
To change the value, you can rewrite the Signal like so:
intSignal.set(2)
Otherwise, if you need to update the signal based on the existing value, you can do so like this:
intSignal.update((value) => value + 1)
Because signals are reactive, our application’s view will update when they are updated, and other signals that depend on this signal will update as well. That’s where computed signals come into play.
Instead of using pipes to manage data, signals use computed signals to define signals that update based on the behavior of other signals:
intSignal = signal(0);
computedSignal = computed(() => intSignal() * 2);
Then, let’s say we wanted to reference intSignal and computedSignal from within our template. Whenever we updated intSignal, we would see that computedSignal changes in value as well.
Perhaps predictably, we can’t set the value of a computed signal directly, as it will only ever have the value that the dependent signals give to it.
Long story short — signals exist as a newer and more efficient way of making a UI responsive and reactive. Connecting multiple signals via computed is much easier than using an observable to do the same.
Should we use signals or observables — or both?
Whenever something new comes out, it can be tempting to abandon the old thing and run to the new thing. The reverse can also be true, where we never want to change what we’re doing because we’re used to how things used to operate.
So, in this case, what should we do? Well, the answer is to continue using observables within our services in Angular, but also consider using signals in component logic and templates.
To show the strengths of both observables and signals, let's make a simple app that reports on the temperatures within the rooms of a house. Normally, these temperatures would not update very frequently, but for this example, we’ll speed it up over a day.
Our app will look like this at the end: 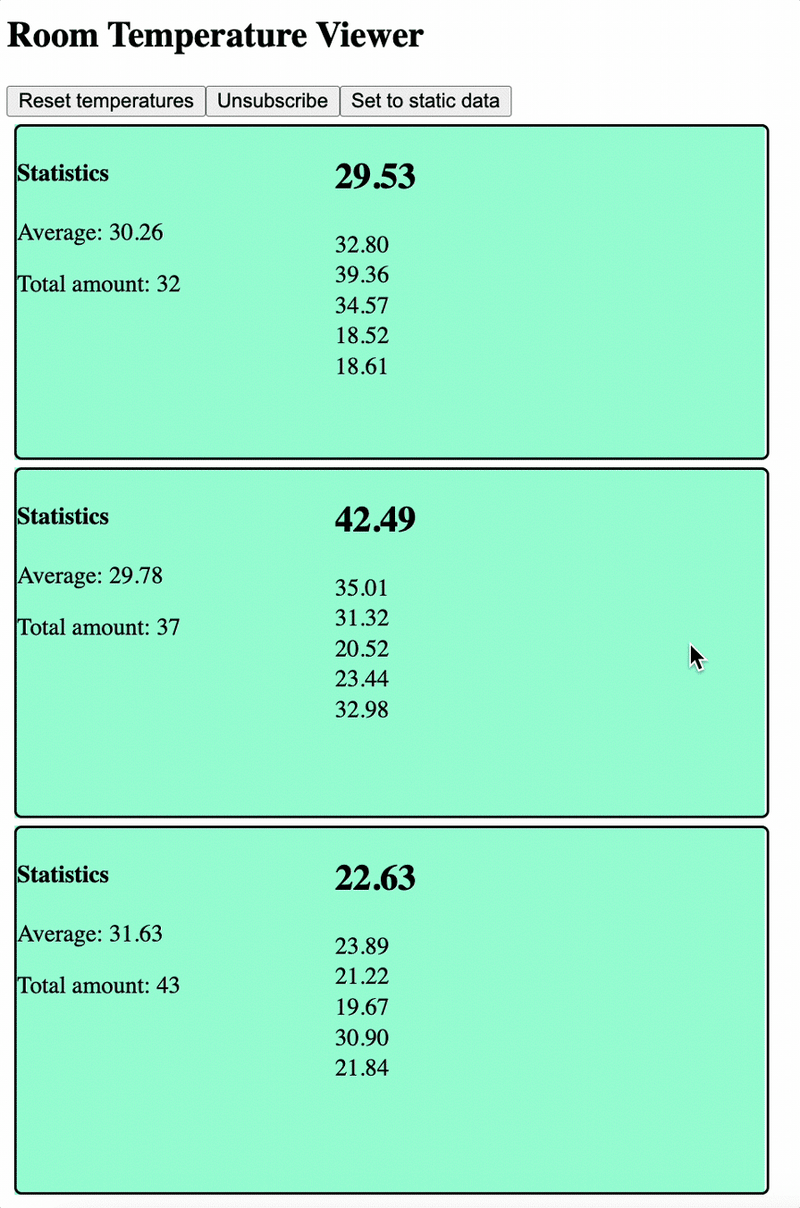 To make our demo app, we’ll combine observables, signals, and good old change detection. You can check out the source code for this app on GitHub.
The room temperature service
The first thing we need for our demo app is a room temperature detection service. Normally, this would be something that we’d get from a third-party service, like an API. But in our case, it’s okay if we just want to create a fake temperature service.
This service will be responsible for creating a BehaviorSubject that emits a single new temperature for a room over time. Just like a real temperature detection service, it’s not concerned with tracking historical temperatures or massaging the data.
Since this is in the service layer and not the UI, it would make sense to use an observable here:
export class RoomTemperatureService {
  public roomTemperatures$: BehaviorSubject<RoomTemperature> = new BehaviorSubject<RoomTemperature>({ name: '', temperature: 0 });

  constructor() {
    this.emitRandomRoomTemperature(); // Begin emitting
  }

  private emitRandomRoomTemperature(): void {
    setInterval(() => {
      // Emit a new temperature for a random room
      const roomNames = ['Living Room', 'Bedroom', 'Kitchen'];
      const randomRoomIndex = Math.floor(Math.random() * roomNames.length);
      const chosenRoom = roomNames[randomRoomIndex];
      const newTemperature = Math.random() * 25 + 18;
      this.roomTemperatures$.next({ name: chosenRoom, temperature: newTemperature });
    }, 1000); // Update random room temperature every second
  }
}
In the code above, we see how to create a BehaviorSubject, which is a type of observable. We can then call next to emit a new value on the BehaviorSubject.
Consumers of this service get the information they need — in our case, the room name and detected temperature. However, what if we wanted to aggregate the received data so we could show a historical temperature list?
Let’s see how we can do that in the individual TemperatureNode component.
The TemperatureNode component
First, let’s create a TemperatureNode that will display the current temperature of each room, historical temperatures, and an average. This component will use standard @Input components and the ngOnChanges hook to know when to update the component:
export class TemperatureNodeComponent implements OnChanges {
  @Input() temperatures: Array<number> | undefined;
  @Input() roomName: string | undefined;

  averageTemperature = 0;
  totalTemperatureCount = 0;

  ngOnChanges(changes: SimpleChanges): void {
    if (this.temperatures){
      this.averageTemperature = this.temperatures.reduce((sum, current) => sum + current, 0) / this.temperatures.length;
      this.totalTemperatureCount = this.temperatures.length;
    }
  }
}
We can also write up our HTML for this component:
<div style="display: flex; width: 100%; align-content: stretch; flex-direction: row; gap: 12px; border: 2px solid black; border-radius: 5px">
  <div style="width: 200px;">
    <h2>{{this.roomName}}</h2>
    <div>
      <h4>Statistics</h4>
      <p>Average: {{averageTemperature | number:'1.2-2'}}</p>
      <p>Total amount: {{totalTemperatureCount}}</p>
    </div>
  </div>
  <div style="display: flex; flex-direction: column; gap: 2px;">
    @for (temp of temperatures; track temp; let idx = $index){
      <span>
        @if (idx == 0){
          <h2>{{temp | number:"1.2-2"}}</h2>
        }
        @else if (idx < 6){
          {{temp | number:"1.2-2"}}
        }
        </span>
    }
  </div>
</div>
In the finished sample, this component will look like this: 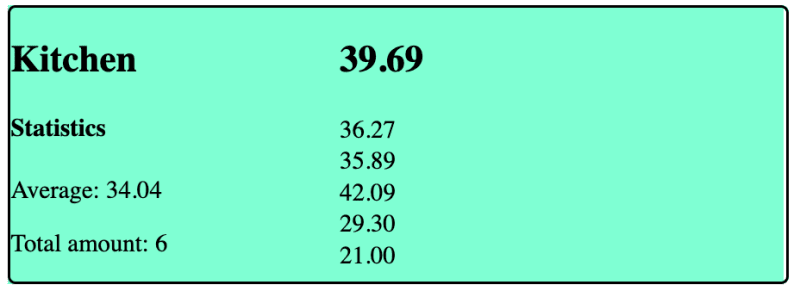 Now we need a component to render one of these components for each room that has a temperature result.
The TemperatureView component
The TemperatureView component should:
- Subscribe to each new emitted object from the temperature service
- Be responsible for aggregating the results in a way that makes sense
- Give the user the option to start and stop the flow of messages, reset the results entirely, and set the temperatures to an entirely new value
Because our work affects the UI, it would be sensible to choose a signal for this.
But wait a minute — our service provides temperatures one at a time via an observable, and we want to use a signal within our UI. How do we connect our observable to the signal and perform some basic data massaging?
Simply put, we can subscribe to our observable as usual and then pipe the data through into our signal via the update method. Because we are subscribing to an observable here, we’re still responsible for subscribing and unsubscribing to the observable:
startSubscription(){
  // Begin the subscription to the service
  this.temperatureSubscription = this.tempService.roomTemperatures$.subscribe(newTemp => {
    // Update the existing Angular signal contents, in this case, an array.
    // Add new values to existing entries, or add a new entry for the given room
    // This acts as the accumulator
    this.historicalTemperatures.update(x => {
      if (newTemp.temperature){ // Only if there is a valid temperature reading
        let temperatures = x.find(x => x.room == newTemp.name); // Is there an existing entry for this room?
        if (temperatures){ // Add to existing collection of temperatures for room
          temperatures.temperatures = [newTemp.temperature, ...temperatures.temperatures];
        }
        else{
          // Create a new collection for this rooms temperatures
          x = [...x, {room: newTemp.name, temperatures: [newTemp.temperature]}]
        }
      }
      // Return the updated variable
      return x;
    })
  });
}
As we saw earlier, we can also update the signal with an entirely new value that isn’t based on the existing value via set. If we wanted to set the temperature data to a new value and disregard what was already in the signal, we could do this:
setStatic(){
  // First, end the subscription to the service
  this.endSubscription();
  // Set the signal data to a new value
  this.historicalTemperatures.set([
    {
      room: 'Loft',
      temperatures: [10,11,12,11,10.5]
    },
    {
      room: 'Guest room',
      temperatures: [13.5,14.5,12.5,12.8]
    },
    {
      room: 'Living room',
      temperatures: [15,16,15,14.3,12]
    }
  ])
}
When to use signals vs. observables
Now that we’ve explored how signals and observables can both be used in a project, let’s recap when it’s best to use one or the other.
When to use observables
In our example, we can see that using an observable requires us to manually subscribe to it, handle the output, and unsubscribe when we are done.
Subscribing to an observable is like listening to new events that filter down to our consumer. There can be new events, but there could also be an error, or an indication to say that the observable has finished.
We also manage the stream of events by piping events through a pipe. These pipes can indeed become extremely complex, but they can be very elegant in managing an asynchronous stream of data over time.
For this reason, you’ll usually see observables in services within your Angular application.
When to use signals
Signals, on the other hand, are used within the UI layer of your application. You can update a signal via the set method, or make a change to an existing value via update.
Since you’re setting or updating the signal each time, there isn’t really a built-in error state, like with an observable. However, you can define your own error state and update a signal accordingly.
Also, you can use computed signals to compose new signals based on existing signals. Changes will propagate through these computed signals when dependent signals are updated.
If your template is being updated reactively in your code, it would make sense to use a signal instead of an observable.
Do we really have to use signals?
Signals are a useful new Angular feature, but do we really have to use them? In short — no.
If you don’t use signals, you’re simply living the life of an Angular developer before Angular 16 landed. Many excellent applications were written and many reactive webpages were created without signals.
However, we have to acknowledge the simplicity and power of signals in making templates reactive, and how computed signals can be easily composed from other signals. Using signals to manage these kinds of requirements instead of creating your own subscription tree with your own observable is much simpler.
No matter what you choose, performance will be about the same in your application, so it ultimately comes down to your preferences and level of comfort.
Conclusion
Signals are an exciting new addition to Angular, and they act as a complement — not a replacement — to observables. By understanding where we should use each, we can write high-quality reactive applications that are more performant and easier to develop.
Feel free to grab the sample app that was used in this tutorial to see the source code or fork the project for your own needs. If you have any questions, you’re welcome to comment below.
Happy reactive coding!
Experience your Angular apps exactly how a user does
Debugging Angular applications can be difficult, especially when users experience issues that are difficult to reproduce. If you’re interested in monitoring and tracking Angular state and actions for all of your users in production, try LogRocket.

LogRocket is like a DVR for web and mobile apps, recording literally everything that happens on your site including network requests, JavaScript errors, and much more. Instead of guessing why problems happen, you can aggregate and report on what state your application was in when an issue occurred.
The LogRocket NgRx plugin logs Angular state and actions to the LogRocket console, giving you context around what led to an error, and what state the application was in when an issue occurred.
Modernize how you debug your Angular apps — start monitoring for free.


Top comments (1)
Are there any examples of the sometimes bewildering behavior of rxjs, which are solved by using signals? 🤔