
Written by Eze Sunday✏️
Visual debugging allows developers to see the execution of their code in real-time, making it easier to identify and fix problems. It is particularly useful when working with complex codebases with several moving parts.
Before using Vitest Preview for testing and visual debugging, it is recommended to have experience with unit testing using Vitest or similar testing frameworks like Jest. If you are new to unit testing with Vitest, we’ve written a beginner-friendly guide demonstrating how to test a frontend application with Vitest. This guide will help you gain a better understanding of unit testing and how to apply it to your own projects.
Jump ahead:
- Why is visual debugging important?
- Intro to Vitest
- What is Vitest Preview?
- Setting up Vitest Preview for debugging
- Visual debugging with Vitest Preview
Why is visual debugging important?
Visual debugging is important for several reasons. First, it helps you pinpoint errors. Visual debugging makes it easier to pinpoint the source of errors and bugs in the code, saving you time and effort when trying to fix problems.
Visual debugging allows developers to see how their code interacts with other parts of the system, providing valuable insights into its behavior. Additionally, visual debugging helps developers identify potential performance issues in their code, allowing them to optimize it for better performance.
By making it easier to identify and fix problems, visual debugging helps developers increase their productivity and efficiency. Overall, it is an essential tool for ensuring the reliability and correctness of software.
Intro to Vitest
Vitest is a new unit testing framework that’s built for speed. According to Anthony Fu, the creator of Vitest and core team member of Vite:
Just like how Vite works in the browser, Vitest also knows the graph of your modules, which makes it able to do smart detection and only re-run the related tests. Feels almost like HMR but for tests.
The best part of Vitest is that it watches all your app’s dependencies and tests and ensures that only the part that gets an update is re-run. From my experience using both frameworks, Jest and Vitest performed similarly in their first run. Meanwhile, Vitest had better test performance on the next re-run. This is because Vitest only runs the part of the test or business logic that was updated.
While this is an incredibly powerful tool, it can be even more powerful if a frontend developer can visualize their test.
For example, when you run a test that adds two variables, A + B, and it’s supposed to return C to the screen, you want to see that the arithmetic was done. The result was displayed on the screen successfully, as expected visually. This is where Vitest Preview comes in.
What is Vitest Preview?
Vitest Preview helps you to write and debug tests faster by allowing you to visualize your test in a browser. If you are familiar with Jest, you know that the Jest community has a similar debugging tool, Jest Preview, created by the same developer, Hung Viet Nguyen. To learn more about testing with Jest, check out our video guide here.
On 24 October 2022, Hung Viet Nguyen publicly announced the launch of Vitest Preview with the following statement:
A question that I usually get asked is "Can I use @JestPreview for @vitest_dev?" Today, I am launching @VitestPreview, a little brother of @JestPreview, built on top of @vite_js, has first-class support for @vitest_dev, and blazing fast.
In the rest of this guide, I’ll show you how to integrate Vitest Preview into your Vite tests suite to help make your debugging faster and more intuitive.
Setting up Vitest Preview for debugging
Because we’ll be focusing on tests, we’ll clone an existing GitHub repository I created for this guide.
First, run the following commands to clone the repository and install all the dependencies:
git clone https://github.com/ezesundayeze/vitest-preview-demo && npm install
Your cloned app directory should look like so:
├── README.md
├── index.html
├── package-lock.json
├── package.json
├── public
│   └── vitest.svg
├── src
│   ├── App.css
│   ├── App.tsx
│   ├── assets
│   │   └── vite.svg
│   ├── hooks
│   │   └── useCounter.ts
│   ├── index.css
│   ├── main.jsx
│   ├── test
│   │   ├── App.test.tsx
│   │   └── setup.ts
│   ├── utils
│   │   └── test-utils.tsx
│   └── vite.env.d.ts
├── tsconfig.json
└── vite.config.js
The cloned app is a basic React project that increments a counter when clicking a button. This is a common starting point for React projects, often referred to as the React Starter app.
To enable us to run a test with Vitest Preview, we have installed the following dependencies in our project:
// package.json

"devDependencies": {
    "@testing-library/jest-dom": "^5.16.4",
    "@testing-library/react": "^12.1.5",
    "@testing-library/react-hooks": "^8.0.0",
    "@testing-library/user-event": "^13.5.0",
    "@types/react": "^18.0.21",
    "@types/react-dom": "^18.0.6",
    "@types/testing-library__jest-dom": "^5.14.5",
    "@vitejs/plugin-react": "^2.1.0",
    "jsdom": "^20.0.1",
    "npm-run-all": "^4.1.5",
    "vite": "^3.1.8",
    "vitest": "^0.24.3",
    "vitest-preview": "^0.0.1",
  }
Creating your own project
To create your own project from scratch, you can use Vite to scaffold the project and install the necessary dependencies, such as Vitest and vitest-preview, as we’ve seen earlier. You can then use npm-run-all to run Vitest Preview and Vitest in parallel. You can add npm-run-all to your package.json file for convenience.
For example, you could include a script in your package.json file like this:
// package.json

...
"scripts": {
    "start": "npm-run-all -p vitest-preview test",
  },
...
Addressing errors
One common issue that I have encountered when setting up a new project with Vitest Preview is the following error:
Error: Cannot find module '…/build/Release/canvas.node'
or
Error: Module did not self-register .../node_modules/canvas/build/Release/canvas.node
There are many suggestions for fixing this issue on Stack Overflow and other forums, but in my experience, simply installing the canvas dependency resolved the issue. Even when I subsequently removed the dependency, the issue did not reoccur. This behavior may seem strange, but it has worked for me in the past.
If you encounter this issue, you may want to try installing canvas and see if it resolves the issue. Keep in mind, the specific steps for fixing this issue may vary depending on your specific setup and configuration, so it's always a good idea to consult the documentation for the tools you're using and seek help from the community if necessary.
Visual debugging with Vitest Preview
Now that you have the demo set up, let’s write a simple test. First, open the src/test/app.test.tsx file and write a test that simulates seven button clicks and then verifies that the count has been incremented by seven.
Here is our test:
// src/test/App.test.ts

import App from '../App';
import { render, screen, fireEvent } from '../utils/test-utils';
import { debug } from 'vitest-preview';

describe('Simple working test', () => {
  it('should increment count on click', async () => {
    render(<App />);
    const button = screen.getByRole('button');
    for (let i = 0; i < 7; i++) {
      fireEvent.click(button);
    }
    debug();
    expect(await screen.findByText(/count is: 7/i)).toBeInTheDocument();
  });
});
In the code above, we grabbed the button element and ran a loop that iterated seven times, simulating seven clicks. Then, we verified that seven were rendered.
Notice the debug function in the code? That is where Vitest Preview gets called and does the magic. Here is the code we are testing:
import { useCounter } from './hooks/useCounter';
import viteLogo from './assets/vite.svg';
import './App.css';
function App() {
  const { count, increment } = useCounter();
  return (
    <div className="App">
      <header className="App-header">
        <p>
          Hello <b>Vitest Preview</b>!
        </p>
        <div>
          <img src={viteLogo} alt="Vite Logo" width={100} />
          <img src="/vitest.svg" alt="Vitest Logo" width={100} />
        </div>
        <p>
          <button className="counter" type="button" onClick={increment}>
            count is: {count}
          </button>
        </p>
        <p>
        </p>
      </header>
    </div>
  );
}
export default App;
Although this is a standard test, what makes it unique is that we can preview and see that count of seven was rendered on the screen, as shown below: 
Creating a second test
Let’s create another test for a component that has two form inputs that accept numbers and return the sum of the numbers when a user submits the form.
Here’s our test:
///src/test/Calculator.test.ts
import { render, screen, fireEvent } from "@testing-library/react";
import Calculator from "../Calculator";
import { debug } from "vitest-preview";

describe("Calculator", () => {
    it("should add two numbers and display the result", async () => {
        // Render the component
        render(<Calculator />);

        // Find the input fields and the button
        const input1 = screen.getByLabelText("First number:");
        const input2 = screen.getByLabelText("Second number:");
        const button = screen.getByRole("button", { name: "Add numbers" });

        // Enter values into the input fields
        fireEvent.change(input1, { target: { value: "2" } });
        fireEvent.change(input2, { target: { value: "3" } });

        // Click the button
        fireEvent.click(button);
        debug();
        // Assert that the result is displayed on the page
        expect(await screen.findByText("The result is: 5")).toBeInTheDocument();
    });
})
Let’s also write the code for it:
// src/Calculator.tsx

import { useState } from "react";
import './App.css';
const Calculator = () => {
  // Declare two state variables, one for each input field
  const [num1, setNum1] = useState(0);
  const [num2, setNum2] = useState(0);
  // Declare a state variable for the result of the calculation
  const [result, setResult] = useState("");
  // Define a function to handle the form submission
  const handleSubmit = (event) => {
    event.preventDefault();
    // Convert the input values to numbers and add them
    const sum = Number(num1) + Number(num2);
    // Update the result state with the calculated sum
    setResult(sum);
  };
  return (
    <form onSubmit={handleSubmit}>
      <label>
        First number:
        <input
          type="number"
          value={num1}
          onChange={(event) => setNum1(event.target.value)}
        />
      </label>
      <label>
        Second number:
        <input
          type="number"
          value={num2}
          onChange={(event) => setNum2(event.target.value)}
        />
      </label>
      <button type="submit">Add numbers</button>
      {result && <div>The result is: {result}</div>}
    </form>
  );
};
export default Calculator;
Here is the preview when you run the test: 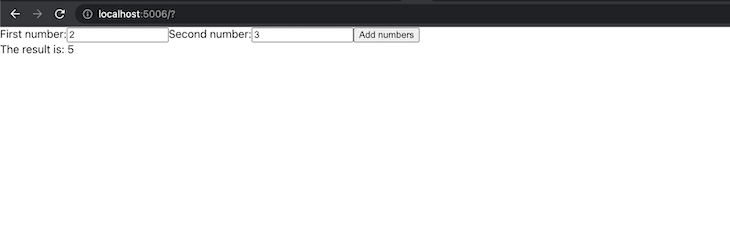
I didn't type those numbers in the input fields. The test did as we described. Then, Vitest Preview made sure we were able to preview it in the browser. All the tests are passing, as you can see in the terminal and visually below: 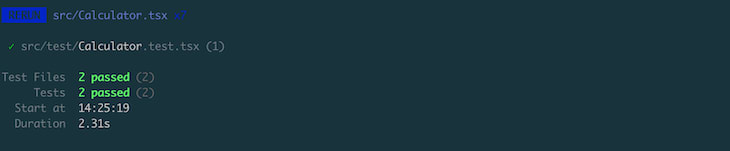
As you can tell, Vitest Preview can be very useful in debugging frontend applications because it allows you to get real-time feedback on your test that directly simulates how your users will interact with your application beyond having a mental model of the process.
Conclusion
Frontend development is getting a lot more fun every day as several tools focused on enhancing developer experience are built. Vitest Preview is a valuable visual testing and debugging tool, regardless of the scale of your project. For further reading, you should check out the documentation.
Are you adding new JS libraries to improve performance or build new features? What if they’re doing the opposite?
There’s no doubt that frontends are getting more complex. As you add new JavaScript libraries and other dependencies to your app, you’ll need more visibility to ensure your users don’t run into unknown issues.
LogRocket is a frontend application monitoring solution that lets you replay JavaScript errors as if they happened in your own browser so you can react to bugs more effectively.
LogRocket works perfectly with any app, regardless of framework, and has plugins to log additional context from Redux, Vuex, and @ngrx/store. Instead of guessing why problems happen, you can aggregate and report on what state your application was in when an issue occurred. LogRocket also monitors your app’s performance, reporting metrics like client CPU load, client memory usage, and more.
Build confidently — Start monitoring for free.

Top comments (0)