
The importance of brand marketing can’t be overemphasized. Impressing a brand on the customer’s mind requires proper and effective marketing, which can only be achieved if the right tools and channels are used.
Lob is an infrastructure as a service solution that helps businesses and enterprises simplify and automate their direct mailing and address verification processes, giving them greater flexibility, visibility, and accuracy in their online and offline communications with customers.
Lob builds APIs to automate and increase connectivity between the offline and online worlds. It uses cloud technologies to help businesses send smart mail faster through automation, giving us exposure, wider reach, and new growth opportunities.
We can track and automate important events related to mail delivery by using Lob’s robust webhooks. The webhooks are very flexible and can be configured to send automated notifications for marketing or professional purposes.
This article explores Lob’s webhook features and how they can be easily automated for notifications and email tracking. We’ll explore these features by building an Express NodeJS application and then integrating Lob’s APIs for mailing and notification automation.
To proceed you need the following prerequisites installed on your local machine:
You’ll also need to have a basic understanding of Node.js and ES6 syntax. Make sure you’re signed up for your free Lob account, which has a quick registration. You can access the complete code for this application on Github to follow along.
Project setup
Let’s start our project setup by creating the folder structure for our application.
Create a folder named “LobWebhooks” and open it in the editor of your choice.
webhook-basics
    src
        controllers
            letter.controller.js
            webhook.controller.js
        models
            letter.js
        routes
            web.js
        views
            index.hbs
            letters.hbs
            letter.hbs
    index.js
    .babelrc
    .env
Application views
In the above application folder structure, you see our three view files:
- index.hbs, which serves as the application landing page, and also contains a form which we use to send letters to Lob.
- letters.hbs, which lists all the letters we created so far on Lob.
- Lastly, the letter.hbs file, which shows the details of each of the letters created on Lob. The views folder also contains some CSS, JavaScript, and images used to make the UI approachable.
Download these three files along with the CSS, JavaScript, and images used in this application by cloning the application repository. Then copy everything in the view folder into your project.
Initialize your project
We want to manage our dependencies using NPM (node package manager). We start by initializing our project with the command.
Enter responses to the prompt of hit enter to accept the default value.
package name: lobwebhook
version: 1.0.0
description: A sample node project, demonstrating the use of Lob Webhooks for emailing and marketing.
entry point: ./src/index.js
test command: echo "Error: no test specified" && exit 1
git repository: https://github.com/lob/lob-node-examples
keywords: Lob, Email, Marketing
author: your name
license: ISC
Is this OK? yes
Install packages
Return to the LobWebhooks directory and install the following packages using the npm install command in your CLI, as shown in this code snippet:
Since we’ll be using ES6 in the application, we’ll also need some Babel packages to transpile our code to plain ES5 JavaScript. We install them as dev dependencies using the following command:
Let’s go over the packages we installed in the first code snippet:
- Express, which we’ll use for our application server.
- Mongoose, a database tool that provides a straight-forward, schema-based solution to model application data.
- cors, which enables cross-site requests.
- hbs (Handlebars), which provides our view templating engine.
- The path module provides us with correct absolute file paths within the application.
- We’ve installed lob, a Node.js SDK that allows us to communicate with a Lob server.
- Dotenv, which is used for our environmental variables.
After installing all the packages listed above, the content of your package.json file should be similar to this code:
Add the following to our “scripts” section of package.json.
package.json
In the scripts tag, we configured the application’s runtime parameters for local and production environments.
Configure babel
To configure Babel, we add the following code snippet to the .babelrc file. This enables us to transpile our cutting edge JavaScript into plain ES5 JavaScript that can run in any browser. In the root of your project create a new file .babelrc
Add the following to the .babelrc file
Integrate Lob webhooks
Lob’s webhooks notify us when an asynchronous event that we’d like to track occurs within Lob's architecture. Lob processes USPS mail scans and combines them with information from other partners to create a comprehensive set of tracking data. We can subscribe to Lob’s service to receive notifications based on this tracking data through our webhook URL.
For example, when a letter gets an “In Local Area" tracking event, an event object of type letter.in_local_area is created. If we’re subscribed to that event type, Lob will send that event to our specified URLs via an HTTP POST request.
Retrieve Lob API credentials
We’re going to integrate Lob into our app, so the first step is to ensure you have a Lob account and Lob API credentials. Retrieve these credentials from your Lob dashboard by clicking on the Settings menu on the sidebar and then clicking on the API Keys tab, as shown in this screenshot:
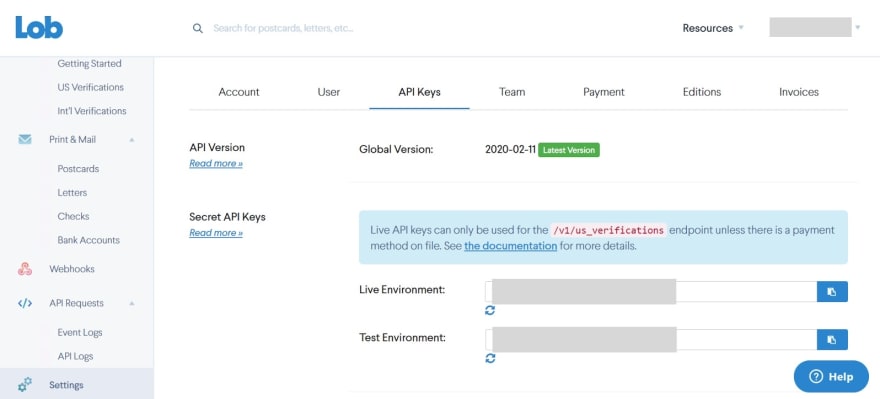
The screenshot shows we have API keys for live and test environments. The test keys can be used for development, but the live key can only be used after your account has been verified. This requires that you update your credit card or bank account details. Lob offers subscription packages for all types of businesses. The free trial will work for our example, though.
Configure Lob API keys
For this project we’ll use environment variables to securely store our API keys. In the root of your project create a new file .env
Open the .env file and add your API keys.
Configure your application
After setting these configurations in the Lob dashboard, we import Express, Mongoose, CORS, and path. We then configure the app to use Handlebars as its templating engine. Then, we configure it to listen to requests on port 3500.
Create an index.js file in the src folder and add the following code:
/src/index.js
Create a test model
To have something to track on Lob, let’s “send” some letters to dummy addresses using Lob’s API. We’ll first model a letter and then set up our application routes and controllers.
We define a Mongoose database schema with the necessary properties for a letter, and then export the schema for use in other parts of our application.
Create a letter.js file in the models folder and add the following code:
/src/models/letter.js
Import express
Now that we’ve created our model, let’s import Express and declare the router variable. Then we’ll set up the routes we’ll use in the application, and connect them to their appropriate controllers.
Create a web.js file in the routes folder and add the following code:
src/routes/web.js
Set up controllers
Now let’s create four functions in the letter.controller.js file: createLetter, createLetterPost, getLetters, and getALetter. We’ll examine these functions after we introduce their code.
First, create the letter.controller.js file in the controllers folder and add the following code to create these functions and set up communication between our Node.js application and Lob’s servers:
src/controllers/letter.controller.js
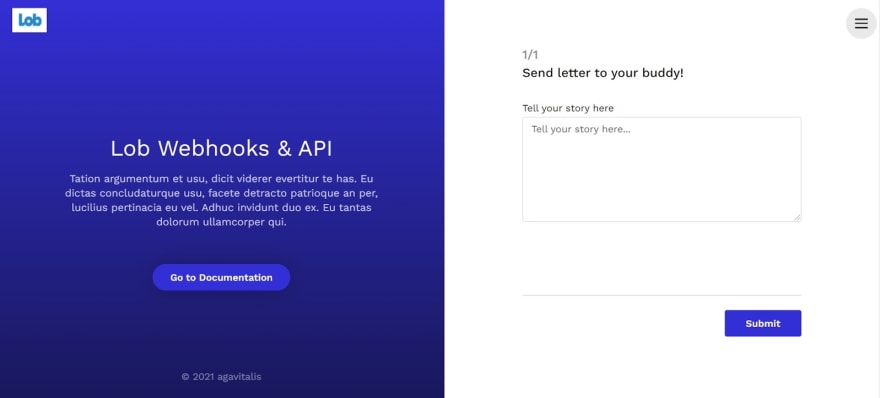
The createLetter function accepts a GET request and returns a form. The form, pictured in the following screenshot, lets us send dummy letters to the Lob server using their API:
The createLetterPostfunction accepts a POST request from the createLetter form, processes it, and then sends the content to Lob’s server.
The getLetters and getALetter functions each accept GET requests. The getLetters function returns a list of all the letters we have created on Lob and displays it on the letters.hbs page. The getALetter function returns the complete details of a letter, selected by letter id, and displays it on the letter.hbs page. You’ll find this functionality in the application menu, located at the top right of our app’s landing page.
Test Lob webhooks
To quickly test out Lob webhooks, we will use ngrok. This tool generates a unique URL that lets us receive webhooks locally by creating a tunnel between our application and the internet. Using ngrok, we expose our local web server to the internet and receive Lob webhooks without having to deploy our application on a live server.
Download and install the ngrok software compatible with your operating system.
After downloading ngrok to your local machine, run the installation file to open the ngrok terminal. Then, expose our application port to the internet using the following ngrok command:
This command generates unique URLs from which our application can be accessed over the internet, as shown in the screenshot below:
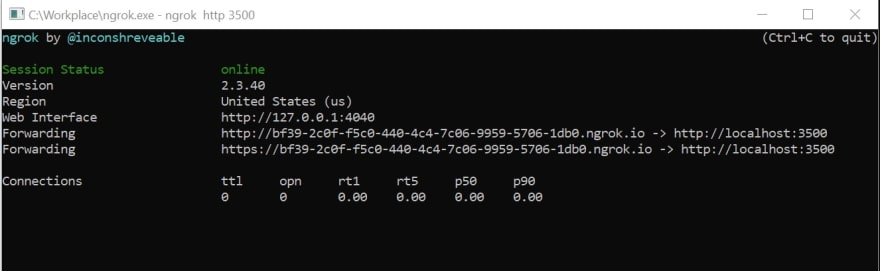
It is important to note that these URLs are randomly generated each time you run ngrok http 3500. If you’re looking to reuse a stable URL, you need to upgrade to a paid plan.
Add a custom webhook route
We’ve tested our application using ngrok, so let's add a custom route to our app. We’ll configure this route on Lob to receive events from the service.
We’ll import Mongoose and our letter model, and then create a processWebhookEventPost function to process Lob events.
In the src/controllers folder, create a webhook.controller.js file, then add the following code to the new file:
src/controllers/webhook.controller.js
The processWebhookEventPost function will receive events from Lob webhooks and then log the content of each event to the console for us to observe.
To configure this route on Lob, first, copy one of the unique URLs — preferably the HTTPS URL — generated by ngrok to your clipboard.
Then, on the Lob dashboard, open the Webhooks menu on the sidebar. Note the Test/Live toggle, located at the top of the webhooks menu page.
Next, select the Create button to create a new webhook record, as shown in the following screenshot:

Fill the webhook URL creation form with the appropriate details and paste the URL from your clipboard into the URL field. In the example screenshot above, our complete webhook URL is “https://bf39-2c0f-f5c0-440-4c4-7c06-9959-5706-1db0.ngrok.io/processWebhookEvent”.
Next, select which events you want to trigger the webhook, and select the Create button to finish. The following screenshot illustrates part of the creation process in the webhook creation form:

We’ve configured the application controllers and added a webhook URL to Lob. Now let’s try to send a webhook to our application — and you can always access the complete working code of the application on Github if you need a reference.
Lob webhook debugger
In the terminal start your application with the command:
In the Lob dashboard, go to the new webhook you created and click the debugger button to access the Webhooks Debugger view.
Clicking the send button will trigger an example webhook event to your application via ngrok.

If we did everything correctly, we’ll receive events from Lob on our local machine, as shown on the console in the screenshot below:
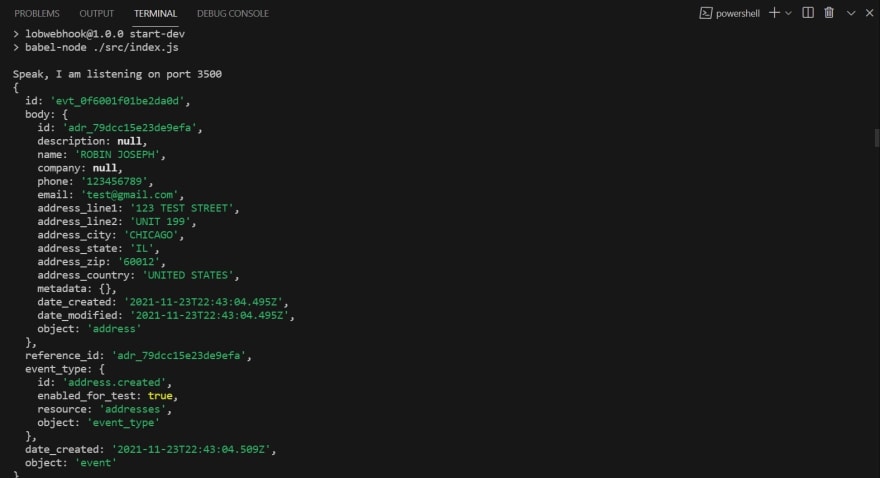
In the screenshot above, you can confirm that a Lob webhook was successfully received using our specified URL via ngrok. We logged the results of the webhook on the console to let us observe and then write code to process the response.
Lob gives us the flexibility of separating webhooks intended for different environments, and we won’t be charged when webhooks created in the test environment are triggered. However, using webhooks in the live environment requires that we verify our account using a debit card or bank account details.
Processing Lob events
Let’s add all the logic we need to the processWebhookEventPost function. This function will process events received from Lob through the /processWebhookEvent route and then trigger actions based on the event properties it receives.
We’ll add some logic to the function to send follow-up letters scheduled for two weeks after delivery. We’ll also add logic to send a notification to our hypothetical customer when mail is in the recipient’s area and to send a notification to our hypothetical staff if mail is returned to sender.
Make sure the final version of your webhook.controller.js file, after the implementation of all these features, matches the following code:
/src/controller/webhook.controller.js
The following screenshot shows a sample letter created in our app, with an event describing the status of the letter. You can navigate to this screen by selecting the menu icon on the landing page, then selecting the Letters menu, which shows a list of letters created on Lob. You can download each letter as a PDF, or select Open Letter to simply view its contents.

Key events returned by Lob webhooks
Lob webhooks returns several events to describe the activity occurring in Lob’s architecture, giving us timely insights into our mail delivery process.
You can take a look at Lob’s official documentation for a complete list of events triggered by Lob’s webhooks, but we’ve highlighted several events of different types in the following list:
- letter.created: This event is available in webhooks for test and live environments. It returns a 200 status code when a letter is successfully created.
- letter.rendered_pdf: This event is also accessible in test and live environments. It indicates that a letter's PDF proof was successfully rendered.
- letter.rendered_thumbnails: Available in test and live environments, this event indicates that a letter's thumbnails are successfully rendered.
- letter.deleted: Available in test and live environments, this event indicates that a letter is successfully canceled.
- letter.mailed: Available only in live environments, this event notifies when a letter receives a “mailed” tracking event.
Conclusion
In this article, we created a Node.js application and explored how we can use Lob’s webhooks to track print emails sent via Lob API. We integrated the Lob API and webhook into our example Node.js application and further explored how we can automate some processes based on events received from Lob webhooks.
Integrating Lob API and webhooks in your processes is hassle-free. Lob is robust and compatible across major programming languages, and it can easily be configured to suit your and your team’s needs. A simplified sign-up process and free plan tier make it seamless to get started and explore. Create a Lob account today, experiment with webhooks, and let Lob automate and increase the connectivity between your offline and online worlds.


Top comments (0)