Introduction to Nightwatch
Welcome to the “A beginners guide to test automation with Javascript(Nightwatch.js)”! This is a three-part blog series to kick start writing web UI automation using Nightwatch.js. In the following parts you will learn the following:
- Introduction to Nightwatch.js
- How to write a script in Nightwatch.js
- How to make your script better in Nightwatch.js
Sounds exciting? Let’s get started!
Writing a script in JavaScript (JS) and Nightwatch.js, aka Nightwatch (NW), is simple once you get started and this guide will help anyone regardless of their skill level. This framework allows writing efficient and easy-to-understand UI automation code with simple configuration. This doesn’t mean that the framework is limited by its rather vast capabilities because it can be easily extended and configured to fit your needs.
This article will be divided into 3 parts – feel free to skip to any part depending on your NW experience:
-What is Nightwatch.js and how to set it up?
-How to write a script?
-How to deploy your test script for cloud-hosted testing?
Code used in this article can be found in Loadero’s public GitHub examples repository here.
Prerequisites
- Text editor of your choice (we prefer Visual Studio Code).
- Node.js (the latest version is preferable, in this example 'v14.15.0' will be used).
- Google Chrome and Firefox browsers.
What is Nightwatch.js and how to set it up?
What is Nightwatch.js?
Nightwatch.js is an open-source (check their GitHub repo and their home page) end-to-end framework that was initially released in 2014 by Andrei Rusu. Since then it has grown dramatically and is still moving forward. We at Loadero are avid Nightwatch.js users and support it in our test scripts from the very first day of our product.
Set up
When starting out, it can be a good thing to run tests locally instead of running them in some cloud service because there is a high chance that a small but critical mistake is made – typo in variable name, incorrect syntax and so on – that will make your tests fail. When tests are run locally, you can easily spot errors in your code, fix them, check once again and, when everything looks great, run the code in some cloud service to gather valuable metrics.
Let’s start by creating a new directory in our home directory where we will host our project locally. To do so, enter the following commands in your terminal:
For Mac/Linux OS:
cd ~
mkdir nightwatch-test
cd nightwatch-test
For Windows:
cd\
mkdir nightwatch-test
cd nightwatch-test
Create package.json file for easier dependency management with default values with the following command
npm init -y
Now let’s download necessary NPM dependencies (Nightwatch, GeckoDriver and ChromeDriver) with the following command which will install the latest available versions of browser drivers and Nightwatch v.1.5.1.
npm install nightwatch@1.5.1 geckodriver chromedriver -D -E
Important: If the non-latest browser versions are used, check ChromeDriver and GeckoDriver supported browser versions.
Tip: We recommend using some kind of code formatter to keep the code consistent. We like Prettier that can be installed both as a code editor extension and NPM global package. Here’s is the .prettierrc configuration file that will be used throughout this
article:
{
 "proseWrap": "always",
 "overrides": [
   {
     "files": "*.js",
     "options": {
       "tabWidth": 4,
       "arrowParens": "avoid",
       "trailingComma": "none",
       "singleQuote": true,
       "printWidth": 100,
       "quoteProps": "consistent"
     }
   }
 ]
}
Now, let’s open the current directory in the code editor of our choice and modify package.json scripts for easier test execution
 "scripts": {
   "test": "nightwatch"
 },
Now, when you enter in the terminal npm test -- --version (yes, 2 --), you should see your Nightwatch.js version and a link to the appropriate changelog. Create a Nightwatch configuration file named nightwatch.conf.js and then paste the following code:
module.exports = {
    src_folders: ['tests'],
    webdriver: {
        start_process: true,
        port: 4444
    },
    test_settings: {
        default: {
            desiredCapabilities: {
                browserName: 'chrome'
            },
            webdriver: { server_path: require('chromedriver').path }
        },
        firefox: {
            desiredCapabilities: {
                browserName: 'firefox'
            },
            webdriver: { server_path: require('geckodriver').path }
        }
    }
};
As the last step tests folder must be created so when we run npm test command all tests in that folder will be run.
The project structure at this point should look like this:

How to write a script?
At once, we can write a Nightwatch.js test. Let’s use DuckDuckGo as an example website for our test script. Let’s create a file duckduckgo_test.js in our tests directory. Now we have to export a CommonJS module object that has one function assigned to the only property – test. This object will be used for Nightwatch.js test execution.
module.exports = {
   test: client => {}
};
Tip: In this example both regular and arrow functions will work but we prefer arrows functions more. If you use regular functions, they can be written like this with shorthand object property:
module.exports = {
   test: function(client) {}
}
To begin with, we have to open DuckDuckGo homepage and wait until #content_homepage (main app container) element loads as a way to determine that the website is ready to be interactable. I usually set wait timeout to 10 seconds (it has to be passed in milliseconds, i.e., 10 * 1000) – if the website doesn’t load within the timeout, the test fails. In Nightwatch.js, these are 3 simple lines.
module.exports = {
    test: client => {
        client
            .url('https://duckduckgo.com/')
            .waitForElementVisible('#content_homepage', 10 * 1000);
    }
};
Now let’s run our first Nightwatch.js test, shall we? To do so we will use the test command defined in package.json. All we have to do is to enter the following line in the terminal and press Enter:
npm test
What just happened? You may have noticed that a Chrome browser window pops up for a split second and then closes and some output in the console that says something like this:
[Duckduckgo Test] Test Suite
============================
ℹ Connected to localhost on port 4444 (1597ms).
  Using: chrome (87.0.4280.88) on Mac OS X platform.
Running:  test
✔ Element <#content_homepage> was visible after 21 milliseconds.
OK. 1 assertions passed. (832ms)
Since we didn’t really see anything, let’s add a 5-second pause after the test, like so:
module.exports = {
    test: client => {
        client
            .url('https://duckduckgo.com/')
            .waitForElementVisible('#content_homepage', 10 * 1000)
            .pause(5 * 1000);
    }
};
Tip: A test might execute so fast that you might not even notice it or it might not have gathered enough data, for example, WebRTC data, which is collected during audio/video call, might not be collected if the user enters the audio/video room only for a split moment. For this reason, it is recommended to have a pause in the script for proper execution. Because pauses are a little bit more complex topic than a tip in the post, they will be covered in this series’ future articles.
Now let’s go through these 4 lines of code to understand what is happening here.
-
client– the Nightwatch.js object containing functions for executing our test. Check Nigthwatch documentation for their API reference. -
.url('https://duckduckgo.com/')– opens provided URL, in this case, DuckDuckGo homepage. -
.waitForElementVisible('#content_homepage', 10 * 1000)– waits until#content_homepageelement is visible. If the element is not visible within 10 seconds (10 * 1000ms), then the script stops its execution. By the way, this is both an action (wait for some time) and an assertion – check if something is correct, (check if the element is visible), that’s why we seeOK. 1 assertions passed. (1.211s)message in the console. -
.pause(5 * 1000);– pauses script execution for 5 seconds. In contrast towaitForElementVisible(), this is just an action which doesn’t assert anything. Now when we run our script, we can see DuckDuckGo’s homepage for 5 seconds and the browser window closes. Alright, the webpage is opened and is ready for the next actions, what now? Let’s see how to send input to a search field and search for “Nightwatch.js”. To do so we need to locate the necessary element. We can do so by using the browser “Inspect element” tool and copying CSS selector. But that’s a horrible approach since auto-generated selectors often are way more verbose than needed and that decreases selector and their element traceability, especially, when you have lots of selectors.
Tip: Manually writing a good selector that matches exactly 1 element is the best practice because it increases test stability. Preferably, elements should be located using CSS selectors, and, if that’s not possible, only then using XPath. We suggest checking out these websites to quickly learn how to locate elements: CSS diner and XPath diner.
Once a proper element selector has been identified, let’s update our script to send a value to our selector and after that send ENTER button keypress to trigger the search. For that we will use Nightwatch’s .setValue() function where as the first argument the selector is passed and as the second a string value that will be sent to the selector. You can read more about the function here.
module.exports = {
    test: client => {
        client
            .url('https://duckduckgo.com/')
            .waitForElementVisible('#content_homepage', 10 * 1000)
            .setValue('#search_form_input_homepage', 'Nightwatch.js')
            .setValue('#search_form_input_homepage', client.Keys.ENTER)
            .pause(5 * 1000);
    }
};
In a similar fashion, .setValue() can be used to send all kinds of inputs to different fields, e.g., account credentials in login forms, keypresses to test the support for shortcuts and closing pop-ups with Escape keypress. And as a next step, we can assert that the first search result title contains “Nightwatch.js”. To do so, will use one of many Nightwatch.js assertion functions – .assert.containsText(), you can read more about the function here. To learn more about assertions and verifications, check out our blog post.
module.exports = {
    test: client => {
        client
            .url('https://duckduckgo.com/')
            .waitForElementVisible('#content_homepage', 10 * 1000)
            .setValue('#search_form_input_homepage', 'Nightwatch.js')
            .setValue('#search_form_input_homepage', client.Keys.ENTER)
            .assert.containsText('#r1-0 .result__title', 'Nightwatch.js');
    }
};
After running the updated script, you should see 2 assertions in your console log output. If assertion passes, let’s click on the link first link. In Nightwatch, it is really simple and can be done using one .click() function call where as the only argument the selector has to be passed. To read more about the function, check out Nightwatch documentation about it.
module.exports = {
    test: client => {
        client
            .url('https://duckduckgo.com/')
            .waitForElementVisible('#content_homepage', 10 * 1000)
            .setValue('#search_form_input_homepage', 'Nightwatch.js')
            .setValue('#search_form_input_homepage', client.Keys.ENTER)
            .assert.containsText('#r1-0 .result__title', 'Nightwatch.js')
            .click('#r1-0 .result__title')
            .pause(5 * 1000);
    }
};
As the final step, let’s take a screenshot of our result using .saveScreenshot() function. All we have to pass to the function is the screenshot’s name.
module.exports = {
    test: client => {
        client
            .url('https://duckduckgo.com/')
            .waitForElementVisible('#content_homepage', 10 * 1000)
            .setValue('#search_form_input_homepage', 'Nightwatch.js')
            .setValue('#search_form_input_homepage', client.Keys.ENTER)
            .assert.containsText('#r1-0 .result__title', 'Nightwatch.js')
            .click('#r1-0 .result__title')
            .saveScreenshot('NightwatchJS.png')
            .pause(5 * 1000);
    }
};
After you run your script, you should see the NightwatchJS.png file in nightwatch-test directory.
That’s about it. These are the mere basics of Nightwatch.js to run it locally but now let’s see how to “deploy” your script to Loadero which will give you additional functionality.
Deploy your test script to Loadero
Why deploy your scripts to Loadero in the first place?
You just wrote a simple functional script that checks basic DuckDuckGo functionality. But that’s about it if you run your scripts only locally. By running your script in a cloud platform such as Loadero, you get so many more features than the local environment because you can:
- run multi-region test in many countries to test the website’s behavior based on geolocation;
- even modify network conditions without any complicated networking setup to test the website’s behavior, for example, in slow 3G network conditions;
- effortlessly test the website on multiple browsers and their various versions;
- easily convert your functional script into a load test in a few minutes;
- run tests with massive number of participants without any system maintenance; Check out our features page to see more information for things you can do in our cloud-platform.
How to deploy Nightwatch.js scripts to Loadero
Before deploying the script, check if you have all the necessary project structure to run your tests (in this case 1 participant with default network configuration will be enough). This blog post might help to get started – Performance Testing Example Using Loadero. If everything is done, click on the “edit” button on your test to update its script. Since Loadero extends vanilla Nightwatch.js functionality with various custom commands and has additional steps inside module.exports to provide you with insightful data that can be analyzed after test execution, you can’t just copy-paste the script from our local text editor. Although, this makes our job even easier – all we have to do is to write one function that will be exported for test execution. So we should update our script like this:
client => {
    client
        .url('https://duckduckgo.com/')
        .waitForElementVisible('#content_homepage', 10 * 1000)
        .setValue('#search_form_input_homepage', 'Nightwatch.js')
        .setValue('#search_form_input_homepage', client.Keys.ENTER)
        .assert.containsText('#r1-0 .result__title', 'Nightwatch.js')
        .click('#r1-0 .result__title')
        .saveScreenshot('NightwatchJS.png')
        .pause(5 * 1000);
}
There is one additional edit we have to do. To save your screenshot during the test, we have to use Loadero’s custom command .takeScreenshot() and provide a screenshot name (not file path) instead using original .saveScreenshot(). This is necessary so that Loadero can find the screenshot after the run and make it available in the run results. More information about this and other custom commands in Loadero can be found in our wiki. After these little changes your script should look like this:
client => {
    client
        .url('https://duckduckgo.com/')
        .waitForElementVisible('#content_homepage', 10 * 1000)
        .setValue('#search_form_input_homepage', 'Nightwatch.js')
        .setValue('#search_form_input_homepage', client.Keys.ENTER)
        .assert.containsText('#r1-0 .result__title', 'Nightwatch.js')
        .click('#r1-0 .result__title')
        .takeScreenshot('NightwatchJS.png')
        .pause(5 * 1000);
}
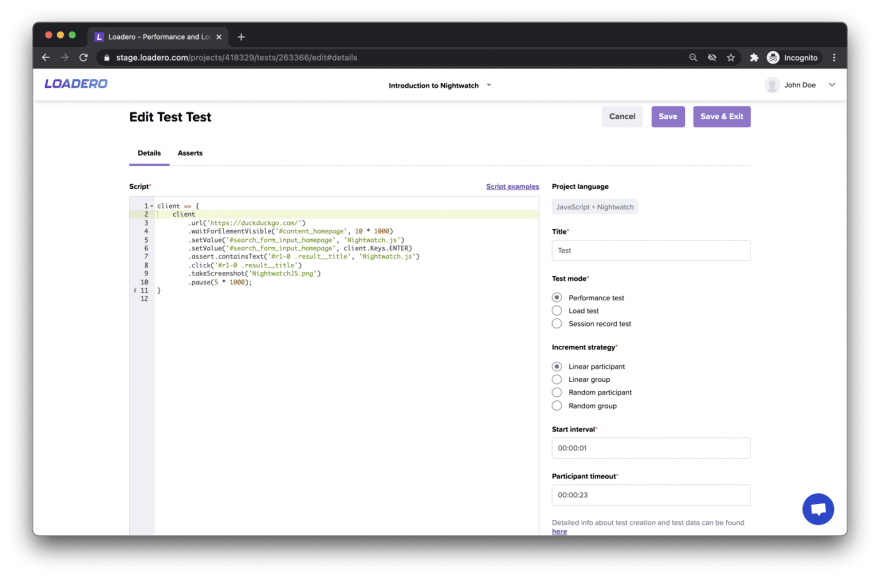
Now we can copy-paste it to Loadero and update our test configuration accordingly, i.e., set proper participant timeout and start interval. Since our test consists of multiple pauses/timeouts and multiple commands, we should take into consideration maximum possible test execution time. The general formula is
PARTICIPANT_TIMEOUT = TOTAL_PAUSE_TIME + TOTAL_TIMEOUTS_TIME + 1 SECOND * COMMAND_COUNT
In our case “Participant timeout” = 5 + 10 + 1 * 7 = 00:00:23 and since we are having only 1 participant in this test, we can set “Start interval” to 00:00:01. All other test parameters are up to you. In the end, your test should look something like this:
Now click “Save & Exit”, click “Run test” and you just run your very first Nightwatch.js test! Go to all results view by clicking “Results” button on the left side bard. Test execution should pass, but in case it fails, reread this article, check your script again and if this doesn’t help you, check our recommendations on debugging Selenium test scripts.
Conclusion
Nightwatch.js is an amazing framework which allows you to write web UI automation quickly and simply. In case you are really into configuring every little detail for your test runner, it has no compromises and enables you to do so as well. Once you have written all the code and validated it locally for any potential errors, you can deploy the script to Loadero and utilize all the stunning features it has to offer – starting from the success rate for your test and ending with detailed metrics, graphs and logs for each of your configured test participants.


Top comments (0)