Hello everyone! Today, I'll be introducing you to Progressive Web Apps; how to build one with React and how to deploy them on Github Pages. I'll also be showing you how to fetch/post data from an API and implement React Router to navigate between pages.
A Brief Intro to PWAs
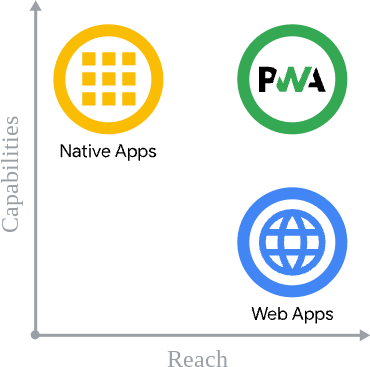
Simply put, a PWA or a Progressive Web App is basically an app that includes both web and native app features. It has the high accessibility and reach that web apps have over native apps. At the same time, it implements a rich and seamless user experience just like a native app.
In other words, a PWA takes the best of both web and native apps. There is no one standard framework or technology to build a PWA. However, there are characteristics that determines if an app is a PWA or not.
These characteristics are:
- Discoverable: The app and its contents can be found through search engines.
- Installable: The app is available for installation for any device.
- Linkable: The app is easily sharable via an URL.
- Network independent: The app can work offline or with a poor network connection.
- Progressive: The app is usable on a basic level on older browsers and fully-functional on the latest ones.
- Re-engageable: The app can send notifications whenever there are updates published.
- Responsive: The app is compatible for viewing and interaction from any device with a screen and browser such as mobile phones, tablets, laptops, etc.
- Safe: The app establishes secure connection between you and your server to protect against any malicious third parties.
Building a PWA in React
Now that we learn what a PWA is and some of its defining characteristics, let's build one using React. For this tutorial, I'll be building a small PWA project based on my API which I made during my Let's Build a Node.js REST API Series. Let's begin!
Some prerequisites useful to know:
- Basic understanding of React and React Hooks
- Basic knowledge in JavaScript
About the PWA we're building
- Name: Hashtag TEA
- Description: Fetches and displays information from T-API in a more engaging format for non-developers. Also allow visitors to post comments to the API via this app.
- Pages included in the app:
-
Home- The homepage shows all the teas we fetch from the API. Organizes and displays the data in a visually pleasing format. -
About- Some links to the repo and app description. -
Share- Allow visitors to share the app on Twitter. > Note: this tutorial only covers the Home page - Demo: https://victoria-lo.github.io/Hashtag-TEA/
Step 1: Create a React App
Create a new react app with npx create-react-app <app-name>. Your project directory will look like:
app_name
├── node_modules
├── public
└── src
    ├── App.css
    ├── App.js
    ├── index.css
    ├── index.js
    ├── logo.svg
    ├── serviceWorker.js
    └── setupTests.js
Step 2: serviceWorker.js
Navigate to serviceWorker.js. Scroll to the bottom where you'll see the line of code:
serviceWorker.unregister();
Simply change it to:
serviceWorker.register();
By registering serviceWorker, you are enabling your app to work offline and load faster. That's essentially how you make an app into a PWA in React. Very simple isn't it?
The Create React App Documentation provides a more detailed explanation on how React PWAs can be made this way. Let's move on to fetching data and display it nicely on our app's Home page.
Let's work on the Home page (Home.js), which will fetch and display the data in the layout shown below:

It also includes an input field at the bottom for user to post data (i.e. comment) to the API.
Step 3: Fetch Data
To fetch data in React using Hooks:
- Initialize a
datastate using theuseStatehook - Create a
fetchDatafunction to fetch the url and setdatato the fetched JSON - Use the
useEffecthook to call thefetchDatafunction as soon as the app loads
//1.
const [data, setData] = useState([]);
const URL = "https://tea-api-vic-lo.herokuapp.com/";

//2.
const fetchData = async () => {
    const res = await fetch(`${URL}tea`);
    const json = await res.json();
    setData(json);
  };

//3.
useEffect(() => {
    fetchData();
  }, []);
Step 4: Load and Display Data
Next, we'll have a loadData function that parses the fetched data and displays its properties in the layout shown in the picture earlier. Custom styling is done in App.css.
Note that this represents 1 tea object.
const loadData = (tea) => {
    return (
      <div key={tea._id} className="panel">
        <div className="name">{`#${tea.name}Tea`}</div>
        <img className="tea-img"
          src={`${URL}${tea.image}`}
          alt={`${URL}${tea.image}`}
        />
        <div className="content">
          <p>{tea.description}</p>
          <p>{`Origin: ${tea.origin}`}</p>
          <p>{`Brew Time: ${tea.brew_time}min`}</p>
          <p>{`Temperature: ${tea.temperature}°C`}</p>
          <p>{"Comments: "}</p>
          <p>
            {tea.comments.map((comment) => (
              <p key={comment._id}>{`"${comment.text}"`}</p>
            ))}
          </p>
        </div>
        <div className="form">
          <input
            onChange={(e) => setComment(e.target.value)}
            className="comment"
            placeholder="Add a comment..."
          />
          <button id={tea.name}
            className="post"
            onClick={(e) => postComment(e)}>
            Post
          </button>
        </div>
      </div>
    );
  };
Finally, we use data.map(loadData) to display each tea object from data.
return <div className="display-panel">{data.map(loadData)}</div>;
If we run npm start we should use that our app has successfully fetched and displays the API data correctly.
Step 5: Post Data
Nice, now we can work on posting data to the API. First, we initialize a comment state, which will be the value the string that the user types in the 'Add a comment' input field.
const [comment, setComment] = useState("");
We add an onChange props in our input element inside our loadData function to set the comment state to whatever the input value is.
<input onChange={(e) => setComment(e.target.value)}
   className="comment"
   placeholder="Add a comment..."
/>
Next, we create our function to handle posting data to our API when the user clicks on the 'Post' button.
  const postComment = (e) => {
    const tea = e.target.id;
    const inputElem = e.target.parentNode.firstChild;

    //make sure there is a comment to post
    if (inputElem.value.trim() === "") {
      alert("There's no comment to post");
    } else {
      //if there is, reset the input field
      inputElem.value = "";

     //create requestOptions to prepare for fetch
      const requestOptions = {
        method: "POST",
        headers: { "Content-Type": "application/json" },
        body: JSON.stringify({ comment: comment }), //send the comment
      };

      //use fetch to post the comment
      fetch(`${URL}tea/${tea}`, requestOptions)
        /*call the fetchData function again after posting
          to re-render tea object with the new comment*/
        .then(fetchData);
    }
  };
Now we can set up navigation between pages using React Router then deploy the app to Github Pages.
Step 6: Create Links to pages
To set up navigation between our Home.js and About.js pages, install react router dom with the following command: npm install react-router-dom.
Then import it in App.js, along with the page components. Proceed to nest the <Route> and <Switch> components within the <Router> component.
Refer to the documentation for more details on routing.
import { BrowserRouter as Router, Switch, Route } from "react-router-dom";
import Home from "./Home";
import About from "./About";

export default function App() {
  return (
    <Router>
      <div>
        <Nav />
        <Switch>
          <Route path="/" exact component={Home} />
          <Route path="/about" component={About} />
        </Switch>
        <Footer />
      </div>
    </Router>
  );
}
In Nav.js (the navigation bar component), set up <Link> components as shown.
<Link to="/">
   <i>
     <FontAwesomeIcon icon={faHome} />
   </i>
</Link>
<Link to="/about">
    <i>
       <FontAwesomeIcon icon={faInfoCircle} />
    </i>
</Link>
Final Step: Deploy!
We can easily deploy react apps to Github Pages. Simply run the following commands in the order:
-
npm install gh-pages: allow us to publish our build to thegh-pagesbranch of the repo - Add a
homepageproperty in ourpackage.jsonfile. The value should be the URL of your github website (i.e. https://.github.io/). For this example:
"homepage":"https://victoria.github.io/Hashtag-TEA"
- Add these 2 lines inside the
scriptsproperty ofpackage.json:
"predeploy": "npm run build",   //creates a build folder
"deploy": "gh-pages -d build"  //deploys the build folder
-
npm run deploy: runs thepredeployanddeployscripts to deploy the React app to the URL in thehomepageproperty
Bonus Step: Verify if an app is a PWA
Now the app should be live on the url! As a bonus step, let's check if it really is a PWA.
If the app is a PWA, the first thing you should notice when you visit the app's site is that it should be installable on your device. On your browser, you should see a small plus icon on the right. Clicking on it would allow the app to be installed.
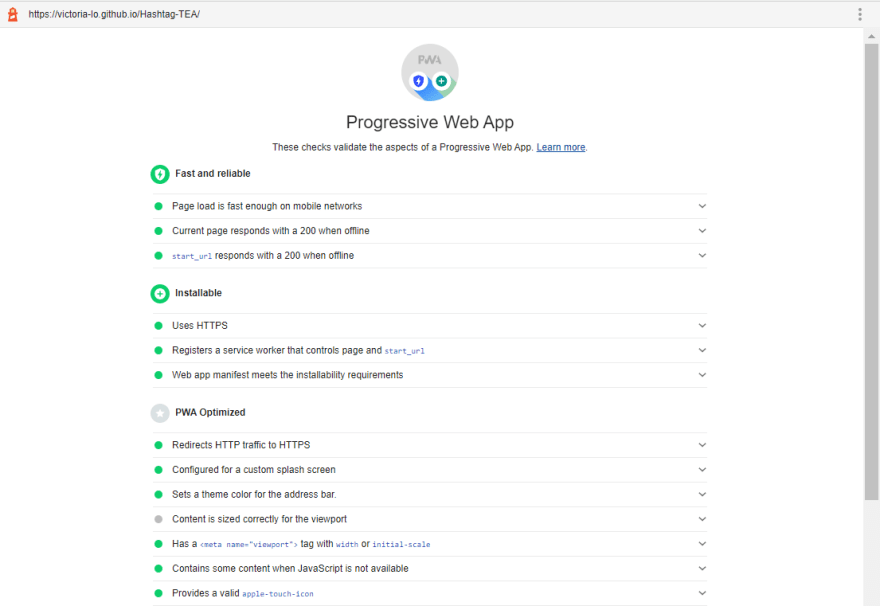
Another way to test if the app is a PWA is to use Google Chrome Inspector. Head over to the Lighthouse tab as shown in the image below.
Select the 'Progressive Web App' checkbox to verify if the site is a PWA. Lighthouse will generate a report and shows whether the app passes all its tests. If it passes all the tests, then it is a PWA!
That's all folks!
And that's how you can build, deploy and verify a Progressive Web App with React. Check out the demo or the repo for this tutorial. Thank you for reading. I hope it has been helpful. If you have any questions regarding PWAs, feel free to comment below. Have a fantastic day, cheers!


Top comments (0)