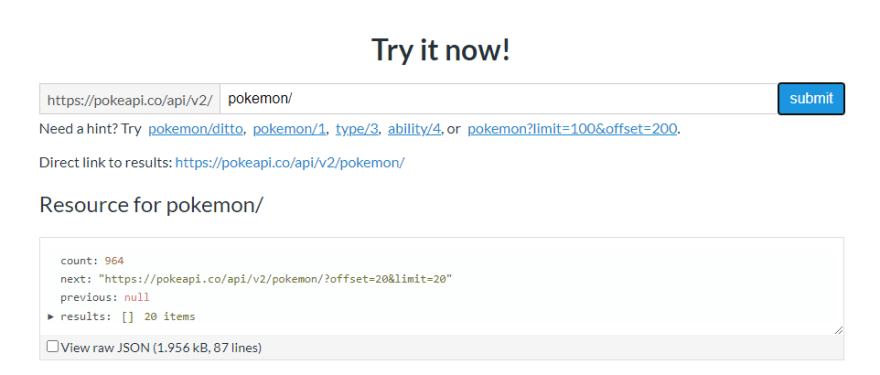
Hello devs! So the REST API from Let's Build a Node.js API Series is finished and deployed to heroku. Phew, the hard parts are over right? Well, there's one more optional but very nice-to-have step. And that is making a client-side for the API (or face, as I call it). That way, you don't need to use POSTman to check the returned response every time you make a request to the API. Here's an example of an API with a client-side:
Source: https://pokeapi.co/

A user can simply type the endpoints they want on the browser and then the API will return the response back onto the browser. Hence, the client-side or the "Face" of the API. In this article, I'll show you how to make a simple "Face" for our T-API deployed at https://tea-api-vic-lo.herokuapp.com. Let's get started!
Prerequisites needed:
- Basic knowledge in HTML, jQuery and Ajax
Step 1: index.html and styling
Create a simple home page for the API and its routes. I used Bootstrap and custom CSS for styling but feel free to use any CSS frameworks you want. For each route, I decided to organize them in a dropdown menu.
But there are many ways to do it like the above pokeapi example. Or https://docs.opendota.com/ if your API has many endpoints.
Of course, don't forget to have a footer that says "Made with ❤️ ".
<div class = "row">
    <div class = "col-md-7 col-sm-12 title">
       <h1>Welcome to T-API</h1>
       <p>The Tea API for all Tea Lovers~</p>
       <div class="dropdown">
          <button class="btn btn-lg dropdown-toggle" type="button" id="dropdownMenuButton"
          data-toggle="dropdown" aria-haspopup="true" aria-expanded="false">
          Routes
          </button>
          <div id = "routes" class="dropdown-menu" aria-labelledby="dropdownMenuButton">
            <a class="dropdown-item" href="#">Get All Tea</a>
            <a class="dropdown-item" href="#">Get One Tea</a>
            <a class="dropdown-item" href="#">Post new comment</a>
            <a class="dropdown-item" href="#">Post New Tea (Admin only)</a>
            <a class="dropdown-item" href="#">Delete All Tea (Admin only)</a>
            <a class="dropdown-item" href="#">Delete One Tea (Admin only)</a>
         </div>
       </div>
       <div class="col-md-12 col-sm-12 none" id="display"></div>
    </div>
    <div id="tea-gif"class = "col-md-5 col-sm-12">
          <video autoplay muted loop src="public/tea.mp4" type="video/mp4">Your browser does not support the video tag.</video>
=</div>

      <footer class="page-footer">
        <div class="footer-copyright text-center py-1">
          <a class="tea-btn" href="https://www.buymeacoffee.com/victoria2666">🍵 Buy Victoria a cup of tea!</a>
          © Made with ❤️ By<a href="https://github.com/victoria-lo/TAPI"> Victoria Lo</a>
        </div>
      </footer>
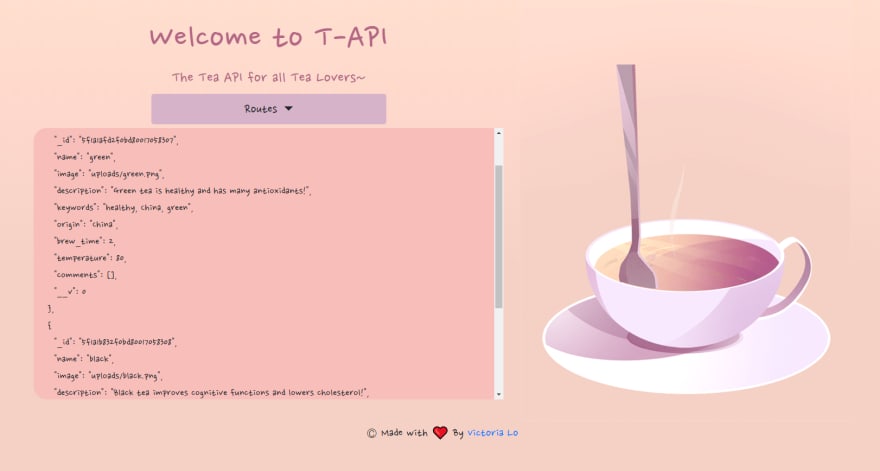
Result is a cute landing page of T-API. Looks so much better than when it was just a white page with text.

Of course, right now every item in the dropdown menu won't work. So let's create a index.js to connect the user interface to our API so that we can interact with our API from the browser.
Step 2: index.js
This script will be in charge of fetching data from the API and displaying it to our page. Remember to add this file as script inside index.html.
First, we want our dropdown menu to display information dynamically, depending on which menu item the user clicks on. So we will display a <div> element with the name of the menu item when it is clicked on.
I'm using jQuery because of Bootstrap but feel free to implement it your own way.
$( document ).ready(function() {
    $('.dropdown-menu a').on('click', function(){
        const selText = $(this).text();
        $('#display').removeClass("none").html("<p>"+selText+"</p>");
    });

})
The result should look something like:
Now, we will take it a step further by calling the individual functions based on the menu item clicked. So we can add conditional statements below our previous code like this:
$(document).ready(function () {
  $(".dropdown-menu a").on("click", function () {
    const selText = $(this).text();
    $("#display").removeClass("none").html("<p>" + selText + "</p>");
    if (selText == "Get All Tea") {
      $("#display").getAll();
    }
    if (selText == "Get One Tea") {
      $("#display").getOne();
    }
    if (selText == "Post new comment") {
      $("#display").postOne();
    }
  });
});
So now, if the user clicks "Get All Tea", we will call the getAll() function and if "Get One Tea" is clicked, getOne() will be called and so on. Let's go through how to write a few of these functions.
First, a recap
Here's a snapshot of our API endpoints so we know what each of our functions need to do. For this tutorial, I'll be focusing on getAll, getOne and postOne. You can visit my repo to see how to implement every function.
| Functions | Routes | Methods | Description |
|---|---|---|---|
| getAll | /tea | GET | Displays all tea |
| getOne | /tea/:name | GET | Displays a specific tea |
| postOne | /tea/:name | POST | Adds a comment to a specific tea |
Step 3: Fetch data from database to client
getAll
In order to retrieve data from our API, we can simply use getJSON(url) and provide our own url which is the API's endpoint. So, let's create the getAll function in jQuery.
$.fn.getAll = function () {
  $.getJSON("https://tea-api-vic-lo.herokuapp.com/tea", function (data) {
    $("#display").append("<pre>" + JSON.stringify(data, null, 2) + "</pre>");
  });
};
In this function, we use getJSON to fetch data from our API deployed at https://tea-api-vic-lo.herokuapp.com with the route /tea (refer to the table above). After the data is fetched, a callback function will parse and format the JSON and append it to the display <div> as a <pre> (preformatted) element.
getOne
getOne works similar to getAll except for the fact that we need the user to supply a name so it only fetches and returns that tea with the name. We do as follows:
- When the "Get One" menu item is clicked, the display
<div>shows an input for name and a button.
- When the button is clicked, we fetch the url
https://tea-api-vic-lo.herokuapp.com/tea/{name}, where 'name' is the value from the input. - Finally, we display the returned data like in
getAll, as a<pre>element.
$.fn.getOne = function () {
  //append input elements upon menu item being clicked
  $("#display").append(
    '<input type="text" id="getOne" name="name" placeholder="Tea name">\
        <button type="button" class="form-btn" id="oneTea">Get My Tea!</button>'
  );
  // if the submit button is clicked, fetch data with the specified name
  $("#oneTea").on("click", function () {
    $.getJSON( "https://tea-api-vic-lo.herokuapp.com/tea/"
       + $("#getOne").val(), function (data) {
         //display the fetched data in a nice format
        $("#display").html("<p>Here's your Tea!</p><pre>" + JSON.stringify(data, null, 2) +"</pre>");
      }
    );
  });
};
The result would be:
Step 4: Post data from client to database
We finished writing both our GET functions. Now it's time for our POST functions. Let's start with postOne, which allows the user to submit a comment to a particular tea's comment property.
postOne
We can do it as follows:
- Just like
getOne, we need to get the name of the tea to POST to the/tea/nameroute. So we will need some input elements for the name, the comment and a button to submit the comment.
- Then we make an ajax request to post the comment to the specific url.
- If the post is successful, display the comment data of the particular tea with the new comment.
$.fn.postOne = function () {

  //append input elements upon menu item being clicked
  $("#display").append(
    '<input type="text" id="postOne" name="name" placeholder="Tea to comment">\
    <input type="text" id="comment" name="comment" placeholder="Comment">\
    <button type="button" class="form-btn" id="oneComment">POST Comment!</button>'
  );

   // if submit comment btn is clicked, post the comment data
  $("#oneComment").on("click", function () {
    $.ajax({
      url: "https://tea-api-vic-lo.herokuapp.com/tea/"+$("#postOne").val(),
      type: "post", //request method
      contentType: "application/json; charset=utf-8",
      dataType: "json",
      data: JSON.stringify({ comment: $("#comment").val() }), //data to post

      //if post succeeds, display the comments
      success: function (data) {
        $("#display").html(
          "<p>Thanks for your comment! Here's all the comments so far.</p>
           <pre>" + JSON.stringify(data.comments, null, 2) + "</pre>"
        );
      },
      error: function (error) {
        $("#display").html("<p>Invalid Tea.</p>");
      },
    });
  });
};
Note that we post the comment data as an object { comment : user_comment } because the API is already expecting that format. And the result in the browser will look like:
The Beauty of Front-End
And that's how you can add a nice 'face' to your API to help you perform actions on it without programming. Just by entering inputs on the browser instead. It makes it user-friendly so people who check out your API can easily type in the parameters they want.
I hope you have enjoyed reading this mini tutorial. Please check out the repo for full source code. The API can be found at this link. Thanks for reading. Cheers!


Top comments (0)