Hello everyone! Welcome back to Let's Build a Node.js REST API Series.
If you are new to this series, please check out the previous articles to follow along:
Continuing from where we left off in the 2nd article, we will now integrate our API with a database. For this API, we are using MongoDB Atlas: a fully managed cloud database.
Step 1: Set up MongoDB
Go to this website to create a MongoDB account or sign in. Follow the steps below to set up MongoDB.
1. Create Cluster
When you first create an account, you will be asked to create a cluster. Choose the Shared Cluster, aka the 'FREE' one.
Now select the closest region to where you are now. I'm selecting N.Virginia since that's closest to where I am.
Leave the rest of the settings as default and click 'Create Cluster'.
2. Whitelist IP Address
After creating the cluster, you should see something like the image below. Click on 'Network Access' on the left panel.
You'll see a page where you can whitelist an IP Address. This means that only whitelisted IPs can access this database.
Click on 'Add IP Address'. A popup will appear, then click on the 'Allow Access from Anywhere' to make sure any device can access the database. Finally, click 'Confirm'. See image below to visualize.
3. Create user
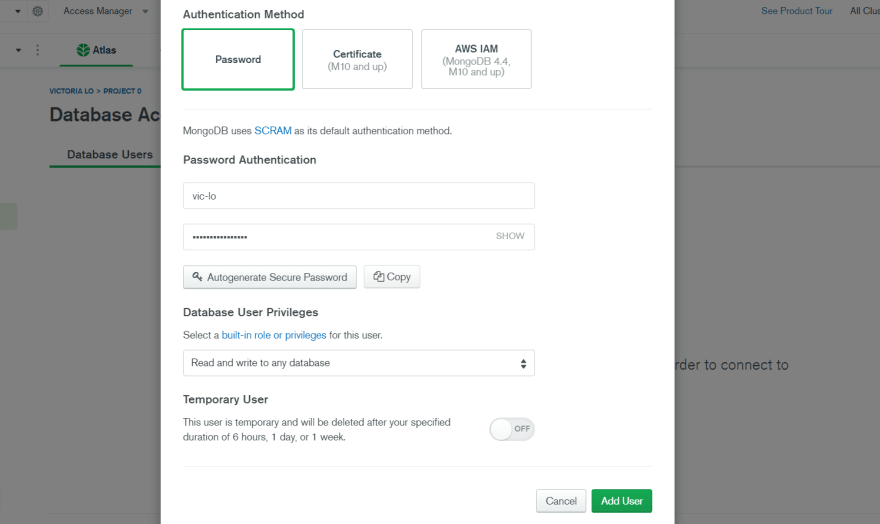
Now click on 'Database Access' on the left panel. We shall create our user by clicking on 'Add New Database User'.
This is a very important step. We will use password authentication to connect our API to our database. Fill in your username and password with anything you want, make sure you remember or take note of them. Then click 'Add User'.
4. Connect Cluster
Now, head to 'Clusters' and click on the 'CONNECT' button. Finally, click 'Connect your Application'. Take a look at the image below to see the steps.
Then, make sure the driver is Node.js and the version is the latest one (see image below). Copy the snippet provided. We will use this to connect our API to this database cluster. Let's close the pop-up window and head over to our API.
Step 2: Connect API to MongoDB
In our project, install mongoose by running:
npm install --save mongoose
What is mongoose?
Mongoose is an object data modeling (ODM) library for MongoDB. It allows us to efficiently create schemas for our MongoDB to use with ease. For more information, visit the mongoose documentation.
After installing mongoose, add the following to our server.js file:
 //import mongoose
const mongoose = require('mongoose');

//establish connection to database
mongoose.connect(
    'mongodb+srv://<username>:<password>@cluster0.eetsx.mongodb.net/<dbname>',
    { useFindAndModify: false, useUnifiedTopology: true, useNewUrlParser: true, useCreateIndex: true},
    (err) => {
        if (err) return console.log("Error: ", err);
        console.log("MongoDB Connection -- Ready state is:", mongoose.connection.readyState);
    }
);
In this code, we did the following:
- Import mongoose.
- Use mongoose.connect() to establish a connection to the database. Enter the copied URL from before as the first argument.
- Replace
<username,<password>and<dbname>of the URL as appropriate. For my API,<dbname>is tea. - In the 2nd argument, we enter some options that we need to set values for. This is so that we don't get deprecation warnings and that mongoose can connect to MongoDB. More details can be found here.
- Finally, we have an error handler function.
For security reasons
If you are adding this project to a public repository, it is best that no one can see the MongoDB URI since we have included our password, a sensitive information, in it. Hence, we can create an .env file in our root directory and write our URI inside it like:
MONGODB_URI='mongodb+srv://<username>:<password>@cluster0.eetsx.mongodb.net/tea'
Back to server.js, replace the uri inside mongoose.connect() with process.env.MONGODB_URI so we can hide this sensitive information. Make sure .env is included in your .gitignore so you don't push it to a public repo for everyone to see your password. That would waste the point of a creating a .env file. Here's what the final mongoose connect method should look like:
mongoose.connect(
    process.env.MONGODB_URI,
    { useFindAndModify: false,useUnifiedTopology: true, useNewUrlParser: true, useCreateIndex: true},
    (err) => {
        if (err) return console.log("Error: ", err);
        console.log("MongoDB Connection -- Ready state is:", mongoose.connection.readyState);
    }
);
Then, install the package dotenv npm so that we can use our .env file in our project:
npm install dotenv
Add this line on the top of server.js which initializes the dotenv:
require('dotenv').config();
Step 3: Create the Tea Model
Now we are ready to add tea data objects into our MongoDB Atlas database.
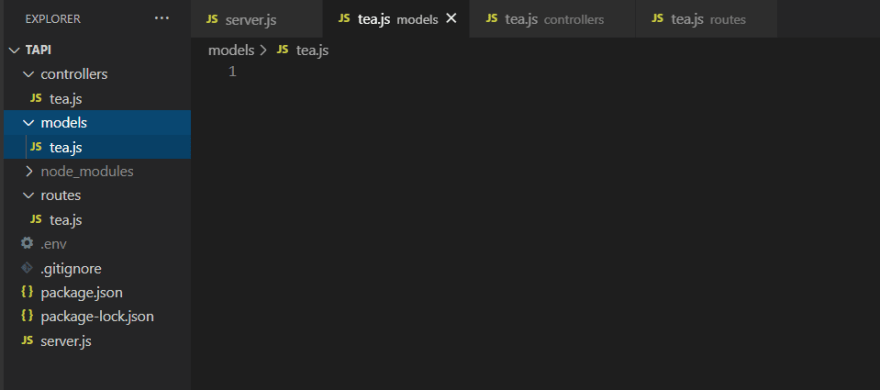
First, create a 'models' folder. Then, create a tea.js file inside the folder. This is where our tea model will be. Here's what your directory should look like at this point:
Now, let's create a new schema inside our models/tea.js file. Then export the module to use in our tea controller.
What is a schema?
A schema defines the shape of the document which maps to a MongoDB collection. We then convert this schema into a Model, which we can then work with to manipulate it with our API.
Our tea schema, will be based on the tea object we planned earlier in the first article:
// A sample tea object
{
    "name": "Jasmine Tea",
    "image": "an image file url",
    "description": "Jasmine tea (茉莉花茶) is tea scented with the aroma of jasmine blossoms.",
    "keywords": "aromatic, china, sweet",
    "origin":"China",
    "brew_time": 2,
    "temperature": 80,
    "comments": ["text": "I am a comment", "date": Date String]
}
We can create our tea schema as follows:
//Syntax
property: {type: SchemaType (i.e. String, Date, Number),
                  other options (i.e. default, required)}

//Examples
name: {type: String, required: true}
description: String   //short for {type: String}
Feel free to stop at this step to try writing the schema yourself. It's the same format as the examples.
Please wait, coding in progress...

(Source: https://data.whicdn.com/images/329890298/original.gif)
Here's our tea schema (in models/tea.js):
const mongoose = require("mongoose"); //import mongoose

// tea schema
const TeaSchema = new mongoose.Schema({
    name: {type:String, required:true},
    image: String,
    description: String,
    keywords: String,
    origin: String,
    brew_time: Number,
    temperature: Number,
    comments: [{ text: String, date: {type:String, default: new Date()} }]
});

const Tea = mongoose.model('Tea', TeaSchema); //convert to model named Tea
module.exports = Tea; //export for controller use
So as shown in the code above, we have created our tea schema, converted it to a model using mongoose.model() and finally export it as a 'Tea' model for controller functions to manipulate (i.e. create, read, update and delete data).
That's all for now!
In this article, we have successfully set up MongoDB Atlas and use mongoose to help integrate our API with MongoDB. Let's add some functions to our controllers/tea.js to use our Tea model for our API in the next part of this series.
Thanks for reading and please leave a like or a share if it is helpful. Don't hesitate to ask any questions in the comments below. If there are some concepts you are unsure of, please have a look at some of the reading resources below. Cheers!


Top comments (0)