So, what's an authentication system?
It is used to identify users which allows the app to store personal user data and provide a personalized experience across all the user's devices. Think of any apps that requires you to create an account like e-commerce apps, productivity apps, etc.
These days, most apps have an authentication system in order to provide their users a personalized and distinct experience. But how do we design and implement a good authentication system? In this tutorial, we will build a simple authentication system using Firebase Authentication and React (for front-end).
Step 1: Set up Firebase Project
If you don't have a Firebase account, go here to create an account.
Then, create a new project and fill in the details:
Using Google Analytics is completely up to you:
Accept terms and create the project:
After creating the project, you will be taken to the project dashboard. There are 4 round icons in the middle (iOS, Android, Web and Unity). For this tutorial, choose the Web icon.
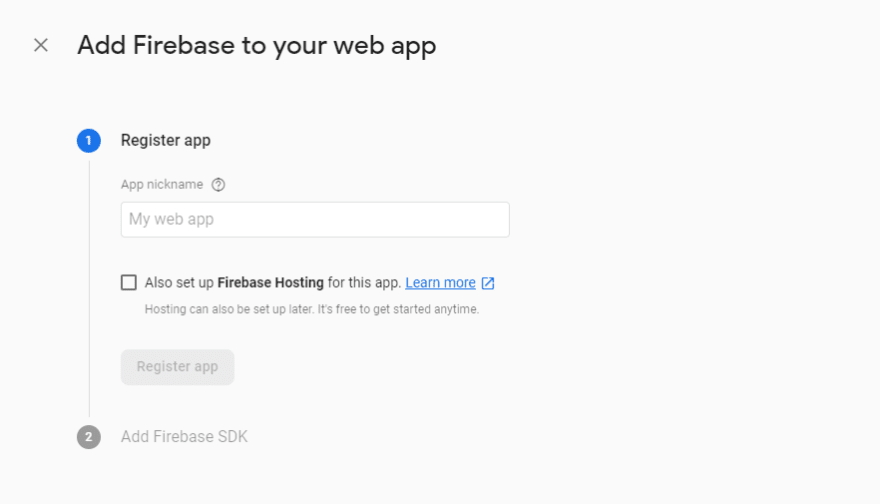
You will then have to register the app. Fill in the details. We can skip the Firebase Hosting option for now.
After clicking 'Register App', you will see the screen below. These configurations will be important so copy the
var firebaseConfig = {...}
and keep it somewhere for now. We will come back to it later.
Set up Firebase Authentication
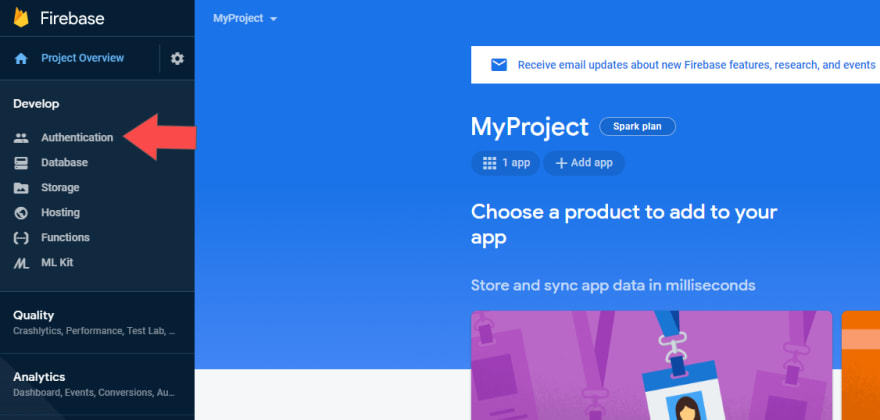
Now that we have our app created, let's head over to the left sidebar of the dashboard. Under the Develop tab, click on the Authentication option.
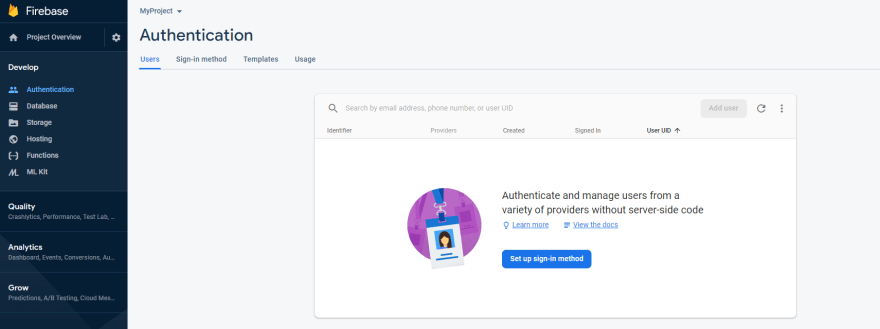
Now click on the Set up sign-in method button to get started.
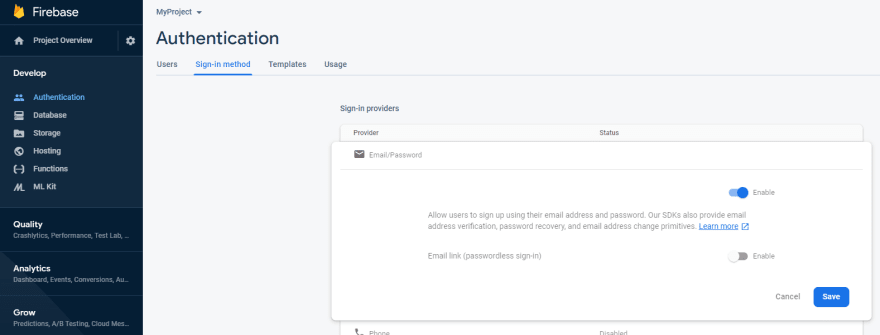
Then let's click on Email/Password option to enable it. And done! Once we connect Firebase to our app, our users will be able to log into the app with their email and password. This tutorial will not cover how to set up other methods of sign in because it requires a few more steps. Do let me know if you want me to show you how to use the other methods!
Step 3: Create React App
We have set up the necessary Firebase stuff for our React App. So let's now create the app!
On your command line:
npx create-react-app myProject
Then run:
npm install firebase
Now, retrieve the
var firebaseConfig = {...}
that you have saved and copy it to the index.js like so:
const firebaseConfig = {
  apiKey: APP_API_KEY,
  authDomain: AUTH_DOMAIN,
  databaseURL: DATABASE_URL,
  projectId: PROJECT_ID,
  storageBucket: STORAGE_BUCKET,
  messagingSenderId: MESSAGING_SENDER_ID,
};

firebase.initializeApp(firebaseConfig);
Add the
import * as firebase from 'firebase'
at the top and this is what it should look like:
import React from 'react';
import ReactDOM from 'react-dom';
import './index.css';
import App from './App';
import * as firebase from 'firebase';

const firebaseConfig = {
  apiKey: APP_API_KEY,
  authDomain: AUTH_DOMAIN,
  databaseURL: DATABASE_URL,
  projectId: PROJECT_ID,
  storageBucket: STORAGE_BUCKET,
  messagingSenderId: MESSAGING_SENDER_ID,
};

firebase.initializeApp(firebaseConfig);
const auth = firebase.auth();

ReactDOM.render(
    <App />
     document.getElementById('root')
);
Step 4 Sign In Page
This is the home page of my project. In order to sign in, the user will click the top right button and this button will display the Firebase Authentication UI to login. Then, the user will be redirected to a home page with a personalized account page. Let's write that in code!
First, install the Firebase UI by running:
npm install --save react-firebaseui
Then, create sign_in.js to display the authentication login page and setup the sign in options. For this example, I want to allow the user to sign in via third party services like Google and Facebook and just in case the user doesn't want to use those services, he/she can sign in using email.
this.uiConfig = {
   signInFlow: "popup",
        signInOptions: [
            firebase.auth.GoogleAuthProvider.PROVIDER_ID,
            firebase.auth.FacebookAuthProvider.PROVIDER_ID,
            firebase.auth.EmailAuthProvider.PROVIDER_ID
         ],
        callbacks: {
            signInSuccessWithAuthResult: () => false
         }
 };
The configurations will be entirely up to you, based on what you want to do. Read the documentation for details.
Then, have a state called isSignedIn to track whether a user is logged in or not. We can update the state using the firebase.auth().onAuthStateChanged() listener function.
This is still in sign_in.js.
componentDidMount() {
    firebase.auth().onAuthStateChanged(user => {
        this.setState({isSignedIn: !!user
        })
    })
}
To redirect the page back to home after the user logs in, run:
npm install react-router-dom
Import it in sign_in.js and here's the full code:
import React from 'react';
import '../App.css';
import { FirebaseAuth } from 'react-firebaseui';
import firebase from 'firebase';
import {Redirect} from 'react-router-dom';

class SignIn extends React.Component {
    constructor(props) {
        super(props);
        this.uiConfig = {
              signInFlow: "popup",
                  signInOptions: [
                  firebase.auth.EmailAuthProvider.PROVIDER_ID
              ],
            callbacks: {
                  signInSuccessWithAuthResult: (result) => false
              }
          };

        //set state to false by default
        this.state = {
            isSignedIn: false
        }
      }

    componentDidMount() {
        firebase.auth().onAuthStateChanged(user => {
            this.setState({
                isSignedIn: !!user,
            }
        })
    }
    render() {
      return (
          <div>
        {this.state.isSignedIn ? <Redirect to={{pathname: "/"}}/> :
        <div className="section">
                <div className="container">
                    <div className="row">
                        <div className="col-md-12">
                            <div className="section-title">
                                <h2 className="title">Sign In</h2>
                            </div>
                            <FirebaseAuth uiConfig={this.uiConfig} firebaseAuth={firebase.auth()}/>
                        </div>
                    </div>
                </div>
        </div>}
        </div>
      );
    }
  }
export default SignIn;
Congratulations!
Your Firebase Authentication is implemented to your React App and should be good to go! If everything is right, upon clicking the SIGN IN button, the user should see:
Step 5: Next Steps
This is the end of what this long tutorial can cover for now. But the next steps to this authentication system is to update the home page if the user signed in to be more personalized. (i.e. have their name and profile picture replace the generic one on the top right corner). I went ahead and did it already:
As seen in the top right corner, after signing in, the app knows exactly who I am and display both my name and profile picture. It also changes the 'SIGN IN/JOIN' to a 'SIGN OUT' button. A simple way to sign a user out is using:
firebase.auth().signOut()
Thanks for reading this article. I hope this tutorial is helpful for new coders trying to deal with Firebase Authentication and React. Feel free to ask me questions if I could help with any issues regarding the implementation of this tutorial. Cheers!
New article on how to set up Firebase authentication with the aforementioned Next Steps using React Hooks and Context API here.


Top comments (0)