
Build a REST API with Linx in under 15 minutes
Twitter, YouTube, Facebook identification systems… hundreds of companies generate business thanks to REST APIs. Why? Because REST is the most logical, efficient and widespread standard in the creation of APIs for Internet services.
However, REST API development has many approaches and there are 100’s of different API development tools to choose from, it can be pretty easy to get lost just in the process.
In this article, we cover how to build and host and API in Linx, a low-code development platform that gives us a quick and easy way to develop and host APIs.
1. Application Specifications
The Linx application will contain a REST API hosted on a Linx application cloud server. The web service will contain an operation to return a full list of mock ‘products’ from a SQL server cloud database as well as an operation to return a specific ‘product’ based on a parameter. The web service will be secured via the API Key authentication scheme.
Database specification
The Linx application will connect to a SQL Server cloud database hosted on an Azure instance.
For demonstration sake, the following table exists that holds records related to mock “products”.
These records have been imported into the database using Linx:
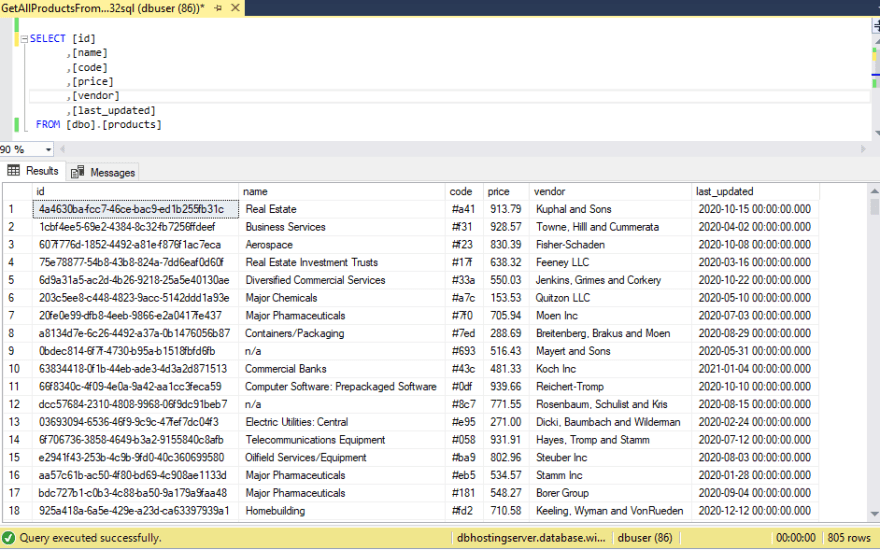
These records will be retrieved from the database and returned in a http response by Linx, filtering for a specific ‘product’ will be achieved with SQL.
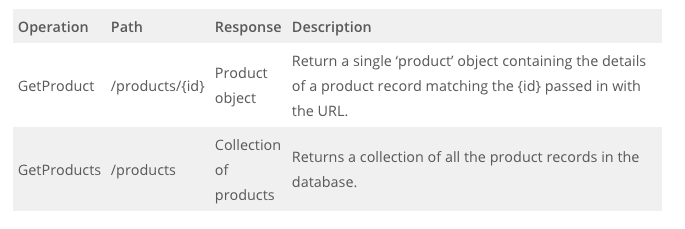
API specification
The REST web service will contain the below operations
2. Building the Application
Building the described application in Linx and hosting it involves the following stages:
- Create a new application
- Add the relevant plugin libraries
- Define the web service operations
- Add custom processing logic
- Deploy and activate
Create a new application
Creating a Linx application is easy – with just a single click, the base skeleton of the application is created for you. You are then able to add services, functions and types to bring your application to life.
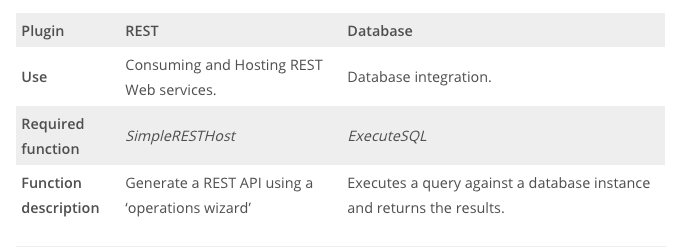
Install the relevant plugin libraries
Linx is based on a plugin architecture that can be thought of as common libraries which contain functions and data types related to that area of functionality. For my application, I need to integrate with a database and expose a REST web service:

Creating and defining a REST web service
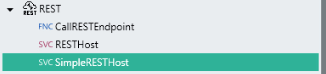
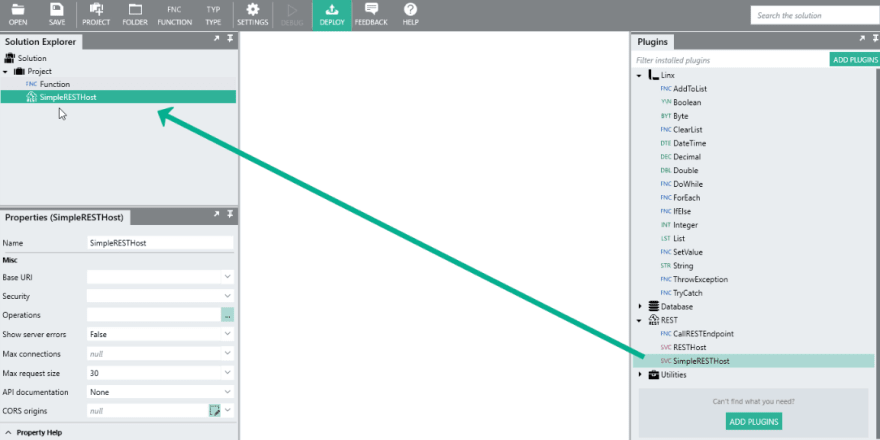
To add a REST web service to my Linx application, I can just make use of the SimpleRESTHost service (part of the REST plugin). This allows me to quickly create and configure REST operations. The service can be added to my application by dragging the SimpleRESTHost service from the plugins panel into the Solution Explorer. This will create a base skeleton of an API for me to work with.
Next, I need to define the Base URL on which the API will be hosted on. The specific paths of each operation will be appended to this Base URL. In my case, I’m are going to initially test the web service locally by hosting it in the actual Linx Designer, this can be done by setting the Base URL to the below:

Defining the operations
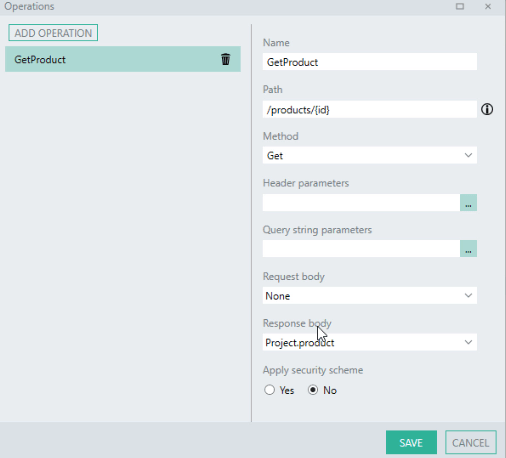
Now that the base configuration is set up, I can now begin to add my operations to the web service. First I’m going to create the ‘GetProduct’ operation and configure it with the below properties:
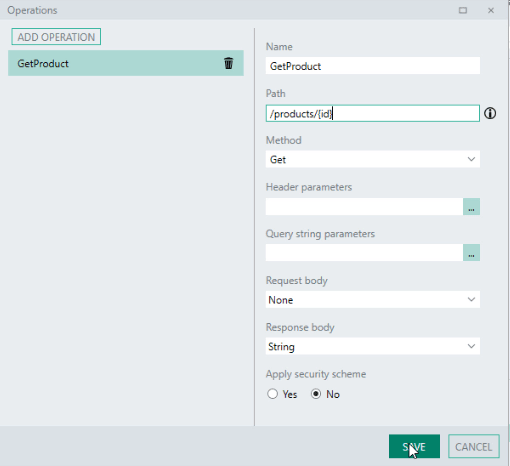
For now, I’m just going to leave the ‘response body’ type as a ‘String’ to make a “Hello World” request.
The ‘GetProduct’ operation will then be created and visible in the Linx Designer.
Adding logic to the operation
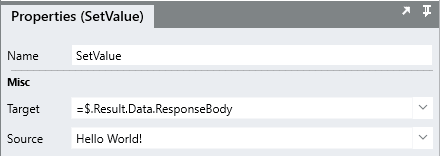
I can now begin to add logic to return our response. To start, I am just going to return a simple message “Hello World!” to ensure I’ve set up everything correctly so far.
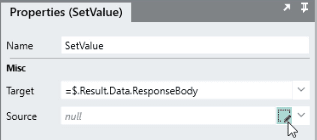
To do this, I can just add a SetValue function from the plugins panel onto the ‘GetProduct’ operation canvas. This function allows you to alter the value of a data reference, in my case I am going to alter the response body property of the ‘GetProduct’ operation and return a simple text message “Hello World!”.

Testing the service
I can now test out my Linx web service by debugging the service in the Linx Designer. This will spin up a locally accessible web service that I can test out and make requests against as well as seeing the process flow.
Once the service debugging has started, I can make a request to the below endpoint in my browser:
http://localhost:8080/myapi/products/this-is-my-testid
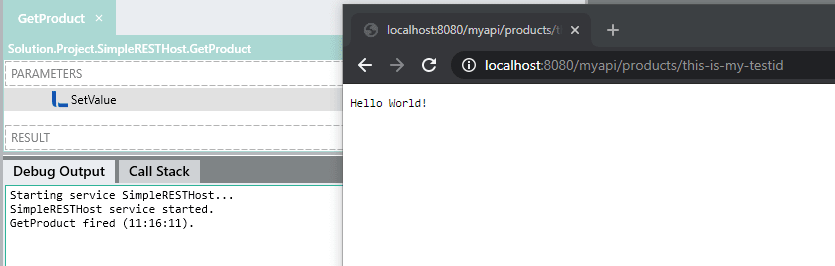
If successful, a string response containing the text “Hello World!” will be returned.
Now that I’ve confirmed the web service is functioning correctly, lets add some real-world functionality.
Define a ‘product’ object
First, I’m going to configure the operation to return a ‘product’ object. To do this, I need to define a custom type in Linx which will contain the relevant fields:
{
“id”: “0bdec814-6f7f-4730-b95a-b1518fbfd6fb”,
“name”: “Clothing Jeans”,
“code”: “#693”,
“price”: 516.43,
“vendor”: “Mayert and Sons”,
“last_updated”: “2020-05-30T22:00:00.0000000Z”
}
To define such an object to work with in Linx, you are able to either import the above JSON string into Linx and a custom type mapping to those fields will be created. Or you have the option of manually creating the relevant fields using the type editor.

Update response type of operation
Once I’ve defined the ‘product’ type, I am able to reference this structure throughout the application. In my case, I am going to be returning this ‘product’ type as the response of our ‘GetProduct’ operation. To do this, I can just open up the operations editor of the SimpleRESTHost and alter the response body type to be of the custom type ‘product’ that I just created.
Set response fields
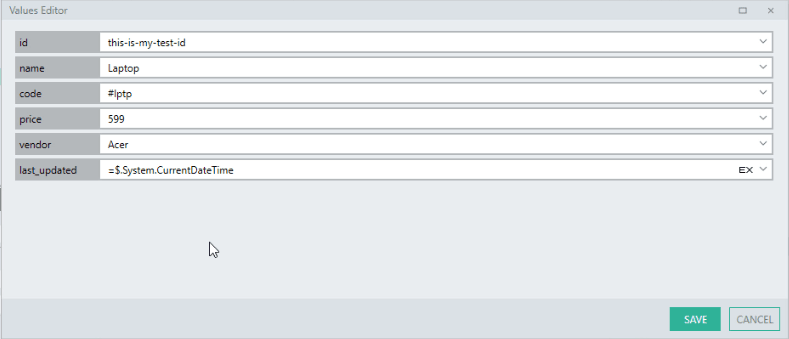
Now if I go back to the SetValue function in the ‘GetProduct’ operation, Linx has picked up the operation changes and now I am able to set the individual fields of the response body using the field editor.
To test it out, I’m going to hard code some values for a mock ‘product’ in the SetValue.
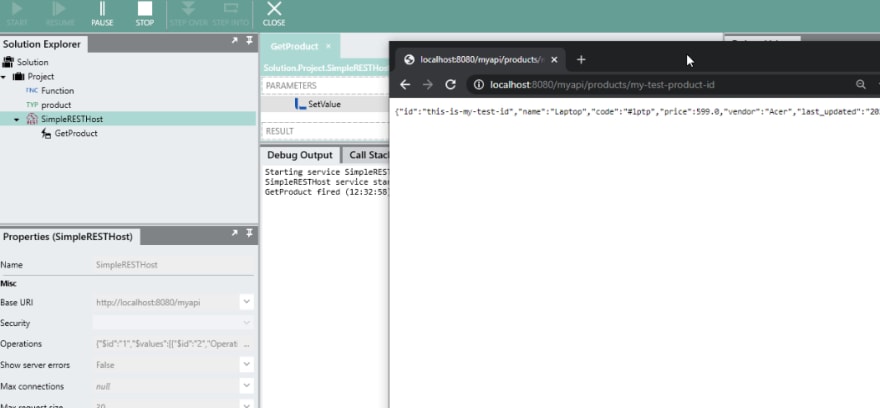
Debug service with changes
When I debug my web service again and make a request using a browser or tool such as Postman. The response data will contain a JSON object containing the fields of my ‘product’.
Now that I’ve confirmed the web service is functioning correctly and the response object has been configured, lets add the final piece to this operation, namely retrieving a particular record from the database.
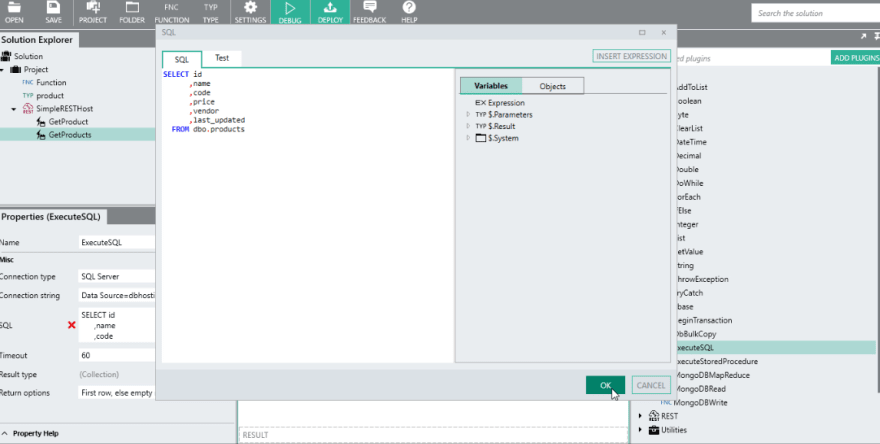
Adding an ExecuteSQL function
To execute such a query against our database, I can just use the ExecuteSQL function which is part of the database plugin. I can just add this function to our ‘GetProduct’ operation above the SetValue.
Creating a connection to the database
Next, I first need to create a connection to the database, this can be done with the connection editor. This will build up a connection string which will be used by the ExecuteSQL function when connecting to the cloud database.
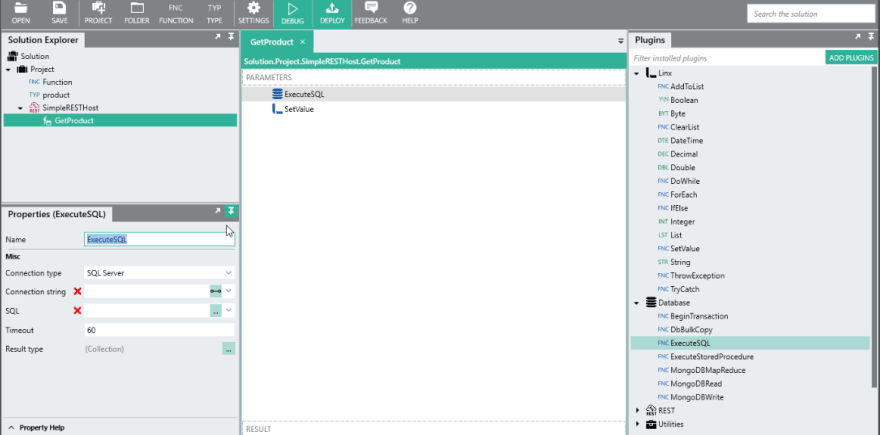

Creating a SQL query
Now that I’ve established a successful connection to the database, lets add a query to filter the ‘products’ for a record matching the {id} parameter passed in with the request URL. With Linx, you are able to auto generate query statements, in my case, I am going to generate a ‘SELECT’ from the ‘products’ table. This will create a basic ‘SELECT * FROM’ statement. For my particular use case, I am going to add a query condition to the SQL statement which will filter for records with the id field matching the ‘id’ parameter passed in with the request. The id parameter is available as a variable which can then just be dragged into my query. The names of the output fields will be auto-populated by Linx.
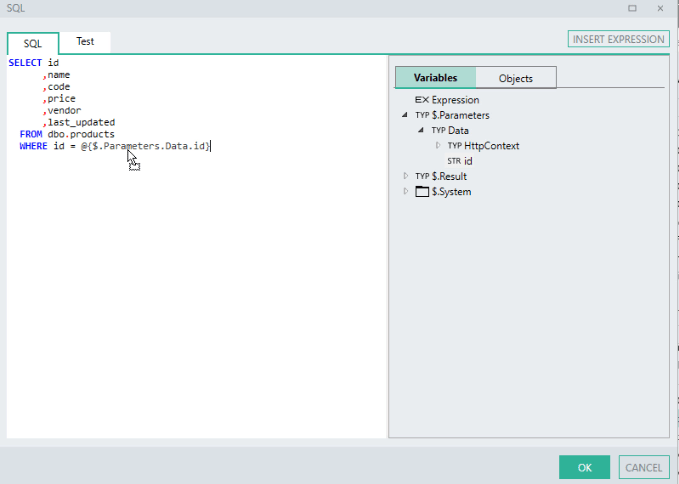
Setting the database return type
Next, I am going to configure the output type of the ExecuteSQL to only return a single row (as product ids are unique), and if none are found then the default value types will be returned. This can be done by setting the output type to ‘first row, else empty’.
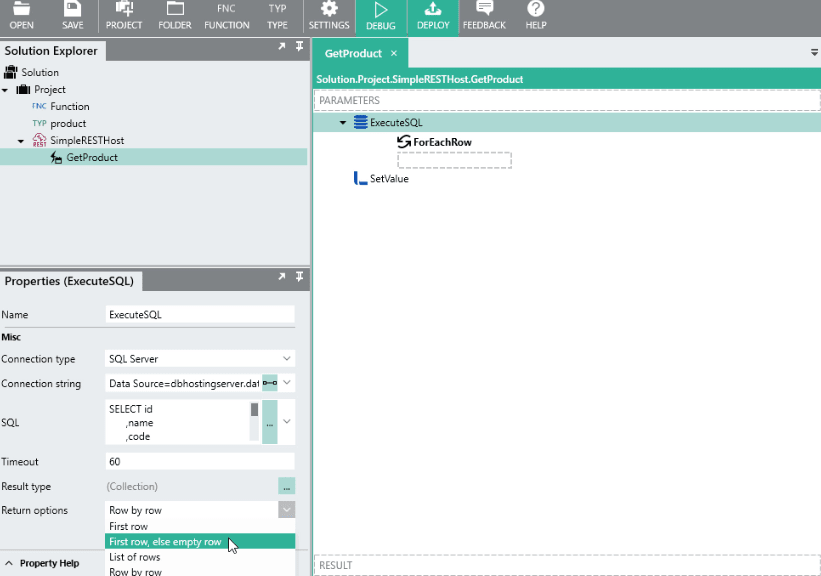
Setting the response of the operation
Now that I’ve setup our database connection and query, I can now return the results of my database query as the response body by referencing the fields returned from the database. To do this, I just need to modify the SetValue and instead of hardcoding values as the response, for each field, I can just reference the appropriate field returned from the database.

3. Debug the Service
Now I have a Linx application that contains a web service operation which takes in an {id} of a ‘product’, queries the database for a matching record and returns the result. Let’s take it for a spin!
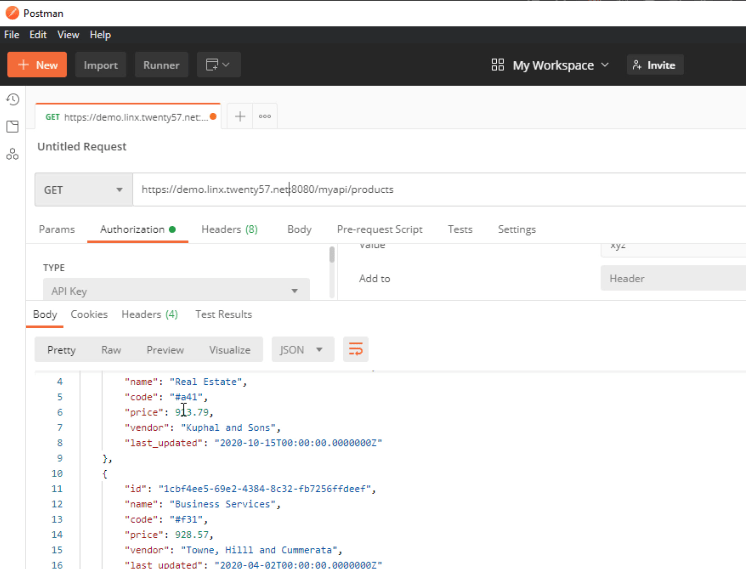
Using Postman, I can make a request to the endpoint:
http://localhost:8080/myapi/products/{id}
Where {id} is GUID that matches a record in the database.

A ‘product’ is returned containing the details of a matching ‘product’ record from the database.
4. Returning All Products
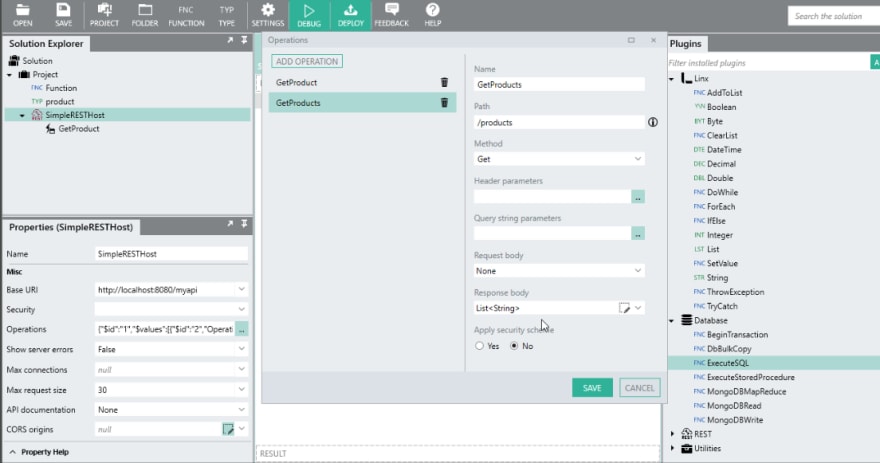
Now that I’ve created my ‘GetProduct’ operation and confirmed it is working as expected. Lets follow the same steps but create an operation that returns all of the products from our database.
In this operation, a request will be made to the ‘/products’ path. The database will be queried for all product records, these records will then be returned in the response as a collections of ‘product’ details.
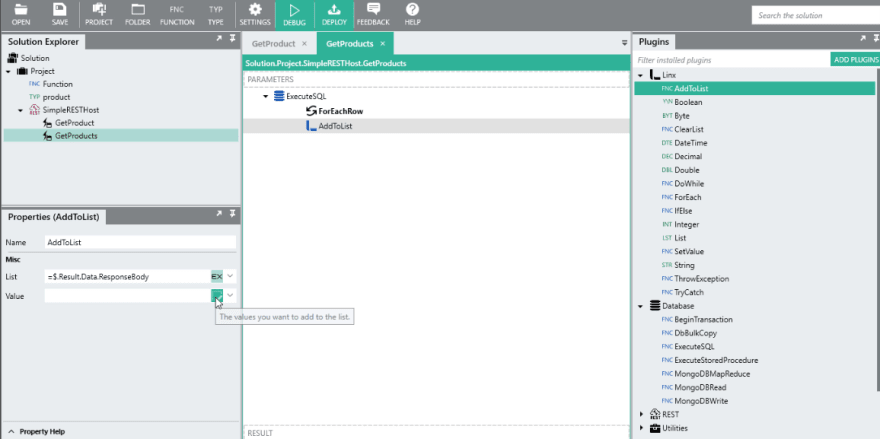
Much like before I can just simply add an additional ‘GetProducts’ operation with the path ‘/products’. In this case, the operation will return a list of ‘product’ in the response body. To configure the operation to do this, set the response body type as ‘List’ and then using the list type editor, set it as ‘List’.

Retrieving all products from the database
As I did before, we can add an ExecuteSQL function to the operation and use the autogenerated statement to return all the records from the database, row by row. You can also copy the ExecuteSQL function from the ‘GetProduct’ operation and alter the query statement and return options properties.
Adding to the products list response
Since the response body type is a list of ‘product’, I need to build up the list of products row by row. This is achieved by using an AddToList function instead of a SetValue. For each row returned by the query, the particular ‘product’ details are then added to the response body list.

Debugging the service
When a call is made to the ‘/products’ operation, a JSON structured List containing all ‘products’ will be returned.

5. Adding Authentication
Now that I’ve got a public and open API, lets add some security to limit who can access the data. In this case I’ll add some basic API Key authentication to the operations. When a request is made, Linx will extract the ‘Authorization’ header from the request, this will then be available to use in my authentication event to validate the API Key against a value stored as a constant (this could also be things such a database record, file record etc.).
To add API Key authentication to an operation, I can just select the ‘API Key’ option in the SimpleRESTHost properties:

This will create an “Authenticate” event which will be visible in the Solution Explorer’. Authentication logic can be added to this event to validate incoming requests before any operation is executed.
Adding authentication logic
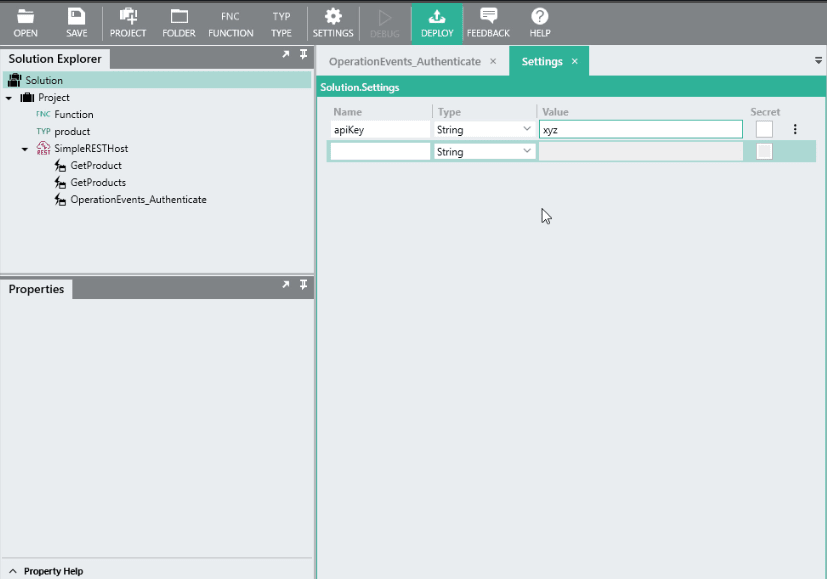
In my case, I am just going to compare the API Key submitted with the request against a value stored as a Linx application’s $.Settings (or constant). If the value matches, the result of the authentication event is set, if it does not match, then by default the operation will return a (401) – Unauthorized response.
I first need to create a constant to store our API Key in, this is done by adding a ‘$.Setting’ to the Linx application which will be available to reference across my Linx application.
Then I need to add some decision-making logic to validate the API Key by using an IfElse decision making function.


Applying the authentication to an operation
Next, I can attach the security scheme to my operations by editing the particular operation and applying the scheme:

Testing the authentication
I can test out the authentication scheme by debugging and making a request without an API Key header, I will receive a ‘(401) – Unauthorized’ error.

When I make a request, if I include an API Key which matches the constant in the Linx application in the ‘Authorization’ header, I should be successfully authenticated and the list of products returned.

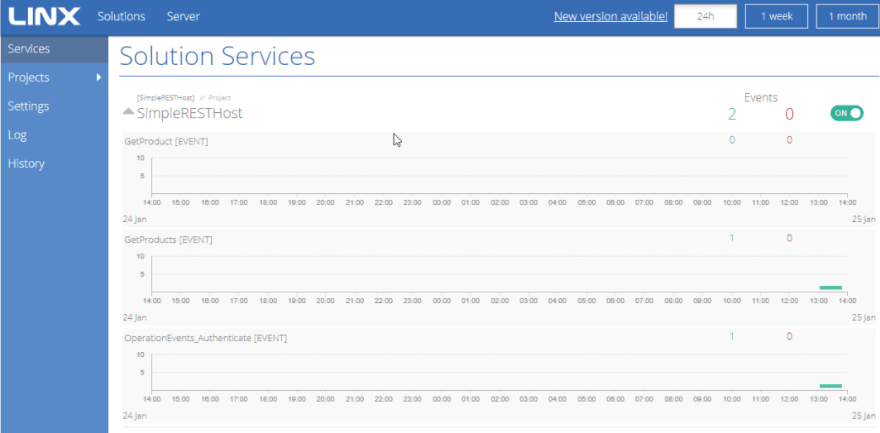
6. Deploying to Production
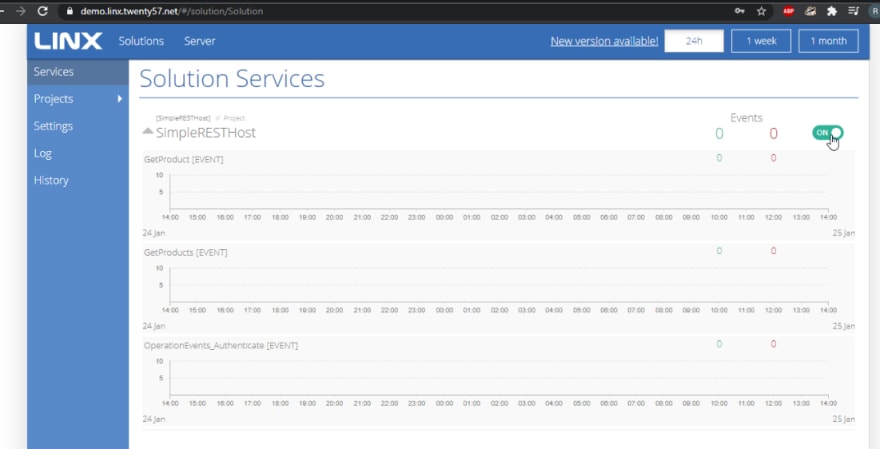
Now that I have a functional Linx web service with security applied, lets deploy my web service into production so I can expose it to the external world. This is done by deploying the Linx application to my Linx application cloud server where it will be hosted and activated. Once this is done, requests can be made from anywhere against the API.
Altering base URL
First I need to alter to Base URL to host it on the cloud server which can be done with the below setting:
https://+:8080/myapi
The ‘+’ character will grab the cloud server instance name once deployed.
Deploying to the cloud server
Next, I can simply deploy to my cloud instance of the Linx application server by deploying straight from the Linx Designer. Next, I just need to activate the web service. And now I can make request from anywhere against the API.

7. Generating documentation for our API
Now that I’ve secured and deployed our API, in order for people to use it, they need to understand the rules. To expose these rules, I can automatically generate the documentation for my Linx API by setting the API Documentation property of the SimpleRESTHost. In my case we are going to generate the documentation in Swagger.

Once I’ve configured the changes, I need to deploy again to activate the changes. Once deployed, users can make a request to the documentation endpoint which is hosted on: {base URL}/swagger

You’re done!
And that’s how simple it is to build an API using Linx.
The post The Ultimate Guide to Building a Low-code REST API (How to Guide) appeared first on Linx.

Top comments (0)