Salesforce offers a REST API that allows you to integrate with third-party applications. This guide illustrates how to integrate with Linx, a low-code application development tool.
- In Linx, you can build automated tasks, process, move and manipulate your data.
- It also allows you to easily extend the functionality of Salesforce, as well as integrate Salesforce with other 3rd party applications such as Xero, QuickBooks, and other system APIs.
- This allows you to join systems together creating a completely automated loop.
The following will be covered in this guide:
- Setup of a Salesforce connected App and OAuth 2.0 authentication
- Authenticating and connecting to the Salesforce API
- Example requests
- Example of custom functions
Tip
Before continuing it is advised that you take a look at the below articles to familiarize yourself with working with APIs in Linx (or, watch this video).
- Consuming REST APIs
- Generic OAuth 2.0 authenticator
- A sample solution has been built to make it easier to get up and developing with Linx and Salesforce: SalesforceTemplate.lsoz (186.0 KB) You will need the Linx designer to view this file (Free download).
Let's get started
1. Register Your Linx-Salesforce App
In order for you to interact with the Salesforce API, you must first register a connected application. This will then provide you with the necessary authorization details, which you can then use to generate your Access and Refresh tokens.
Tip It is advised that you create a separate demo instance of Salesforce in order to test.
- Log in into the Salesforce front-end.
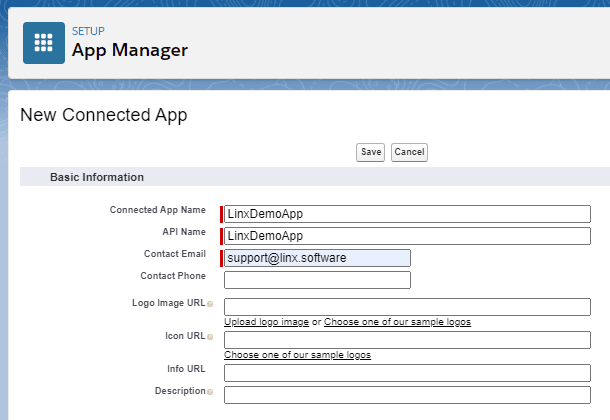
- Navigate to the App manager console (Left menu bar > Apps > App Manager). Click New Connected App in the top-left corner of the screen and complete the basic information like below:
Select Enable OAuth Settings and complete the section below:
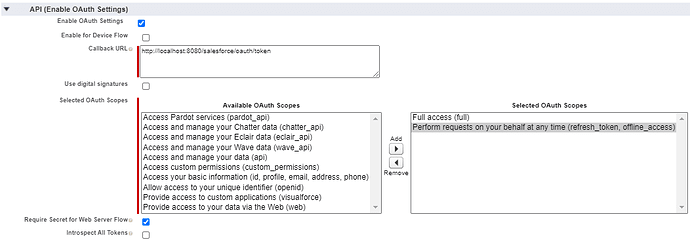
For the Callback URL/Redirect URL add the following:
http://localhost:8080/salesforce/oauth/token
- Add your chosen access “scopes” by clicking the ► button or the purpose of this guide we are going to grant:
- Full access (full)
- Perform requests on your behalf at any time (refresh_token, offline_acces)
Note: If you select different scopes, be sure to update the $.Settings.salesforce_app_scopes value appropriately. More information on the scope of access can be found here.
- Click Save. You should now be able to see your newly created Apps client identifiers like the screenshot below

Click Click to reveal next to the Consumer Secret to generate and show an app secret.
Copy and save the Consumer Key (Client ID), as well as the Consumer Secret (Client Secret), and store these for the next step.
2. Configure Linx Application Settings
Open the provided sample Solution in the Linx Designer and update the $.Settings of the Linx application with the client identifiers like the ones below:
- linx_database_conn_string: Connection string used for storing and retrieving the authentication token from a database. Read more about creating connection strings here.
- salesforce_app_consumer_key: Your connected app’s Consumer Key
- salesforce_app_consumer_secret: Your connected app’s Consumer Secret
- salesforce_api_version: Current version of the API, at the time of writing it is v50.0, and may change. The latest version information can be found here.
Your Linx Solution’s $.Settings should look like below:

3. Authorize the Application
In the Linx Designer, debug the RESTHost (service), once started to navigate to the below URL, or click here:
http://localhost:8080/salesforce/oauth/authorizeLogin to Salesforce and grant access to your registered app.
Once you’ve granted access, the Salesforce authorization server will redirect the user-agent to the Callback URL with the code and state parameters. This will trigger the access token generation. If successful, the resulting message should be displayed in your browser like below:
{

  "date":"2021-01-05T13:33:29.36004+02:00",

  "summary":"Linx application successfully authorized.",

  "platform":"SALESFORCE",

  "authorized_entity":"https://yu8.salesforce.com"

}
This indicates that Linx successfully generated and stored the access token, and it is stored in the database. This token information will be retrieved from the database each time a request is made.
4. Making a request to the Salesforce API
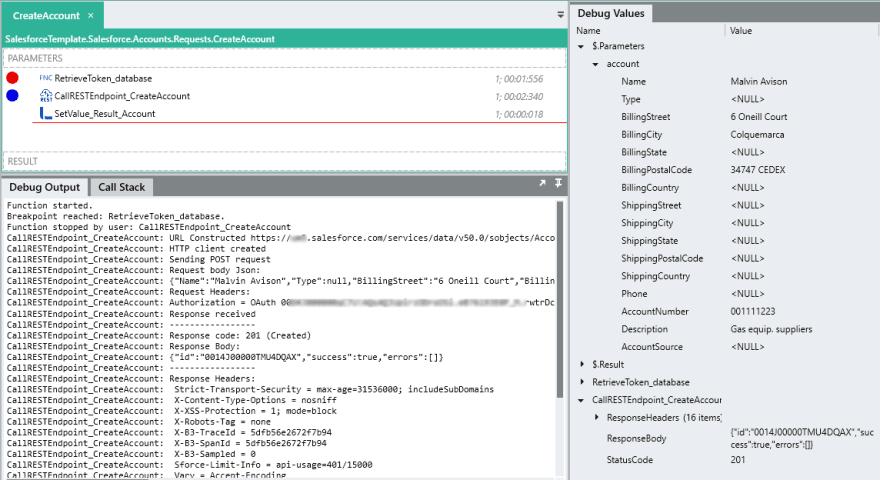
Now that the Linx application has been granted access and the access token generated, you are now able to make CRUD requests against objects in your instance of Salesforce.
In order to make HTTP requests in Linx, you must use the CallRESTEndpoint (function). To make requests against a Salesforce API endpoint, you must prefix the endpoint URL with your instance of Salesforce like below. You can find more information here:
{instance url}/services/data/v{version number}/sobjects/Account
In order to authenticate the request, you must include the access token in the Authorization header like below:
Authorization : "OAuth " + {access token}
Sample Template
The Salesforce API reference documentation does not describe in detail each object, endpoint, or methods.
In order to work with sObjects on Salesforce, you will first need to make requests against the API, which returns the structure of the objects. From this, you will then be able to create the appropriate data structures. You are able to return the metadata of a sObject by making a request like below:
{instance url}/v50.0/sobjects/{sObjectName}/describe/
This will give you detailed metadata on what’s possible with the object.
Template Requests
The below custom functions have been built to demonstrate the best practice of creating stand-alone functions that make a single request. Each function returns the request-response as structured data.
For the purpose of this demonstration, we will be detailing the “Account” object.
The following custom functions can be located in the Solution Explorer: [Salesforce] > [Accounts] > [Requests]
A best practice to follow is to create a wrapper Function per each type of call like below:
- GetAccounts: Retrieves all the existing Account Ids from Salesforce and returns the list of objects as the result.
- GetAccount: Retrieves the detailed information associated with a specific account based on the Id input parameter. This can be used to check modification history as well as used to update the sObject.
- CreateAccount: Create a new account based on the Account details passed in as the input parameter.
- UpdateAccount: Modify an existing account based on the Account details passed in as the input parameter.
- DeleteAccount: Remove an existing account. based on an Id input parameter.
You will then be able to use these functions interchangeably to create custom logic to automate data processing on Salesforce.
Typical Structure:
Template Functions
The below custom functions have been built to demonstrate real-world functionality. The following custom functions can be located in the Solution Explorer: [Salesforce] > [Accounts] > [CustomFunctions]
Add Update Accounts From CSV
This custom function handles the creation or modification of Account entities retrieved from a local CSV file.

Resource: mock_customers.csv (11.8 KB) contains 100 records related to "mock" customers, which you can use in your testing.
Place the provided .csv in the directory
C:\Linx\Salesforce\Accounts\Upload\-
In the Linx Designer, debug the AddUpdateAccountsFromCSV function.
A FileList(function) performs a scan of a local directory filtering for files in the format of *customers*.csv. For each file matching the filter, the full 'FileName' property is returned.
For each file picked up, a TextFileRead (function) then parses the file and returns each row, one-by-one, in a structured format.
For each line that is returned, an instance of an “Account” type is set to the details returned from the file.
A search is then performed on Salesforce for an Account matching the name from the file. The custom function SearchObject takes in an input parameter of the current line’s name details.
This will then return the Id of any matching records.
An IfElse (function) is then used to check if any matching Id values where returned. If matching Id does exist, the specific details of the Account matching the Id are retrieved using the custom function GetAccount.
A check is done using an IfElse (function) to compare the last modified field from the file to the last modified field returned from Salesforce. If the data from the file is more recent than the record on Salesforce, the account details are updated using the custom function UpdateAccount, passing in the “Account” type that was set earlier.
If the Account does not exist on Salesforce, it is created using the custom function CreateAccount, passing in the “Account” type that was set earlier. The newly created Id is then returned. This Id is added to a list containing the recently added Accounts.
Once the particular file has completed reading, it is moved to a “backup” location using a FileMove (function).
The list of Accounts is then looped through and appended to a local CSV file for recording keeping purposes.

Write Accounts to CSV
This function inserts the details of all the accounts from Salesforce into a local CSV file.
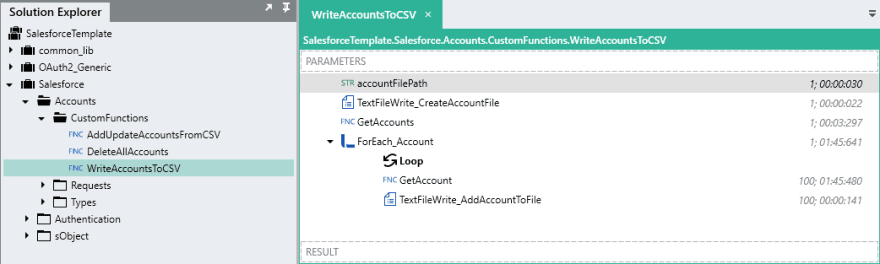
First, a TextFileWrite (function) is used to reset the local file with the header’s of the columns.
All the existing Accounts Ids are then retrieved using the custom function GetAccounts. A loop is performed on the list of Account Ids returned using a ForEach (function).
For each Account, the custom function GetAccount is executed, passing the current loop’s Id field value as an input parameter. The specific account’s details are then returned as a result.
The returned Account’s details are then written line by line as a CSV file using a TextFileWrite (function).
Resulting file:

Delete All Accounts
This custom function removes all the existing accounts from Salesforce.

First, all the existing Accounts Ids are retrieved using the custom function GetAccounts. A loop is performed on the list of Account Ids returned using a ForEach (function)
For each Account, the custom function DeleteAccount is executed, passing the current loop’s Id field value as an input parameter. The specific account is then removed from your Salesforce instance. (Caution: This will remove all accounts currently on Salesforce)

Top comments (1)
👏Thank you for sharing this informative article! Integrations are becoming increasingly important in today's business world, and the low-code approach to Salesforce REST API integration is an excellent way to reduce complexity and increase productivity.💡🔗
Your step-by-step instructions make the process much more manageable. Keep up the good work! 💻👍
💡 In addition, I came across a great article on Salesforce REST API Endpoints which provides comprehensive information on Salesforce REST API, including examples, tips, and best practices to help you achieve integration success.🚀