
Github repo for this project: (Please give me a Github star ⭐ for this effort! Thank you!)
https://github.com/linhtch90/microservices-java-demo-zoo-devto
Introduction
Microservice is the concept of decomposing a large monolith application into small, independent, distributed services. This could improve the flexibility, scalability and resiliency of the whole system.
The introduction of Spring Cloud framework makes it easier for developers to build and deploy microservices to private and public clouds. This framework has wrapped a wide varieties of popular cloud-management microservices frameworks under a well-organized framework.
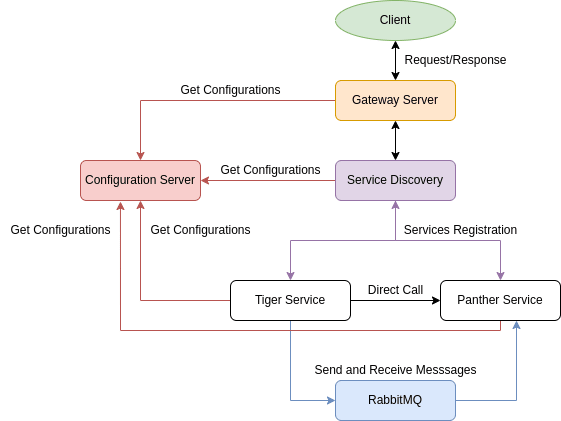
In this blog post, I want to help you have an overview about Spring Cloud framework by building a simple microservices system with Spring Cloud step by step. This system includes the following components:
- Configuration server
- Service discovery with Eureka
- 2 demo microservices called Tiger and Panther
- Gateway server
- RabbitMQ for messaging between microservices
The relationships between those services are described as the following figure.
Let's begin building this system!
Configuration server
Go to start.spring.io and generate a new project with the following information:
- Group ID: com.microservices.zooconfsvr
- Artifact ID: microservice-zoo-config-server
- Name: microservice-zoo-config-server
- Description: zoo microservices config server
- JDK: I am using JDK 17 for this tutorial. I have not tested this project with older JDKs yet!
- Dependencies: Config Server (So other services can get their configuration information from this service)
Your pom.xml should look like this:
<dependencies>
        <dependency>
            <groupId>org.springframework.cloud</groupId>
            <artifactId>spring-cloud-starter-bootstrap</artifactId>
        </dependency>
        <dependency>
            <groupId>org.springframework.cloud</groupId>
            <artifactId>spring-cloud-config-server</artifactId>
        </dependency>

        <dependency>
            <groupId>org.springframework.boot</groupId>
            <artifactId>spring-boot-starter-test</artifactId>
            <scope>test</scope>
        </dependency>
    </dependencies>
    <dependencyManagement>
        <dependencies>
            <dependency>
                <groupId>org.springframework.cloud</groupId>
                <artifactId>spring-cloud-dependencies</artifactId>
                <version>${spring-cloud.version}</version>
                <type>pom</type>
                <scope>import</scope>
            </dependency>
        </dependencies>
    </dependencyManagement>
- In folder
src/main/resources/, add a file calledbootstrap.properties - In folder
src/main/resources/, add a folder calledconfig/and create 4 configuration fileseureka-server.properties,gateway-server.properties,panther-service.properties,tiger-service.properties - The content of those
.propertiesfiles could be found in my Github repo I put the link on top of this blog post)
Add @EnableConfigServer annotation to the main entrance class MicroserviceZooConfigServerApplication.java.
Service discovery (with Eureka)
Go to start.spring.io and generate a new project with the following information:
- Group ID: com.microservices.zooeurekasvr
- Artifact ID: microservice-zoo-services-discovery
- Name: microservice-zoo-services-discovery
- Description: zoo microservices services discovery
- Dependencies: Eureka server, config client
Your pom.xml should look like this:
<properties>
        <java.version>17</java.version>
        <spring-cloud.version>2021.0.0</spring-cloud.version>
    </properties>
    <dependencies>
        <dependency>
            <groupId>org.springframework.cloud</groupId>
            <artifactId>spring-cloud-starter-bootstrap</artifactId>
        </dependency>
        <dependency>
            <groupId>org.springframework.cloud</groupId>
            <artifactId>spring-cloud-starter-config</artifactId>
        </dependency>
        <dependency>
            <groupId>org.springframework.cloud</groupId>
            <artifactId>spring-cloud-starter-loadbalancer</artifactId>
        </dependency>
        <dependency>
            <groupId>org.springframework.cloud</groupId>
            <artifactId>spring-cloud-starter-netflix-eureka-server</artifactId>
        </dependency>

        <dependency>
            <groupId>org.springframework.boot</groupId>
            <artifactId>spring-boot-starter-test</artifactId>
            <scope>test</scope>
        </dependency>
    </dependencies>
    <dependencyManagement>
        <dependencies>
            <dependency>
                <groupId>org.springframework.cloud</groupId>
                <artifactId>spring-cloud-dependencies</artifactId>
                <version>${spring-cloud.version}</version>
                <type>pom</type>
                <scope>import</scope>
            </dependency>
        </dependencies>
    </dependencyManagement>
- In folder
src/main/resources/, add a file calledbootstrap.properties - The content of those
.propertiesfiles could be found in my Github repo (I put the link on top of this blog post)
Add @EnableEurekaServer annotation to MicroserviceZooServicesDiscoveryApplication.java
Gateway server
Gateway server is the service that handles all request from client. Go to start.spring.io and generate a new project with the following information:
- Group ID: com.microservices.zoogateway
- Artifact ID: microservice-zoo-gateway
- Name: microservice-zoo-gateway
- Description: microservice gateway for the zoo demo
- Dependencies: Eureka client, config client, gateway
Your pom.xml should look like this:
<properties>
        <java.version>17</java.version>
        <spring-cloud.version>2021.0.0</spring-cloud.version>
    </properties>
    <dependencies>
        <dependency>
            <groupId>org.springframework.cloud</groupId>
            <artifactId>spring-cloud-starter-bootstrap</artifactId>
        </dependency>
        <dependency>
            <groupId>org.springframework.cloud</groupId>
            <artifactId>spring-cloud-starter-config</artifactId>
        </dependency>
        <dependency>
            <groupId>org.springframework.cloud</groupId>
            <artifactId>spring-cloud-starter-gateway</artifactId>
        </dependency>
        <dependency>
            <groupId>org.springframework.cloud</groupId>
            <artifactId>spring-cloud-starter-netflix-eureka-client</artifactId>
        </dependency>

        <dependency>
            <groupId>org.springframework.boot</groupId>
            <artifactId>spring-boot-starter-test</artifactId>
            <scope>test</scope>
        </dependency>
    </dependencies>
    <dependencyManagement>
        <dependencies>
            <dependency>
                <groupId>org.springframework.cloud</groupId>
                <artifactId>spring-cloud-dependencies</artifactId>
                <version>${spring-cloud.version}</version>
                <type>pom</type>
                <scope>import</scope>
            </dependency>
        </dependencies>
    </dependencyManagement>
- In folder
src/main/resources/, add a file calledbootstrap.properties - The content of those
.propertiesfiles could be found in my Github repo (I put the link on top of this blog post)
Add @EnableEurekaServer annotation to MicroserviceZooGatewayApplication.java
Tiger service
Go to start.spring.io and generate a new project with the following information:
- Group ID: com.microservices.tigerservice
- Artifact ID: microservice-tiger
- Name: microservice-tiger
- Description: microservice tiger
- Dependencies: Eureka client, config client, web, client load balancer, open feign (also for load balancer), RabbitMQ
Your pom.xml should look like this:
<dependencies>
        <dependency>
            <groupId>org.springframework.cloud</groupId>
            <artifactId>spring-cloud-starter-bootstrap</artifactId>
        </dependency>
        <dependency>
            <groupId>org.springframework.boot</groupId>
            <artifactId>spring-boot-starter-web</artifactId>
        </dependency>
        <dependency>
            <groupId>org.springframework.cloud</groupId>
            <artifactId>spring-cloud-starter-loadbalancer</artifactId>
        </dependency>
        <dependency>
            <groupId>org.springframework.cloud</groupId>
            <artifactId>spring-cloud-starter-netflix-eureka-client</artifactId>
        </dependency>
        <!-- https://mvnrepository.com/artifact/org.springframework.cloud/spring-cloud-starter-openfeign -->
        <dependency>
            <groupId>org.springframework.cloud</groupId>
            <artifactId>spring-cloud-starter-openfeign</artifactId>
            <version>3.1.0</version>
        </dependency>
        <dependency>
            <groupId>org.springframework.cloud</groupId>
            <artifactId>spring-cloud-starter-config</artifactId>
        </dependency>
        <dependency>
      <groupId>org.springframework.boot</groupId>
      <artifactId>spring-boot-starter-amqp</artifactId>
    </dependency>

        <dependency>
            <groupId>org.springframework.boot</groupId>
            <artifactId>spring-boot-starter-test</artifactId>
            <scope>test</scope>
        </dependency>
    </dependencies>
    <dependencyManagement>
        <dependencies>
            <dependency>
                <groupId>org.springframework.cloud</groupId>
                <artifactId>spring-cloud-dependencies</artifactId>
                <version>${spring-cloud.version}</version>
                <type>pom</type>
                <scope>import</scope>
            </dependency>
        </dependencies>
    </dependencyManagement>
- In folder
src/main/resources/, add a file calledbootstrap.properties - The content of those
.propertiesfiles could be found in my Github repo (I put the link on top of this blog post)
Add @EnableFeignClients annotation to MicroserviceTigerApplication.java
- Create
com.microservices.tigerservice.servicepackage and add 2 filesClientToPantherService.javafor directly call Panther service andRabitMQSender.javafor sending a string message to Panther via RabbitMQ. - Create
com.microservices.tigerservice.controllerpackage and addTigerController.java, specifying controllers for calling Panther service. - Create
com.microservices.tigerservice.componentpackage and addRabitMQSenderComponent.javafor creating Beans related to messaging service. - Please refer to my Github repo for the content of these files.
Panther service
Go to start.spring.io and generate a new project with the following information:
- Group ID: com.microservices.pantherservice
- Artifact ID: microservice-panther
- Name: microservice-panther
- Description: microservice panther
- Dependencies: Eureka client, config client, web, client load balancer, RabbitMQ
Your pom.xml should look like this:
<dependencies>
        <dependency>
            <groupId>org.springframework.cloud</groupId>
            <artifactId>spring-cloud-starter-bootstrap</artifactId>
        </dependency>
        <dependency>
            <groupId>org.springframework.boot</groupId>
            <artifactId>spring-boot-starter-web</artifactId>
        </dependency>
        <dependency>
            <groupId>org.springframework.cloud</groupId>
            <artifactId>spring-cloud-starter-loadbalancer</artifactId>
        </dependency>
        <dependency>
            <groupId>org.springframework.cloud</groupId>
            <artifactId>spring-cloud-starter-netflix-eureka-client</artifactId>
        </dependency>
        <dependency>
            <groupId>org.springframework.cloud</groupId>
            <artifactId>spring-cloud-starter-config</artifactId>
        </dependency>
        <dependency>
      <groupId>org.springframework.boot</groupId>
      <artifactId>spring-boot-starter-amqp</artifactId>
    </dependency>

        <dependency>
            <groupId>org.springframework.boot</groupId>
            <artifactId>spring-boot-starter-test</artifactId>
            <scope>test</scope>
        </dependency>
    </dependencies>
    <dependencyManagement>
        <dependencies>
            <dependency>
                <groupId>org.springframework.cloud</groupId>
                <artifactId>spring-cloud-dependencies</artifactId>
                <version>${spring-cloud.version}</version>
                <type>pom</type>
                <scope>import</scope>
            </dependency>
        </dependencies>
    </dependencyManagement>
- In folder
src/main/resources/, add a file calledbootstrap.properties - The content of those
.propertiesfiles could be found in my Github repo (I put the link on top of this blog post)
Create controller and other components for the services as follow.
- Create
com.microservices.pantherservice.controllerpackage and addTigerCallPanther.javafor directly respond to calls from Tiger service in the form of a string. - Create
com.microservices.pantherservice.componentpackage and add 2 filesRabbitMQComponent.javaandRabbitMQReceiver.javafor settings related to listening and responding to messages sent from Tiger service. Right after receiving the message from Tiger service, Panther service print the message into the Log. - Please refer to my Github repo for the content of these files.
RabbitMQ
Please refer to this tutorial for using RabbitMQ with Docker.
Running the whole system
Please follow this order:
- Start RabbitMQ with Docker (see above section)
- Start Configuration server
- Start Discovery service
- Start Tiger service
- Start Panther service
- Start Gateway server
Testing microservices with Postman
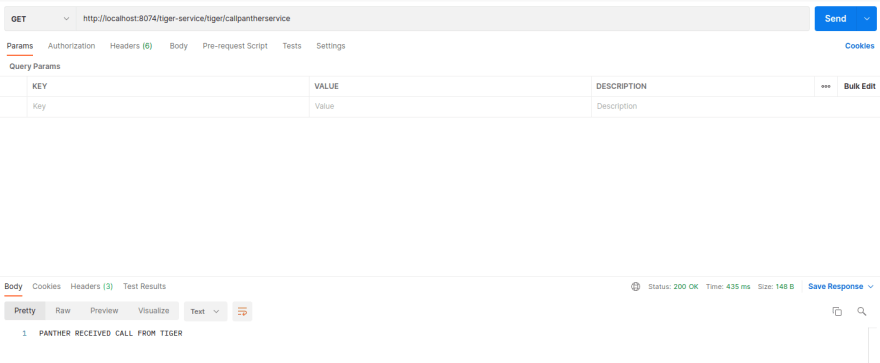
- Direct call from Tiger service to Panther service: Open Postman and send a request to
http://localhost:8074/tiger-service/tiger/callpantherservice
The result should look like the following figure.
- Send message from Tiger service to Panther service: Open Postman and send a request to
http://localhost:8074/tiger-service/tiger/sendmessagetopanther
There is not any response in Postman. It is okay. Please go to the terminal screen where you are running Panther service. You will see a log message saying:
Received message is: Message from Tiger to Panther via RabbitMQ
And that is all everybody!
If you feel this project is useful for you, please give my project a Github star ⭐ as an encouragement!
Thank you so much!

Top comments (0)