
Well, It's been a while working on React, still learning and it feels pretty awesome. We all understand how important it is to interpret the basic concepts before we set our path to work with any framework or library.
Usually what happens, even as a beginner we tend to jump on things without understanding how it works, to see the practical usage, fancy stuff etc and hey You are not alone!
But sometimes, it's good to come back on time and try to understand the underlying pieces. There are tons of boilerplates available which are really helpful to kickstart the project as a solid foundation and the plus point is most of these boilerplates are built by Industry experts.
Taking my past experiences into account, there have been multiple React projects I have worked upon; so sooner or later we get to overcome the fear of setting up our own package.json and webpack configurations.
So, here we will try to set up our own boilerplate or you can say our own way of React project set up with some interesting packages which normally get used at some point.
Now in order to build our boilerplate, the very first thing we need to understand is package.json.
What is package.json and why do we need it
The package.json file is an essential part of the Javascript (Node) eco-system. It’s like one of the very first baby step developers takes while starting development in Node.js. Also, It helps in streamlining the process, managing packages for your project. You can say, its essentially a manifest file that contains the metadata like name, description, package versioning etc of the project (All in one place).
Setting up package.json
Defining the metadata by typing it out i.e creating a package.json is always an option, but we don't have to do it in case you are setting up a new project. Instead, there are existing ways to commandify it. We can use standard package managers such as NPM, YARN as they help interactively in creating/updating a package.json file.
You must have heard about NPM, YARN, but in this post, we will be using Yarn to setup our react boilerplate. In case, you would like to read about the differences, check this out here.
Continuing, Let’s try to explain Yarn in the simplest way possible
Yarn is a package manager that lets you use code developed by the community from around the world which eventually makes things easier to build the solution.
This collection of functionality is something called package.
To set up package.json, Yarn provides an initialize command, which will give you a kind of a questionnaire about the project and that tends to be your project’s metadata.
// Run `yarn init` in terminal.
> yarn init

After filling in all the required information, it will create a package.json file at the root of the project’s directory. It should look like:

What does this mean to us?
Let’s talk about it one by one:
- name: This contains our package’s name and it does not allow spaces and instead it should be lowercase separated by hyphens/underscores. For example: react-boilerplate. 😊
- version: This is the standard metadata for any kind of module, it should be in the format 'x.x.x' (Usually starts with 1.0.0). It follows semantic versioning (semver). Read more about it here.
- description: This is just a human-friendly description of your project/module. It helps developers to understand quickly regarding the intentions of the project or module.
-
main: This can be taken as the bootstrap file i.e an entry or lookup file when application boots up. Usually
index.js, but it's upto us to change it or not. - author: This is generally a piece of information about who’s writing the project/module, could be name, email address, etc.
- license: This explains about the license the project/module belongs to. It could be MIT, ISC, etc.
While can be few other questions which you probably won't see in the package.json file, but can add such as:
- repository URL: Here we can mention the URL where the code is being hosted, so developers can check more details.
- private: If set to true, then you won’t be able to publicly release your project/module to the community. Prevents accidental publication.
Now that we understand the basic metadata of the package.json file, let’s go ahead and set up our boilerplate (for which the post was intended for 😉).
Setup minimal React boilerplate
Quicktip: To add packages using YARN, we can use
yarn add <package_name>,yarn add --dev <package_name>(To add as dev dependency) similarly to remove; useyarn remove <package_name>
-
Installing React and ReactDOM: React (Javascript Library) package contains just the code required to define react components, state, props (All that is React) where React DOM works as a React renderer for the web, it works as a glue between React and the DOM.
 If you see your
 package.jsonfile, there should be React and ReactDOM listing under thedependenciesof your project. It indicates, that now your project depends on React and ReactDOM. You might have noticed that there is a new directory created node_modules at the root of your project. This is where your installed packages will be kept. If you check there should be a React directory under node_modules which helps run React for the application. To use the React functionality, you might want to import it in your.js(x)file like:
Webpack: In simple terms, its a bundler which helps bundles your files, images, assets, scripts, styles, module dependencies. It takes in modules with dependencies and spits bundled code which browsers can understand.
We can install web pack using Yarn as a dev dependency:

Babel: While working on React, we usually follow ES6. Since older browsers can not understand the syntax say Class keyword, import statements. For these to be converted to ES5 which browsers can understand, we need Transpiler. That’s how
Babelcomes in picture.
You are probably thinking, then what is the use of Webpack?
Webpack does not have the capability to transpile the code from ES6 to ES5, but it has this concept of loaders which helps in transforming the code and outputs the browser-compatible code.
Loader, which we will use isbabel-loaderwhich internally usedBabeland requires a certain level of configurations/presets i.ebabel preset env(Used for transpiling code from >=ES6 to ES5) &babel preset react(Used for transpiling.Jsxcode to ES5).
Let's install and configure babel and the required dependencies:

To complete the setup, we would need to create a file called.babelrcand define the configuration as below:

To set up thebabel-loaderand make it work as a web pack loader, we would need to define the configuration like below in a file calledwebpack.config.jsat the root of the project:
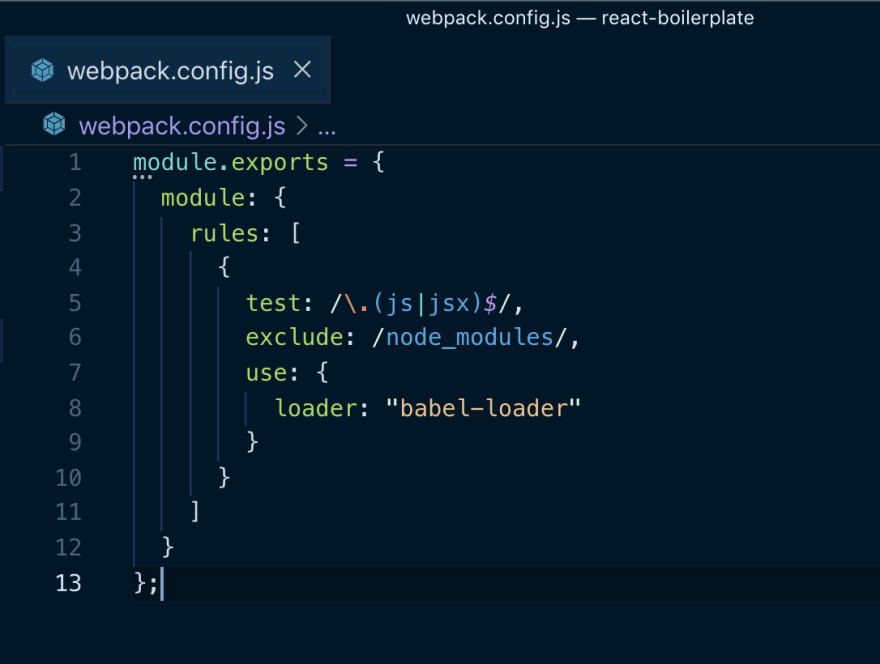
If we want to decode the configuration, then it's just telling Webpack to take in js, jsx code and use babel for transpiling and output the ES5 browser compatible code.HTML Webpack Plugin: This plugin helps to generate HTML files which ultimately serves Webpack generated bundles. That means, when webpack creates a new javascript bundled file, then it also needs an html file to serve on the client-side with the latest changes.
Let's install the plugin and the loader as a dev dependency:

Wait, we are not done with the HTML plugin yet, we would need to configure it with Webpack as well. Earlier we defined,babel-loaderto transpile the code, now we would need to definehtml-loaderfor generating the HTML.
// Load the plugin in your webpack.config.js file.
const HtmlWebPackPlugin = require("html-webpack-plugin");

module.exports = {
  module: {
    rules: [
      {
        test: /\.(js|jsx)$/,
        exclude: /node_modules/,
        use: {
          loader: "babel-loader"
        }
      },
      // Add HTML loader to serve HTML files.
      {
        test: /\.html$/,
        use: [
          {
            loader: "html-loader"
          }
        ]
      }
    ]
  },
  // Call the Plugin here.
  plugins: [
    new HtmlWebPackPlugin({
      template: "./public/index.html",
      filename: "./index.html"
    })
  ]
};
The setup is almost complete, but there is a downside to this. Whenever we will make any change to the code, we would need to manually refresh the page to see our changes. In order to overcome this problem, we can install another package called webpack-dev-server as a dev dependency.

To make this work either webpack command directly or its best that we modify our package.json and add:
// Open flag is for opening the browser as soon as we run `yarn start`.
// Hot flag is for hot reloading i.e refresh the page as soon as you make any change to the code.
"scripts": {
  "start": "webpack-dev-server --config webpack.config.js --open --hot",
  "build": "webpack --config webpack.config.js"
},
Running the React Application
- Start by creating a folder called
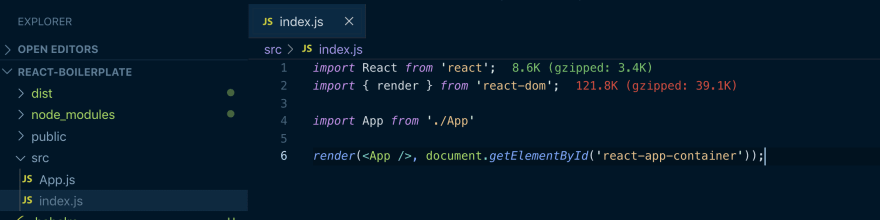
src/which will contain a couple of files such asindex.js(Rendering the app) andApp.js(Contents of the App).
This is just a dumb component which is exposing some static text:

This is importing the dumb component we just created and rendering on the page, basically injecting on the element ID react-app-container.
Now, you can start your application using:
> yarn start
Should get something like this in your terminal:

And we're all set here.
You can check out the boilerplate for the complete folder structure here.
Thanks for reading. 😃
Visit my blog for the original post.

Top comments (2)
This is gold! 🥇
Thanks, Rohan.