
Introduction
Hello guys! Welcome to the “In the shoes of a QA” series for my second article! Last time we discussed the primary difficulties that a QA faces once they enter the IT field, we mentioned some methods and tips on tackling them effectively.
This time we will discuss our work from a practical point of view. The task ahead of us today will be to test a REST-ful API via Postman. So before we begin with the request walkthrough itself, let’s first clarify several things that will ease the process of understanding:
- What is an API
- What is a REST API
- What is Postman
- Let’s start!
Covering some basics
What is an API?
“API” stands for Application Program Interface and is a paradigm that defines a way of communication between independent systems. An API gives two programs or apps the necessary tools to connect. A software system can utilize an API by sending a request and receiving a response (https://www.lexis.solutions/blog/beginner-frienly-http-requests).
What is a REST API?
REST stands for Representational State Transfer, and it precisely sends a representation of the state with each request or response. When we want to get data from a REST API, the form is sent back to us within the answer, and when we want to create or change data — we send the desired state in the request.
REST leverages a variety of HTTP methods that we can employ through the CRUD — create, read, update, and delete operations that RESTful APIs provide. The GET method reads data from the API, POST makes it in the first place, and PATCH updates and DELETE deletes.
The HTTP method names have already been discussed in a previous article. (https://www.lexis.solutions/blog/beginner-frienly-http-requests)
What is Postman?
Postman is a tool used to test, create and share APIs. It’s widely used by teams and individuals, greatly simplifying working with an API. Through Postman, you can build and submit API queries, fetch or alter data on a web server, try the operations of an API, or send a request to a specific endpoint.
Trying it first hand
We will follow through with a simple POST request using the TMDB platform to see how exactly a REST API works with Postman. Mainly, we will use Postman’s help to add the movie “Inception” to our Watchlist.
The first step — Getting acquainted with the docs
Where do we find the elements necessary to build our request in Postman? The answer is fundamentally always the same — documentation, in our case — the documentation in TMDB. We have to visit https://developers.themoviedb.org/3/getting-started/introduction for starters because this is the page from where we will generate our API key, which is needed all the time and is a crucial part of the tests.

The second step — Generating API Key
The API key is generated from the account settings page. This is how you do it in a couple of steps:
From the account settings page, you click on your avatar
From the menu that will appear — click on API
Click on “Create”
The API Key should look something like this: 6b9b694299a12306eaeb1a8c5a2d7866
It’ll be generated instantly, after which you must authenticate it. The point of the API Key authentication is to validate ourselves as legit users of the system. The validation itself we do from this endpoint: https://api.themoviedb.org/3/movie/76341?api_key=<>
The third step — Checking the requirements for our request
Once we generate the API key and complete its authentication after that, our next step is to check the docs and find out how to add a movie to our Watchlist:
https://developers.themoviedb.org/3/account/add-to-watchlist

As we can see — the required attributes that we have to fulfill are the Content-Type within Headers, api_key & session_id within Query Strings, and media_type, media_id, and Watchlist within the Request body.
The query strings are optional parameters at the URL’s end. They have various use cases; in this example, they are used for authentication.
The request body is optional and the preferred place to put a more significant amount of data. It is also hidden from the generic users in contrast to the query params that everybody has seen trailing in the URL. To keep the Params section neat, we add query parameters into the request body, making the URL manageable.
Also, let us mention that the media_id changes with every movie. For example, 27205 is the ID for the film “Inception.” This means that when we want to access the movie “Inception” — 27205 will be our value in our URL. If we want to access “Fight Club” then we need “Fight Club” ‘s ID of 550.
The fourth step — Creating a collection in Postman
Our next task is to open Postman and create a new collection called “TMDB API Testing.”

The collection we created will contain three requests: one GET and two POST requests.
The GET request will fetch us a request token. This token is a temporary passport allowing us to communicate with the TMDB API freely.
The Create Session POST request translates to the login functionality of the average user flow. The session_id we get out of it is yet another passport that authenticates us as a specific user. This user has a watchlist that we ultimately want to update.
Add Movie to My Watchlist POST request adds the desired movie to a user’s Watchlist. To do that via the API, we need both the token (which allows us to use the API) and the session_id (lets the server know which user we are) that we got beforehand.
Let’s review more about how the documentation translates into Postman and how we can use it effectively.
Fifth step — Tips for orientation in the docs and Postman
We already generated an API key, and according to TMDB’s platform — the media type for “Inception” is “movie,” and the media_id is 27205. In contrast, the watchlist field is a boolean, so logically, it’ll be “true” because we want to add our movie. What’s left is the session_id, and we already know how to get it too.
However, we have a primary URL that doesn’t change (https://api.themoviedb.org/3) and an API key that does not change. So the params that do not change are constants. We can have Postman remember them for us by double-clicking on them, choosing Set as variable➜Set as a new variable➜Type name, Choosing the current collection, and saving, after which when we build requests in this collection in the future — they can be generated automatically by typing “{{“(shown below).


We’ll begin by creating a new GET request which will generate a token, and after that, we will use the token to make our session. That session will contain the session_id required for our Add to Watchlist POST request, as we mentioned before.
Now what’s left is to go through all three thoroughly and explain them in the process.
The sixth step — Let the execution begin with a token!
First comes generating our token.
(https://developers.themoviedb.org/3/authentication/create-request-token)
Checking the required query params for it shows that we only need our API key ↓

After which we execute the GET request ↓
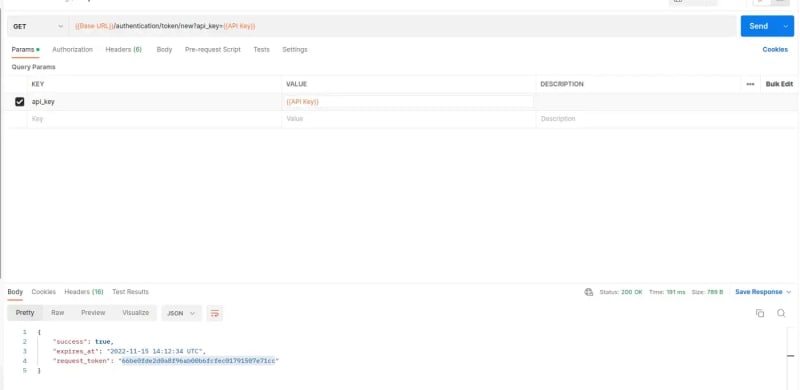
You noticed how my API Key was already added as a constant, and I inserted it directly from the collection.
The request token will be generated in the response body, and we can directly copy it from there.
The seventh step — Creating a session
Now that we have a token, we use it to create our session that will contain our session_id.
https://developers.themoviedb.org/3/authentication/create-session
Checking again the needed params shows that we require an API key and request token.

After which we execute our POST request ↓

The session_id will be generated in the response body again, from where we can copy it.
Our session is created, and we finally have our session_id. Having obtained all the params needed for our Add to Watchlist POST request, we go back to the central part of our task.
Final step — Adding the movie to our Watchlist
Having obtained the needed params for the request, what’s left is to add Content-Type in the Headers with the value “application/json” as per the required documentation.
https://developers.themoviedb.org/3/account/add-to-watchlist
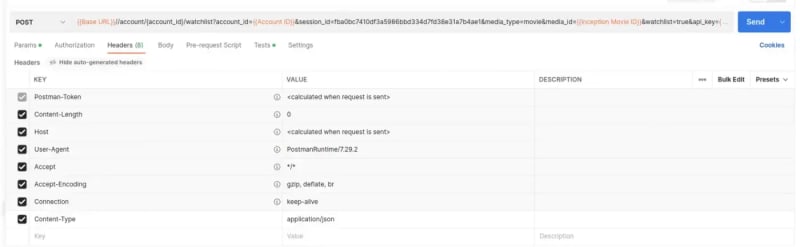
We have filled every required field necessary to add the movie “Inception” to our Watchlist, and our last and significant request is ready to be executed:

A quick look at the response reveals that the request was executed successfully, and “Inception” goes directly into our Watchlist as the last movie added to the collection. We can either open our collection on the site before we add the movie, execute all the steps and refresh the page on the site, or execute the actions and then visit the page. Either way, we were able to complete our assignment, and we can check that from here:
![]()
Replace the crossed field with your Account name, and once you open it, you’ll see the last added movie to the Watchlist, Inception. ↓
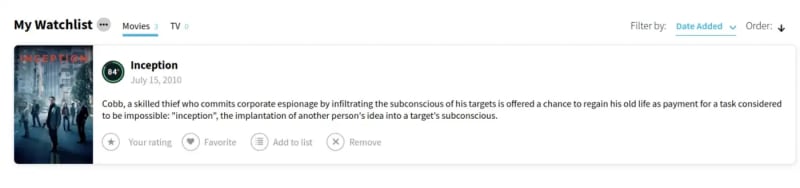
We have found our way around the TMDB documentation and successfully executed the queries necessary to add a movie to our Watchlist. This process happens behind the scenes when you manually click the “Add to watchlist” button in the user interface. The UI is limited to what the API beneath is capable of. That’s why it is essential to understand how APIs work and how to utilize them. I hope this tutorial achieved just that.See you next time when we will continue with GraphQL API testing!
See you next time when we will continue with GraphQL API testing!
Radoslav Kosev — QA Engineer at Lexis Solutions

Latest comments (0)