
An important point in monitoring devices, applications or systems exposed on the internet, is to include information about the origin of the requests or attempts we receive.
This is useful on both the infrastructure and security side as well as the business side. For example, knowing the origin and number of requests or attempts, we can better plan the geographic distribution of servers, detect compromised credentials or attack attempts and identify new business opportunities in different locations.
A very simple way to do this when using the elastic stack as one of the monitoring tools is to use the geoip filter in logstash.
the geoip filter
The geoip filter has a very simple function, it queries an IP address in an internal database, identify its geolocation and returns some fields like the country name, country code, city, geographic coordinates and a few others.

In the case of the geoip filter used by logstash, the internal database with the geolocation information is the GeoLite2, provided by maxmind, and using this filter with an IP address it is possible to obtain, in addition to the geographical information, data related to the Autonomous System (AS), associated with the routing for the IP.
To use the geoip filter you need your event to have a field where the value is a public IP address and you also need to create a specific mapping for your index to store fields with geolocation data.
applying the filter
As an example of how to apply the geoip filter I will use a simple API that I made in Go that returns the status of the connections in a linux machine, this emulates part of what netstat does.
This API returns a JSON document with the following format.
{
    "srcip":"10.0.1.100",
    "srcport":56954,
    "dstip":"151.101.192.133",
    "dstport":443,
    "status":"ESTABLISHED"
}
The value of the srcip field is the local machine IP address and the value of the dstip field is the external IP address, this is the field that we will use with the geoip filter.
To query this API with logstash I will use the filter http_poller as the input in the pipeline, this basically make requests to an endpoint on a specificed schedule.
input {
    http_poller {
        urls => { "api" => "http://10.0.1.100:5000/netstat" }
        schedule => { "every" => "30s"}
    }
}
The way that logstash receives the data makes no difference for the
geoipfilter, you only need a field with a public IP address.
The simplest configuration for the geoip filter has only one required option, the source, which is the name of the field that has the IP address that we want to find its geolocation data.
filter {
    geoip {
        source => "dstip"
    }
}
When an event pass through this filter with success, a new field named geoip is added to the event.
"geoip" => {
    "country_code2" => "IS",
    "continent_code" => "EU",
    "city_name" => "Reykjavik",
    "country_code3" => "IS",
    "region_code" => "1",
    "timezone" => "Atlantic/Reykjavik",
    "region_name" => "Capital Region",
    "location" => {
        "lon" => -21.9466,
        "lat" => 64.1432
    },
    "latitude" => 64.1432,
    "ip" => "31.209.137.10",
    "country_name" => "Iceland",
    "postal_code" => "101",
    "longitude" => -21.9466
}
If the geoip fails, the tag _geoip_lookup_failure will be added.
We can change the default behaviour using other options in the filter configuration.
-
target: name of the field where the geolocation data should be stored, the default isgeoip. -
default_database_type: it has only two optionsCityandASN, the first one is the default and gives you geographic information about the IP, the second one gives you information about the Autonomous System (AS) associated with the IP. -
fields: the fields that should be returned, by default all available fields will be returned. -
tag_on_failure: the name of the tag that should be added on failure, the default is_geoip_lookup_failure.
Since the idea is to enrich the events, we are going to use two geoip filters in sequence, one with the option default_database_type set as City and the other one with the same option set as ASN.
filter {
    geoip {
        default_database_type => "City"
        source => "dstip"
        target => "geo"
        tag_on_failure => ["geoip-city-failed"]
    }
    geoip {
        default_database_type => "ASN"
        source => "dstip"
        target => "geo"
        tag_on_failure => ["geoip-asn-failed"]
    }
}
filtering private addresses
When the field that we use as the source for the geoip filter can also have private IP addresses, we need to filter out those IPs.
A simple way to avoid that private IPs pass through the geoip filter is to use a conditional to add a tag to the events that have a private IP and another conditional to limit the geoip filter to only be applied on events without this tag.
In our example we need to filter out the network 10.0.1.0/24, the localhost IP 127.0.0.1 and the local routing IP 0.0.0.0.
if [dstip] =~ "^10.0.*" or [dstip] =~ "^127.0.*" or [dstip] == "0.0.0.0" {
    mutate {
        add_tag => ["internal"]
    }
}
Now all the events where the destination is a private IP will have the tag internal and we can use this tag to avoid applying the geoip filter on those events.
if "internal" not in [tags] {
    geoip {
        default_database_type => "City"
        source => "dstip"
        target => "geo"
        tag_on_failure => ["geoip-city-failed"]
    }
    geoip {
        default_database_type => "ASN"
        source => "dstip"
        target => "geo"
        tag_on_failure => ["geoip-asn-failed"]
    }
}
mapping
Before we can start analyzing the data in elasticserch or create maps in kibana, we need to create a mapping to tell elasticsearch about the data type of every field.
Although elasticsearch can infer the data type and create a mapping at ingestion time, this does not work for the fields that need to store geolocation data, those fields need to be defined manually before the index creation.
The required part of the mapping is the one that defines the field geo.location as having the type geo_point, so if we use an index named endpoints, we would need to create the index and apply the mapping for this field.
PUT /endpoints
PUT /endpoints/_mapping
{
    "properties": {
        "geo": {
            "properties": {
                "location": {
                    "type": "geo_point"
                }
            }
        }
    }
}
This way we can guarantee that the field geo.location has the type geo_point and we can let elasticsearch create the mapping for the other fields when it index the first document.
While we can work like that without any problem, it is better to create a template for our index with the data type for every field.
In our example we can use the following template.
PUT _template/endpoints
{
    "order" : 0,
    "version" : 1,
    "index_patterns" : [ "endpoints" ],
    "settings" : {
      "index" : {
        "mapping" : {
          "ignore_malformed" : "true"
        },
        "refresh_interval" : "5s",
        "number_of_shards" : "1",
        "number_of_replicas" : "0"
      }
    },
    "mappings" : {
        "properties" : {
            "@timestamp" : {
                "format" : "strict_date_optional_time||epoch_millis",
                "type" : "date"
            },
            "@version" : { "type" : "keyword" },
            "status" : { "type" : "keyword" },
            "srcip" : { "type" : "ip" },
            "srcport" : { "type" : "keyword" },
            "dstip" : { "type" : "ip" },
            "dstport" : { "type" : "keyword" },
            "geo" : {
                "properties" : {
                    "as_org" : { "type" : "keyword" },
                    "asn" : { "type" : "keyword" },
                    "country_code2" : { "type" : "keyword" },
                    "country_code3" : { "type" : "keyword" },
                    "country_name" : { "type" : "keyword" },
                    "continent_code" : { "type" : "keyword" },
                    "city_name" : { "type" : "keyword" },
                    "region_code" : { "type" : "keyword" },
                    "region_name" : { "type" : "keyword" },
                    "postal_code" : { "type" : "keyword" },
                    "ip" : { "type" : "ip" },
                    "location" : { "type" : "geo_point" },
                    "latitude" : { "type" : "float" },
                    "longitude" : { "type" : "float" },
                    "timezone" : { "type" : "keyword" }
                }
            },
            "message" : { "type" : "text" },
            "tags" : { "type" : "keyword"}
        }
    }
}
Since the template is only applied on the index creation, if the index already exists it is necessary to delete it with the request
DELETE endpoints
After we create the template we can add the output to elasticsearch in the pipeline.
output {
    elasticsearch {
        hosts => ["http://elk:9200"]
        index => "endpoints"
    }
}
visualizing the data and creating maps
As soon as we start logstash with the configured pipeline, the data from the API will start to be collected and sent to elasticsearch, after we create an index pattern we can visualize the data with the geolocation in kibana.
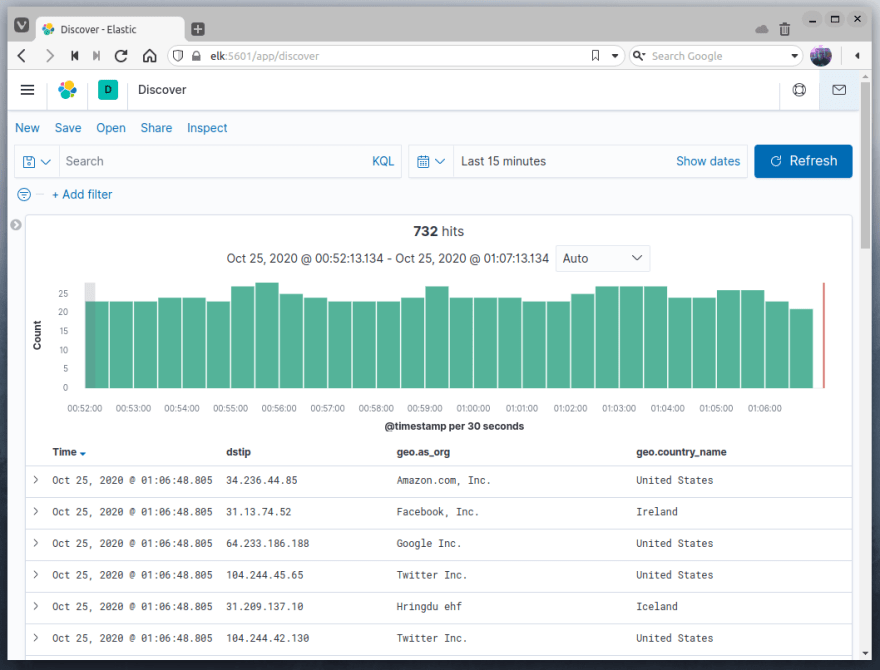
While our original event only had the information about the destination IP address, using the geoip filter allowed us to enrich the documents with more information about the destination IP address.
The field geo.country_name is an example of data enrichment by the geoip filter with the option default_database_type set as City and the field geo.as_org is an example of data enrichment by the same filter when we set the default_database_type to ASN, this is the reason we used two geoip filters in the pipeline.
We can also plot the data using the Maps tool in kibana.

If before our monitoring only had the information about the destination IP, now we can have an idea of where this destination is and we can visualize it in a map.

An important thing that we should consider is that the accuracy of the coordinates obtained with the geoip filter are not exact and can vary according with the geographic location, being more accurate in some countries, the type of the connection, if an IP is from a mobile connection or not, and the zoom level used in the map.
This link from maxmind page, allows us to check the accuracy in each case.
The result of the geoip filter should never be considered exact and may not correspond to reality.
For more information about the geoip filter you can check the official documentation from elastic.

Top comments (0)