For those like me who study and work in .NET projects and would like to use Visual Studio Code for almost everything instead of Visual Studio..., you can in some projects -WPF Forms, Xamarin and the like need Visual Studio-.
This works with xUnit projects, MVC, ASP.NET projects, etc etc.
WRITING FULL .NET PROJECTS USING VISUAL STUDIO CODE
Let's get started writing code with VSC!
Let's say you want to create a new project.
In this example I will utilize various mini folders -without touching Visual Studio- in VSCode, which will keep several projects.
You need the C# (Omnisharp) extension for this, of course.
** Start Visual Studio Code.** We begin with the very basics.
Navigate to File | Open Folder..., or press Ctrl + O. You can click the Open Folder button in the EXPLORER pane or click the Open Folder... link on the Welcome page.
In the dialog box, navigate to your user folder, your Documents folder, or any directory or drive in which you want to save your projects.
Click the New Folder button and name the folder however you prefer.
In that folder, create a new folder with another name you like. In this example I am naming it VSCode. Here we are going to have all our code and projects.
In the VSCode folder, create a new folder with whatever name you like. Say Project01 for instance.
We could follow the same steps to create a Project02 folder, this is VERY important when we want to combine them -more on that in the **Using Visual Studio Code workspaces* below-.*
- In the Project01 folder, create a new folder named HelloCSharp. Select the HelloCSharp folder and on Windows click Select Folder (on macOS I think it's click Open).
Here we are going to create a new console project, as an example.
Navigate to View | Terminal. Make sure your terminal is in the HelloCSharp folder, if not navigate to it using the Terminal -like DOS commands-.
In TERMINAL, enter the following command:
dotnet new console
NOTE: Full list of dotnet cli commands here
https://docs.microsoft.com/en-us/dotnet/core/tools/dotnet-new
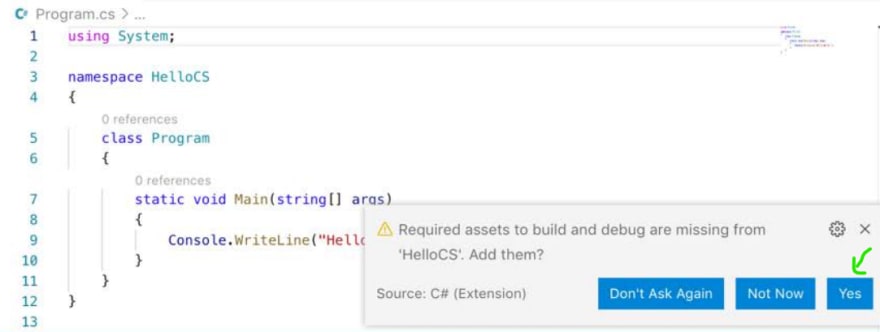
You will see that the dotnet command-line tool creates a new Console
Application project for you in the current folder, and the EXPLORER
window shows the two files created, HelloCSharp.proj and Program.cs.If you see a warning saying that required assets are missing, click Yes, -this is essential to have VSC running as a VS Code formatter as
shown in the following screenshot:
After a few seconds, a folder named .vscode will appear in the EXPLORER
pane. This is used during debugging.
Navigate to File | Auto Save. This toggle will save the annoyance of
remembering to save before rebuilding your application each time.
COMPILING AND RUNNING CODE USING DOTNET CLI
Navigate to View | Terminal and enter the following command in the folder where the program you want to run is:
dotnet run
The output in the TERMINAL window will show the result of running your
application.
USING VISUAL STUDIO CODE WORKSPACES
Before we want to create any more projects, let's talk about workspaces.
Although we could continue to create and open separate folders for each project, it can be useful to have multiple folders open at the same time. Visual Studio Code has a feature called workspaces that enables this.
Let's say we started another project called Maths in the Project01 folder along with the HelloCSharp project we already had, and want to create a workspace for two projects we created below it so far.
In Visual Studio Code, navigate to File | Save Workspace As....
Enter Project01 for the workspace name, change to the Project01 folder -if you are not there-, and click Save.
Navigate to File | Add Folder to Workspace...
Select the Maths folder, click Add, and note that both HelloCSharp and Maths
are now part of the Project01 workspace.In order to switch between our projects in the workspace, press F1 and select Omnisharp: Select Project. You can switch between the HelloCSharp and Maths projects with this.
If you don't do that, C# won't use intellisense and other features if you edit files in a project you didn't select, of course.
Good Practice: When using workspaces, be careful when entering commands in Terminal. Be sure that you are in the correct folder before entering potentially destructive commands!
So to sum it up. As another example...
In the Project01 folder create a new folder named Love and add it to the Project01 workspace.
Navigate to Terminal | New Terminal.
Go to the Love folder.
- Enter the command to create a new console application: dotnet new console.
Navigate to View | Command Palette. Enter and select OmniSharp: Select Project. (F1 key)
Select the Love project, and if prompted, click Yes to add required assets to debug.
- In Terminal, if you are in the Love project execute the code by entering dotnet run. Rinse and repeat. It's always like that.
HOW REFERENCES TO OTHER PROJECTS OR DEPENDENCIES WORK
Say you created a library project in the Maths folder, with the corresponding command. And you want to reference it from other projects.
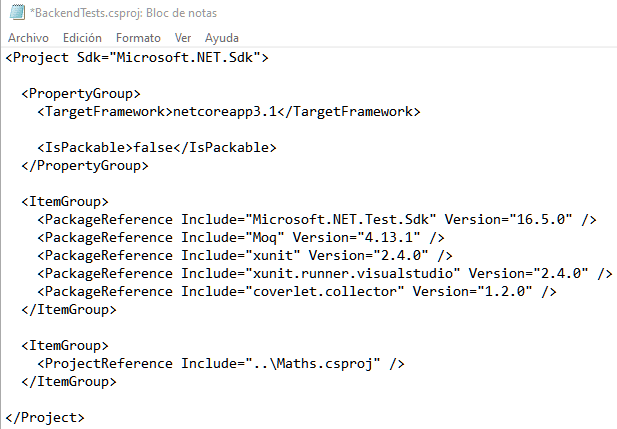
In that case you have to edit the Love.csproj manually and reference the Maths project with something along the lines of -if it is at the same level in the folders structure-:

ItemGroup can reference libraries and Nuget Packages and so on.
This is a complete example:
If you find this complicated, you can create a solution with Visual Studio 2019 and add the references and stuff, and then open the root folder of the project with Visual Studio Code.
If you see a warning saying that required assets are missing to click Yes, then everything is fine because it means that VSC has detected a VS project and wants to add Intellisense and so on.
If you don't, open the Visual Studio 2019 solution with VSC in the previous folder in the folder hierarchy where the .sln file is. This should solve it.
CONCLUSION
It's basically always the same:
- Choose a folder for your code.
- Create a subfolder within, i.e. Project01
- Save the folder to your workspace with the Save as Workspace option.
- Create another subfolder within Project01, for a library, console app, etc. i.e. MathsLibrary
- Add the new MathsLibrary folder to the Project01 workspace.
- Navigate to Terminal | New Terminal. And go to the MathsLibrary subfolder.
- Enter the command to create a new library application: dotnet new classlib .
Navigate to View | Command Palette. (or press F1)
Enter and select OmniSharp: Select Project.
Select the MathsLibrary project, and if prompted, click Yes to add required assets to debug -essential.
Note: for a library, once you have the code, type dotnet build so you can reference it on other projects.Create a new subfolder within Project01 named Calculator for instance and add it to the Project01 workspace.
Say this is a console app, go to Terminal | New Terminal and to the Calculator subfolder, type dotnet new console.
Press F1 and with Omnisharp: Select Project, select the Calculator project.
Click Yes to use the required assets when prompted.
In case you want to reference the MathsLibrary project, you need to edit the .csproj file as explained above.
Other helpful stuff
In addition, you can create your own solutions in VS Code with the Solution Explorer extension.
https://marketplace.visualstudio.com/items?itemName=fernandoescolar.vscode-solution-explorer
I haven't fiddled with it that much yet, but you can create typical Visual Studio solutions that way.
In order to open existing Visual Studio 2019 -or previous versions- solutions in VSCode, there is a quick and easy to read guide here:
Gotta thanks Mark J. Price because thanks to his teachings I learnt to do this by reading his excellent books.

Top comments (0)