
With the rise of the Metaverse and 3D games such as Battle Royale, the demand for immersive audio experiences in virtual environments is growing rapidly. Spatial audio, a technology that allows users to perceive the location and distance of a sound source around them in a virtual scene, is quickly becoming an essential part of creating immersive virtual experiences.
In response to this rapidly growing demand for an immersive audio experience, we've added a Proximity Voice module to the ZEGOCLOUD Express Web SDK (since v2.10.0), which provides the following features:
- Proximity voice chat: A form of voice chat in virtual spaces chat where users can only hear the voice of other users from within a certain proximity, and the volume of the sound changes according to the distance between the listener and the sound source.
- Spatial audio: Users in a virtual space can sense the position and distance of a sound source as they do when hearing a sound in the real world.
- Team voice chat: Users can join a team and switch between the Team-only mode (the user's voice can only be heard by other users in the same team) and the Everyone mode (the user's voice can be heard by everyone in the room) as they wish.
In this article, we will focus on how we can use the Web Audio API provided by web browsers to implement the spatial audio effect. Here is a simple spatial audio demo page we made using the Web Audio API.
- Click the Play button to start playing the music.
- Click the Turn On/Off Spatial Audio button to turn on or off the spatial audio effect.
- When the spatial audio effect is turned on, you can hear that the music is moving around your head.
(To experience the spatial audio effect, you will need to use stereo headphones or speakers.)
Okay. Let's dive into more details.
An introduction to Web Audio API
The Web Audio API can be used for many different audio operations. For example, it is often used to replace the <audio> tag to play audio on the web. In addition, it provides other audio-processing capabilities, such as audio volume adjustment, audio mixing, and audio spatialization.
The Web Audio API lets you perform audio operations inside an audio context, and has been designed to allow modular routing. Basic audio operations are performed with audio nodes, which are linked together to form an audio routing graph. A very basic audio routing graph looks like this:
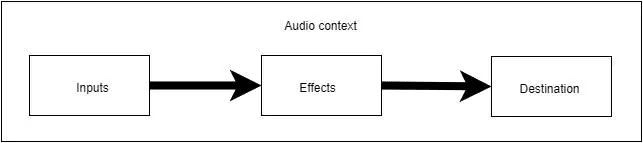
In the graph, the Inputs, Effects, and Destination modules are three AudioNodes representing the audio source, the intermediate processing module, and the audio destination respectively.
The following describes the basic steps of a simple audio processing work-flow:
1. Create an audio context
// Create audio context
const AudioContext = window.AudioContext || window.webkitAudioContext;
const audioCtx = new AudioContext();
An AudioContext represents an audio-processing graph built from audio modules linked together, each represented by an AudioNode. It is a central processing unit that controls the creation of the nodes it contains and the execution of the audio processing of each node.
2. Create a source node and an effect node inside the created audio context.
// Creat a SourceNode for decoding the audio source provided in the <audio> tag
const audioEl = document.querySelector('audio');
const sourceNode = audioCtx.createMediaElementSource(audioEl);
// Create a GainNode for controlling the audio volume
const gainNode = audioCtx.createGain();
3. Connect the source node to the effect node
Call the source node's connect method to connect it to the specified effect node.
sourceNode.connect(gainNode);
4. Connect the effect node to the destination of the audio context
Call the effect node's connect method to send the processed audio to the destination of the audio context. In this example, the destination node audioCtx.destination represents the speakers currently being used.
gainNode.connect(audioCtx.destination);
5. Change the audio output by changing the properties of the effect node.
// Put the audio on mute
gainNode.gain.setValueAtTime(0, audioCtx.currentTime);
Implement a spatial audio effect using the Web Audio API
Now, let's have a look at how we can implement spatial audio effects using the Web Audio API.
Basically, to add spatial audio effects to the audio source, you will need to use the following two interfaces in combination:
AudioListener : Represents a unique listener in a virtual 3D space. You can get the listener instance of an audio context from the AudioContext.listener property.
PannerNode: Represents an audio source in a virtual 3D space. You can call the new method or the AudioContext.createPanner() method to create a PannerNode.
The following describes how to set up the AudioListener and the PannerNode to achieve the audio spatialization effects you want.
1. Set up the AudioListener
An AudioListener describes the position and orientation of a unique person listening to the audio scene used in audio spatialization. A PannerNode can be used to describe the position of the audio source relative to the listener.
The following three properties of an AudioListener define its position in a right-hand cartesian coordinate system:
positionX: Represents the horizontal position of the listener. The default value is0.positionY: Represents the vertical position of the listener. The default value is0.positionZ: Represents the longitudinal (back and forth) position of the listener. The default value is0.
// Set the listener's position
const listener = audioCtx.listener;
listener.positionX = camera.position.x;
listener.positionY = camera.position.y;
listener.positionZ = camera.position.z;

The following three properties define the position of the listener's forward direction in the same right-hand cartesian coordinate system as the position values (positionX, positionY, and positionZ):
forwardX: Represents the horizontal position of the listener's forward direction. The default value is0.forwardY: Represents the vertical position of the listener's forward direction. The default value is0.forwardZ: Represents the longitudinal (back and forth) position of the listener's forward direction. The default value is-1.
The following three properties define the position of the top of the listener's head in the same right-hand cartesian coordinate system as the position values (positionX, positionY, and positionZ):
upX: Represents the horizontal position of the top of the listener's head. The default value is 1.
upY: Represents the vertical position of the top of the listener's head. The default value is 0.
upZ: Represents the longitudinal (back and forth) position of the top of the listener's head. The default value is 0.
By setting up these two orientation vectors, the positions of the listener's ears can be determined to create the spatial audio effect.
2. Set up the PannerNode
A PannerNode is an audio-processing module describing the position and movement of an audio source signal in a 3D audio space with the right-hand Cartesian coordinates. It spatializes an audio source signal using its position and orientation relative to the current AudioListener within an AudioContext.
The following are some of the commonly used properties of a PannerNode:
-
panningModel: An enumerated value determining which spatialization algorithm to use to position the audio in 3D space. The default value isequalpower, representing the equal-power panning algorithm. We recommend setting this property toHRTF, which means to render a stereo output of higher quality thanequalpower. -
positionX/positionY/positionZ: The horizontal/vertical/longitudinal (back and forth) position of the audio in a right-hand cartesian coordinate system. -
orientationX/orientationY/orientationZ: The horizontal/vertical/longitudinal (back and forth) position of the audio source's vector in a right-hand cartesian coordinate system. -
coneInnerAngle: A double value describing the angle, in degrees, of a cone inside of which there will be no volume reduction. The default value is360. -
rolloffFactor: A double value describing how quickly the volume is reduced as the source moves away from the listener. The default value is1. -
distanceModel: An enumerated value determining which algorithm to use to reduce the volume of the audio source as it moves away from the listener. The default value isinverse.
3. Implement the audio panning effect
The following code snippet shows how you can realize an audio panning effect that makes listeners feel like the audio is moving around their head. It is done simply by changing the position values of the PannerNode while the music is being played.
<!DOCTYPE html>
<html lang="en">

<head>
  <meta charset="UTF-8">
  <meta http-equiv="X-UA-Compatible" content="IE=edge">
  <meta name="viewport" content="width=device-width, initial-scale=1.0">
  <title>Web Audio</title>
</head>

<body>
  <audio loop autoplay crossorigin="anonymous"
    src="https://s3-us-west-2.amazonaws.com/s.cdpn.io/858/outfoxing.mp3"></audio>
  <button onclick="startPlay()">Play</button>
  <button onclick="spatialize()">Turn On/Off Spatialization</button>
  <span>Sound effect status:</span><span id="status">Off</span>
  <script>
    // Set up the initial position of the audio source
    const audioPosition = [0, 0, 1]
    // Create an audio context
    const AudioContext = window.AudioContext || window.webkitAudioContext;
    const audioCtx = new AudioContext();
    // Set up an AudioListener
    const listener = audioCtx.listener;
    listener.positionX.value = 0;
    listener.positionY.value = 0;
    listener.positionZ.value = 0;
    listener.forwardX.value = 0;
    listener.forwardY.value = 0;
    listener.forwardZ.value = -1;

    // Create a source node for the source audio provided in the <audio> tag
    const audioEl = document.querySelector('audio');
    // Create an effect node for processing the source audio
    const sourceNode = audioCtx.createMediaElementSource(audioEl);
    // Create a PannerNode and set up its properties
    const pannerNode = new PannerNode(audioCtx, {
      panningModel: "HRTF",  // The spatialization algorithm to be used to position audio.
      distanceModel: "linear",  // The algorithm to be used to reduce the volume of the audio source as it moves away from the listener.
      rolloffFactor: 1,  // How quickly the volume is reduced as the source moves away from the listener.
      coneInnerAngle: 360, // The angle of a cone inside of which there will be no volume reduction.
      positionX: audioPosition[0],
      positionY: audioPosition[1],
      positionZ: audioPosition[2],
      maxDistance: 10000,
    });
    // Connect the source node directly to the destination node
    sourceNode.connect(audioCtx.destination);

    // Change audio source's position values on the X, Y, Z axes to make it move around the listener.
    function autoMove(axis, interval, step = 100, maxDistance = 1000) {
      let isAdd = true
      const positionAxisMap = ["positionX", "positionY", "positionZ"]
      setInterval(() => {
        if (isAdd && audioPosition[axis] >= maxDistance) {
          isAdd = false;
        } else if (!isAdd && audioPosition[axis] <= -maxDistance) {
          isAdd = true;
        }
        if (isAdd) {
          audioPosition[axis] += step;
        } else {
          audioPosition[axis] -= step;
        }
        pannerNode[positionAxisMap[axis]].value = audioPosition[axis]
        console.log('audioPosition', audioPosition);
      }, interval)

    }
    // Move back and forth on the X-axis between -1000 and 1000
    autoMove(0, 100, 100, 1000)
    // Move back and forth on the Z-axis between -1000 and 1000
    autoMove(2, 200, 100, 1000)
    // Move back and forth on the Y-axis between -100 and 100
    autoMove(1, 400, 10, 100)

    // Start playing the music
    function startPlay() {
      audioCtx.resume();
      // Put the audio on mute.
      audioEl.play();
    }

    // Turn off 3D sound effect
    let isSpatialized = false
    function spatialize() {
      isSpatialized = !isSpatialized
      document.querySelector("#status").innerText = isSpatialized ? "On" : "Off"
      if (isSpatialized) {
        sourceNode.disconnect();
        sourceNode.connect(pannerNode);
        // Connect the Panner node to the destination node
        pannerNode.connect(audioCtx.destination);
      } else {
        sourceNode.disconnect();
        sourceNode.connect(audioCtx.destination);
      }
    }
</script>
</body>

</html>
Conclusion
This article gives a basic introduction to the Web Audio API and describes how to implement a spatial audio effect (the sound moving around the listener's head) using the AudioListener and PannerNode interfaces.
Besides audio spatialization, the Web Audio API has many other powerful audio-processing features. For more details, you can check out the Web Audio API documentation on MDN.
For more details about the Proximity Voice module of the ZEGOCLOUD Express SDK, see the related developer documentation on ZEGOCLOUD website.
Visit ZEGOCLOUD website to learn more about what you can build with real-time audio and video!

Top comments (2)
Could you remove the
metatag, please? That’s for discussion about DEV.to itself. Thanks!ok, i have removed