
We live in an era where we are surrounded by data that can be harnessed by extracting meaningful insights from it. As quoted by Tim Berners-Lee, inventor of the World Wide Web — “Data is a precious thing and will last longer than the systems themselves.”
If the data is the new oil, web scraping (or web harvesting) is the expeller that helps squeeze more oil.🙂Web scraping can be leveraged for analyzing and deriving actionable insights from tons of information available on the internet.
Irrespective of the business domain (e.g., eCommerce, EdTech, Fintech, etc.), scraping can be used for market research, pricing intelligence, lead generation, and sentiment analysis, to name a few! Though web scraping is immensely useful, it comes with a caveat — Scraping should be done legally and ethically, respecting the website’s T&C and data privacy regulations.
Popular programming languages like Python, Java, JavaScript, etc., are well-equipped with tools and libraries that can ease the job of web scraping. In this blog, I will limit the discussion of web scraping with Python — a popular programming language for automated testing. You can check my earlier blog on Python automation testing, highlighting why Python is the best-suited language for automation testing.
By the end of this blog on web scraping with Python, you will learn to scrap static and dynamic websites using the best Python tools (or libraries) like PyUnit, pytest, and Beautiful Soup. The actionable examples will help you harness the capabilities of web scraping with Python to extract meaningful insights from websites.
Without further ado, let’s get started…
**Note: **Scrap & Scrape and document & page are used interchangeably throughout the blog.
Text Uppercase is a free online tool for converting text into uppercase. Enter your text and click the convert button to make all lowercase letters upper case.
What is Web Scraping?
To set the ball rolling, let’s do a quick recap of the What & Why of web scraping. In simple terms, web scraping, or web harvesting (or data extraction), is the technique for deriving information (that matters) from websites.
Shown below is the simplistic representation of web scraping that shows that input is a website that needs to be scrapped by the scraping logic.

Web Scraping Architecture
Once the information from the HTML of the page is scraped, the raw data can be stored in a more presentable (or readable) format in Excel sheets, databases, etc.
With scraping options in the arsenal, it becomes imperative to opt for efficient and responsible scraping! In the examples presented later in this blog on web scraping with Python, the scraped information will be presented on the terminal.
Prominent Use Cases of Web Scraping
Most new-age websites leverage JavaScript for loading and updating content on the page. AJAX (Asynchronous JavaScript and XML) is used to retrieve data from the server and update relevant parts of the page (without a full page reload).
For instance, videos on the LambdaTest YouTube channel are dynamically loaded when the user performs a scroll operation. As seen in the below screenshots, the URL remains unchanged, but the videos are loaded on a dynamic basis.


Example — Dynamic Website Content
Popular Python frameworks like pytest and PyUnit, in conjunction with Selenium, can be used for dynamic web scraping websites (and SPAs) like YouTube, Netflix, LambdaTest eCommerce Playground, and more.
It goes without saying that scraping can be done on static websites where the entire HTML page content is downloaded and parsed to extract the desired information. You can check out my earlier blog highlighting the difference between Static and Dynamic Web Scraping.
Now that we know that it is possible to scrap static and dynamic websites, let’s look at some of the primary use cases of web scraping:
Competitor Analysis
Irrespective of the size (or scale) of the business, businesses must keep a close watch on their competition. Insights into competitor’s products and services can be instrumental in having an upper edge over the competition.
Web scraping can effectively scrape relevant information (e.g., products, services, pricing, etc.) from competitors’ websites. The scraped data can be leveraged for tweaking product & pricing-specific information on the website.
Lead Generation
Web scraping can gather details (e.g., names, phone numbers, email addresses, etc.) from websites to generate leads for your business.
The scraped data is then fed to CRM software, so the sales team can reach out to those leads.
Rotate your text and add some creativity to your words with our Text Rotater tool. Try it out now and see the results in just a few clicks!
Data Analysis
Many websites have products that span across different categories. For instance, a horizontal eCommerce website might have products across electronics, apparel, baby care, etc.
Web scraper is instrumental in extracting product metadata, seller details, number of SKUs, etc., from such websites. Whether it is a SPA (Single Page Application) or paginated content, relevant web scraping tools & libraries let you scrape information from them.
Apart from the use cases mentioned above, you can also use web scraping for academic research and training data for ML projects!
Python Libraries and Tools for Web Scraping
I have also tried web scraping using C#, but the web scraping ecosystem is nothing like Python. One of the major benefits of using Python is the availability of many tools and libraries for web scraping.
It is recommended to perform the package installation in a virtual environment (venv) to isolate it from the packages in the base environment. Run the commands virtualenv venv and source venv/bin/activate on the terminal to create the virtual environment.
Though I will be covering a few libraries (or tools) using a detailed demonstration, let’s list some of the popular ones below:
Selenium
For starters, Selenium is a popular open-source framework that helps with web browser automation. The tools and libraries offered by Selenium are instrumental in automating interactions with the elements in the document (or page). When writing this blog on web scraping with Python, the latest version was 4.14.0.
Selenium 3, the earlier version of Selenium, used the JSON-Wire protocol. On the other hand, Selenium 4 uses the W3C protocol because automated tests are less flaky (or more stable) when compared to tests implemented using Selenium 3. For a quick recap, you can check out our blog highlighting the differences between Selenium 3 and Selenium 4.
Most modern-day web pages use AJAX & JavaScript to load and display dynamic content. Consider LambdaTest eCommerce playground. The content is loaded when the user scrolls the page. As seen in the screenshot below, the images are lazy loaded and appear in the DOM once the user scrolls the page.


Example of Lazy Loading of Images
This is where Selenium proves to be an instrumental option for web scraping due to its ability to handle dynamically loaded content using JavaScript.
In the case of Python, popular test automation frameworks like pytest and PyUnit can be leveraged for scraping static and dynamic page content. Run the command pip install selenium *(or *pip3 install selenium) depending on the Python version installed in the machine.
PyUnit (or unittest ) is the default test automation framework, part of the Python standard library.

PyUnit is inspired by the xUnit framework in C# and is also compatible with older versions of Python. For pytest, check out our zero-to-hero Selenium pytest tutorial for a quick recap on running pytest with Selenium.
Run the command pip install pytest (or pip3 install pytest) to install the pytest framework on the machine.

Explicit waits in Selenium will be leveraged for complex scenarios like waiting for the content to load, navigating through multiple pages, and more. In further sections of this blog on web scraping with Python, I will be using appropriate locators in Selenium along with find_element() / find_elements() methods to scrape content on the document (or web page).
Need to know how many characters are in your text? Get an accurate count of the characters in your text with our free online character count tool. Try it now and see how easy it is!
Beautiful Soup
Beautiful Soup is a popular Python library primarily built for web scraping. As specified in the official documentation, Beautiful Soup can navigate and parse through HTML & XML documents. Unlike Selenium, which can be used for static and dynamic web scraping, Beautiful Soup is apt for static web scraping with Python.
It supports unit test discovery using pytest. When writing this blog on web scraping with Python, the latest version of Beautiful Soup is 4.12.1. Hence, the library is also referred to as BS4. In case you are using BS3, simply changing the package name from BeautifulSoup to bs4 will help in porting the code to BS4. For more details, you can refer to the official BS4 porting guide.
BS4 uses the html.parser module by default, which can be swapped out with lxml or html5lib libraries in Python. Web elements on the HTML page can be located using the CSS Selector and XPath locators. Akin to the *find_element() *method in Selenium Python, the find() method in BS4 returns the element located using the appropriate selector.
Similarly, the find_all() method in BS4 (like the find_elements() method in Selenium) scans through the entire page and returns a list of all the descendants that match the filters. You can refer to the official documentation of Beautiful Soup (or BS4) to get insights into all the methods provided by the library.
Before using BS4 for static web scraping, the built-in Requests library makes HTTP requests. Text (or text) that contains the HTML content from the HTTP response object is then subjected to HTML parsing (or html.parser) using BS4. Once parsed, the Beautiful Soup object can be used for navigating & searching through the document’s structure.
BS4 can also be used with Selenium to give wings to dynamic web scraping. In this case, BS4 is used to parse and extract data from the loaded (or rendered) HTML page, whereas Selenium is used to navigate to the relevant pages.
Run the command pip3 install beautifulsoup4 or pip3 install bs4 on the terminal to install Beautiful Soup 4 (or BS4). As seen below, the Beautiful Soup 4.12.2 installation was successful.

In further sections of the blog, I will demonstrate the usage of Beautiful Soup and Selenium for scraping content on various pages (1 through 5) on the LambdaTest eCommerce playground.
Playwright
Playwright is another popular test automation framework suited for web scraping. It is primarily used for end-to–end testing of modern web applications. Like Selenium, it also provides APIs that let you perform advanced interactions on the page using headless versions of Chrome, Chromium-based browsers, and WebKit.
Run the command pip3 install playwright (or pip install playwright) to install Playwright for Python on the machine.

When writing this blog on web scraping with Python, the latest version of Playwright is 1.39.0. Auto-waiting in Playwright ensures that waits on elements are performed before they become actionable. This eliminates the need to add artificial timeouts, making the scraping code much more maintainable & readable.
Over and above, Playwright plugins like Pyppeteer (Python port of Puppeteer) and scrapy-playwright can also be leveraged for static and dynamic web scraping with Python.
Scrapy
Scrapy is a full-fledged web crawling and scraping framework that can be used to crawl websites to extract structured data from the page(s). Scrapy can be leveraged for data mining, monitoring, and automated testing.
When writing this blog, the latest version of Scrapy is 2.11.0. Run the command pip3 install scrapy (or pip install scrapy) on the terminal to install Scrapy.


![]()
As stated in the Scrapy documentation, Scrapy can extract data using APIs like Amazon Web Services (AWS). Though Scrapy is mainly used for static web scraping, it can also be used for scraping dynamic web pages (e.g. QuotestoScrape JS).
Similar to Beautiful Soup, Scrapy along with frameworks like Selenium or Playwright, can be instrumental in scraping dynamic web content.

In such cases, the scrapy-playwright plugin is handy for scraping dynamic web content using Playwright and Scrapy.
PyQuery, lxml, and Mechanical Soup are other popular libraries for scraping with Python.
In the further sections of the blog on web scraping with Python, the discussion & demonstration will be limited to the following libraries (or tools):
Web scraping using Selenium PyUnit
Web scraping using Selenium pytest
Web scraping using Beautiful Soup
The learnings from the demonstration will be useful for creating sample code for scraping with other Python-based tools. So, let’s get our hands dirty with some code. 🧑💻
Sentence Count is a free, easy-to-use tool for counting sentences in text. Simply upload your text, click Count and you’ll get the number of sentences in seconds!
Demonstration: Web Scraping With Python
For demonstrating web scraping using Selenium PyUnit (& pytest) and Beautiful Soup, I will be using the following websites:

Directory Structure
As seen in the project structure, scraping using PyUnit, pytest, and Beautiful Soup is driven via a Makefile. Let’s look at the important directories and files in more detail below:

Here is a closer look at the overall structure:
- pageobject
Page Object Model (POM) design pattern is used for separate web locators from the core test logic. locators.py contains details of locators used for interacting with the test websites mentioned earlier.

helpers.py contains the implementation of the wrapper functions for triggering actions, performing explicit waits, and more. Since the use cases for scraping with PyUnit and pytest are the same, two wrapper functions are created for reduced code duplication and improved maintenance:

Both the functions return a list where the scraped information is stored for further operations.

- tests
As the name suggests, the tests folder contains the implementation of the core test methods that are responsible for scraping the content using the respective scraping library (or tool).
To keep the code more modular and maintainable, we have created subfolders (or sub-directories) for the libraries used for scraping the test websites:

We will cover more about the implementation in the code walkthrough section of the blog.
- Configuration (or setup) files
The conftest.py file in pytest helps to fixture and share fixtures, hooks, and other configuration options used in the test code. For demonstration, scraping with Selenium and/or Beautiful Soup is performed using browsers on the local machine and cloud grid like LambdaTest.
LambdaTest is an AI-powered test orchestration and execution platform that lets you perform automated testing using Selenium Python on an online browser farm of 3000+ real browsers and operating systems.
Catch up on the latest tutorials around Selenium automation testing, Appium automation, and more. Subscribe to the LambdaTest YouTube Channel.
Want to decode a messy URL? Unleash the full potential of your website with our online URL Parse tool. Optimize your website’s URLs to improve your site’s visibility.

The scope of the pytest fixture (i.e., @pytest.fixture) is set to function, which means that the fixture is set up and torn down before & after executing a test function (or method). As seen below, execution is controlled using the environment variable EXEC_PLATFORM, which can be set to local *or *cloud.

Username (LT_USERNAME) and Access Key (LT_ACCESS_KEY) for using the cloud Selenium Grid on LambdaTest can be obtained by navigating to LambdaTest Profile Page. Set them using the export (for macOS and Linux) or set (for Windows) command to export the environment variables.

In the teardown function, the quit() method is invoked to terminate the browser session. The JavaScriptExecutor in Selenium [i.e., execute_script()] is used to update the lambda-status variable, which indicates the test execution status on LambdaTest Selenium Grid.

Similarly, we have created puynitsetup.py that contains configurations related to the PyUnit (or unittest ) framework. Implementation under the init() method is used for initializing the test cases.

Irrespective of whether the tests are executed on a local grid or cloud Selenium grid, the browser is initialized in headless mode. If the environment variable EXEC_PLATFORM is set to the cloud, Chrome browser on the LambdaTest grid is instantiated in headless mode.

The said capability (i.e., headless), along with the other capabilities, can be set using the LambdaTest Capabilities Generator.

As stated in the official Selenium documentation, Chrome is instantiated in the headless mode by adding –headless=new to Chrome options.

Lastly, the setUp() and tearDown() methods are implemented to set up and tear down the test environment. In fact, init() is optional, and implementation under it can be moved under the setUp() method.

- Makefile
As stated earlier, scraping using the respective libraries (or tools) is controlled via a Makefile. Typing make help provide all the options available for execution.

The make install command will install the packages/libraries specified in requirements.txt.
pytest-selenium
selenium>=4.6.0
urllib3==1.26.12
requests
py
bs4

Pre Requisites
First and foremost, trigger virtualenv venv and source venv/bin/activate on the terminal to create the virtual environment.

Since there is a provision to perform scraping on the cloud Selenium grid, it is recommended to have an account on LambdaTest. To scrap websites using Selenium on LambdaTest Grid, you must update LT_USERNAME and LT_ACCESS_KEY (in Makefile) from the LambdaTest Profile Page.

Install the required frameworks and libraries (mentioned in requirements.txt) by triggering the make install command on the terminal.

With this, the stage is finally set to scrap the test websites. Let’s dive in!
Since the scraping logic with Selenium & Python remains the same for PyUnit and pytest, we have combined both frameworks in this section. To begin with, we look into the configuration aspects of the framework, after which we would look into the common scraping logic.
Need to extract text from HTML code? Our free online tool makes it easy and fast. Save time by extracting only the text you need from HTML code in no time.
Web Scraping using Selenium and PyUnit
For simplification, all setup-related code (i.e., instantiating the browser, setting explicit timeouts, etc.) is in pyunitsetup.py. Essential aspects of the setup are already discussed in the earlier section of this blog on web scraping with Python.

Let’s deep dive into some of the integral parts of the configuration file pyunitsetup.py
import sys
import os
from os import environ
sys.path.append(sys.path[0] + "/../..")
from pageobject.locators import locators
from pageobject.locators import *

exec_platform = os.getenv('EXEC_PLATFORM')

class pyunit_setup:
    def __init__(self):
        if exec_platform == 'cloud':
            username = environ.get('LT_USERNAME', None)
            access_key = environ.get('LT_ACCESS_KEY', None)

            ch_options = webdriver.ChromeOptions()

            lt_options = {}
            lt_options["build"] = "Build: Web Scraping with Selenium & Pyunit"
            lt_options["project"] = "Project: Web Scraping with Selenium & Pyunit"
            lt_options["name"] = "Test: Web Scraping with Selenium & Pyunit"

            lt_options["browserName"] = "Chrome"
            lt_options["browserVersion"] = "latest"
            lt_options["platformName"] = "Windows 11"

            lt_options["console"] = "error"
            lt_options["w3c"] = True
            lt_options["headless"] = True

            ch_options.set_capability('LT:Options', lt_options)

            gridURL = "@hub.lambdatest.com/wd/hub">https://{}:{}@hub.lambdatest.com/wd/hub".format(username, access_key)
            self.browser = webdriver.Remote(
                command_executor = gridURL,
                options = ch_options
            )
        elif exec_platform == 'local':
            ch_options = ChromeOptions()
            ch_options.add_argument("--headless=new")
            self.browser = webdriver.Chrome(options=ch_options)

    def setUp(self):
        self.browser.implicitly_wait(10)
        self.browser.maximize_window()

    def tearDown(self):
        if (self.browser != None):
            self.browser.quit()
The value of the EXEC_PLATFORM environment variable (i.e., cloud or local) decides whether the instantiation of the browser is on the local machine or cloud grid on LambdaTest.

Remote WebDriver with grid URL & browser options as parameters are instantiated using the *webdriver.Remote() *method. Capabilities (or browser options) can be obtained from LambdaTest Capabilities Generator.

Chrome in headless mode is instantiated as we do not require GUI for web scraping with Python. The w3c flag is set to true since we are using Selenium 4 (which is W3C compliant) for the tests.

When using a local grid (or machine), we set the –headless=new argument for Chrome Options.

Finally, the *setUp() *and *tearDown() *methods contain the implementation of maximizing the browser and releasing the resources post text execution respectively.

Perform browser test automation on the most powerful cloud infrastructure. Leverage LambdaTest automation testing for faster, reliable and scalable experience on cloud.
Web Scraping using Selenium and pytest
Since the demo websites scraped with PyUnit and pytest are the same, there are changes only in the setup-related code. Like web scraping with PyUnit, all setup-related code (i.e., instantiating the browser, setting explicit timeouts, etc.) is segregated in conftest.py.
For starters, conftest.py is a special file in pytest that contains the configuration of the test suite. Hence, hooks, fixtures, and other configurations are all a part of conftest.py

Let’s deep dive into some of the integral parts of the configuration file conftest.py
# Import the locators file
import sys
import os
from os import environ
sys.path.append(sys.path[0] + "/../..")
from pageobject.locators import locators
from pageobject.locators import *

exec_platform = os.getenv('EXEC_PLATFORM')

@pytest.fixture(scope='function')
def driver(request):
    if exec_platform == 'cloud':
        username = environ.get('LT_USERNAME', None)
        access_key = environ.get('LT_ACCESS_KEY', None)

        gridURL = "@hub.lambdatest.com/wd/hub">https://{}:{}@hub.lambdatest.com/wd/hub".format(username, access_key)

        ch_options = webdriver.FirefoxOptions()
        ch_options.browser_version = "latest"
        ch_options.platform_name = "Windows 11"

        lt_options = {}
        lt_options["build"] = "Build: Web Scraping with Selenium & Pytest"
        lt_options["project"] = "Project: Web Scraping with Selenium & Pytest"
        lt_options["name"] = "Test: Web Scraping with Selenium & Pytest"

        lt_options["browserName"] = "Firefox"
        lt_options["browserVersion"] = "latest"
        lt_options["platformName"] = "Windows 11"

        lt_options["console"] = "error"
        lt_options["w3c"] = True
        lt_options["headless"] = True

        ch_options.set_capability('LT:Options', lt_options)

        browser = webdriver.Remote(
            command_executor = gridURL,
            options = ch_options
        )

        yield browser

        def fin():
            if request.node.rep_call.failed:
                browser.execute_script("lambda-status=failed")
            else:
                browser.execute_script("lambda-status=passed")
                browser.quit()

        request.addfinalizer(fin)
    elif exec_platform == 'local':
        options = ChromeOptions()
        options.add_argument("--headless=new")
        browser = webdriver.Chrome(options=options)

        yield browser

        def fin():
            browser.quit()

@pytest.hookimpl(tryfirst=True, hookwrapper=True)
def pytest_runtest_makereport(item, call):
    outcome = yield
    rep = outcome.get_result()

    setattr(item, "rep_" + rep.when, rep)
The @pytest.fixture(scope=’function’) decorator is used for defining a fixture with a function scope.

Depending on the value of the EXEC_PLATFORM environment variable (i.e. cloud or local), the browser is instantiated on the local machine or cloud grid on LambdaTest.

In case you are planning to run the Selenium Python tests (i.e., scrap website under test) on browsers in LambdaTest cloud, instantiate Remote WebDriver with grid URL & browser options as parameters to the webdriver.Remote() method. Capabilities (or browser options) can be obtained from LambdaTest Capabilities Generator.

Since we are performing web scraping with Python, the browser (i.e., Chrome) is instantiated in the headless mode. Headless Chrome is faster than the real browser (with the GUI). Hence, it is best suited for web scraping with Python. Since Selenium 4 (W3C compliant) is used for testing, the w3c *flag is set to *true.

For scraping using Selenium on local headless browsers (e.g., Chrome) on a local grid (or machine), simply set the –headless=new argument for Chrome Options.

Lastly, the yield statement provides the resource (i.e., browser) in the setUp and tearDown sections of the code. Hence, all the resources the browser uses will be cleared once the execution is complete.

With this, we are all set to dive deep into the scraping implementation!
Test Scenario 1 — Scraping LambdaTest YouTube Channel
In this example, meta-data (i.e., title, views, duration, etc.) associated with LambdaTest YouTube Videos is scraped using the PyUnit (or unittest framework).

Since the LambdaTest YouTube channel has more than 600+ videos, a vertical scroll (till the end of the page) is performed so that required information can be scraped from those videos!
Need a great solution for Safari browser testing on Windows? Forget about emulators or simulators — use real online browsers for testing on safari for windows. Try LambdaTest for free!
Implementation (pyUnit)
The file test_yt_scraping.py contains the test logic where the scrap_youtube() method scraps the channel. It returns a list that contains the metadata of the videos.
# Import the locators file
import sys
sys.path.append(sys.path[0] + "/../..")
from pageobject.locators import locators
from pageobject.locators import *

from pageobject.helpers import helpers
from pageobject.helpers import *

from pyunitsetup import pyunit_setup

test_setup = pyunit_setup()

def scrap_youtube(test_url) -> list:
    meta_data_arr=[]
    test_setup.setUp()
    test_setup.browser.get(test_url)

    # Click on 'Accept All' in case the said window comes up
    # This occurs since cookies are cleared and machines are sanitized each run

    # Stack Overflow - https://stackoverflow.com/questions/66902404/selenium-python-click-agree-to-youtube-cookie
    # Locators were located using the below link
    # https://consent.youtube.com/m?continue=https%3A%2F%2Fwww.youtube.com%2F&gl=FR&m=0&pc=yt&uxe=23983172&hl=en&src=1

    # Below issue is not observed in local machines since there is no clean-up of cookies

    try:
        # Wait until the "Accept all" button is clickable
        accept_all = WebDriverWait(test_setup.browser, 5).until(EC.element_to_be_clickable(
            (By.CSS_SELECTOR, "form:nth-child(3) > div > div > button[aria-label= 'Accept all']")))

        # Click the "Accept all" button
        accept_all.click()

        print("Click on Accept all successful")
    except Exception as e:
        # Even if this exception is raised, we can still continue test execution
        # This means that the button was not found & the YouTube channel link has opened successfully
        print(f"'Accept All' button not present, proceed with the tests: {str(e)}")

    meta_data_arr = helpers.scrap_yt_content(test_setup.browser)

    test_setup.tearDown()
    return meta_data_arr

def main():
    meta_data_arr = scrap_youtube(locators.test_yt_url)
    helpers.print_scrapped_content(meta_data_arr)

if __name__ == '__main__':
    main()
To get started, we create an object of the pyunit_setup class which contains implementation of setUp() and tearDown() methods.

The browser instantiation is done in the init() method implemented in pyunitsetup.py. An empty list named *meta_data_arr *is created, and the browser is navigated to the URL under test.

Scraping YouTube content is legal as long as we comply with regulations that deal with personal data and copyright protection. After repeated scraping, we observed that YouTube showed the Consent Page, where we had to programmatically click the Accept all button to navigate to the LambdaTest YouTube channel.

Since the above consent page was shown intermittently, we used the try…catch *loop to counter the above situation. We first locate the Accept all button using the CSS Selector *form:nth-child(3) > div > div > button[aria-label= ‘Accept all’] *Alternatively, we could have also located the element using the XPath locator *//div[@class=’csJmFc’]/form[2]//div[@class=’VfPpkd-RLmnJb’]

To locate elements with ease, we used the POM Builder *that provides CSS Selector & XPath of elements at the click of a button. The *WebDriverWait class is used along with the *element_to_be_clickable *expected condition in Selenium to realize an explicit wait for 5 seconds.
Once the element is located, the *click *method in Selenium is invoked to perform a click operation on the Click all button.


In case the YouTube Consent Page does not show up, we simply handle the exception in the expect block and print the exception.

Now that we are on the LambdaTest YouTube Channel, we invoke the *scrap_yt_content()* method that is a part of the *helpers *class. We will look into its implementation in the further sections of the blog.

Upon successful scraping, a list meta_data_arr containing the scraped content is returned, and the content is printed on the terminal using the *print_scrapped_content()* method.
Implementation (Pytest)
Like PyUnit, the core logic for scraping the YouTube channel is implemented in the scrap_youtube() method in test_yt_scraping.py. It returns a list that contains the metadata of the videos.
Since the majority of the implementation remains the same, we would be focussing only on the changes that are specific to the pytest framework.
# Import the locators file
import sys
sys.path.append(sys.path[0] + "/..")
from pageobject.locators import locators
from pageobject.locators import *

from pageobject.helpers import helpers
from pageobject.helpers import *

@pytest.mark.usefixtures('driver')

class TestYoutubeScraping:
    def test_scrap_youtube(self, driver) -> list:
        meta_data_arr=[]
        driver.get(locators.test_yt_url)

        try:
            # Wait until the "Accept all" button is clickable
            accept_all = WebDriverWait(driver, 5).until(EC.element_to_be_clickable(
                (By.CSS_SELECTOR, "form:nth-child(3) > div > div > button[aria-label= 'Accept all']")))

            # Click the "Accept all" button
            accept_all.click()

            print("Click on Accept all successful")
        except Exception as e:
            print(f"'Accept All' button not present, proceed with the tests: {str(e)}")

        meta_data_arr = helpers.scrap_yt_content(driver)
        helpers.print_scrapped_content(meta_data_arr)
The @pytest.mark.usefixtures(‘driver’) decorator indicates that the driver (i.e., instantiated Chrome browser) fixture must be used in the execution of the test methods.

As mentioned in the earlier section, the click to Accept all button is initiated in case the YouTube consent form is displayed on the screen.

Once you are on the LambdaTest YouTube channel, the *scrap_yt_content()* method is invoked to scrap the channel content. Lastly, the scraped content is printed on the screen.

Since the rest of the implementation is the same as in the PyUnit framework, hence we are not touching upon those aspects in this section.
Run your Selenium Automation Testing scripts on the LambdaTest cloud grid. Test on 3000+ desktop & mobile environments. Try it for free
Implementation (Core Scraping Logic)
The helpers.py file contains the core implementation for scraping the LambdaTest YouTube channel.
# Import the locators file
import sys
from pageobject.locators import locators
from pageobject.locators import *

def create_actions(driver):
    actions = ActionChains(driver)
    return actions

def create_waits(driver, duration):
    # Explicit wait of 10 seconds
    wait = WebDriverWait(driver, duration)
    return wait

class helpers(object):
    def scrap_yt_content(driver)->list:
        meta_data_arr=[]
        # Explicit wait of 10 seconds
        wait = create_waits(driver, 10)

        actions = create_actions(driver)

        # Explicit wait of 10 seconds
        wait = WebDriverWait(driver, 10)

        # Wait for 10 seconds till the Document State is not complete
        wait.until(lambda driver: driver.execute_script('return document.readyState') == 'complete')

        # Once the page has loaded, scroll to the end of the page to load all the videos
        # Scroll to the end of the page to load all the videos in the channel
        # Reference - https://stackoverflow.com/a/51702698/126105
        # Get scroll height
        start_height = driver.execute_script("return document.documentElement.scrollHeight")

        # Repeat scrolling until reaching the end of the page
        # Taking cues from my own blog https://www.lambdatest.com/blog/scraping-dynamic-web-pages/
        while True:
            # Scroll to the bottom of the page
            driver.execute_script("window.scrollTo(0, " + str(start_height) + ")")
            # Wait for the content to load
            time.sleep(2)
            scroll_height = driver.execute_script("return document.documentElement.scrollHeight")
            if (scroll_height == start_height):
                # If heights are the same, we reached the end of page
                break
            # print("scroll_height = " + str(scroll_height))
            time.sleep(2)
            start_height = scroll_height

        time.sleep(2)

        elem_1 = driver.find_elements(By.CSS_SELECTOR,
            "#dismissible > #details")

        for video_metadata_1 in elem_1:
            elem_2 = video_metadata_1.find_element(By.CSS_SELECTOR,
                "#meta")

            elem_3 = elem_2.find_element(By.CSS_SELECTOR,
                "#video-title")

            elem_4 = elem_2.find_element(By.CSS_SELECTOR,
                "#metadata > #metadata-line > span:nth-child(3)")

            elem_5 = elem_2.find_element(By.CSS_SELECTOR,
                "#metadata > #metadata-line > span:nth-child(4)")

            video_title = elem_3.get_attribute('innerText')
            video_views = elem_4.get_attribute('innerText')
            video_time = elem_5.get_attribute('innerText')

            # Create a dictionary of the video meta-data
            meta_data_dict = {
                'video title': video_title,
                'video views': video_views,
                'video duration': video_time
            }

            meta_data_arr.append(meta_data_dict)

        return meta_data_arr

    def print_scrapped_content(meta_data):
        for elem_info in meta_data:
            print(elem_info)
Code Walkthrough
To get started, we wait for a maximum duration of 10 seconds till the document (or page) is fully loaded (i.e. Document.readyState is equal to complete). Feel free to check out the detailed DOM tutorial if you want a quick refresher about the nuances of DOM.

Once the page is loaded, we first get the scrollable height of the document using the JavaScript function document.documentElement.scrollHeight. Before doing so, we maximize the browser window since that is considered one of the best practices in Selenium automation.

Next, we run a while loop where a vertical scroll is performed using the window.scrollTo() method with *document.documentElement.scrollHeight *as the input argument.

In order to see the window.scrollTo() method in action, open the LambdaTest YouTube channel on your browser. Then trigger the following commands in the browser console:
document.documentElement.scrollHeight
window.scrollTo(0, document.documentElement.scrollHeight)

In the implementation shown above, we perform the above two actions till the end of the page is reached. This is when we break from the while loop!
The video meta-data (i.e., name, views, duration, etc.) is present in the div with ID details, *which is under another div *dismissible. The said element(s) are located using the CSS Selector (i.e., dismissible > #details).

As seen in the Inspect Tools screenshot, there are 581 entries (or elements) when searched with CSS Selector (i.e., *dismissible > #details). *In summary, the LambdaTest YouTube channel has 581 videos when writing this blog on web scraping with Python.

Next up, we locate the element(s) using CSS Selector #meta, which is nested under the div #details.


Now that we have located the #meta tag, we procure the video title, which is nested in the #meta tag. The title of the video is located using the #video-title CSS Selector.


As seen below, the innerText attribute of the element (CSS Selector #video-title) provides the title of the video!


Automate Cypress testing and perform browser automation testing with LambdaTest. Our cloud infrastructure has 3000+ desktop & mobile environments. Try for free!
The next task is to find the video views, which are located using the nested CSS Selector #metadata > #metadata-line > span:nth-child(3)
As seen in the Inspect Tools screenshot, #metadata-line is nested inside #metadata (i.e., Element with ID #metadata-line is a child of an element with ID #metadata). To find the element’s locator that gives video views, simply hover over the views (of the first video) and copy the selector from the Inspect tools in the browser.

The pseudo class nth-child(3) selects the third child span element among the direct children of the element with the ID metadata-line. Hence, the element located using CSS Selector #metadata > #metadata-line > span:nth-child(3) provides the views of the video in the earlier step.

Locating the Video Views element using Inspect Tools

The innerText attribute of the located element provides the number of views of the said video.

On similar lines, the publishing date of the respective video is also procured using the innerText attribute of the element located using the CSS Selector #metadata > #metadata-line > span:nth-child(4).


All the above-mentioned steps are executed in a for loop that iterates through the elements that were located using driver.find_elements(By.CSS_SELECTOR, “#dismissible > #details”)

Automate Cypress testing and perform browser automation testing with LambdaTest. Our Cypress cloud infrastructure has 3000+ desktop & mobile environments. Try for free!
Test Scenario 2 — Scraping LambdaTest eCommerce Playground
In this example, we scrap the product meta-data (i.e., product name and price) from LambdaTest eCommerce Playground. As mentioned earlier, the scraping logic works seamlessly on the local grid and cloud Selenium grid like LambdaTest.

Implementation (Core Scraping Logic)
Since the overall setup & configuration-related implementation remain unchanged, we would directly deep dive into the scraping implementation.

Akin to the YouTube test scenario, the helpers.py file contains the core implementation where the *scrap_ecomm_content()* method is responsible for scraping the eCommerce Playground. It returns a list that contains the metadata of the SKUs on the page.
# Import the locators file
import sys
from pageobject.locators import locators
from pageobject.locators import *

def create_actions(driver):
    actions = ActionChains(driver)
    return actions

def create_waits(driver, duration):
    # Explicit wait of 10 seconds
    wait = WebDriverWait(driver, duration)
    return wait

class helpers(object):
    def scrap_ecomm_content(driver)->list:
        meta_data_arr=[]
        # Explicit wait of 10 seconds
        wait = create_waits(driver, 10)

        actions = create_actions(driver)

        element_cat = wait.until(EC.visibility_of_element_located((By.XPATH,
                locators.shopcategory)))

        # Move to the element and perform click operation
        actions.move_to_element(element_cat).click().perform()

        element_phcat = wait.until(EC.visibility_of_element_located((By.XPATH,
                locators.phonecategory)))

        actions.move_to_element(element_phcat).click().perform()

        nested_elements = wait.until(EC.visibility_of_element_located((By.XPATH,
            "//div[@id='entry_212391']//div[@id='entry_212408']//div[@class='row']")))

        # Tough nut : 2 - nested locators!
        actual_items = nested_elements.find_elements(By.CLASS_NAME,
                "product-layout.product-grid.no-desc.col-xl-4.col-lg-4.col-md-4.col-sm-6.col-6")

        count = len(actual_items)

        for ind_elem_props in actual_items:
            nested_product_name_elem = ind_elem_props.find_element(By.CSS_SELECTOR,
                "div.product-thumb > div.caption")

            ################ Product Name ################
            nested_title_elem = nested_product_name_elem.find_element(By.CSS_SELECTOR,
                    ".title .text-ellipsis-2")

            ################ Price #######################
            nested_price_elem = nested_product_name_elem.find_element(By.CSS_SELECTOR,
                    ".price .price-new")

            # Create a dictionary of the meta-data of the items on e-commerce store
            meta_data_dict = {
                'product image': nested_title_elem.get_attribute('href'),
                'product name': nested_title_elem.text,
                'product price': nested_price_elem.text
            }

            meta_data_arr.append(meta_data_dict)

        return meta_data_arr

    def print_scrapped_content(meta_data):
        for elem_info in meta_data:
            print(elem_info)
Code Walkthrough
Let’s directly look into the major aspects of the scrap_ecomm_content() method!
First, we create an instance of the ActionChains class to perform mouse movement operations on the page. We suggest having a look at our detailed blog on *ActionChains *in Selenium Python in case you are new to ActionChains or want to have a quick refresher of this important concept!

*WebDriverWait and *ExpectedConditions *in Selenium are used to initiate an explicit wait till the visibility of a specified element is true. The element in question is the menu item that is located using the XPath *“//a[contains(.,’Shop by Category’)]”

Once the menu is visible, the move_to_element() method of ActionChains class is used to move (or focus) on the located menu item. Since only operation (i.e., click) is involved in the chain, we invoke the click() and perform() methods to trigger the required action.

Now that we are on the Menu, the menu item containing Phone, Tablets & Ipod uses the XPath selector. Once the menu item is located, the combination of move_to_element() and click operations is performed to open the Product Page.


Now that we are on the Product Page, we wait for the visibility of the grid containing the respective products. By default, 15 products are available in a single go.

Nested XPath locator //div[@id=’entry_212391′]//div[@id=’entry_212408′]//div[@class=’row’] is used for locating the grid containing the products. Alternatively, you can also use the CSS Selector to locate the grid.
Simply right-click on the row and choose Copy → Copy CSS Selector to locate the grid using CSS Selector. You can check out our XPath vs CSS Selectors guide to get more insights into the advanced features of these selectors.

Now that we have located the grid (containing the 15 products), the next step is to locate every row housing the corresponding product. As shown below, we have <div>’s for each nested product under the locator used in the previous step.

The *find_elements() *method in Selenium is used along with the Class Name selector to find the elements containing product(s) information. Since there are 15 products on the page, the length of the list returned by the find_elements() method will also be 15!


This Cypress automation testing tutorial will help you learn the benefits of Cypress test automation, and how to install Cypress and execute Cypress automation testing over scores of browsers and operating systems online.
Next, we run a for loop and iterate through the list to scrap details of every product in the list. Since there are 15 products on the page, the loop will be executed 15 times.
As seen below, The element(s) located using CSS locator div.product-thumb > div.caption provides the meta-data (i.e., product name & price) of every product on the page.


With the meta-data handy, the next step is to find the Product Name from the element located in the previous step.

As seen from the DOM layout, the element located using nested CSS Selector .title .text-ellipsis-2 provides product details.

The text attribute of the element provides the Product Name of the respective product.

On similar lines, the href attribute of the located element provides the link to the product (e.g., Product Link).


Like the earlier step, the price of the current product is scraped by locating the element using the nested CSS Selector .price .price-new


Now that the element is located, the text attribute of the element gives the price of the product.

Finally, the scrap_ecomm_content() method returns a dictionary of the scraped content of the page under test!
Test your website or web app online for iOS browser compatibility. Perform seamless cross browser testing on the latest iPhone tester Simulator. Try for free!
Execution (PyUnit + Selenium)
As stated earlier, we can use the browser on a local machine (or grid) and cloud Selenium grid.
Set environment variable EXEC_PLATFORM to **local *using Chrome browser (headless mode) with Selenium for web scraping. Invoke the command *make scrap-using-pyunit to start scraping content from the test website(s).

As shown below, the Accept all button does not appear when the scraping is done on a local machine.

On the other hand, the Accept all button is seen when the scraping is done using Chrome (headless mode) on cloud Selenium Grid.

As seen below, the content from the LambdaTest YouTube channel and LambdaTest eCommerce playground was scrapped successfully.


Set environment variable EXEC_PLATFORM to **cloud **for using Chrome browser (headless mode) on cloud Selenium Grid.

Log on to the LambdaTest Automation Dashboard to view the status of the test execution.

As seen below, the test execution on LambdaTest was successful!

Execution (pytest + Selenium)
Like earlier, set EXEC_PLATFORM to **local *for using Chrome browser (headless mode) with Selenium for web scraping with Python. Invoke the command *make scrap-using-pytest to start scraping content from the test website(s).

As seen below, scraping data from the test websites was successful.


Set environment variable EXEC_PLATFORM to the **cloud *and invoke *make scrap-using-pytest for using Chrome browser (headless mode) on cloud Selenium Grid.


Shown below is the status on the dashboard, which indicates that web scraping using Selenium and pytest was successful.


Explore Jest tutorial, your go-to guide for mastering Jest testing. Run Jest automation tests in parallel across multiple browser and OS combinations.
Web Scraping using Beautiful Soup and Selenium
For a demonstration of web scraping with Python using Beautiful Soup and Selenium, we would be scraping content from the following websites:

We are using the combination of Beautiful Soup and Selenium for a very specific reason.🙂As you can see, both the test websites have dynamic content which is where Selenium has an upper-hand over Beautiful Soup.
Selenium is used for performing actions (e.g., scrolling, clicking, etc.) on the page (or document) so that the content to be scraped is available for our perusal. On the other hand, Beautiful Soup is used for parsing and navigating the structure of the HTML page.
The prerequisites and directory structure are already covered in the earlier sections of this blog on web scraping with Python. BeautifulSoup4 (or bs4) & Selenium (v 4.13.0) are used for scraping the ScrapingClub website, whereas bs4, along with Requests (v 2.31.0) help in scraping the eCommerce playground product page(s).
Demonstration: Scraping eCommerce Playground
In this test scenario, we would scrap the products from the eCommerce Playground product page. The website uses pagination, and 15 products are displayed on a single page.
Navigate to the eCommerce Playground product page.
Send an HTTP GET request to the URL using the Requests library.
Using bs4, scrap product information from all the products of the said category.
Implementation
Similar to the configuration for the PyUnit & pytest frameworks, the locator & URL details are present in locators.py.

The core scraping logic is implemented in *test_ecommerce_scraping.py.* Let’s dive deep into the same!
# Beautiful Soup Official Documentation - https://www.crummy.com/software/BeautifulSoup/bs4/doc/

# Import the locators file
import sys
from pprint import pprint
sys.path.append(sys.path[0] + "/../..")

from pageobject.locators import locators
from pageobject.locators import *

from pageobject.helpers import helpers
from pageobject.helpers import *

def scrap_ecommerce(url) -> list:
    response = requests.get(url)

    if response.status_code != 200:
        print(f"Unable to fetch the page. Status code: {response.status_code}")
        return None

    soup = BeautifulSoup(response.text, 'html.parser')

    rows = soup.select('.product-layout.product-grid.no-desc.col-xl-4.col-lg-4.col-md-4.col-sm-6.col-6')

    meta_data_arr = []

    for row in rows:
        link = row.find("a", class_='carousel d-block slide')
        name = row.find("h4", class_='title')
        price = row.find("span", class_='price-new')

        # Create a dictionary of the meta-data of the items on e-commerce store
        meta_data_dict = {
            'product link': link.get_attribute_list('href'),
            'product name': name.get_text(),
            'product price': price.get_text()
        }

        meta_data_arr.append(meta_data_dict)
    return meta_data_arr

# Pagination - 1:5
# Page 1: https://ecommerce-playground.lambdatest.io/index.php?route=product/category&path=57&page=1
# Page 5: https://ecommerce-playground.lambdatest.io/index.php?route=product/category&path=57&page=5
if __name__ == '__main__':
    for iteration in range(1,6):
        test_url = locators.test_bs4_url + "&page=" + str(iteration)
        meta_data_arr = scrap_ecommerce(test_url)
        print('\n')
        print("Product Page = " + test_url)
        print("*********************************************************************************************************\n")
        helpers.print_scrapped_content(meta_data_arr)
Code Walkthrough
Inside the main *construct, we set up the test URL, which constitutes the base URL appended by the page number (i.e. &*page=< page-number >).


Since there are 5 pages in total for the said product category, the scraping implementation is executed in an interactive loop (from 1..6).

To get started with scraping, an HTTP GET request is initiated using the get() method of the requests library. The method takes the URL under test as the input parameter and returns a response object.

The status code (i.e., status_code) attribute of the response object is compared with 200 (i.e., STATUS_OK). If the status_code is not 200 (e.g., 404, 403, etc.), the test is terminated.

The response.text attribute contains the HTML content of the page, which is retrieved as a string. As stated earlier, the HTML parser (i.e., html.parser), the default parser in bs4, is used to parse the HTML content.
BeautifulSoup(response.text, ‘html.parser’) returns a BeautifulSoup object that will be used throughout scraping. The select() method of Beautiful Soup finds elements using the CSS Selector property — .product-layout.product-grid.no-desc.col-xl-4.col-lg-4.col-md-4.col-sm-6.col-6
As expected, 15 elements match the CSS Selector since there are 15 products on the page. The select() method returns a list that will be further used for iteratively scraping information (i.e., name, cost) of each product.


Next up, we run a for loop for scraping information of all the 15 products (or elements) under the div located in the previous step.

Test native, hybrid, and web apps on any mobile OS with our free Android emulator online. Sign up to optimize app performance.
The product link is obtained by locating the element using the find() method of Beautiful Soup. As seen in the Inspect Tools screenshot above, the first argument is the tag that needs to be searched for (i.e., “a” — anchor tag), and the second is the CSS Class attribute.

Link to the product is procured by using the get_attribute_list() method with the located element. In case you need more information on the find() method of Beautiful Soup, we recommend checking out the Beautiful Soup Official Documentation.


On similar lines, the product name is also scraped by using the find() method in Beautiful Soup. In this case, the first argument is the “h4” tag, and the second argument is the Class Name locator “title”.

Finally, the *get_text()* method of Beautiful Soup, when used with the recently located element, provides the product name of the current product.

The last step is to scrap the price of the respective product. As shown below, the text under the element with Class Name “price-new” provides the product price.

Like before, the find() method of Beautiful Soup is used with “span” (i.e., tag to be located) as the first argument and Class Name “price-new” as the second argument. The get_text() method returns the text inside the element.

Finally, a dictionary (i.e., meta_data_dict) of the scraped information (i.e., product link, name, and price) is created, and the same is appended to the list (i.e., meta_data_arr).

The same steps are repeated for all the other product pages (i.e., Product Page 1 → Product Page 5), and the scraped data is displayed on the screen.

Demonstration: Scraping Infinite Scrolling website
In this test scenario, we would be scraping the ScrapingClub website that has content loaded on a dynamic basis. Since the website involves dynamic content, the combination of Selenium & Beautiful Soup is used for web page interactions & scraping.
Navigate to Infinite Scroll Page.
Scroll till the end of the page.
Scrap product content using Beautiful Soup.
Implementation
Akin to the PyUnit & pytest frameworks, the locator & URL details are present in locators.py

The core scraping logic is implemented in *test_infinite_scraping.py.* Let’s deep dive into the same!
# Selenium WebDriver used for infinite scrolling
# Beautiful Soup used for scraping content

# Beautiful Soup Official Documentation - https://www.crummy.com/software/BeautifulSoup/bs4/doc

import sys
# Import the locators file
import os
from pprint import pprint
sys.path.append(sys.path[0] + "/../..")

from pageobject.locators import locators
from pageobject.locators import *

from pageobject.helpers import helpers
from pageobject.helpers import *

exec_platform = os.getenv('EXEC_PLATFORM')

def scrap_inifite_website(url) -> list:
    meta_data_arr = []

    if exec_platform == 'cloud':
        username = environ.get('LT_USERNAME', None)
        access_key = environ.get('LT_ACCESS_KEY', None)

        gridURL = "@hub.lambdatest.com/wd/hub">https://{}:{}@hub.lambdatest.com/wd/hub".format(username, access_key)

        ch_options = webdriver.ChromeOptions()
        ch_options.browser_version = "latest"
        ch_options.platform_name = "Windows 11"

        lt_options = {}
        lt_options["build"] = "Build: Web Scraping with Selenium & Beautiful Soup"
        lt_options["project"] = "Project: Web Scraping with Selenium & Beautiful Soup"
        lt_options["name"] = "Test: Web Scraping with Selenium & Beautiful Soup"

        lt_options["browserName"] = "Chrome"
        lt_options["browserVersion"] = "latest"
        lt_options["platformName"] = "Windows 11"

        lt_options["console"] = "error"
        lt_options["w3c"] = True
        lt_options["headless"] = True

        ch_options.set_capability('LT:Options', lt_options)

        driver = webdriver.Remote(
            command_executor = gridURL,
            options = ch_options
        )
    elif exec_platform == 'local':
        options = ChromeOptions()
        options.add_argument("--headless=new")
        driver = webdriver.Chrome(options=options)

    driver.get(url)

    # Took some support from https://stackoverflow.com/a/41181494/126105
    start_height = driver.execute_script("return document.documentElement.scrollHeight")

    while True:
        # Scroll to the bottom of the page
        driver.execute_script("window.scrollTo(0, " + str(start_height) + ")")
        # Wait for the content to load
        time.sleep(2)
        scroll_height = driver.execute_script("return document.documentElement.scrollHeight")
        if (scroll_height == start_height):
            # If heights are the same, we reached the end of page
            break
        time.sleep(2)
        start_height = scroll_height

    time.sleep(2)

    # Why features='html.parser' is required
    # The code that caused this warning is on line 44 of the file <file>.
    # To get rid of this warning, pass the additional argument 'features="html.parser"'
    # to the BeautifulSoup constructor.
    soup = BeautifulSoup(driver.page_source, features='html.parser')

    # Instantiated Chrome instance is no longer required
    # since we have already read the source
    driver.quit()

    # Code changes as per 28/07/2023
    # In case if elements are not located, please change the locators accordingly
    rows = soup.find_all('div', class_='w-full rounded border post')
    print("\nTotal items on " + url + " are " + str(len(rows)) + "\n")

    for row in rows:
        dress = row.find('h4')
        link = dress.find('a')
        price = row.find('h5')

        # Create a dictionary of the meta-data of the items on e-commerce store
        meta_data_dict = {
            'dress': dress.text.strip(),
            'link' : link.get_attribute_list('href'),
            'price': price.text.strip()
        }

        meta_data_arr.append(meta_data_dict)
    return meta_data_arr

if __name__ == '__main__':
    meta_data_arr = scrap_inifite_website(locators.test_bs4_infinite_url)
    helpers.print_scrapped_content(meta_data_arr)
Code Walkthrough
Inside the main *construct, we invoke the *scrap_inifinite_website() method that is primarily responsible for scraping the website under test.

Since we are using Selenium for performing actions on the page, the EXEC_PLATFORM environment variable helps us choose between local grid (or machine) and the cloud Selenium Grid.
We have already covered Remote WebDriver and Headless browser testing in the earlier sections of the blog.

Since the content is loaded dynamically (i.e., on page scroll), scroll till the end of page is performed using the combination of the execute_script() method with document.documentElement.scrollHeight as the input argument.

Content & Images loaded on a dynamic basis

Now that the page load is complete, create a Beautiful Soup object that parses the page source obtained using Selenium. You can check out our detailed blog that deep dives into getting page sources with Selenium WebDriver for more information on retrieving page sources using Selenium.

Since we already have the page source, it’s safe to release resources used by the instantiated browser instance.

Discover 31 best automation testing tools in 2023 for powerful and efficient testing solutions.
Next, the find_all() method of Beautiful Soup is used with “div” (i.e., tag to be located) as the first argument and Class Name “w-full rounded border post” as the second argument. It returns a list of elements that meet the specified conditions.

As seen from the Inspect Tools screenshot, the length of the list returned by find_all() method should be 60 (i.e. 60 products are present on the page).

Next up, we use the for loop for iteratively scraping information (i.e. dress name, link, price) of each product.

The find() method of Beautiful Soup is used to locate the element with input as “h4” tag.

The text() attribute of the located element provides the product name (e.g., Short Dress). The leading & trailing spaces of the output are done using the strip() method.

The “href” attribute of the element located earlier using the “h4” tag [i.e., dress = row.find(‘h4’)] gives the product link.


On similar lines, the price of the respective product is obtained by locating the element using the find() method. The method takes the “h5” tag as the input argument since the text() attribute of the element contains the product price.

Deep dive to learn about test automation; what is automation testing,its uasage, types and also gain insights on how to get started with automated testing.
Like the earlier step, leading & trailing spaces from the output of text() attribute to get the final price of the respective product.

With this, we have successfully scraped the meta-data of products from the ScrapingClub (Infinite Scrolling) website. Let’s trigger the same on the local as well as LambdaTest Cloud Selenium grid.
Execution
As stated earlier, we can instantiate the Chrome browser (in headless mode) on a local machine (or grid) as well as cloud Selenium grid.
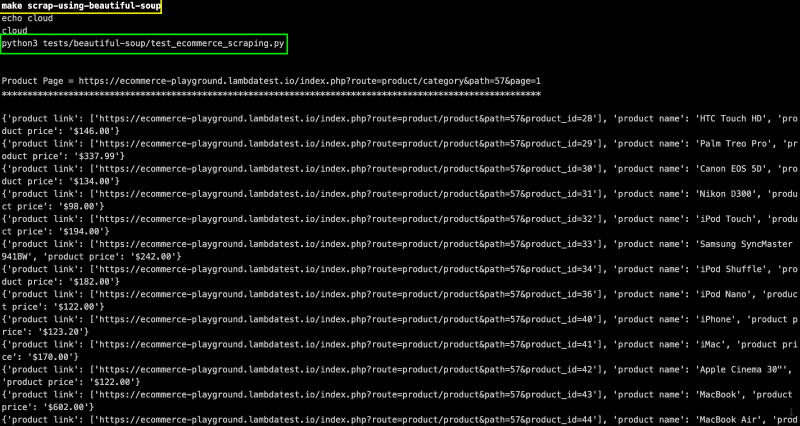
Set environment variable EXEC_PLATFORM to local for using cloud Selenium grid. Invoke the command make scrap-using-beautiful-soup to start scraping content from the test website(s).

As seen below, we are able to scrap content from the LambdaTest E-commerce Playground Product Page(s) and ScrapingClub website.


Set environment variable EXEC_PLATFORM to cloud for using Cloud Selenium Grid on LambdaTest.


Shown below is the status on the dashboard, which indicates that web scraping with Python using Beautiful Soup and Selenium was successful.


With this, we have covered web scraping with Python using popular libraries (or tools) like Selenium (with PyUnit & pytest) and Beautiful Soup. The popularly-quoted Spider-Man theme of “With great power, comes great responsibility” also applies to web scraping!
This is because web scraping with Python must be performed while taking legal and ethical considerations into account. It is unethical to scrape confidential (or sensitive) information from any website.
Web Scraping Done Right!
As stated, web scraping is a super-powerful tool to have in your data collection armory. However, its benefits should be leveraged with utmost caution! Python provides numerous tools (or libraries) for web scraping, making it one of the preferred languages for scraping web content.
Though the choice of web scraping tool purely depends on the requirements, Selenium can be preferred for scraping dynamic web content. On the other hand, Beautiful Soup is one of the preferred choices for scraping static web content.
Playwright is another popular framework for scraping web content. You can refer to our detailed blog on Web Scraping with Playwright and Python in case you intend to leverage the framework for scraping.
As a part of the web scraping series, I dabbled into Web Scraping with C# using Selenium. To summarize, web scraping is a great tool that helps make the most of public data, but it should be used with utmost responsibility.🙂
Happy Scraping !
This blog explains different types of automation testing along with their benefits and best practices. Also we have discussed different frameworks and tools at the end.
Frequently Asked Questions (FAQs)
Is Python good for web scraping?
Yes, Python is widely recognized as an excellent programming language for web scraping. Python offers several libraries and frameworks, such as BeautifulSoup and Scrapy, that simplify the web scraping process. Its simplicity, readability, and rich ecosystem of packages make it a popular choice for web scraping tasks. Additionally, Python is platform-independent, which means you can use it on various operating systems to collect data from websites efficiently.
What is web scraping with Python?
Web scraping with Python refers to automatically extracting data from websites. Python provides various libraries and frameworks, such as BeautifulSoup, Scrapy, and Requests, that enable developers to write scripts to access web pages, parse the HTML content, and extract specific information or data. This data can be used for various purposes, including data analysis, research, content aggregation, or any other application where web data is needed. Web scraping with Python is a versatile and powerful technique for collecting information from the internet.
Is it legal to web scrape?
The legality of web scraping depends on various factors, including the website’s terms of service, the nature of the data being collected, and local or international laws. Here are some key points to consider:
Website’s Terms of Service: Websites often have service or usage policies that specify whether web scraping is allowed or prohibited. It’s essential to review and comply with these terms. Violating a website’s terms of service could lead to legal issues.
Publicly Accessible Data: Web scraping publicly accessible data, such as information without logging in, is typically considered more acceptable. However, this does not grant unlimited rights to use or redistribute the data.
Copyright and Intellectual Property: If the data being scraped is protected by copyright or contains intellectual property, scraping and using that data may infringe on those rights.
Personal Data and Privacy: Scraping and using personal data without consent can raise privacy and legal concerns, particularly under data protection laws like the GDPR in the European Union.
Anti-Competitive Behavior: Web scraping for anti-competitive purposes, like price scraping to undercut competitors unfairly, may be subject to legal action under antitrust laws.
Rate Limiting and Politeness: It’s advisable to implement rate limiting and be polite in your scraping activities. Excessive requests can strain a website’s servers and may be viewed as a denial-of-service attack.
Laws and Jurisdictions: The legal aspects of web scraping can vary by jurisdiction. What’s legal in one country may not be in another.
To ensure compliance with laws and ethical standards, it’s essential to consult with legal experts if you have concerns about the legality of your web scraping activities, particularly when dealing with sensitive or proprietary data. Additionally, always respect a website’s terms of service and robots.txt file, which can specify rules for web crawlers.

Top comments (0)