MSTest setup is a popular open-source test framework that is shipped along with the Visual Studio IDE. It is also referred to as Visual Studio Unit Testing Framework. However, MSTest Setup is more synonymous within the developer community.
As the MSTest framework comes pre-bundled with Visual Studio, many developers prefer MSTest over other C# frameworks such as NUnit, xUnit.net, etc. for test automation. The latest version of MSTest is 2, a major overhaul over its predecessor. The earlier version of MSTest i.e. MSTest V1 was not open-source and lacked many good features (particularly parallel test execution) which were supported by other Selenium C# testing frameworks.
MSTest V2 is cross-platform compatible, extensible, and supports parallel test execution which is one of the major requirements for performing Selenium C# testing. It also supports data-driven testing as methods can be executed multiple times by providing different input arguments. The MSTest framework recognizes the test via annotations/attributes under which the test code is present. [TestInitialize], [TestMethod], [TestCleanup] are the most widely used attributes by developers who make use of the MSTest framework for automation testing.
In this MSTest setup tutorial, I’ll take a detailed look at setting up the MSTest framework which can help you get started with MSTest on Visual Studio.
A comprehensive end to end Testing tutorial that covers what E2E Testing is, its importance, benefits, and how to perform it with real-time examples.
MSTest Setup Visual Studio For Development and Testing
Before moving ahead in this MSTest tutorial for environment setup, I’ll quickly address how to set up Visual Studio IDE for MSTest test case development. Shown below are the steps for installing Visual Studio 2019 (VS 2019):
Download The Latest Visual Studio
Download the latest version of Visual Studio i.e. Visual Studio 2019. You can choose from either Professional/Community/Edition of Visual Studio. The selection should be based on your project requirements. In this MSTest tutorial for environment setup, I’m using the Community Edition of VS 2019.
Install Necessary Platform For Development & Testing
In this MSTest tutorial for environment setup, the MSTest framework will be used for testing so we’ll be installing the necessary packages for development on the Windows platform.
Sign-In To Visual Studio IDE
In order to leverage the features of Visual Studio 2019, it is recommended that you sign-in to the IDE so that you can make use of the useful features of Visual Studio 2019 such as pushing code to private Git repository, syncing settings, and more.
In the next section of the MSTest tutorial on environment setup, I’ll take a look at steps to be followed for the installation of the mandatory packages required for executing the tests based on the MSTest framework.
This MSTest Tutorial for beginners and professionals will help you learn how to use MSTest framework with Selenium C# for performing Selenium automation testing.
Installing The MSTest Framework & MSTest Adapter
For executing automated browser testing using the MSTest framework, you need to install the corresponding test adapter as the adapter enables the execution of the test code. Installation of the MSTest adapter can be done by executing the package manager commands on the console or by accessing the package manager from the GUI. In this MSTest tutorial for environment setup, I’ll show you how to set up using both the options.
In order to install the required packages, we perform the following steps:
Step 1: Create a new project of the type ‘MSTest Test Project (.Net Core)’ in Visual Studio.
Step 2: Since the project is based on the MSTest framework, the default C# file that comes along with the project has attributes [TestMethod] and [TestClass] in it.
Even if you have not created a MSTest Test Project, you could still make use of the MSTest framework by installing the framework using the NuGet Package Manager.
Take this certification to master the fundamentals of Selenium automation testing with C# and prove your credibility as a tester.
Here’s a short glimpse of the Selenium C# 101 certification from LambdaTest:
Automated Functional Testing tests helps to ensure that your web app works as it was intented to. Learn more about functional tests, and how automating them can give you a faster release cycle.
Installing MSTest With NuGet Package
For installing the required MSTest packages for cross browser testing, you can either make use of the Package Manager commands or use the IDE to achieve the task. In case you are just getting started with Selenium C# testing using MSTest, I’ll recommend the IDE option.
Using Visual Studio IDE To Install The MSTest Framework
To install the MSTest framework and the other mandatory packages for Selenium test automation with MSTest, perform the following steps using the Visual Studio IDE:
Step 1: Add Console.WriteLine(“Selenium C#”) to the newly created .cs file.
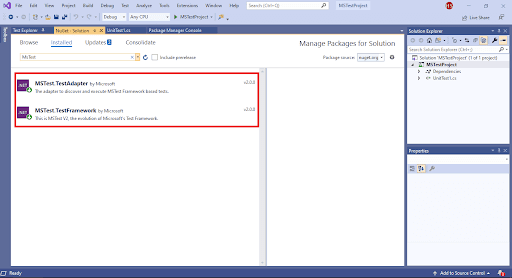
Step 2: Navigate to Tools -> NuGet Package Manager -> Manager NuGet Packages for Solution and search for the following packages in the Browse tab.
MSTest.TestAdapter
MSTest.TestFramework
Microsoft.NET.Test.Sdk
Step 3: Click on the Install button and press OK for each of these packages so that package is installed for the current project.
Using Package Manager Commands To Install The MSTest framework
Instead of using the IDE, the Package Manager (PM) commands can also be used for installing the required MSTest packages.
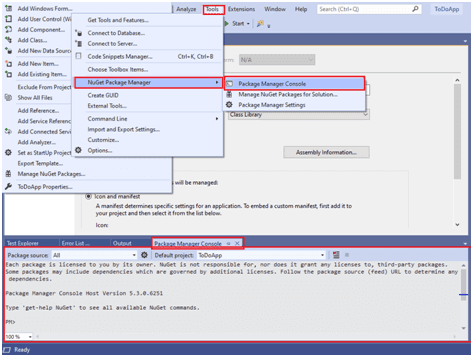
Step 1: For executing commands from the PM console, navigate to Tools -> NuGet Package Manager -> Package Manager Console.
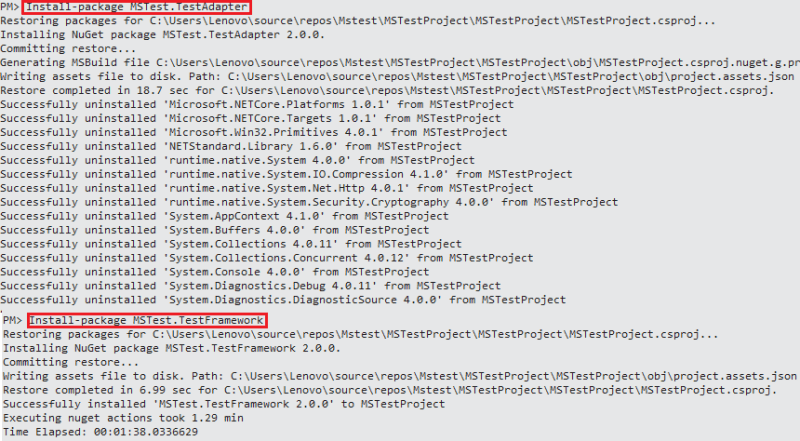
Step 2: For installation of the packages, we use the Install-Package command with the required as the argument to the command.
Install-Package MSTest.TestAdapter
Install-Package MSTest.TestFramework
Install-Package Microsoft.NET.Test.Sdk
Shown below is the installation screenshot:
Step 3: You can confirm whether the packages are installed by executing the Get-Package command on Package Manager (PM) Console.
PM> Get-Package

Id                                  Versions
--                                  --------
MSTest.TestFramework                {2.0.0}
MSTest.TestAdapter                  {2.0.0}
coverlet.collector                  {1.0.1}
Microsoft.NET.Test.Sdk              {16.2.0}
The version of MSTest framework is 2.0.0 or MSTest V2 which is currently the latest version of the MSTest framework.
Through this usability testing tutorial, you will learn how usability testing is a great way to discover unexpected bugs, find what is unnecessary or unused before going any further, and have unbiased opinions from an outsider.
Wrapping It Up
With this MSTest environment setup example, I demonstrated how to get started with the MSTest framework for Visual Studio. The steps listed in this MSTest tutorial for environment setup will help you in performing automation testing with C#.
That’s all for this MSTest tutorial on environment setup, I hope this cleared all your doubts with respect to the setup. In case of any further questions, please feel free to reach out to us in the comments section below. Help us to reach out to your peers and colleagues looking by retweeting us or sharing our posts on Social Media. Happy Testing!!?


Top comments (0)