
There are times when developers get stuck with a problem that has to do with version changes. Trying to run the code or test without upgrading the package can result in unexpected errors.
While we may believe there is a problem with the code, we weren’t the culprit this time.
The developers working behind these libraries do their best to make the most of them, but sometimes there will be breaking changes in the latest version, and most of the time, we might consider migrating our code to the latest version.
When it comes to automating testing, managing the test data, and analyzing the results to improve software quality, Cypress is one of the most popular options among developers.
According to npmjs, Cypress garners around 4,165,468 weekly downloads, whereas Selenium, its nearest competitor, has 2,652,431 weekly downloads.

Selenium is one of the most popular test automation frameworks and has been a leading choice for testing applications for many years. Although Cypress is a developer-friendly framework, it is now becoming popular for testing modern web applications since we can do component, API, and end to end testing with a single framework.
One of the worst nightmares for developers and testers is test flakiness. Imagine being greeted with test failures even when there are no changes in the test code!
As per my experience, Cypress tests are less flaky than Selenium tests. You can learn more about the differences through this Selenium vs Cypress blog.
The Cypress team recently announced the release of Cypress 10, or more precisely, July 1, 2022. It is better to migrate to Cypress 10, one of the most recent stable versions, because the Cypress team doesn’t add any new features, updates, or bug fixes to the older version.
This detailed blog on Cypress 10 migration will explain how to migrate your test automation suite to Cypress 10 and execute it over a cloud Cypress grid like LambdaTest.
P.S.: When writing this blog, the latest version of Cypress is 11.2.0. However, since the support for v11.0 by LambdaTest is currently under development, we have considered using Cypress 10.
Test your native, hybrid, and web apps across all legacy and latest mobile operating systems on the most powerful online Android emulator.
What is Cypress?
Cypress is a NodeJS-based, open-source, MIT-licensed test automation framework written in JavaScript. It is the most preferred automation framework for testing modern web applications. When writing this blog on Cypress 10 migration, Cypress has over 41,800 stars on GitHub.
It makes quality end-to-end, integration, and unit tests easy to write and debug. It ensures that your web application is strictly tested before delivering it to quality assurance for testing. You make your code more reliable by inserting assertions and testing your application state after every change.
Cypress has a GUI and a command line interface to work with. The GUI, built on top of Electron JS, is suitable during the development stage as the user can interact with data flowing from the test runner to the server and vice-versa. The CLI is suitable when using a remote server for our test automation.

A key feature of Cypress is that it is designed and optimized for local development. With Cypress, you can test a web application from the perspective of your users. Without a doubt, this will give many of you more confidence to build robust applications.
Why use Cypress for end to end testing?
In the State of JS 2021 survey, Cypress is ranked fourth in the most popular test automation frameworks, showing that developers and quality assurance engineers increasingly turn to Cypress to automate their tests.

We will look at some of the major benefits of Cypress for testing web apps in this section:
Cypress is fast
There are only a few dependencies, and a complex test environment is not necessary to set up Cypress. Well, it is easy to set up Cypress in a few minutes! Any novice developer can start using Cypress like a command line tool and run the tests at your fingertips.
*](https://res.cloudinary.com/practicaldev/image/fetch/s--zixHX8Lg--/c_limit%2Cf_auto%2Cfl_progressive%2Cq_auto%2Cw_880/https://cdn-images-1.medium.com/max/2000/0%2AYRc4l-Zr7IsJnu1S.png)
As mentioned earlier, Cypress uses Node.js to run in browsers and is written in JavaScript using the Mocha and Chai libraries.
Test your web and mobile apps on Android online emulator. Ensure your apps are compatible across latest and legacy Android operating systems, devices, and browsers. Start Testing Now !!
Real-time testing
Cypress’s architecture is based on Electron.js/Node.js, and it communicates with its Node server process to react to application events in real-time. Every time you modify your tests, Cypress reloads automatically.
Cypress runs as fast as your browser can render content. You can watch tests as you create your applications as they are executed in real-time.
Debugging experience
The Cypress test code runs in the same run loop as your application. This indicates that you can access the page’s active code and the tools your browser makes available to you, such as document, window, and debugger.
Cypress allows you to debug your application directly using Chrome DevTools while your tests are executed within the browser. When a test fails, an error message is thrown. You can also record screenshots of the test steps.

Time travel
We can travel through various states thanks to Cypress. This is made possible by taking a picture as the test is being run. When hovered over, each command and assertion returns the application or component under test to the state it was in when that command was executed.

Automatic waiting
Cypress waits for the DOM to load automatically; you don’t need to add additional waits or sleep. Cypress carries out everything asynchronously, including loading the page and the event elements send. You can go through this detailed guide on the types of Wait to learn more about it.
Zero network lag
Your application will be driven and run at the maximum rendering speed by the Cypress commands. Because Cypress executes most of its commands within the browser, there is no network lag. You can test under different throttling network conditions. This means that your tests will always be deterministic and predictable — no matter what network you are on or how fast or slow the connection is.
Recording states
Cypress keeps track of all CI data, screenshots, and videos and lets us see the outcomes in the dashboard. Cypress can take screenshots whether you use cypress open or cypress run, even in CI.
The benefit of recording these is that it enables visual regression testing, which allows us to verify that nothing has changed by comparing the screenshots of earlier runs with the current run. You can learn more about it through this blog on visual regression testing with Cypress.
In this article, we take a look at some aspects of simulation and discuss some ways through which we can use iOS emulator for PC.
Cross-platform support
Cypress supports multiple operating systems such as Windows, Mac, and Linux. Browsers like Electron, Chromium, Chrome, Edge, and Firefox can run Cypress tests.
All the popular browsers on the market are supported by the modern development framework, so organizations try to support all the major browsers whenever a new product is released.
To summarize, Cypress tests run inside the browser, making them less flaky than tests using the Selenium framework.
Now that we have covered the integral aspects of the Cypress framework, let’s dive deep into the changes that have come with Cypress 9.
Major updates in Cypress 10
Cypress has released several new features that are handy for testing. Let’s take a look at the important features of Cypress 10. We have referred to the Cypress changelog to curate the changes that matter the most!
Component testing is now seamlessly integrated into the main app, allowing you to select the testing environment you prefer as soon as Cypress launches. Currently, Cypress only supports a few frameworks and versions for component testing.

Cypress 10 has improved how configurations are set and refreshed. When changes are made to the configuration file, the Cypress app will automatically refresh instead of reopening it.
Cypress 10 also includes several new configuration options. Major ones are listed below:
A new testing-type-specific configuration option called specPattern must be defined in the e2e and/or component configurations. By replacing the componentFolder, integrationFolder, and testFiles options, this option streamlines the spec discovery process.
The excludeSpecPattern option is a new configuration option for testing types within the e2e and/or component configurations. It allows you to ignore spec files that would otherwise appear in your list of specs by using a glob or an array of globs. The ignoreTestFiles option has been replaced by this one.
The defineConfig() helper function has an addition of intelligent code completion. By doing this, you can enable configuration auto-completion and in-line documentation in your IDE’s configuration file. Cypress does not need to parse your configuration, but it is advised to wrap your config object with defineConfig().
In addition to configuration changes, Cypress has also changed the APIs. Let’s examine those now:
- .within(): A visual indication of logs and commands executed in the .within() command context has been added to the .within() command.
Let’s see an example of it
  it("within testing",()=>{
    cy.get('.within')
    .within(() => {
     return cy.contains('Add').should('have.class', 'button')
    })
  })
});

cy.origin(): The cy.origin() API now supports more than 30 unique origin spec bridges per test.
cy.session(): The behavior of the cy.session() command has been improved, and it no longer clears the dom following the execution of a validation function. This means a cy.visit() command is no longer required after running cy.session() when a validation function is used.
If component testing is not set up, Cypress will display an improved error message when running cypress run –ct.

Cypress 10 has also made some updates to the Cypress CLI, listed below:
With the –config CLI flag, you can now pass in testing type-specific configuration options without nesting JSON.
The –e2e and –component CLI flags have been added to cypress run and cypress open to allow users to run Cypress for specific testing types. If a testing-type specific CLI flag is not provided when running cypress run, Cypress will run end-to-end tests by default.
If cypress open is run with the –browser CLI flag for an unknown browser, a warning message will now appear.
After seeing all these, should we migrate or not?
Mobile emulator online from LambdaTest allows you to seamlessly test your mobile applications, websites, and web apps on mobile browsers and mobile devices.
Breaking changes in Cypress 10.0
The release of Cypress 10 came with various new features and bug fixes. Not only that, there are a couple of breaking changes with version 10.0 and above.
Let’s take a look at it.
Default configuration files
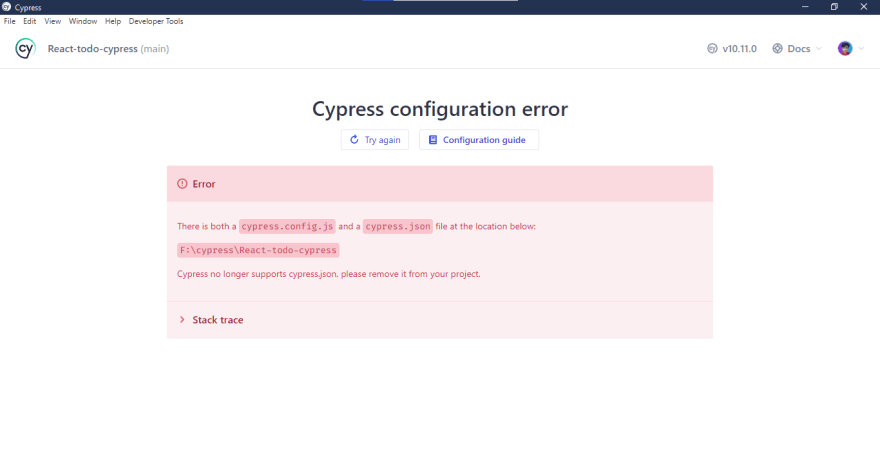
In the previous versions of Cypress, the cypress.json file was the default configuration file, but this file is no longer supported. It has been renamed to cypress.config.js.
If you use TypeScript or any other module systems like Common JS or ECMAScript modules, the extension is cypress.config.ts, cypress.config.cjs, or cypress.config.mjs. This change now provides better flexibility and extensibility of configuration.
If we accidentally have both the cypress.json and cypress.config.js files, an error will be thrown.
Mandatory configuration file
Before Cypress 10.0, the configuration file was not required, and we can pass the flag
–config-file=false. But as of version 10.0 and above, the configuration file is now mandatory, and passing the -–config-file=false flag will throw an error.

Modifications to the configuration option
Cypress has changed several configuration options, including their names, availability, and limitations to certain testing types. Many configuration options are now specific to either end-to-end or component testing.
The baseUrl and experimentalSessionAndOrigin configuration options can only be specified within the e2e configuration and are no longer valid as top-level configuration options. The support files are now distinct for E2E and component tests.
The componentFolder and integrationFolder options are no longer a part of Cypress 10. The new specPattern option has replaced these options. The ignoreTestFiles option was removed, and the new excludeSpecPattern option has taken its place.
During cypress open, the ability to Run all specs and Run filtered specs has been removed while running the Cypress specs in a GUI.
The commands cypress open-ct and cypress run-ct have been phased out. Instead, we must now use the commands cypress open --component and cypress run --component.
Why should you migrate Cypress to the latest version?
Undoubtedly, Cypress is becoming a popular web testing framework because of its ease of use. It enables test automation engineers and front-end developers to write automated web tests in JavaScript, which makes Cypress highly appealing to developers.
Cypress continuously strives to improve its products by integrating new features and fixing bugs. As there are breaking changes in the Cypress latest version, if you don’t update the project to the latest version, you must continue to use Cypress version 9 or the previous releases.
So it’s recommended to update and migrate your project to the latest Cypress version. As a developer, who wouldn’t want to capitalize on the latest additions in a new software release 🙂
How to migrate the test automation suite to Cypress 10?
The recent major Cypress release is version 10, which includes new features like integrating component testing into the GUI app and a new user interface with a unified testing experience. Cypress had to make some adjustments, like changes in folder structure and configuration, to how they were operating in the past to benefit from these new features.
In addition to upgrading Cypress, you might want to migrate the current project’s test code. All you have to do is review and include Cypress’ automatic migration option in your project.
You can follow the steps below for Cypress 10 migration in a beginner-friendly manner:
Upgrading the package
The Cypress dependency needs to be updated to migrate your project. Upgrading Cypress is simple and can be done with your preferred package manager. Run the following command on the terminal to upgrade the Cypress package:
For npm:

If you are using yarn as your package manager, then:
yarn add -D cypress@latest

Starting the migration
If you’ve upgraded Cypress to the latest version, you can run this command to begin the Cypress 10 migration:

npx cypress open
If you are performing this action for the first time, the GUI will display a welcome message and an introduction to Cypress 10 in video form.
You can get started by clicking the “Continue to Cypress 10” button.
If it is not the first time you are doing this, assuming you run the command npx cypress open, it will open the GUI with two options to start with, which are E2E testing and component testing.

Renaming the existing specs
To conform to the new 10.0+ standards, the migration window advises changing the name of the specification files folder as well as the file extension. To do that, follow these steps:
Step 1: Change the folder name from cypress/integration to cypress/e2e.

Step 2: Change the default spec file extension from [filename].spec.[.extension] to [filename].cy.[.extension].

Changing the filename is as simple as clicking on the Rename these specs for me button, and Cypress will do the rest for you.

Get started with this complete Selenium automation testing tutorial. Learn what Selenium is, its architecture, advantages and more for automated cross browser testing. Read more.
Renaming the Cypress support file
As of Cypress version 10, it provides different support files for both component and end to end testing in Cypress. You need to rename the support file for E2E from the cypress/support/index.js *file to *cypress/support/e2e.js.

You can click on the Rename the support for me button, and Cypress will take care of the rest for you.
The image below shows all the changes to the folder structure and file names.

Migrating to the new Cypress configuration file
In Cypress 10, changes to the configuration file were one of the major changes.
The final step will be to migrate the existing Cypress configuration, formerly cypress.json, over to the new Cypress configuration, cypress.config.js, in this Cypress 10 migration tutorial.
While this step not only renamed the configuration file, it also seeded the new configuration with the corresponding options from the old one.

Like above, we can use the GUI button to move the configuration file automatically while performing Cypress 10 migration.
Manually, you can migrate the configuration file by renaming it from cypress.json to cypress.config.json and adding the following lines of code to the file.
   const { defineConfig } = require('cypress')

    module.exports = defineConfig({
      e2e: {
        // We've imported your old cypress plugins here.
        // You may want to clean this up later by importing these.
        setupNodeEvents(on, config) {
          return require('./cypress/plugins/index.js')(on, config)
        },
      },
    })
You will now see a “Welcome to Cypress” window and information indicating that E2E testing has been successfully set up in our project.

You might also have seen the choice to include component testing, though. This is one of the exciting new features that ships with Cypress 10. Component testing is currently in beta and is subject to future releases for additional testing features.
Updates to Cypress Command Line Interface
The Cypress CLI option keeps functioning as before. However, Cypress has introduced new options. Your project may include component and end-to-end testing since Cypress now supports them.
The following are a few helpful CLI snippets.
Execute all e2e tests in Cypress CLI
npx cypress run --e2e
Execute all component tests in Cypress CLI
npx cypress run --component
Execute tests in a specified browser
cypress run --browser chrome
Execute tests in a particular port
cypress run --port 8080
Now that we have completed Cypress 10 migration, you are ready to use both E2E testing and component testing to their full potential. Let’s check out how these tests can be done with Cypress.
How to perform end to end testing with Cypress 10?
An end-to-end test evaluates an application’s performance and functionality in real-world settings using data that closely resembles real-world conditions during the software development lifecycle. The objective is to completely recreate a real-world, real-user scenario in the simulation.
This testing aims to validate the system being tested and ensure that all of its supporting systems function properly and behave as expected.
Earlier in this blog on Cypress 10 migration, we migrated Cypress to one of the latest versions, and now we can start using Cypress E2E testing. You can start by clicking the E2E testing tile to get started.

The next step is to choose your preferred browser. While you are free to select the browser of your choice, I like to stick with Chrome.

Click the “Start E2E Testing in Chrome” button, and it will open the browser you selected, in this case, Chrome, which is now controlled by Cypress.

Let’s now create a to-do app to visualize the real-time testing using Cypress E2E testing. We can first look into the workflow using Cypress v9.
React application testing with Cypress 9
We’ll use React JS to build the to-do application and Tailwind CSS for styling. We can make the app simple by only using one main component, i.e., App.js.
Our package.json, which contains the details of our applications, will look like this:
    {
      "name": "cypress9",
      "private": true,
      "version": "0.0.0",
      "type": "module",
      "scripts": {
        "dev": "vite",
        "build": "vite build",
        "preview": "vite preview"
      },
      "dependencies": {
        "react": "^18.2.0",
        "react-dom": "^18.2.0",
        "react-toastify": "^9.0.8"
      },
      "devDependencies": {
        "@types/react": "^18.0.22",
        "@types/react-dom": "^18.0.7",
        "@vitejs/plugin-react": "^2.2.0",
        "autoprefixer": "^10.4.13",
        "postcss": "^8.4.18",
        "tailwindcss": "^3.2.1",
        "vite": "^3.2.0"
      }
    }
To make this simple, we will create a to-do application that can create a new to-do and delete an existing to-do.
The App.js file will look like this:
    import React, { useRef, useState } from "react";
    import "./App.css";
    import { ToastContainer, toast } from "react-toastify";
    import "react-toastify/dist/ReactToastify.css";

    function App() {
      const [count, setCount] = useState(0);
      const [todoList, setTodoList] = useState([]);
      console.log(todoList);
      const inputRef = useRef();

      function addNewTod(newTodo) {
        let flag = 0;
        todoList.forEach((todo) => {
          if (newTodo === "") {
            flag = 1;
            toast.error("Please enter a valid todo");
          }
          if (todo === newTodo || newTodo === "") {
            alert("Oops! You have already added this task");
            flag = 1;
          }
        });

        if (flag === 0) {
          setTodoList([...todoList, newTodo]);
          toast(`Todo ${newTodo} Added`, {
            position: "top-center",
            autoClose: 5000,
            hideProgressBar: false,
            closeOnClick: true,
            pauseOnHover: true,
            draggable: true,
            progress: undefined,
            theme: "dark",
          });
          inputRef.current.value = "";
        }
      }

      function removeTodo(event, todoremove) {
        console.log(event.detail);
        if (event.detail === 1) {
          setTodoList(todoList.filter((todo) => todo !== todoremove));
          toast(`Todo ${todoremove} removed`);
          console.log(12345678);
        }
      }

      return (
        <div>
          {/* Todo app with tailwind */}
          <ToastContainer />

          <div
            style={{
              backgroundImage:
                'url("https://www.allartclassic.com/img/Albert_Bierstadt_BIA017.jpg")',
              backgroundRepeat: "no-repeat",
              backgroundSize: "cover",
              height: "100vh",
              width: "100vw",
            }}
            className='flex flex-col items-center justify-center  min-h-screen py-4'>
            <div className='flex flex-col items-center justify-center w-full max-w-md px-4 py-6 space-y-4 bg-white rounded-lg shadow-pink-300 shadow-xl'>
              <h1 className='text-2xl font-bold text-gray-900'>Todo App</h1>
              <div className='within flex flex-row items-center justify-center w-full space-x-4'>
                <input
                  ref={inputRef}
                  data-input='todo-input'
                  className='input flex-1 px-4 py-2 text-gray-900 bg-gray-100 rounded-lg shadow-sm focus:outline-none focus:ring-2 focus:ring-blue-600 shadow-blue-200 focus:ring-opacity-50'
                  type='text'
                  placeholder='Add todo'
                />
                <button
                  data-button='Add-Todo'
                  onClick={() => addNewTod(inputRef.current.value)}
                  className='px-4 button py-2 text-white bg-blue-600 rounded-lg shadow-sm hover:bg-blue-700 focus:outline-none focus:ring-2 focus:ring-blue-600 focus:ring-opacity-50'>
                  Add
                </button>
              </div>
              {todoList?.map((item, key) => {
                return (
                  <div
                    onClick={(e) => removeTodo(e, item)}
                    key={item}
                    className='flex flex-col items-start justify-start w-full space-y-4'>
                    <div
                      data-todo={item}
                      className='flex flex-row items-center justify-between w-full px-4 py-2 space-x-4 bg-blue-400 rounded-lg shadow-sm'>
                      <p className='text-gray-100'>{item}</p>
                    </div>
                  </div>
                );
              })}
            </div>{" "}
          </div>
        </div>
      );
    }

    export default App;


    // class based component example
The output will be like this:

Let us now add Cypress as a dev-dependency to our project. We will use Cypress V9.7.0

If you are using yarn, you can run the following command:
yarn add -D cypress@9.7.0
Cypress will now be added to the dependencies list.

Now we run Cypress and open the GUI by running the following command:
npx cypress open
This will open the interactive GUI, where you will find some example files to get started.

Let’s now create our sample test that will check if the browser is focused on the input field when it loads.
The test description for this scenario will look like this:
    // cypress 9 code to test the todo app
    //
    /// <reference types="cypress" />

    describe("to-do app", () => {
      beforeEach(() => {
        cy.visit("http://localhost:5173");
      });

      it("Focus on the input", () => {
        cy.focused().should("have.class", "input");
      });
    });
The first thing we do is visit the app inside the Cypress Dashboard. When the app opens inside the dashboard, we check if the focused element has a class named input. If there is one, our test passes.
Let’s add another test to see if the error message appears on the screen if we add a null or empty string.
     // test whether the input field is empty
      it("Accepts input", () => {
        const newItem = "";
        cy.get('[ data-input="todo-input"]').type(`${newItem}{enter}`);
        cy.get(`[data-button="Add-Todo"]`).click();
        cy.get(".Toastify>div").should("have.text","Please enter a todo");

      });
You can see from the below output that it checks for an element that has the text “Please enter a todo” when we try to add an empty to-do.

Migrating the React to-do app from Cypress 9 to Cypress 10
We’ll use the same to-do app made with React JS for Cypress 9 to Cypress 10 migration.
You might have inferred from the code that there are two main functions: add todos and remove them.
Are you using Playwright for automation testing? Run your Playwright test scripts instantly on 50+ browser/OS combinations using the LambdaTest cloud. Sign up for free!
Adding a to-do item
Adding a to-do item requires only two checks: Does the to-do list already have the item, and is the new item empty? We have implemented this in the code, and if everything is OK, we will add the new to-do to the to-do list, in this case, an array.
      function addNewTod(newTodo) {
        let flag = 0;
        todoList.forEach((todo) => {
          if (newTodo === "") {
            flag = 1;
            toast.error("Please enter a valid todo");
          }
          if (todo === newTodo || newTodo === "") {
            alert("Oops! You have already added this task");
            flag = 1;
          }
        });
Removing a to-do item
Removing a to-do is straightforward. We will remove the item from the array whenever the user double-clicks an item. We use the filter() method in JavaScript to filter the array list, i.e., the to-do list. The code for removing an item is shown below:
    function removeTodo(event, todoremove) {
        console.log(event.detail);
        if (event.detail === 1) {
          setTodoList(todoList.filter((todo) => todo !== todoremove));
          toast(`Todo ${todoremove} removed`);
          console.log(12345678);
        }
      }
The output of the following code will be like this:

Our to-do app is working fine right now. To ensure our app works for everyone, we need to test it, in this case, E2E testing with Cypress.
We currently have Cypress 9 installed on our application as a dev dependency. We can now upgrade to Cypress 10. We can do it by running the following command.
npm i -D cypress@10.11.0
Now we can power the Cypress GUI application by running:
npx cypress open
This will open the GUI, and you can select the end-to-end testing tile to start the test. The GUI will ask to create the files and folders related to Cypress; just click on the proceed button.
For Cypress 10 migration from Cypress 9, we must follow the above-mentioned steps:
Changing the folder name from
cypress/integrationtocypress/e2e.Changing the file extension from
[filename].spec.[.extension]to[filename].cy.[.extension].Rename the Cypress support file.
Migrate to the new
Cypress configuration file.
Now our folder structure will look like this:

You can clearly see the difference in folder structure compared to Cypress V9.
The E2E *folder is where you write your custom tests. *Testing-todo-app is the folder that we will use to create our custom tests.
Let’s start writing tests for our application with Cypress 10.
We will start by creating a file inside the e2e folder. We will name it todoTest.cy.js. The following is the file that we just created in this Cypress 10 migration tutorial.
   /// <reference types="cypress" />

    describe("example to-do app", () => {
      beforeEach(() => {
        cy.visit("http://localhost:3001");
      });

      it("displays 0 todo items by default", () => {
        // We use the `cy.get()` command to get all elements that match the selector.


    //    checking if we have a heading tag with text Todo App
        cy.get("h1").should("have.text", "Todo App");
      });

      it("can add and remove todo items", () => {
        // We'll store our item text in a variable so we can reuse it
        const newItem = "I want to take my dog for a walk";
        const newItem2 = "I want to go to the restaurant";

        // Let's get the input element and use the `type` command to
        // input our new list item. After typing the content of our item,
        // we need to type the enter key as well in order to submit the input.

        cy.get('[ data-input="todo-input"]').type(`${newItem}{enter}`);
        cy.get(`[data-button="Add-Todo"]`).click();

        cy.get('[ data-input="todo-input"]').type(`${newItem2}{enter}`);


        cy.get(`[data-button="Add-Todo"]`).click();

        // remove a Todo
        cy.get(`[data-Todo="${newItem}"]`).click();
      });

      it("Can add same todo again", () => {
        const newItem = "I want to take my dog for a walk";

        cy.get('[ data-input="todo-input"]').type(`${newItem}{enter}`);

        cy.get(`[data-button="Add-Todo"]`).click();
        cy.get(`[data-button="Add-Todo"]`).click();
      });
    });
We will go through the code and understand how each snippet of code will be reflected in our test.
When writing tests, it might be necessary to group them so that they can be modularized. Cypress’ describe() function is used to accomplish this.
   describe("example to-do app", () => {

         });
There are two arguments to the describe() function, the name of the test and a callback function that includes all the tests.
We include the following code inside that callback function to ensure we go to the specified URL before running each test in this Cypress 10 migration tutorial.
   describe("example to-do app", () => {
      beforeEach(() => {
        cy.visit("http://localhost:3001");
      });
Let’s now run our first test. Our objective is to find an h1 element with the text “Todo App.” We use it() function to accomplish this. The it() function describes a specification or test case with the given title and callback function acting as a thunk.
      it("check if there is a heading H1 element", () => {
        // We use the `cy.get()` command to get all elements that match the selector.


    //    checking if we have a heading tag with text Todo App
        cy.get("h1").should("have.text", "Todo App");
      });
You can run the test by clicking the todoTest.cy.js file in the Cypress automated browser.

This will start the cypress runner to start the test.

We have passed the first test, and Cypress successfully found the < h1 > tag with the text “Todo App.”
The next step in this Cypress 10 migration guide is to add two more tests, one to test whether items can be added or removed and another to test whether the same todo can be added again.
    it("can add and remove todo items", () => {
        // We'll store our item text in a variable so we can reuse it
        const newItem = "I want to take my dog for a walk";
        const newItem2 = "I want to go to the restaurant";

        // Let's get the input element and use the `type` command to
        // input our new list item. After typing the content of our item,
        // we need to type the enter key as well in order to submit the input.

        cy.get('[ data-input="todo-input"]').type(`${newItem}{enter}`);
        cy.get(`[data-button="Add-Todo"]`).click();

        cy.get('[ data-input="todo-input"]').type(`${newItem2}{enter}`);

        cy.get(`[data-button="Add-Todo"]`).click();

        // remove a Todo
        cy.get(`[data-Todo="${newItem}"]`).click();
      });

      it("Can add same todo again", () => {
        const newItem = "I want to take my dog for a walk";

        cy.get('[ data-input="todo-input"]').type(`${newItem}{enter}`);

        cy.get(`[data-button="Add-Todo"]`).click();
        cy.get('[ data-input="todo-input"]').type(`${newItem}{enter}`);

        cy.get(`[data-button="Add-Todo"]`).click();
      });
We have written tests for both of the scenarios, and the cypress spec tab will show us the result of the test.

By hovering over the tests on the left side, you can see that we passed every test and all the states; We are grateful to Cypress for this wonderful feature.
You can now modify the tests, add them, and check to see if they pass or fail.
In the next section of this Cypress 10 migration tutorial, we will learn about performing Component testing in Cypress.
What is Component testing in Cypress?
Component testing is a type of software testing where each part of an application is tested separately to make sure it is functioning properly. Another name for this approach is module testing.
It addresses the various parts or components that make up a software application separately. One of the most frequent types of black box testing carried out by the testing team is component testing. A component test reduces delivery time since each component can be tested independently, reducing defects that may arise after integration.
Cypress 10 now includes first-class support for component testing! The end-to-end test runner and the component test runner were separate executables when we first introduced component testing in an alpha release last year. Component testing has been integrated into the main app of Cypress 10 so that you can select the testing environment you want as soon as Cypress is launched.
The objective of component testing is:
To verify the functionality of each component and ensure everything is working as intended.
Validating all the functions, methods, and overall state flow of the component.
Detecting errors and fixing bugs.
Eliminate all coding errors and logical errors in Component testing before moving to higher levels of testing.
How to run Component testing with Cypress 10?
As soon as the Cypress opens, it asks whether you want to perform E2E or component testing. Configure Component Testing by selecting it and following the instructions.

You will be taken to the browser selection screen after, then click the Start Component Testing button to launch the Cypress automated browser, in this case, Chrome.

After this step, we can go to our codebase and start writing tests for testing our components. I have created a new component instead of having everything in the App.js file.
    import React, { useState } from "react";
    import logo from "./logo.svg";
    import "./App.css";
    import TodosComponent from "./component/TodosComponent";

    function App() {
      return (
        <div>
          <TodosComponent />
        </div>
      );
    }

    export default App;
Now our TodosComponent is the component that we are going to test. We can create a test file by going under the component folder inside the Cypress folder.

We will start testing by using the mount function, which is imported from the Cypress package. The mount() function is responsible for rendering components within Cypress’s sandboxed iframe when using cy.mount() anywhere.
import { mount } from 'cypress/react'
Let’s write a script that mounts the TodosComponent in the Todos.cy.jsx.
    import TodosComponent from "../../src/component/TodosComponent";
    import React from "react"

    describe("<Counter>", () => {
      it("mounts", () => {
       cy.mount(<TodosComponent/>)
      });
    });
We can now add a component test to check whether we can add or remove an item. The code for that will be as follows:
    describe("<TodosComponent>", () => {
      it("mounts", () => {
       cy.mount(<TodosComponent/>)


          // We'll store our item text in a variable so we can reuse it
          const newItem = "I want to take my dog for a walk";
          const newItem2 = "I want to go to the restaurant";

          // Let's get the input element and use the `type` command to
          // input our new list item. After typing the content of our item,
          // we need to type the enter key as well in order to submit the input.

          cy.get('[ data-input="todo-input"]').type(`${newItem}{enter}`);
          cy.get(`[data-button="Add-Todo"]`).click();

          cy.get('[ data-input="todo-input"]').type(`${newItem2}{enter}`);


          cy.get(`[data-button="Add-Todo"]`).click();

          // remove a Todo
          cy.get(`[data-Todo="${newItem}"]`).click();
      });


    });
The test has run successfully, and the output will be as follows:

You can continue to add components and test each one separately as you go.
How to perform Cypress testing with LambdaTest?
Even though Cypress testing allows for parallel test execution, local setups make it impossible to achieve optimal browser coverage. To use the Cypress framework for Cypress UI testing across various browsers and operating systems. We need an infrastructure to test our application on various browsers and operating systems.
This is where cross browser testing platforms like LambdaTest come into play. LambdaTest is a continuous quality cloud platform that provides developers and testers with the ability to test their applications across on-demand real browsers, devices, and operating systems combinations.
With its high-performing test execution cloud, you can run automated tests using frameworks like Selenium, Cypress, Playwright, Appium, Espresso, and more. You can also perform Cypress parallel testing on 40+ browser versions to accelerate your go-to-market delivery.
Subscribe to the LambdaTest YouTube channel for tutorials around Selenium testing, Playwright browser testing, Appium, and more.
Now let’s use the LambdaTest platform to test a simple application and watch it in action while performing Cypress 9 to Cypress 10 migration.
Follow these steps if you want to follow along:
Step 1: Clone the Repository
Get started by cloning the cypress-cloud repository.

Step 2: Install all the dependencies
As our application has a lot of dependencies, you must install them all. Use your favorite package manager to install it.
If you are using npm:
npm install

If you are using yarn:
yarn install
Step 3: Install the LambdaTest Cypress CLI
LambdaTest’s Cypress CLI enables cross-browser testing with Cypress. You can install the lambdatest-cypress CLI package by running the following command under the project root directory.
npm install lambdatest-cypress-cli
The folder structure of the Cypress project will be like this.
If you are using Version 9:
    app
    ...
    cypress
    |-- fixtures
    |-- integration
    |-- plugins
    |-- support
    cypress.json
    ...
If you are using Version 10, the folder structure will be as follow
    ...
    cypress
    |-- fixtures
    |-- e2e
    |-- support
    cypress.config.js
    ...
    cypress.json
    ...
Step 4: Create the lambdatest config file.
You can do it manually or run the following command, and it will create a lambdatest-config.json file with some default values to start with.
npx lambdatest-cypress-cli init
The config file will look like this in the case of version 9: Config file v9.
You can perform Cypress 10 migration by following this Config file
Step 5: Add your LambdaTest username and API token.
You can get your API token from the LambdaTest Profile Section and store it in an environment variable. In this case, for the sake of explanation, we are directly including the values, and it is never recommended to disclose your API secrets.

Step 6: Run this final command to start the test on the LambdaTest platform
You can use the following command to start uploading your test files and then wait for the upload to finish.


After the upload, you will be given a link to view the test being run and the results.

You can visit the link and see the results.

And we used the cloud for our Cypress UI testing!
Cypress test automation best practices
While we are free to use Cypress in our favor, it is advised to adhere to some Cypress best practices to maintain uniformity.
Isolate the test specs so that they are maintainable.
Use data-* attributes to provide context to your selectors and isolate them from CSS or JS changes.
Do not target text content if dynamic.
Use closures to access and store what Commands yield you.
Only test what you control. Try to avoid requiring a 3rd party server. Always use cy.request() to talk to 3rd party servers via their APIs when necessary.
Tests should always be able to be run independently from one another and still pass.
Clean up the state before tests run.
Use route aliases or assertions to guard Cypress against proceeding until an explicit condition is met.
If you’re a developer looking to get started with Cypress, the Cypress 101 certification is for you. The Certification will give you a broad sense of what Cypress is and how it works.
Ready for Cypress 10 migration?
Congratulations on reaching this far! You’re a fantastic reader!!
In this detailed blog on Cypress 10 migration, we looked at how to migrate Cypress to the latest version. Not only did we experiment with some testing, but we also discussed how to test an application with Cypress GUI, test our application on the cloud, as well as best practices to follow while implementing the tests.
Now you know how Cypress 10 migration works, so you can get started with Cypress testing.
Happy Testing!


Top comments (0)