
Websites nowadays are frequently implementing the usage of pop-ups, alerts, or modal dialog boxes for various use cases like accepting cookies, asking for permissions, entering data, warning alerts, etc. Although there are a few valid use cases for these, unnecessary popups might look annoying and need to be handled.
You must have encountered these in your day-to-day web interactions on different websites like Amazon or Walmart on the first visit prompting for SignUp, on various food websites like McD, Swiggy to provide the location, or a payment gateway modal to complete payment.
With this increased usage, it is now expected of an automation tester that they are aware of their handling via automation. The main reason is that most of these popups, which at times are multiple, appear on the homepage for the website under test and need to be handled/closed till the parent page is accessible to interact with and the actual test flow can begin.
So if you have not got a chance to work on these or automate them so far, this blog is the right one for you. In this blog, we will learn how to handle modal dialog box in Selenium WebDriver Java with practical examples.
This blog would cover handling Bootstrap dialog boxes, pop-up windows/tabs, and alerts. I will be starting with the basics of pop-ups, post which I will demonstrate how to handle modal dialog box in Selenium WebDriver Java. So let’s get started.
How to handle Modal Dialog Box in Selenium WebDriver Java?
In this Selenium Java tutorial, we will learn what is a modal dialog box and demonstrate the handling of a modal dialog box in Selenium Java.
What is a Modal Dialog Box?
A Modal Dialog Box (also referred to as Bootstrap Modal Window) is built in Bootstrap Framework, due to which it gets displayed on top of your current page. Due to this, modal boxes need to be interacted with first before moving to the current webpage.
For starters, The Bootstrap Framework is a very popular, free, and open-source CSS framework that is highly used in web page development, especially for responsive and mobile-first web pages. It contains HTML, CSS, and JavaScript. To learn more about the Bootstrap framework, you can deep dive into CSS Grid vs. Bootstrap comparison.
A modal dialog box written with Bootstrap is formed with three key components, namely,
Trigger element, which triggers the modal window to be shown on the webpage. It can be any link on the webpage or any button, etc.
Modal, which is like a holding area for the actual modal window code that will come up when the trigger element is interacted with.
Modal content, is the actual code and the content with which the window is formed and displayed as per the implementation.
So while automating any modal window, we first fetch the modal using our web driver and then identify the modal content inside it to perform actions.
Do you wish to perform browser automated testing on the most powerful cloud infrastructure. Leverage LambdaTest automation testing now.
Demonstration: Handling Modal Dialog Box in Selenium WebDriver Java
Having developed a basic understanding of the modal dialog box, it’s time to implement it and see how it works in real-time.
Please note that for all the examples in this blog, we will be using this same project setup for all the examples in this blog and keep adding more test class files as we proceed. So do the setup carefully on your machine for implementation purposes.
Step 1. Choose the IDE on which you want to do the setup. In this blog, Eclipse IDE is being used. You can follow the same steps if any other IDE has opted. In case you are using IntelliJ, you can go through the article on building and executing Selenium Projects.
Step 2. Create a Maven Project in Eclipse and name it as Dialog_Boxes_With_Selenium_Java.
Step 3. Update the pom.xml file to have Selenium (as it will be a web automation project using Selenium WebDriver) and TestNG (to create test flow and execute test cases using Annotations) dependencies.
<project xmlns="[http://maven.apache.org/POM/4.0.0](http://maven.apache.org/POM/4.0.0)" xmlns:xsi="[http://www.w3.org/2001/XMLSchema-instance](http://www.w3.org/2001/XMLSchema-instance)" xsi:schemaLocation="[http://maven.apache.org/POM/4.0.0](http://maven.apache.org/POM/4.0.0) [https://maven.apache.org/xsd/maven-4.0.0.xsd](https://maven.apache.org/xsd/maven-4.0.0.xsd)">
  <modelVersion>4.0.0</modelVersion>
  <groupId>Dialog_Boxes_With_Selenium_Java</groupId>
  <artifactId>Dialog_Boxes_With_Selenium_Java</artifactId>
  <version>0.0.1-SNAPSHOT</version>
  <build>
 <sourceDirectory>src</sourceDirectory>
 <plugins>
   <plugin>
     <artifactId>maven-compiler-plugin</artifactId>
     <version>3.8.1</version>
     <configuration>
       <release>16</release>
     </configuration>
   </plugin>
 </plugins>
  </build>
  <dependencies>
     <dependency>
       <groupId>org.seleniumhq.selenium</groupId>
       <artifactId>selenium-java</artifactId>
       <version>3.141.59</version>
     </dependency>
     <dependency>
       <groupId>org.testng</groupId>
       <artifactId>testng</artifactId>
       <version>7.5</version>
       <scope>test</scope>
     </dependency>
  </dependencies>
</project>
Step 4. Now inside the src package, add a package and name it as test. This will contain all the test classes which will be created in this blog.
Step 5. Inside the test package add a Java class file and name it as BaseClass.java. This file will have the basic driver functions like, initialize driver, quit driver, etc.
In this blog on how to handle modal dialog box in Selenium WebDriver Java, we will be using the TestNG testing framework for test execution. Reason being, it is widely supported with Selenium Java testing and provides an easy way to write and manage test automation scripts with the usage of annotations.
package test;

import java.net.MalformedURLException;
import java.net.URL;

import org.openqa.selenium.remote.DesiredCapabilities;
import org.openqa.selenium.remote.RemoteWebDriver;
import org.testng.annotations.AfterMethod;
import org.testng.annotations.BeforeMethod;

public class BaseClass {

  public RemoteWebDriver driver = null;
  String username = "<lambdatest_username>";
  String accessKey = "<lambdatest_accesskey>";

  [@BeforeMethod](http://twitter.com/BeforeMethod)
  public void setUp() {
       DesiredCapabilities capabilities = new DesiredCapabilities();
       capabilities.setCapability("browserName", "Chrome");
       capabilities.setCapability("version", "92.0");
       capabilities.setCapability("platform", "Windows 10");
       capabilities.setCapability("resolution", "1024x768");
       capabilities.setCapability("build", "DialogBoxes And Pop-ups Selenium JAVA");
       capabilities.setCapability("name", "DialogBoxes And Pop-ups Selenium JAVA");

       try {
            driver = new RemoteWebDriver(
                       new URL("https://" + username + ":" + accessKey + "[@hub](http://twitter.com/hub).lambdatest.com/wd/hub"), capabilities);
       } catch (MalformedURLException e) {
            System.out.println("Invalid grid URL");
       }
  }

  [@AfterMethod](http://twitter.com/AfterMethod)
  public void closeDriver() {
       driver.quit();
  }
}

}
Code Walkthrough
We have created BaseClass.java as the first file, which will have the code to initiate the browser session for Selenium automation and handle the code for browser setup and closing it after test completion. This will be inherited to our test classes, thus preventing redundancy for such code and providing an abstraction of driver code from every other class user.
Step 1. Inside the BaseClass, we will be adding two functions, one to initialize the driver and create an instance of it and another to close it once the test cases are executed.
We will be executing the code on a Selenium Cloud Grid using an instance of Selenium RemoteWebDriver.
The reason is, along with the advantages of Selenium Grid, like executing multiple cases across various browsers and OS, a Cloud Grid also offers speed and scalability, which makes executions faster and more reliable.
An example of one such Selenium Cloud Grid is LambdaTest, which facilitates cross browser testing across an online browser farm of 3000+ real browsers and operating systems on the cloud. Automation testing tools like LambdaTest provide an interactive reporting dashboard for results analysis along with all the benefits of cloud testing.
Here’s a glimpse of LambdaTest cloud Selenium Grid:
You can also Subscribe to the LambdaTest YouTube Channel and stay updated with the latest tutorials around automated browser testing, Cypress testing, CI/CD, and more.
public RemoteWebDriver driver = null;
Step 2. Next would be to add the LambdaTest username and access key for your account to be used to run the script. You can find these details in the LambdaTest Profile Section.
String username = "<lambdatest_username>";
String accessKey = "<lambdatest_accesskey>";
Step 3. After that, add the first method in this file as setUp(), which would be used to set initial capabilities for the browser and launch the grid with the given credentials.

You can see we have set some capabilities for the Chrome browser to be used for our test case. As we are using the LambdaTest platform here for remote execution, we can take advantage of its Selenium Desired Capabilities Generator to generate such values for a number of browser and operating systems combinations by selecting them as required.

Step 4. Just like the setUp() method would create the driver instance to be used for executing the script, it is a good practice to quit the current browser instance as soon as the case is completed. To facilitate the same, add the next method as closeDriver() to quit the driver instance. This would have @AfterMethod annotation in TestNG as the method with this annotation will be called after every test method has completed execution.
[@AfterMethod](http://twitter.com/AfterMethod)
public void closeDriver() {
 driver.quit();
}
This completes the setup for our base implementation. Let’s move to the next section to implement and see how modal dialog box automation works.
Do you wanna know which are the most wanted automated testing tools that have climbed the top of the ladder so far? Let’s take a look.
Modal Dialog Box Automation Example
For this blog purpose, we will be automating the following flow:
Navigate to https://www.lambdatest.com/selenium-playground/bootstrap-modal-demo.
Click on Launch Model under Single Modal Example.
Fetch the modal container web element.
Fetch the modal content web elements using the container element.
Verify and interact with the modal dialog window.


package test;

import org.openqa.selenium.By;
import org.openqa.selenium.WebElement;
import org.testng.Assert;
import org.testng.annotations.Test;
import org.openqa.selenium.support.ui.ExpectedConditions;
import org.openqa.selenium.support.ui.WebDriverWait;

public class TestModalDialogBox extends BaseClass {

[@Test](http://twitter.com/Test)(description = "test to verify modal dialog box")
 public void verifyModalDialogBox() throws InterruptedException {
  // to navigate to the website
  System.out.println("Navigating to the website");
  driver.get("[https://www.lambdatest.com/selenium-playground/bootstrap-modal-demo](https://www.lambdatest.com/selenium-playground/bootstrap-modal-demo)");

// to click Launch model button - Trigger element
  System.out.println("Clicking launch modal button");
  driver.findElement(By.xpath("//button[[@data](http://twitter.com/data)-target='#myModal']")).click();

// wait to let the modal box be visible
  WebDriverWait wait = new WebDriverWait(driver, 30);
            wait.until(ExpectedConditions.visibilityOfElementLocated(
                                     By.className("modal-dialog")));

// to fetch the web element of the modal container
  System.out.println("Fetching the web element for modal container");
  WebElement modalContainer = driver.findElement(
                       By.className("modal-dialog"));

// to fetch the web elements of the modal content and interact with them
  // code to fetch content of modal body and verify it
  System.out.println("Fetching modal body content and asserting it");
  WebElement modalContentBody = modalContainer.findElement(By.xpath(".//div[[@class](http://twitter.com/class)='modal-body']"));
  Assert.assertEquals(modalContentBody.getText(),
    "This is the place where the content for the modal dialog displays", "Verify modal body message");

// code to click on accept modal button
  System.out.println("Clicking modal accept button");
  WebElement modalAcceptButton = modalContainer
    .findElement(By.xpath(".//button[contains(text(),'Save Changes')]"));
  modalAcceptButton.click();
 }
}
Code Walkthrough
Step 1. First lines of code in the testcase are to navigate to the URL on which we will have our modal dialog box to automate.
driver.get("[https://www.lambdatest.com/selenium-playground/bootstrap-modal-demo](https://www.lambdatest.com/selenium-playground/bootstrap-modal-demo)");
Step 2. After the page has loaded, we click on the button to launch the dialog box. As we learnt, this is the trigger element which makes the dialog box appear.
For this we use the XPath element locator to fetch the element using its tag and attribute key-value.
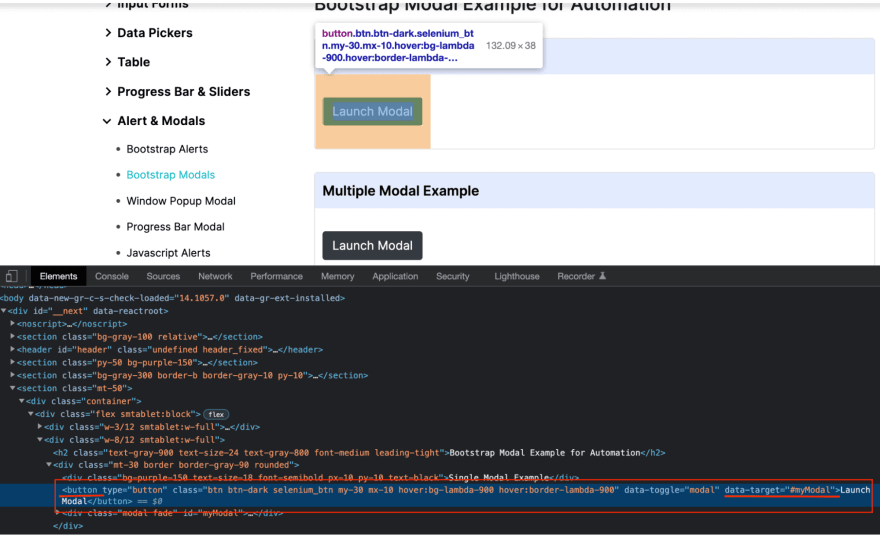
driver.findElement(By.xpath("//button[[@data](http://twitter.com/data)-target='#myModal']")).click();
Step 3. After clicking the button, we wait for the modal box to be visible. For this, we have used explicit waits, as per which the WebDriver waits for a certain condition to occur before proceeding to execute the further code. To know more about explicit waits, you can go through this article on types of Waits in Selenium.
To use these waits in your test automation script, the following imports are done:
import org.openqa.selenium.support.ui.ExpectedConditions;
import org.openqa.selenium.support.ui.WebDriverWait;
Step 4. After this, an object of WebDriverWait class is instantiated using the WebDriver reference and maximum time to wait for before raising an exception. The time is in seconds.
WebDriverWait wait = new WebDriverWait(driver, 30);
Using this wait object, we implement some “ExpectedConditions” function to be fulfilled. There are certain predefined conditions for it in Selenium, of which we have used visibilityOfElementLocated(), which means to wait until the given WebElement is visible.
wait.until(ExpectedConditions.visibilityOfElementLocated(By.className("modal-dialog")));
Step 5. Once the modal dialog box opens up, we fetch the WebElement of the modal container as we will be interacting with the elements inside the modal dialog box container.
WebElement modalContainer = driver.findElement(By.className("modal-dialog"));

Step 6. Next, we fetch the modal dialog box WebElements to perform actions on their content. One important thing to note here is the way how the WebElement for the model content is fetched.
For this, in place of the driver, the WebElement identifier for the modal container is used, and the identifying XPath for the element starts with “.//,” which signifies that the corresponding element to be found is inside this element, i.e., inside the modal dialog box.
The following code showcases this implementation of how elements would be identified and how we can assert on it or click the button. To learn more about assertions you can go through our earlier blog on How To Use Assertions In TestNG With Selenium.
WebElement modalContentBody = modalContainer.findElement(By.xpath(".//div[[@class](http://twitter.com/class)='modal-body']"));
Assert.assertEquals(modalContentBody.getText(), "This is the place where the content for the modal dialog displays", "Verify modal body message");

// code to click on accept modal button
WebElement modalAcceptButton = modalContainer .findElement (By.xpath (".//button[contains(text(),'Save Changes')]"));
modalAcceptButton.click();
Test Execution
Having understood the code implementation, lets execute the code using TestNG. Once successfully executed, you can see the following output on the IDE.

Since we executed the code on a remote grid using LambdaTest, execution logs are also available on the LambdaTest Dashboard, including video, steps of the automation script, and network and console logs.
You can see your executed test cases under Recent Tests on the Dashboard.

To see the detailed execution for your case, click on the test case, and you can see the details like the following:
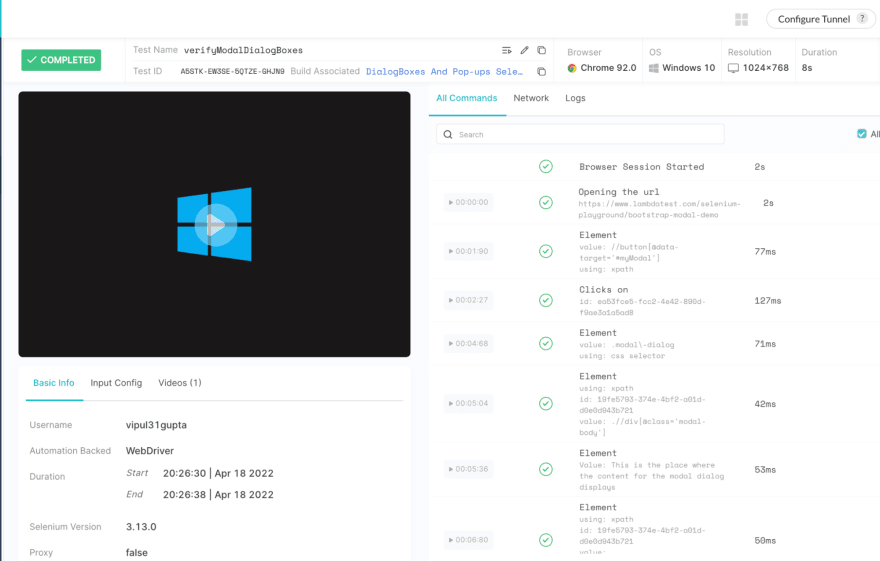
You can also navigate to the LambdaTest Analytics Dashboard to see test performance metrics. From the Test Summary section, you will see the total number of tests passed or failed, including completed and pending tests. You can also see the snapshot of consistent tests from the Test Overview section.
How to handle Alerts using Selenium Java?
In this section of the blog on how to handle modal box in Selenium WebDriver Java, we will learn what are alerts and how to handle alerts in Windows using Selenium Java
What are Alerts?
Alerts in web development usually refer to a message or notification that lets the user know about information, namely:
Asking for access permissions.
Highlighting mandatory fields on a form.
Display warning messages or help information.
Unlike modal dialog boxes, Selenium offers some special functions to deal with alerts. This is because it is a very tricky and time-consuming task for testers to automate alerts using regular methods. A few of these predefined methods are
-
Click Accept Button of the alert Dismiss/Cancel an Alert Box
driver.switchTo().alert().dismiss();
-
Click Accept on Alert Box
driver.switchTo().alert().accept();
-
Fetch static data from Alert Box
driver.switchTo().alert().getText();
-
Send data to input fields on Alert Box
driver.switchTo().alert().sendKeys("Text");
sendKeys() function is used to enter data to the input fields on any web page in Selenium automation. SendKeys in Selenium performs the same action here by entering data to any input field on the alert.
Demonstration: Handling Alerts Window using Selenium Java
For this blog on how to handle modal dialog box in Selenium Java, we will be automating the following flow:
Navigate to https://www.lambdatest.com/selenium-playground/javascript-alert-box-demo.
Click on Click Me button under Java Script Alert Box.
Verify the alert body content as Please Enter Your Name.
Enter some data in the alert input box.
Click OK to accept the alert.

package test;

import org.openqa.selenium.By;
import org.testng.Assert;
import org.testng.annotations.Test;
import org.openqa.selenium.support.ui.ExpectedConditions;
import org.openqa.selenium.support.ui.WebDriverWait;

public class TestAlerts extends BaseClass {

[@Test](http://twitter.com/Test)(description = "test to verify alerts")
 public void verifyAlerts() throws InterruptedException {
  // to navigate to the website
  System.out.println("Navigating to the website");
  driver.get("[https://www.lambdatest.com/selenium-playground/javascript-alert-box-demo](https://www.lambdatest.com/selenium-playground/javascript-alert-box-demo)");

// to click the button to get demo alert
  System.out.println("Clicking launch alert button");
  driver.findElement(By.xpath("(//button[contains(text(),'Click Me')])[3]")).click();

// to let the alert be visible
  WebDriverWait wait = new WebDriverWait(driver, 30);
            wait.until(ExpectedConditions.alertIsPresent());

// to fetch the alert body content and verify it
  System.out.println("Fetching the alert body content and asserting it");
  String alertBodyText = driver.switchTo().alert().getText();
  Assert.assertEquals(alertBodyText, "Please enter your name", "Verify alert body content");

// to enter data as required by the alert
  System.out.println("Entering date in the alert input box");
  driver.switchTo().alert().sendKeys("LambdaTest");

// to accept the alert
  System.out.println("Accepting the alert");
  driver.switchTo().alert().accept();
 }
}
Code Walkthrough
Step 1. This code also starts with the first step as navigating to the target page where the actual automation script would be executed.
driver.get("[https://www.lambdatest.com/selenium-playground/javascript-alert-box-demo](https://www.lambdatest.com/selenium-playground/javascript-alert-box-demo)");
Step 2. Once the page is loaded, we click the button to get the alert on which alert functions can be implemented and verified.
driver.findElement(By.xpath("(//button[contains(text(),'Click Me')])[3]")).click();
Step 3. Just like for the modal dialog box, for alert as well, explicit wait is being implemented. Imports and object creation remain same for this case as well with only difference being on ExpectedConditions. For supporting alerts, just like there are predefined functions in Selenium, alertIsPresent() is used in this case.
wait.until(ExpectedConditions.alertIsPresent());
Step 4. After the alert is visible, we start with implementing alert().getText() to fetch the content on the alert and asserting it.
But before we can do so, we need to make sure that the driver instance focus has been switched to the alert from the main window. For this purpose, the switchTo() function is used in Selenium automation testing. This function is used whenever we are working with multiple windows like new tab, alerts, pop ups, etc. in web automation.
Since in this test script, we need to switch to alert in this test script to interact with it, switchTo().alert() is used. We will learn more about how to switch between parent/child windows in the popups section.
String alertBodyText = driver.switchTo().alert().getText();
Step 5. Here we are using the Assert class of TestNG to compare the content using the assertEquals() function. In this function, we will pass the expected content, which is the string and the actual content, which is the body content of the alert that is fetched on the previous step. If both matches, assert is passed; else, it fails with an error that is expected and actual data do not equal.
Assert.assertEquals(alertBodyText, "Please enter your name","Verify alert body content");
Step 6. Next, we verify the alert().sendKeys() function by entering some data in the input field.
driver.switchTo().alert().sendKeys("LambdaTest");
Step 7. The last step of this test scenario is to accept the alert for which the predefined method that Selenium provides is being used.
driver.switchTo().alert().accept();
Depending upon the use case, you can also implement the function to dismiss/cancel the alert. For this following method Selenium method can be used
driver.switchTo().alert().dismiss();
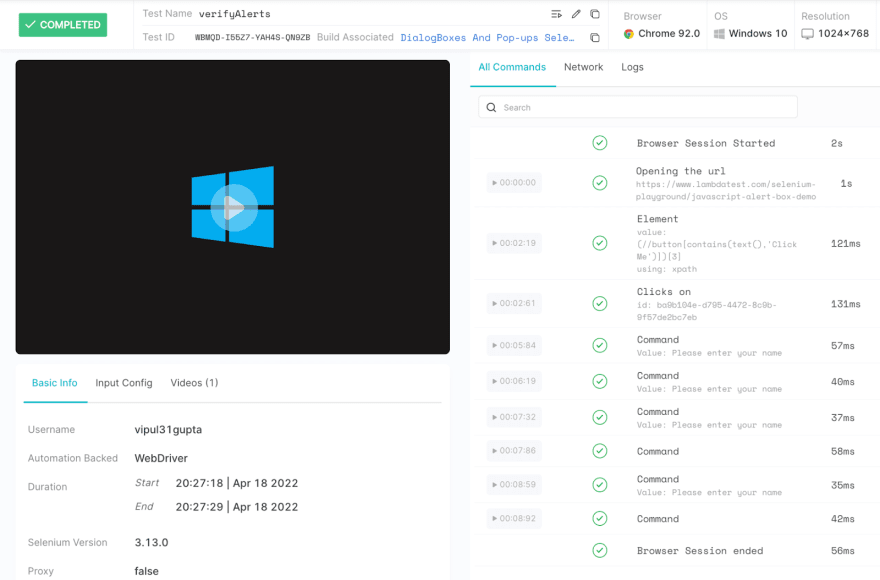
Test Execution
As mentioned for the modal dialog box in the previous section, we can similarly execute the alerts test case from IDE and see the output like below on successful execution on the IDE and the LambdaTest dashboard for the automation cases.

How to handle Popups using Selenium Java?
In this section of the blog on how to handle modal box in Selenium WebDriver Java, we will learn what are popups and how to handle popups using Selenium Java.
What are Popups?
Pop-up refers to a new window or tab that pops up or gets opened as a result of some interaction on the webpage. It can come up in a number of conditions and as per implementation.
In Selenium automation, the driver always focuses on the currently active window and interacts with it. So whenever we are working with pop-ups in Selenium, some additional methods are used to shift the driver’s focus to the newly opened window and then back to the main window.
-
Get handles of all the windows that are open at that instance.
driver.getWindowHandles();
-
Get the current window handle on which the driver is focused.
driver.getWindowHandle();
-
Switch to the main parent window.
driver.switchTo().defaultContent();
-
Switch to any specific window using its handle.
driver.switchTo().window(handleId);
handleId here refers to the ids of the window which we can fetch using the getWindowHandle() or getWindowHandles() function of the WebDriver.
Check out this blog for most wanted testing tools for automation that have climbed the top of the ladder so far.
Demonstration: Handling Popups using Selenium Java
For this blog purpose, we will be automating the following flow:
Navigate to https://www.lambdatest.com/selenium-playground/window-popup-modal-demo.
Click on Follow On Twitter under Single Window Popup.
Switch to a new popup window.
Assert Follow button on it is present.
Switch back to the main window.
Assert Follow On Twitter is displayed.

package test;

import java.util.Iterator;
import java.util.Set;

import org.openqa.selenium.By;
import org.openqa.selenium.WebElement;
import org.testng.Assert;
import org.testng.annotations.Test;
import org.openqa.selenium.support.ui.ExpectedConditions;
import org.openqa.selenium.support.ui.WebDriverWait;

public class TestPopups extends BaseClass {

[@Test](http://twitter.com/Test)(description = "test to verify pop ups")
 public void verifyPopups() throws InterruptedException {
  // to navigate to the website
  System.out.println("Navigating to the website");
  driver.get("[https://www.lambdatest.com/selenium-playground/window-popup-modal-demo](https://www.lambdatest.com/selenium-playground/window-popup-modal-demo)");
  driver.manage().window().maximize();

// to fetch and save the handle of current window
  System.out.println("storing the main window handle");
  String mainWindowHandle = driver.getWindowHandle();

// to click the button to get a popup (new tab in this case)
  System.out.println("Clicking launch popup button");
  WebElement followButtonOnMainWindow = driver.findElement(By.xpath("//a[contains([@title](http://twitter.com/title),'Twitter')]"));
  followButtonOnMainWindow.click();

// to get the list of all window handles after the new tab
  // should have length 2 since 1 new tab opens up
  System.out.println("Fetching the list of all window handles and asserting them");
  Set<String> windowHandles = driver.getWindowHandles();
  Assert.assertEquals(windowHandles.size(), 2, "Verify the total number of handles");

// switch to new opened tab
  System.out.println("Switching to the new window handle");
  Iterator<String> itr = windowHandles.iterator();
  while (itr.hasNext()) {
   String childWindowHandle = itr.next();
   // to skip the handle of our main window and switch to new one
   if (!mainWindowHandle.equalsIgnoreCase(childWindowHandle))
    driver.switchTo().window(childWindowHandle);

}

WebDriverWait wait = new WebDriverWait(driver, 30);
            wait.until(ExpectedConditions.visibilityOfElementLocated(
                                     By.xpath("//span[(text()='Follow')]")));
  // to verify that driver focus is shifted to popup window
  System.out.println("Asserting some element on the new popup window to confirm switch");
  WebElement twitterFollowButton = driver.findElement(By.xpath("//span[(text()='Follow')]"));
  Assert.assertTrue(twitterFollowButton.isDisplayed(), "Verify twitter follow button is displayed");

// shift driver back to main window and verify
  System.out.println("Switching back to main window and asserting same");
  driver.switchTo().window(mainWindowHandle);
            wait.until(ExpectedConditions.visibilityOfElementLocated(
                                     By.xpath("//a[contains([@title](http://twitter.com/title),'Twitter')]")));
  Assert.assertTrue(followButtonOnMainWindow.isDisplayed(), "Verify focus is shifted to main window");
 }
}
Code Walkthrough
You can find two special imports in this test class, namely
import java.util.Iterator;
import java.util.Set;
These are done to support the usage of Set type Data Structure and Iterator, the function to traverse through the Set. More details about these are with the corresponding code where these are used.
Step 1. For writing the automation test case for handling pop-ups, after navigating to the required webpage, first, we get and save the handle of the main window. This is done as once there is a new popup window, we need to have some way to differentiate between the handle of the current window and the newly opened window.
String mainWindowHandle = driver.getWindowHandle();
Step 2. After storing this, the next step would be to click on the link text or button, in this case, on the current/main window, to get the new popup window.
WebElement followButtonOnMainWindow = driver.findElement(By.xpath ("//a[contains([@title](http://twitter.com/title),'Twitter')]"));
followButtonOnMainWindow.click();
Step 3. Now, as per the test scenario expectation, we should have two windows on the screen. To verify the same, use the getWindowHandles() method to get identifiers (or window handles) of the respective Windows.
This method returns the list of handles of all the Windows, which to understand are the ids of different Windows that can be used to identify them. This entire list is stored in a Set type of data structure for easy accessibility.
As the number of window handles is stored in the Set type variable, we can use the size() method to fetch the total number of handles in that and assert as per expectation which is 2 here.
Set<String> windowHandles = driver.getWindowHandles(); Assert.assertEquals(windowHandles.size(), 2, "Verify the total number of handles");
Step 4. Next step would be to switch to the new pop up window. For this, we traverse through the list of window handles and compare it with the main window handle value, which we stored in the first step.
For traversal through the Set containing all window handles, we are using Iterator. As the name suggests, it means to visit repeatedly until some point. So here, we keep on iterating the set for the next values till we reach the last value.
Iterator<String> itr = windowHandles.iterator();
while (itr.hasNext()) {
 String childWindowHandle = itr.next();
 // to skip the handle of our main window and switch to new one
 if (!mainWindowHandle.equalsIgnoreCase(childWindowHandle))
  driver.switchTo().window(childWindowHandle);

}
Step 5. Once we get a non-matching value, we switch to the new popped-up window and use the Explicit Wait like discussed before to wait for the new popped-up window using the visibilityOfElementLocated() function and raise an Assert to verify the switch is successful.
// to verify that driver focus is shifted to popup window
WebDriverWait wait = new WebDriverWait(driver, 30);
wait.until(ExpectedConditions.visibilityOfElementLocated(By.xpath("//span[(text()='Follow')]")));
WebElement twitterFollowButton = driver.findElement(By.xpath ("//span[(text()='Follow')]"));
Assert.assertTrue(twitterFollowButton.isDisplayed(), "Verify twitter follow button is displayed");
Step 6. The last step is to switch back to the main window using its already stored handle and assert some element on it to verify that the driver focus has been shifted again to the main window.
driver.switchTo().window(mainWindowHandle);
Assert.assertTrue(followButtonOnMainWindow.isDisplayed(), "Verify focus is shifted to main window");
Test Execution
In a similar way as discussed above, after execution, we will get the result on IDE as follows:

And we can see the detailed execution logs on LamdaTest Dashboard by navigating to the test details and can see the data like:

If you’re a Java developer looking to improve your skills, the following certification from LambdaTest can help:
This Selenium Java 101 certification is for beginning to intermediate level Java developers who want to refresh their knowledge of the programming language and learn more about the Selenium automation testing.
Here’s a short glimpse of the Selenium Java 101 certification from LambdaTest:
By now you must have got a fair understanding about popups and alerts and how you can handle modal dialog box in Selenium WebDriver Java over a cloud grid like LambdaTest. However, if you want to leverage the best features of the cloud setup with faster execution (as good as the speed of a local setup), you can try HyperExecute — a blazing fast next gen testing cloud, which is upto 70% faster than any traditional Selenium cloud setup.
Conclusion
With this blog on how to handle modal dialog box in Selenium WebDriver Java, we have learned the implementation and working for all of these in detail covering all the aspects and functions that you might encounter and would need while working with these. I hope, by now, you would be confident enough to automate any kind of modal dialog box, alerts, or popups that come up in your automation scripts. So go ahead and get started with Selenium Java automation testing to handle these with ease.
Happy Automating !!

Oldest comments (0)