
Continuous Integration is considered one of the best practices in development where code integrations are done frequently into the code repository rather than waiting to commit a larger version. As a part of continuous integration, the developer should ensure that integrations should not break the already available code, as being a shared repository would have a significant impact. To solve this problem and show how continuous integration and testing works, we’ll use one of the most popular continuous integration services: Travis CI pipeline.
Travis CI pipeline would help the user report automatic build changes and test the integrations and deployment management. It also helps your code repository with improved and shippable software quality with reduced risks and better collaboration.
In today’s blog, I will walk you through the Travis CI overview and the advantages of using Travis CI. You will also see how to configure Travis CI pipeline with your current test automation repository over an online Selenium Grid.
Now, Automate Cypress cloud tests and perform browser automation testing with LambdaTest.
Introduction to Travis CI
Travis CI is a cloud-based CI service that builds and tests your projects hosted on GitHub. It would trigger a build process to validate the build and report any failures for every commit made. It fetches the commands from a .travis.yml file, a YAML-based file format, from your project’s root folder to get started with the build process. Travis YML file would enable the Travis CI to understand which programming languages are being used, branch specifications required for the build to be triggered, installation of dependencies if there are any required.
Every other code repository has its Continuous Integration tools nowadays. Let’s take Bitbucket being an Atlassian code repo, Bamboo is a tool that comes along. If you prefer GitLab as your code repo, GitLab CI exists. Tool selection could also be majorly impacted due to the code repository being used for version controlling. Currently, we have a myriad of tools available which are both free and open source. To choose the tools that best suits your requirement, you can go through some of the top CI/CD tools available today. Also, you can make a comparison of the top CI/CD tools to make your selection.
Dependencies rely on the development environment being used and the code repositories used for version control purposes.
In the case of Travis CI, below are some of the prerequisites to get started.
A mandatory GitHub account
Permission for integrating GitHub code repo with the Travis CI.
Why Travis CI?
It seamlessly integrates with GitHub and is easy to set up. Users need to Sign Up with GitHub and authorize to sync their GitHub projects which we would have a detailed walkthrough in the upcoming configuration section of the article.
Extensive Travis CI documentation is available to get started, where you can head over for reference. It has sections related to installing dependencies, configuration options in different programming languages, and encryption and integration topics discussed in detail.
Support almost every other programming language and cloud solution for deployments.
Travis CI would seamlessly integrate with cross browser testing solutions such as LambdaTest for parallel testing.
Travis CI is not platform-dependent as it supports multiple platforms apart from Windows, such as Mac and Linux. Infrastructure dependencies might vary depending upon the environment being used. However, you can navigate through the detailed documentation available.
Travis CI is free for open-sourced projects, i.e., projects that are public over GitHub. For private repositories, there is an enterprise version available.
Automatic build triggers when there is a change in the code repository with the user’s desired configuration. The user can select the branch name specified in the Travis yml file in the root folder of your project.
Travis CI Challenges
With integrations limited to GitHub, GitLab, Bitbucket, and Assembla cloud repository, using Travis CI outside of GitHub isn’t as user friendly as with GitHub.
Private repo comes in an Enterprise Version where you have to pay after trial version, which involves the first 100 builds for free.
Are you using Playwright automated testing? Now run your Playwright test scripts instantly on 50+ browser/OS combinations using the LambdaTest cloud.
Building your first CI/CD pipeline with Travis CI
Any public repository can be used to create a free pipeline. Let’s get started with the Configuration of Travis CI pipeline.
Step 1: Log in to your GitHub account with a valid username and password. Select the repo you are planning to integrate with Travis CI pipeline. Make sure your repo is up to date.
Step 2: Log on to Travis CI and sign up with your GitHub account used above.

Step 3: Provide authorization as requested, reference provided in the below image.

Step 4: Once you have completed the sign-up and authorization process, you would be redirected to the dashboard, where you would be prompted for a sync account option towards the left-hand corner of your screen. This would ideally sync all your existing GitHub projects with your Travis CI pipeline.
Step 5: Under Legacy Service Integrations, you can view all your current repositories synced on your Travis CI pipeline.
By default, the CI process for all repositories would be turned off. Toggle the button to turn on the integration for a specific project.
![]()
Step 6: Now, you need to add a .travis.yml file to your current automated test suite’s root folder.
What is a .travis.yml file?
Travis YML is a configuration file placed in your project’s root folder to define how to configure the build-related information.
If a .travis.yml is not in your repository or is not valid YAML, Travis CI pipeline will ignore it. You can also find all language-related templates from the Travis CI language template. The file consists of information such as what programming language is being used, what operating system is being used, branch name of the repo, which is being targeted.
Once the .travis.yml file is created and pushed to the GitHub repo, upcoming commits to the repo would trigger a build in Travis CI cloud, similar to that of the below image. After successful integration with the help of a configuration file, Travis CI pipeline has a certain mechanism that compiles the GitHub code whilst it would pull in the code for the first time and then on each commit to the repo or the specific branch trigger a compilation process. Provided below are the screens of Travis CI pipeline.
Active Repositories View:

JobView after build completion:
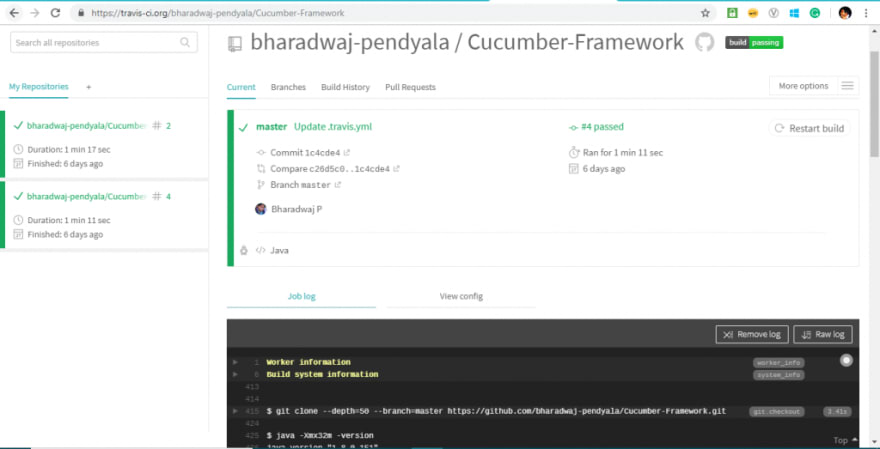
Job Log Sample:

View Config with the configuration information:

Step 7: Fork the GitHub repo and sync with Travis CI pipeline through the above process.
If you don’t want to fork the above-mentioned repo, make sure you select a repository, which is not empty in your GitHub account enabled with build tool configuration such as Maven or Ant. This would be helpful in the compilation process.
Step 8: Enable the synced repository. Once you enable it, this synced repo should be visible on my repositories page.
Step 9: Add .travis.yml file to the repo with the below build configuration for compilation.
language: java
sudo: false
script: "mvn test"
Ensure that you enable your framework so that tests get triggered through the maven command — “mvn test” as specified in the configuration file.
Step 10: Once the above configuration file is committed and pushed to the main branch in GitHub. You would observe a test getting triggered with build and worker information in the job log view. This process would essentially trigger your first compilation by pulling in code from the GitHub account onto the VM created by Travis CI pipeline.
As we have configured our tests to run on the LambdaTest Platform through RemoteWebDriver class, once a new commit is made, it triggers execution of the specified test suite onto the LambdaTest Platform. This will ideally identify if any user-made commit is breaking the build or the automated test suite.
Integrating Travis CI pipeline for automated testing with LambdaTest
LambdaTest is a cloud-based cross browser testing solution, which would enable us to perform automated and live interactive cross browser testing on more than 3000 browsers and operating systems online. This would help you scale up and down without much of a hassle in terms of resource allocation and deallocation. It would also help you support budget estimations on resources used for parallel and cross browser testing.
Testing Local or Privately Hosted Projects
Global enterprises use private servers for their IT purposes for enabling better web protection and security. LambdaTest would seamlessly integrate with such platforms with the help of a secure shell tunneling feature called LambdaTest Tunnel. This would also enable you to test locally hosted web pages. Let’s discuss how to configure LambdaTest Tunnel.
Step 1: Navigate to Automation Dashboard as shown in the below image after logging in to your LambdaTest platform.
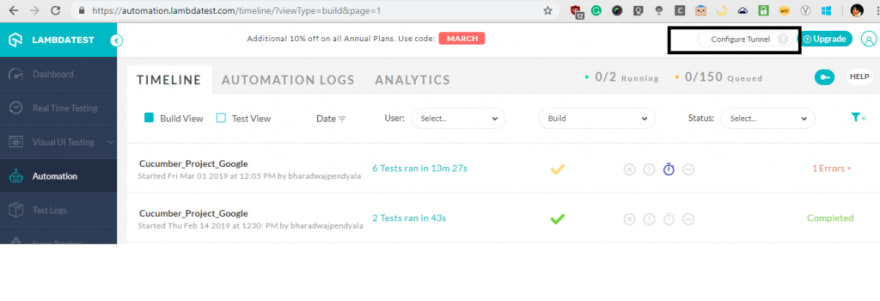
Step 2: Once you click on configure tunnel feature, you would be prompted with an overlay with two sections being internal server configurations and locally hosted web page testing features.
Step 3: Copy the access token related to the desired feature of an application under test. Please refer to the below token for reference.
LT -user [lambdatest@sampleemail.com](mailto:lambdatest@sampleemail.com) -key qYlLn1IzVrC2U41zM4kyjv35EvpHxR2tyMB4aEBlkNMmvpnQ5A
We would be making use of this token while configuring our desired capabilities in our next section of the article below to demonstrate Parallel Testing with LambdaTest.
Try this online Selenium Automation Grid to run your browser automation testing scripts.
Parallel Testing With LambdaTest Selenium Grid
We will see how to perform parallel testing with an online Selenium Grid using an automated testing pipeline, like Travis CI pipeline. We would be making use of our Cucumber TestNG code repository for reference. You need to clone the code and then import the code into the desired IDE.
We would be declaring our LambdaTest username and password as global environment variables in the yml file in the below format to be considered for execution.
env:
 global:

   - LT_USERNAME=${LAMBDATEST_USERNAME}
    - LT_ACCESS_KEY=${LAMBDATEST_KEY}
Where the global variable for LambdaTest username would be LT_USERNAME, and LambdaTest password would be LT_ACCESS_KEY. The same can be retrieved from the Profile Section.
Your .travis.yml code would be something similar to as below.
language: java
sudo: false
script: "mvn test"
env:
 global:
    - LT_USERNAME=${LAMBDATEST_USERNAME}
    - LT_ACCESS_KEY=${LAMBDATEST_KEY}
You can make use of this variable while trying to trigger a remote web driver execution, as shown in the below code in the case of our Cucumber+TestNG code.
package com.cucumber.tests;

import java.net.MalformedURLException;
import java.net.URL;

import org.openqa.selenium.remote.DesiredCapabilities;
import org.openqa.selenium.remote.RemoteWebDriver;
import org.testng.annotations.AfterClass;
import org.testng.annotations.BeforeClass;
import org.testng.annotations.DataProvider;
import org.testng.annotations.Parameters;
import org.testng.annotations.Test;

import cucumber.api.CucumberOptions;
import cucumber.api.testng.CucumberFeatureWrapper;
import cucumber.api.testng.PickleEventWrapper;
import cucumber.api.testng.TestNGCucumberRunner;

@CucumberOptions(features = { "src/test/java/features" }, glue = { "com.cucumber.stepdefs" }, plugin = { "pretty",
        "json:target/cucumber/cucumber.json" })

public class TestNGRunCucumberTest {

    DesiredCapabilities capabilities = new DesiredCapabilities();

    /*
     * Previous declarations for LambdaTest Connect
     * String username = "LT_USERNAME";
     * String accesskey = " LT_ACCESS_KEY";
     */

    protected static RemoteWebDriver driver = null;
    String gridURL = "@hub.lambdatest.com/wd/hub";
    boolean status = false;
    protected String baseURL = "https://www.google.com";
    private TestNGCucumberRunner testNGCucumberRunner;

    @BeforeClass
    @Parameters(value = { "browser", "version" })
    public void beforeClass(String browser, float version) {
        capabilities.setCapability("build", "Cucumber_Project_Google");
        capabilities.setCapability("name", "Querying in google engine");
        capabilities.setCapability("platform", "Windows 10");
        capabilities.setCapability("browserName", browser);
        capabilities.setCapability("version", version);
        try {
            driver = new RemoteWebDriver(new URL("https://" + LT_USERNAME + ":" + LT_ACCESS_KEY + gridURL),
                    capabilities);
        } catch (MalformedURLException e) {
            System.out.println("Invalid grid URL");
        } catch (Exception e) {
            System.out.println(e.getMessage());
        }
        testNGCucumberRunner = new TestNGCucumberRunner(this.getClass());
    }

    @Test(groups = "cucumber scenarios", description = "Runs Cucumber Scenarios", dataProvider = "scenarios")
    public void scenario(PickleEventWrapper pickleEvent, CucumberFeatureWrapper cucumberFeature) throws Throwable {
        testNGCucumberRunner.runScenario(pickleEvent.getPickleEvent());
    }

    /**
     * @return returns two dimensional array of {@link CucumberFeatureWrapper}
     *         objects.
     */
    @DataProvider
    public Object[][] scenarios() {
        return testNGCucumberRunner.provideScenarios();
    }

    @AfterClass
    public void tearDown() {
        driver.quit();
        testNGCucumberRunner.finish();
    }
}
Once you replace the TestNG Runner file with the above code for the integration of LambdaTest based parallel execution with the help of Travis CI automated testing pipeline, this would help you get the test execution trigger in the LambdaTest platform as shown in the image below.

Conclusion
We have discussed the importance of continuous integration and how it can be leveraged using Travis CI pipeline and its advantages and disadvantages. We have seen the need for parallel and cross browser testing using cloud solutions such as LambdaTest with an automated testing pipeline. Also, Travis CI’s configuration with one of our frameworks using Cucumber and TestNG for triggering tests on LambdaTest to achieve our cross browser testing goals.
To kick start a deployment, you would need a quality check in place to validate the build. You cannot depend on a manual test process to test each and every build integration into the environment. It is not automated and requires human dependency, which proves to be tiresome and has a high chance of failure. To avoid manual quality checks for providing a sign-off to the build, we ensure that we have an automated test suite that acts as a checkpoint in the Continuous Integrations through Continuous Deployment processes with Travis CI pipeline’s help.
Thanks for reading the article. Have a great day and Happy Testing!


Top comments (0)