
Continuous Integration/Continuous Deployment (CI/CD) has become an essential part of modern software development cycles. As a part of continuous integration, the developer should ensure that the Integration should not break the existing code because this could lead to a negative impact on the overall quality of the project. In order to show how the integration process works, we’ll take an example of a well-known continuous integration tool, TeamCity. In this article, we will learn TeamCity concepts and integrate our test suites with TeamCity for test automation by leveraging LambdaTest cloud-based Selenium grid.
There are numerous best CI/CD tools available for building high-quality code and narrowing the gap between development and impacted teams. Besides establishing a DevOps culture in the organizations, teams enhance it by implementing best CI/CD practices throughout the Software Development Life Cycle(SDLC). These practices help the teams accelerate product development, automate the processes, and improve overall productivity.
If you’re new to Selenium and wondering what it is then we recommend checking out our guide — What is Selenium?
What is Jetbrains TeamCity?

JetBrains TeamCity is a user-friendly and general-purpose CI/CD solution for developers and build engineers. TeamCity helps the team carry out all kinds of workflows and development practices within the SDLC life cycle.
TeamCity comes in two different flavours.
- TeamCity Professional
A free version of the software even for commercial use. We can connect up to three build agents and create up to a hundred build configurations.
It is multi-platform, multi-language, and multi-cloud — helps build, test, and deploy apps, packages, and containers of all sorts.
- TeamCity Enterprise
An enterprise version of the same software where we can create unlimited build configurations.
Manage hundreds of build agents with a single server. Connect multiple servers into a cluster if required.
Priority customer support from Jetbrains.
In this System testing tutorial, learn why System testing is important and all the intricacies of the System testing process.
What Can You Do With TeamCity?
Let’s look at the following services offered by Teamcity for test automation.
Self-hosted Continuous Integration.
Simultaneously run parallel builds on different platforms and environment configurations.
Configure the TeamCity continuous delivery pipelines via UI or configuration-as-code option using Kotlin DSL.
Customize the statistics for different aspects — build duration, success rate, quality of the code, and custom metrics.
Run the code coverage and duplicates finder for Java and .NET environments.
Note: To know all the features of TeamCity, please have a look at the features overview section of the Jetbrains official site.
TeamCity Architecture
Getting started with TeamCity has never been easier. Unlike some other build servers, TeamCity has distributed grid architecture, i.e., the TeamCity build system comprises two primary components — the server and a farm of build agents.
The TeamCity Server provides the user interface for managing build configurations and managing results. The server doesn’t run any jobs or tests.
The TeamCity Build agent executes build configurations or build jobs and can be installed on-premise or in cloud providers like AWS/Azure/GCP.

1.TeamCity server initiates a build process whenever a specific condition is met. These conditions might be that there are changes in the VCS that TeamCity has detected. Many other conditions can trigger a build. Once a specific condition is met, the TeamCity server tries to identify the available agents based on the appropriate environment and compatibility. If there are no agents available, the build is added to the build queue. The build will be in the queue waiting for assigning to an agent. Once the build has been assigned to an agent, the agent has to get the sources to run the build.
2.TeamCity provides two possible options on how the build agent can get sources needed for the build:
Server-side Checkout: TeamCity server exports the required sources and passes them to the build agent.
Agent-side Checkout: The build agent itself checks out the sources before the build.
3.Once the build agent has all the required sources and files, it starts executing the build steps one after the other sequentially. Each step is represented by a specific build runner in this process — for example, maven, gradle, or sonarqube server, etc.
4.As the build steps are being executed, the build agent sends all the log messages, code coverage results, testing reports, etc., to the TeamCity server instantly. Because of this, we can monitor the build process in real-time on the server console.
5.Once all the build steps are executed, and the build is completed, the build agent sends the generated artifacts to the server. These are the files produced by the build — for example, WAR or JAR files, test reports, log data, etc.
TeamCity supports development across all types of platforms, including Windows and Linux, macOS. TeamCity can be easily extended and integrated with other tools that make up the SDLC toolchain.
Some of the integrations and toolchain that TeamCity support is shown below:
| TOOL CHAIN | INTEGRATION |
|---|---|
| Build Runners | Apache ANT, Maven, Gradle, Microsoft .NET, Helm |
| Testing Frameworks | Junit, Nunit, TestNG, Apache ANT, Maven, MSTest, VSTest, MSpec |
| Version Control Systems | Github, Gitlab, Bitbucket, Azure DevOps, Git, Subversion, Mercurial, Perforce |
| Integrated Development Environments | IntelliJ IDEA, Visual Studio, Eclipse |
| Code Quality | Inspection, Duplicates, Finder, Emma, JaCoCo, FxCop, dotCover, NCover |
| Cloud | AWS, Google Cloud, Microsoft Azure, VMWare vSphere, Docker, Kubernetes |
| Defect Tracking Systems | You Track, Jira, Github, Bitbucket, Azure DevOps |
| Others | Unity, Octopus Deploy, SonarQube, Slack, JFrog, Snyk |
A comprehensive Exploratory Testing tutorial that covers what Exploratory Testing is, its importance, benefits, and how to perform it with real-time examples.
Advantages Of TeamCity
TeamCity has the below advantages over other CI/CD solutions.
| For Developers | For DevOps Engineers | For Managers | For Admins |
|---|---|---|---|
| Perform Better | Configuration as code | Get a bird’s view of the CI | Zero maintenance |
| Get started easily | Pipeline Optimization | Organize team’s work | Scalability |
| Test Intelligence | Templates | Can grow to any scale | Cloud integrations |
| Real-time reporting | RESTFul API | Benefit from a fast feedback loop | Access Management |
TeamCity Terminologies
To perform test automation with TeamCity, let’s look at the concepts/terminology used within TeamCity.
| Terminology | Description |
|---|---|
| TeamCity Server | The major component in the TeamCity ecosystem that stores all the objects’ settings, manages the build queue, monitors the state of running builds, and performs many other tasks. We can have this server on-premise or in any cloud(AWS/GCP/Azure etc.) or TeamCity Cloud. |
| Build Agent | Build agent is the software that executes a build process as per the instructions from the server. Typically, it is installed and configured on a separate machine than the TeamCity server. TeamCity build agents can have multiple operating systems, different platforms, and also pre-configured environments. |
| Project | TeamCity project is a collection of all different build configurations. We can create a project in TeamCity corresponding to a software project, specific release/version of a project, or any other logical grouping as per the product. These projects can be nested and organized into a tree-like structure. |
| Build Configuration | A build configuration in TeamCity is a collection of settings used to start a build or group the sequence of builds in the UI console. |
| VCS Root | Whenever TeamCity needs to get the source code, it needs to connect to the version control system(VCS), referred to as a VCS root. TeamCity monitors the changes in VCS and gets the sources for a specific build configuration. |
| Build Step | Step is the task that needs to be executed, such as compiling the project, running code coverage, invoking the test tools, etc. |
| Build Trigger | Triggers are used to add builds to the queue. We can add a trigger either when an event occurs (for ex. VCS check-in) or periodically with some configurable interval |
| Change | Any modification to the source code of the project repository. |
| Build | It is the actual process of creating an application version. After the build process is triggered, it is added to the build queue and is started when there are agents available to run it. After the build is completed, the build agent sends build artifacts to the server. |
| Build Queue | Represents the list of builds that were triggered and are waiting to be started by the agents. TeamCity distributes the builds to the available agents as soon as they become idle. |
| Build Artifacts | After a build is completed, typically, we get files such as WAR/JAR files, installers, log files, etc. Once they are available for download, they are called build artifacts. |
As we all know, Jenkins is one of the most used CI/CD servers across different teams. Jenkins and TeamCity mainly provide the same set of concepts and functionalities but with slightly different naming conventions.
The following table provides a mapping for some of the Jenkins concepts and terminology to the TeamCity counterparts.
| Terminology | Description |
| Jenkins Master/Node | TeamCity Server |
| Dumb Slave/Permanent Agent | Agent Pool |
| Executor | TeamCity Agent |
| View or Folder | Project |
| Job/Item/Project | Build Configuration |
| Build | Build Steps |
TeamCity Installation
It’s a lot of theory! Now let’s install TeamCity, do some hands-on, and understand each of the concepts in detail.
The TeamCity installation package is identical for both Professional and Enterprise editions. TeamCity can be installed and used in the following ways.
Direct installation package. (.exe for Windows, .tar.gz for Linux/macOS)
Docker Image
TeamCity Cloud — as a managed service
Let’s start with each of the options in detail.
A comprehensive UI testing tutorial that covers what UI testing is, its importance, benefits, and how to perform it with real-time examples.
1. Direct Installation Package
On Windows — Navigate to TeamCity official download page and download the installation package. After downloading, you can start using TeamCity under the free Professional license right away. It is enabled by default.
Once the file is downloaded, run the file to start the installation process.
Read and accept the Licence Agreement.
Choose the folder in which you want to install the TeamCity or accept the default path provided. Click on Next.
As discussed above, TeamCity has two components — Server and Agent. Select the components as required to be used on the machine and click on Next.
Since we will use the same machine as the Server and Agent, we will select both options. This approach is only applicable for learning and exploring TeamCity. Click on Next.
Let us choose port 8088 and proceed with the installation.
On the next screen, TeamCity displays the build agent properties with the selected options. As chosen earlier, the server should be running on port 8088 and should be available on URL — http://localhost:8088, and the agent listens on port 9090 for all the server communication. Let’s not change any of these details, as we go with default values and click on Save.
Once clicked on OK, we need to choose a user account to run the server and agent services. We select the SYSTEM account and click on Next.
Select the services to start on the machine.
Click Finish on the installation wizard. TeamCity web interface will be launched in a browser at the URL — http://localhost:8088/.
TeamCity might take some time to load all the components and show the UI. Choose the default data directory or use a custom folder to store all the build configuration and artifacts.

TeamCity stores all the build history and user-related data in a relational database. In the Database Connection setup screen, we can choose the appropriate SQL database. For the demo/training purposes, we could choose the internal database (HSQL) by TeamCity.
Note: It is recommended to configure a database for production purposes before this and configure it with TeamCity as needed.

On Proceed, TeamCity will create a SQL database and provision all the required resources.

Once everything is ready, the License Agreement screen is displayed. Carefully read and accept the agreements, proceed to Next.
TeamCity advised us to create an administrator account. Choose the details appropriately and click on Create Account.

That’s it! The TeamCity installation and initial configuration are complete. We will be redirected to the TeamCity server home page as below.
We could also choose to use the new experimental UI or continue using the classic UI.

We have chosen to use the new UI; hence the below home page will be displayed.

The installation process is pretty similar in Linux and macOS. Please refer to these instructions for the same.
In this Ad hoc testing tutorial, let’s deep dive into what Ad hoc testing is, its advantages, disadvantages, types, characteristics, and their best practices.
2. Installation using Docker
TeamCity can also be installed using docker. Login to the machine where Docker is present and follow the below instructions to install TeamCity. If you are not familiar with docker, please refer to these guidelines to install and set up.
Typically, TeamCity is used with relational databases configured separately in production configurations. We will use Postgresql in these installation steps. This is how we are going to configure TeamCity here.
Linux machine1 — used as a server + postgres DB
Linux machine2 — used as an agent
1. Using Linux Machine 1 As A Server + Postgres DB
Login to machine1 and perform the below steps.
- Pull the postgres image as the root user on the linux machine.
$ sudo su -
    $ docker pull postgres
- Create a directory named postgres in the docker volumes.
$ mkdir -p $HOME/docker/volumes/postgres
- Run the postgres container with the below options.
$ docker run --name pg-docker -e POSTGRES_PASSWORD=start123 -d -p 5432:5432 -v $HOME/docker/volumes/postgres:/var/lib/postgresql/data postgres
We are starting a new container from the postgres image with a name ‘pg-docker’ with default user ‘postgres’ and our own password ‘start123’. The port 5432 on the host machine is mapped to the port 5432 on the container. The folder/volume ‘$HOME/docker/volumes/postgres’ that we created in the previous step on the host machine is mapped to the ‘/var/lib/postgresql/data’ folder on the container. And using the flag -d we are starting the container in a detached mode.
- Verify if the postgres container has started successfully using the below command.
$ docker ps -a
Make a note of the container-id for the postgres from the above command.
Connect to the running container using the below command and create new ROLE, DATABASE and grant all the required permissions for the new user.
Replace the container id with the above-noted value.
$ docker exec -it <container-id> bash
    root@1c3102ea09d0:/# psql -U postgres
    psql (13.2 (Debian 13.2-1.pgdg100+1))
    Type "help" for help.


    postgres=# CREATE ROLE teamcityuser with password 'start123' login;
    CREATE ROLE
    postgres=# create database teamcitydb with owner teamcityuser;
    CREATE DATABASE
    postgres=# grant all on database teamcitydb to teamcityuser;
    GRANT
With all these steps, we are done with the setup required for the Postgres database.
- Run the below commands to create the required folders for storing the TeamCity server-specific data and logs.
 $ cd ~
    $ mkdir teamcity
    $ cd teamcity
    $ mkdir data
    $ mkdir logs
    $ cd ~
- Run the below command to pull and start the TeamCity server.
$ docker run -d --name teamcity-server -v /home/ec2-user/teamcity/data:/data/teamcity_server/datadir -v /home/ec2-user/teamcity/logs:/opt/teamcity/logs -p 8111:8111 -u 0 jetbrains/teamcity-server
We are starting a new container from the jetbrains/teamcity-server image with a name ‘teamcity-server’ and mapping port 8111 on the host machine to port 8111 on the container. The folders/volumes ‘/home/ec2-user/teamcity/data’ & ‘/home/ec2-user/teamcity/logs’ that we created in the previous step on the host machine are mapped to the ‘/data/teamcity_server/datadir’ & ‘/opt/teamcity/logs’ folders on the container respectively. And using the flag -d we are starting the container in a detached mode with root user using -u 0.
Docker takes some time to pull, extract the contents and start the container. Verify if the teamcity-server container has started successfully using the below command.
$ docker ps -a
Once the server has started, navigate to :8111 on the browser. We get the same screens as discussed in the native installation method. Navigate through all the required steps and proceed with the configuration.
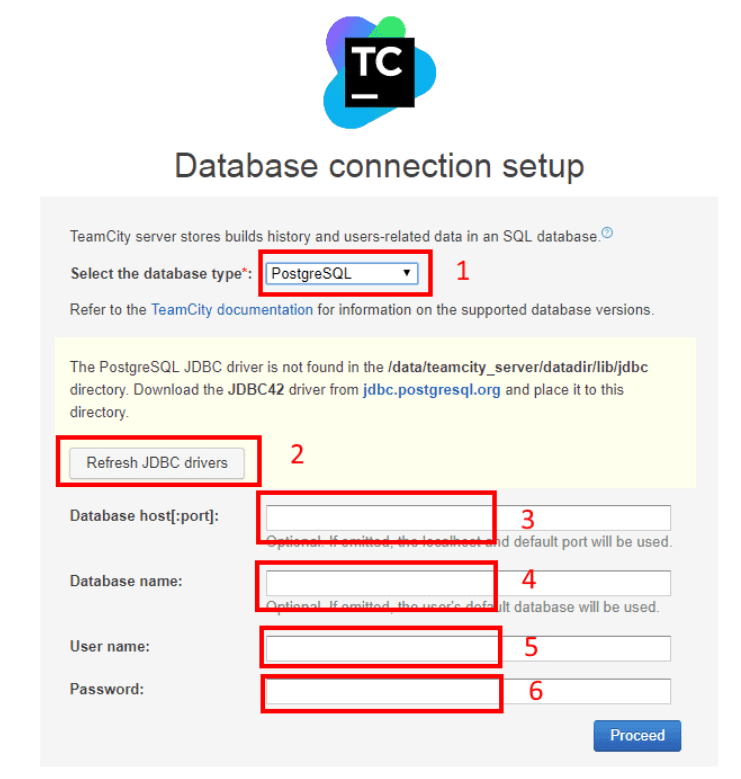
The only difference here is that since we have configured a postgres database, we need to configure it to use it with the TeamCity server. On the database connection setup screen, choose database type as PostgreSQL(step-1). Click on Refresh JDBC drivers(step-2). Enter the database host and port details(step-3). Enter the database name(step-4), username(step-5) and password(step-6) and click on Proceed.
As we have created previously:
Host — machine1 IP address
Port — 5432
Database name — teamcitydb
Database username — teamcityuser
Database password — start123
2. Using Linux Machine 2 To Add An Agent To TeamCity Server
- Run the below commands to create the required folders for storing the TeamCity agent-specific data.
 $ cd ~
    $ mkdir teamcity
    $ cd teamcity
    $ mkdir data
    $ cd ~
- Run the below command to pull and start the TeamCity agent.
$ docker run -d --name teamcity-agent1 -e SERVER_URL="<teamcityserverhostipaddress:8111>" -e AGENT_NAME="agent1" -v /home/ec2-user/teamcity/data:/data/teamcity_agent/conf -v /var/run/docker.sock:/var/run/docker.sock jetbrains/teamcity-agent
Make sure to replace the teamcityserverhostipaddress with the TeamCity server IP address.
We are starting a new container from the jetbrains/teamcity-agent image with a name ‘teamcity-agent1’ and connecting it to the TeamCity server which is running on another machine on port 8111. The folder/volume ‘/home/ec2-user/teamcity/data’ that we created in the previous step on the host machine is mapped to the ‘/data/teamcity_agent/conf’ folder on the container. And using the flag -d we are starting the container in a detached mode with agent name ‘agent1’.
Docker takes some time to pull, extract the contents and start the container. Verify if the teamcity-agent container has started successfully using the below command.
$ docker ps -a
Once the TeamCity server and agent setup are complete, we need to authorize the agent to start using it. Navigate to the server URL on the browser at :8111, click on Agents(step-1), click on Unauthorized tab(step-2) and select the agent and authorize(step-3).

That’s it! We can now start building the pipelines with TeamCity and use them for various jobs.
Run your Jest automation tests in massive parallel across multiple browser and OS combinations with LambdaTest.
3. TeamCity Cloud
If you have observed the above two methods of installing TeamCity, we need to configure the server, agents and maintain the infrastructure on our own. Considering this, TeamCity has recently launched TeamCity Cloud, a fully-managed CI/CD solution that automatically runs the builds and tests in the cloud servers. It lets development teams deliver quality software faster and also at scale. This is currently available in the beta phase, and TeamCity is planning for a public release soon.
- You can navigate TeamCity Cloud and create your TeamCity instance on the cloud.

Once the request is approved, TeamCity will send a confirmation to the registered email address. As we see below, TeamCity configures the server and adds a couple of agent machines to the cloud instance.

As of now, TeamCity cloud is free based on certain build credits. Once it is officially released to the public, you need to take a subscription for using it. Using TeamCity cloud is one of the easiest ways to explore and learn it without any extra infrastructure setup or provisioning.
Creating Our First Build Configuration
Note: Whatever the TeamCity installation type you have followed, the below steps will be the same and applied for all instances.
TeamCity configurations always start with a project. A project is a collection of all different build configurations. We can create a project in TeamCity corresponding to a software project, specific release/version of a project, or any other logical grouping as per the product. These projects can be nested and organized into a tree-like structure. This will enable the hierarchical display and propagate the settings across projects.
TeamCity creates a Root project at the top of the project hierarchy. This project has most of the similar properties of a usual project. The settings and configurations made in the root project are available to all the other child projects created on the server.
The root project is unique and has the below characteristics:
It is created by default, and we can’t remove it.
It is created as a top-level project; hence it has no parent project associated with it.
It doesn’t have any build configurations.
It does not appear in the normal user-level UI screens as it is primarily present as an entity in Administration UI only.
Let’s start creating a new project by clicking on the Create Project button on the home screen and choose the option Manually. We will give the project details as below and create a simple HelloWorld project.

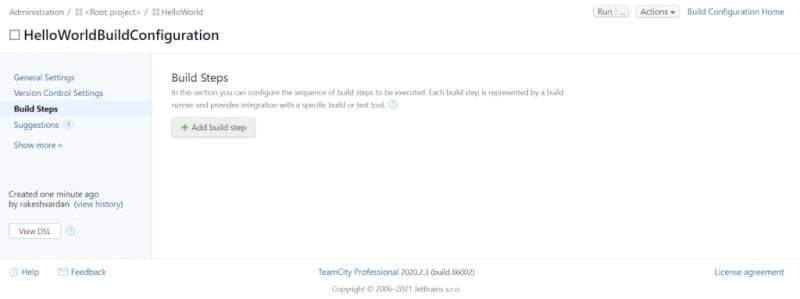
Once the project is created, we need to create a build configuration under it.
A build configuration in TeamCity is a collection of settings used to start a build or group the sequence of builds in the UI console. Some examples of the build configurations are checking out the code, running the integration tests, building the artifact, etc. Build configuration is specific to a project, and it contains different builds. We can explore all the details of a build configuration on its home page or update it on the edit page.
Click on Create Build Configuration.

Enter the below details and create the build configuration.

When creating a build configuration in TeamCity, we should configure the sequence of steps to be executed. These build steps are configured in the Build Steps section of the Build Configuration Settings page.
We can perform these steps here:
Adding new steps.
Using the auto-detect option in TeamCity to scan the VCS repo and choose the steps.
Copy and delete the steps.
Temporarily enable/disable the build steps.
Click on Add build step, choose the runner type as Command-Line, enter the script below, and finally save.

We are done with configuring our first build configuration in TeamCity for the HelloWorld project. We are good to run our build and see if it’s working. As you have noticed, we are trying to use the echo command to print the sample text to the console.
On the build configuration page — we can see a Run button. Click on the Run button to start the build. TeamCity server starts the build and executes the build steps sequentially on the available agent. Once the build is completed, we can see and verify all the details using different tabs available.

Click on Show full log to see the complete build log.

TeamCity displays the complete build log. As we see in the image, the echoed text is printed to the console.
That’s all! We can use TeamCity for test automation and create CI/CD pipelines for different purposes.
In this Appium tutorial, learn about Appium and its benefits for mobile automation testing. Take a look at how Appium works and see how to perform Appium testing of your mobile applications.
Using TeamCity for Running Selenium Test Automation
Now we have got an understanding of installing and configuring TeamCity. Also, we created a project and were able to create build configurations, build steps, and run them. Let us explore creating CI/CD pipelines for running test automation with TeamCity. Selenium Webdriver is a collection of open-source libraries used for testing web applications. The API is used to automate the web application flow and verify if it’s working as expected or not. It supports most common browsers such as Firefox, Chrome, Safari, Edge, and Internet Explorer.
Let us consider the below test case for our example. We use the Selenium Webdriver library to automate one of the UI flows on LambdaTest’s sample website — https://lambdatest.github.io/sample-todo-app/.
We will use WebDriver manager to configure the Firefox driver instance and use it further to interact with the elements of the page. We will also leverage TestNG to control the test execution flow — set up the driver before the test, running the actual test step, and close once the test execution has been completed.
Complete code for the below example is available on Github here for reference.
package com.lambdatest;

    import io.github.bonigarcia.wdm.WebDriverManager;
    import org.openqa.selenium.By;
    import org.openqa.selenium.WebDriver;
    import org.openqa.selenium.firefox.FirefoxDriver;
    import org.testng.annotations.AfterTest;
    import org.testng.annotations.BeforeTest;
    import org.testng.annotations.Test;

    public class Lambdatest {

       public WebDriver driver;

       @BeforeTest
       public void setUp() {
           WebDriverManager.firefoxdriver().setup();
           driver = new FirefoxDriver();
       }

       @Test
       public void testScript() {
           try {
               driver.get("https://lambdatest.github.io/sample-todo-app/");
               driver.findElement(By.name("li1")).click();
               driver.findElement(By.name("li2")).click();
               driver.findElement(By.id("sampletodotext")).clear();
               driver.findElement(By.id("sampletodotext")).sendKeys("Yey, Let's add it to list");
               driver.findElement(By.id("addbutton")).click();
               driver.quit();
           } catch (Exception e) {
               System.out.println(e.getMessage());
           }
       }

       @AfterTest
       public void teardown() {
           if (driver != null) {
               driver.quit();
           }
       }
    }
The complete project structure is as below.

Let us begin with creating a new TeamCity project for running the automated tests in Selenium. Click on Create Project and choose From a repository URL. Since TeamCity needs to pull the code from any repository like GitHub, BitBucket, or Gitlab — we need to configure it using this option.
Enter the below details — repository URL for Github, username, password (if required) and click on Proceed. Username and password are not mandatory and needed only for the repositories, which require authentication for cloning operation.

TeamCity makes a connection to the provided repository and displays the below screen. Proceed with the defaults or choose the required branch name and build a name as needed. In our case, we are proceeding with the master branch.

Upon clicking on Proceed, TeamCity creates a project, build configuration, and VCS root as appropriate as below. TeamCity is also intelligent enough to scan the whole repository and suggest the required build steps automatically.

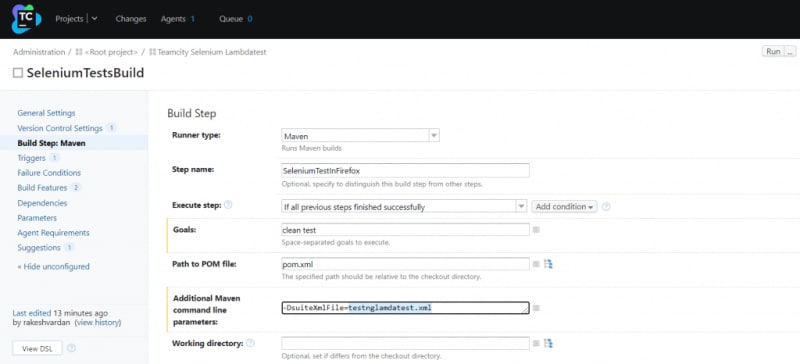
Since we are using a Java-based project with maven as the build tool, TeamCity has detected that we would like to run the maven commands, specifically the maven goal clean test and pom.xml.

We can either choose the suggested build step by TeamCity or proceed with creating a new one. We would select the recommended step here and click on Use Selected. A new build step would be added to the build configuration as below.

Click on Edit and verify the configurations that TeamCity adds by default.

We can also see the advanced options and configure them as needed. Since in our example, we need to let maven know which suite file to run the tests from, we should pass additional command line parameters. Update the command line parameter as below. The important note here is that we added a build step in the TeamCity build configuration to execute the maven goal clean test using the maven runner. Once everything looks good, click on Save.

Now our build configuration is completed with the required steps to run the build. Before running, let us have a look at the Version Control Settings option. Click on Version Control Settings in the left pane. The configuration looks as below at the moment.

As we see above in the Version Control Settings pane, a new VCS Root has been added to the build configuration. Whenever TeamCity needs to get the source code, it needs to make a connection to the version control system(VCS), which is referred to as a VCS root. TeamCity monitors the changes in VCS and gets the sources for a specific build configuration. All these configuration parameters, such as the path to the VCS repository source, user name, password, and any additional settings, are represented by the VCS root only.
VCS roots are created within a project. Once created they are available to all the build configurations added to that project and its child projects. We can configure more than VCS root to a build configuration. We can even configure additional options using the Show Advanced Options; also, we can create custom checkout rules.
Click on the Run button to trigger and execute the build steps.

TeamCity starts pulling the latest code from the VCS root and specific branches and executing the build steps one by one. In our case, there is only one step to run the maven goal. So it starts pulling the required dependencies to build the project and starts the tests. Once all the build steps are executed, we see the below screen with the overall status.

Let us click on the Show Full log option to see the whole execution log for the run.
As we see below, the expected maven command is executed, and the tests are completed.
mvn clean install -DsuiteXmlFile=testnglocal.xml

This is great! We can run a Selenium Automated test in our local machine using the build configuration that we have just created in TeamCity. We could also leverage some of the below additional features of TeamCity for test automation and develop robust TeamCity build pipelines.
Triggers:
Triggers are used to add builds to the queue. We can add a trigger when an event occurs (for ex. VCS check-in) or periodically with some configurable interval. We could use a schedule trigger and configure to run the build periodically — this is used while configuring the test suite for nightly regression execution.
Parameters:
Parameters in TeamCity enable the users to share different settings with the running build. These are key-value pairs, which can be defined by the user or provided by TeamCity.
There are three types of build parameters:
Environment variables are passed into the generated build process as environment and defined with the env. prefix.
System properties are passed into the build scripts of the TeamCity’s supported runners as variables and are defined with the system. prefix. They are specific to a build tool.
Configuration parameters are not passed into the build but are only supposed to share the settings within a build configuration. These are useful for customizing a build configuration based on a template. They don’t contain any prefixes.
Failure conditions
We can define the conditions under which TeamCity marks a build as failed. These are some of the available conditions.

Build Features
A building feature is an additional functionality that we can add to TeamCity’s build configuration. It affects the running builds and results. We could add a build feature to process the XML reports generated by TestNG after the test execution is over.
Statistics
When we have multiple projects and several build configurations, tracking all those statistics is very important. TeamCity collects all the statistical data across builds and presents a visual chart for easy analysis.

DSL
Besides storing the settings in a version-controlled system, TeamCity also allows storing the settings as a Kotlin DSL(Domain Specific Language). Using the DSL configuration stored in version control systems enables you to define the settings programmatically. Since Kotlin is a statically typed language, you automatically receive the auto-completion feature in an IDE, discovering available API options much more straightforward.
Coming back to our example, we have executed our tests in only one browser — firefox. What if we need to run the tests in other browsers as well? And we might have some of the below requirements from the TeamCity test automation perspective.
Save the test execution reports and logs over some time.
Able to spin up different browsers including multiple versions i.e. Cross-Browser Testing.
Integrate the test framework with other tools like Jira or GitHub, or Trello for bug creation on failure.
Support a vast number of tests — thousands of tests across different browsers, OS, and resolutions.
To achieve all this, we need a solution that caters to all the requirements and helps us do continuous testing, providing early feedback to the development team. LambdaTest is one such solution to all these requirements. In the next section, we will integrate our example with the LambdaTest cloud Selenium grid and perform the test automation using TeamCity.
Integration With LambdaTest Cloud-Based Selenium Grid
LambdaTest is a cross-browser testing cloud solution to perform live interactive and automated cross-browser testing on 3000+ real browsers and operating systems online. It is one of the most often used Selenium grid solutions for many companies.
To get started with the LambdaTest cloud, navigate to LambdaTest Register Page and sign-up for a new account. Once your LambdaTest account is activated, go to your Profile section and note the username and access key. We would need these LambdaTest username and access key to execute our tests on the LambdaTest platform.
Before using LambdaTest with our TeamCity build pipeline, we need to download and install the plugin from the marketplace.
Visit the JetBrains marketplace and download the “LambdaTest” plugin.
To install the downloaded TeamCity plugin, follow the below steps to upload the plugin on your TeamCity server.
Go to your server Administration and then to Plugins List.
Choose the option Upload plugin zip in the Plugins screen.
Choose the zip file and upload it to TeamCity.
Once uploaded, click on Enable uploaded plugins.
At this moment, we can see the LambdaTest plugin added to the External Plugins as below.

Now go to the existing Selenium test build configuration, and update the required testng XML file in the Additional Maven command line parameters.
Click on Build Features and then click on Add build feature. Select LambdaTest from the dropdown list.

Enter the username, and access token noted as above and save. The build feature for LambdaTest is added now, and these values/parameters are passed to our test case once the build is started.

Run the build. Once the build has started, navigate to the LambdaTest Automation dashboard and verify the execution status.

LambdaTest also provides all the test logs and recordings of the test execution as below. It will be very helpful for any issues with the script and using logs we can debug and identify the root cause of the issue.

In the above example, we have executed our tests on the Chrome browser on Windows OS.

LambdaTest also provides the desired capabilities generator to help us with the required configuration values to run the tests on different platform combinations. It is a valuable utility and comes in handy while working with cross-browser testing.
Conclusion
We have now successfully learned how to create a CI/CD pipeline using TeamCity and performed Selenium test automation on the LambdaTest cloud grid. We have covered some of the essential concepts used in TeamCity that help build pipelines and use them for test automation.
There are numerous CI/CD benefits and among them, TeamCity is a robust CI/CD solution to manage the pipelines, and in turn, helps the teams to follow best practices of Continuous Testing and other DevOps principles. We can even integrate IDE like IntelliJ with TeamCity plugins and start running the jobs from the IDE itself. Teams can build robust pipelines using TeamCity and leverage LambdaTest cloud grid solution for achieving excellent test automation benefits.
Happy Building and Testing!

Top comments (0)