
Azure DevOps by Microsoft Azure is one of the leading tools that automate CI/CD’s process and, in turn, supports automatic builds and code projects to make them available to others. The Azure pipelines combine Continuous Integration (CI) and Continuous Delivery (CD) to consistently test and build the code and ship it to the target environment.
In this article, we will learn how to configure an Azure CI/CD pipeline and integrate it to LambdaTest Azure DevOps for bug tracking. LambdaTest is a cross browser testing cloud trusted by 375,000+ users that facilitates easy integration with numerous CI/CD tools to boost your go-to-market delivery.
You can accelerate your test cycles, trim down your overall test execution, and scale with ease by running Selenium tests in parallel from Azure pipelines on LambdaTest cloud.
What is a CI/CD Pipeline?
A CI/CD pipeline is used to automate the process of continuous integration and continuous deployment. The pipeline facilitates the software delivery process via stages like Build, Test, Merge, and Deploy.
In simple words, a pipeline may sound like an overhead, but it isn’t. Instead, it’s a runnable specification of steps that reduce developers’ manual work by delivering a new version of a software productively and saves time.
Stages of a CI/CD Pipeline:
- Source Stage – In most cases, when a change is attempted to the central repository, a pipeline run is triggered. These triggers are set by the CI/CD pipeline tool in the source stage.
- Build Stage – The combination of source code and its dependencies when building into a runnable instance corporate to the end-user application. The built-in application languages like Java need compilation too, which is done in the build stage. If docker images are to be constructed, that can also be facilitated in this stage. Failing this stage marks a potential error in the code or its dependencies.
- Test Stage – This stage corresponds to automated tests running to validate our code and its behavior accordingly. This stage acts as a sieve that prevents the bugs from reaching the end-user. There can be multiple stages, from smoke tests to end to end testing. Failure at this stage will expose errors in the code.
- Deploy Stage – Once we have a runnable code, the deployment is processed with all predefined tests passed. There are a lot of stages like “Beta,” “Staging,” etc., for the product team. A “Production” stage for the end-users is also present.
Remember, the stages mentioned above are the basic stages, and different steps can be added to make the CI/CD process more automated. To bring a new life to these stages, we have Azure DevOps CI/CD.
What is Azure DevOps?
Azure DevOps is a collection of services given by Microsoft Azure. It provides development services for a team to support, plan, collaborate, build, and deploy applications. It provides integrated features in a browser or an IDE(Integrated Development Environment). Some of the services for developers are :
- Azure Repos
- Azure Pipelines
- Azure Boards
- Azure Test Plans
- Azure Artifacts
These resources are quite useful, especially Azure Pipelines. In this article, we will be using Azure Pipelines to create a CI/CD pipeline for a .NET project.
We will also connect the Azure DevOps CI/CD to LambdaTest account at a later stage. This will help you push the bug, epic, task, story, etc., to the Azure DevOps project instance. And guess what! This is freemium.
Check out your browser compatibility! Maxlength attribute for input and textarea elements declares a maximum number of characters that the user can enter.
What is Azure Pipelines?
The Azure CI/CD pipeline simplifies continuous integration and continuous delivery (CI/CD) in the application development process. You can start from the source stage with existing code on GitHub or on-premise containers. The Azure Repos can maintain a central repository, and the Azure pipelines maintain build and release pipelines for the given project. The Azure DevOps CI/CD process is a crucial process with all the required dev services.
Apart from continuous integration and continuous deployment with Azure DevOps, these pipelines are used to construct build-deploy-test workflows used mainly in continuous testing (CT). This tests the changes in a fast and scalable routine.
Advantages of Azure Pipelines:
The Azure Pipelines can be multifactored, and in the Azure DevOps CI/CD practice, they provide various advantages:
- Version Control Systems – Having the code into a version control system is the first step of building an Azure CI/CD pipeline. You can manage your source code in GitHub, Bitbucket, Subversion, or any other Git repository. It also supports Team Foundation Version Control (TFVC).
- Programming Languages and Application Types – You can use different languages with Azure pipelines like Java, Ruby, C, C++, Python, PHP, Go, and JavaScript.
- Deployment Targets – The applications with Azure CI/CD pipelines can be deployed to multiple target environments. This includes Virtual Machines, Containers, or any On-prem or Cloud Platform.
- Pricing – It is free for public projects. But, for private projects, you can run up to 1800 minutes of pipeline jobs free per month.
How to build Azure CI/CD Pipeline?
To create an Azure CI/CD Pipeline, you need to follow the below-given steps:
- Create an ASP.NET sample DevOps project using Azure DevOps Starter resource in Azure.
- Examine Azure CI/CD pipelines configured by Azure DevOps Starter.
- Clone the sample DevOps project to the system.
- Commit the code and execute CI/CD.
We will later attempt the LambdaTest Azure DevOps CI/CD integration to ease bug tracking, pushing the epic, story, or any task to the respective project anytime.
Prerequisites
You will need an active Azure account for creating Azure Repos and Pipelines. You can create a Microsoft Azure Account for the same.
For creating a sample app, we will be using Visual Studio and .NET Core. You can download Visual Studio and get .NET Core from the .NET Download Archives page.
Creating an ASP .NET DevOps Project using Azure DevOps Starter
Azure DevOps project simplifies the setup of CI/CD pipelines in Azure. You can go with the existing code or create a sample application as a new Azure DevOps project.
Here, we will create a new DevOps project by following the steps below:
- Sign in to your Azure account at the Microsoft Azure Portal.
- Select the + Create a Resource button under the Azure Services, and then search for DevOps Starter.

- Then choose the DevOps Starter and click on Create.

- Select .NET as shown in the below figure, and click Next.
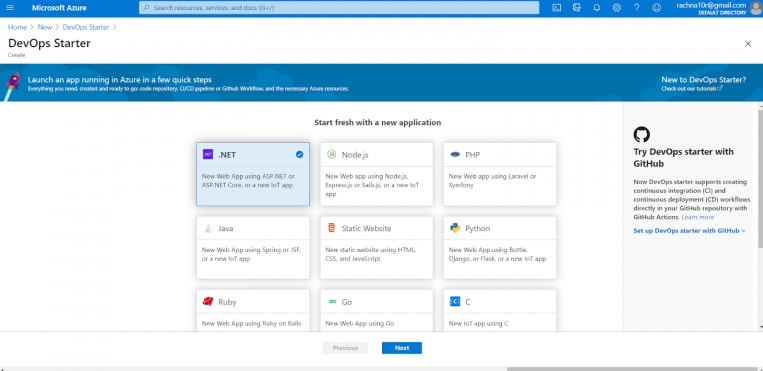
- The .NET sample application consists of either the Open – source ASP.NET framework or cross-platform ASP.NET Core framework. Go for the ASP.NET Core framework. You can also toggle over and select the Add a Database option if needed. When you’re done, choose Next.

- You can deploy your application either to Windows Web App or Virtual Machine. The Windows Web App is the default deployment target, but you can choose a Virtual machine. Choose and click Next.

- On the next screen, provide the Project name, Azure DevOps Organization , Subscription , and Web app name (Web app name should be unique in Azure). You can change the location from the default, which is South Central US. Let’s go with the default for now.

- You can select the Additional settings if you want to change the web app or database parameters.

- When the settings are completed, choose Done.
- Once the deployment is done, select Go to resource to view it.

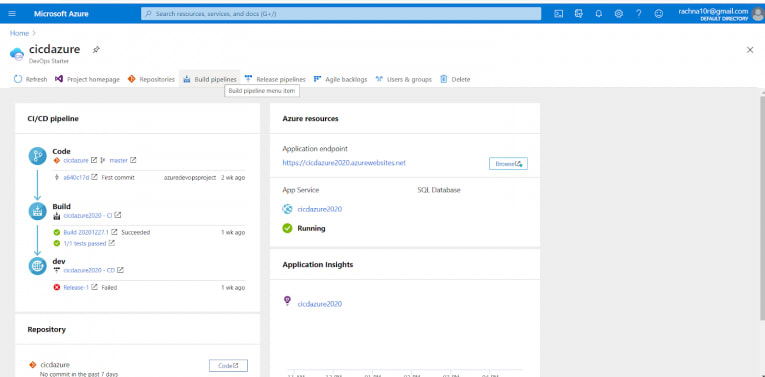
- The Azure DevOps CI/CD Project is created, the Azure resources pane will take some minutes to load. The project also creates –
- A team project with sample .NET code repository.
- An Azure Web App and Azure SQL Database (if the database toggle was selected) in Azure.
- Build Pipeline to compile and test the application.
- Release Pipeline to deploy the application.
- You can now collaborate with your team on the ASP .NET Core App with an automated CI/CD process that deploys the latest change to the website.
- On the right pane of Azure resources , click on the Browse button to view the application.
Examining the CI/CD Pipeline of the Sample DevOps Project
When created, the project automatically configures a complete CI/CD Pipeline in your Azure DevOps organization. However, you can still do customization on these pipelines.
- On the top of the Azure Dashboard, there are options of both Build Pipelines and Release Pipelines. On clicking on any of the options, a new browser tab gets open up with the Pipeline.

Build Pipelines :
- Click on the Build Pipelines on the Azure Dashboard.
- After the new browser tab opens up, select Edit from the top-right of the screen.

- You can see various tasks for your build pipeline. The build pipeline can do a number of tasks like fetching code from a repository, restoring dependencies, compiling applications, running tests, and giving outputs for deployments.

- Select the History tab under the name of the build pipeline. You will see an audit trail of all the changes for the build. Azure DevOps keeps track of all the changes made to the build specification and allows you to compare those via versions.

- Select the Triggers tab, and you will see that the Azure DevOps CI/CD Project automatically created a trigger named CI trigger, that is on every commit to the repository will initiate a new build. You can include or exclude the branches as per your choices from the continuous integration process.

- Select Retention Tab to add, view, or delete the policies to keep or remove a certain number of builds.
Release Pipelines :
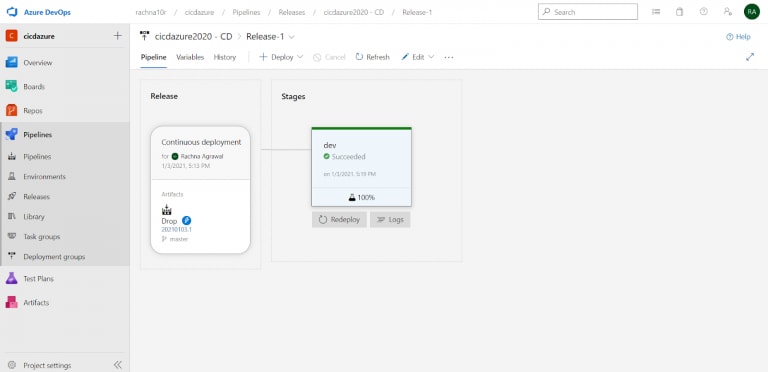
- Select Releases under the Pipelines section from the left side.
- The release pipeline manages the deployments in Azure DevOps. Click on Edit to examine the pipeline.
- Below the release pipeline’s name, you will find the same tabs as in the build pipeline.
- Under the Pipeline tab, go to the Artifacts , and select Drop. The build pipeline we examined before is the output to the Artifact.

- The release pipeline has an enabled Continuous deployment trigger. This executes a deployment every time a new build takes place. You can also disable the trigger, where the deployments will require manual execution.
- Select the dev stage and then click on the Tasks tab at the top. The tasks define all the activities your deployment performs. Like you can see in the below figure.

- The five tasks done are attempted on the agent. These can be foreseen as –
- Azure Resources Deployment – This deploys all the Azure resources like Azure Web App and Azure SQL Database for application usage.
- Azure App Service Deploy – This deploys the application package to a website.
- Azure SQL Database Deployment – The SQL changes are deployed to the database.
- Visual Studio Tests – This runs functional tests after deployment.
- On the left pane, you will find Releases under Pipelines. This shows the history of releases.

- Select the release number to view the release summary. There are menus to explore, like associated work items, release summary, and tests.
- Select Logs below dev. The logs will show all the useful information about the deployment. The logs can be viewed both during and after deployments.
Cloning the Sample DevOps Project Repository
- On the Azure Dashboard, click on the project’s name from the left pane. A new window opens up.
- On the new window, click on the Clone button from the top-right of the screen and copy the repository URL.

- Open the Visual Studio on your system and click Continue without code on the right side, below the Get started menu.
- Click View ->Team Explorer option on the IDE, and also select Clone on the Explorer window.
- State the repository URL copied from your Azure Portal and specify the folder where you want your repository to get cloned on your system.
- Click Clone to start the cloning.
- Once the code is successfully cloned, you can view the whole project on the Solutions Explorer and make changes.
Note: As soon as you merge the changes to the remote repository, the build process gets triggered.
Commit the code and execute CI/CD
- The sample project we have created has a Git Repository in Azure DevOps Organization, which can be viewed in Azure Repos. The same repository has been cloned in Visual Studio 2019 via the previous steps.
- In the Visual Studio 2019 solutions explorer, navigate to Application/aspnet-core-dotnet-core/Pages/Index.cshtml file.
- Double-click the Index.cshtml to open it. Add a text line “This is a test message” in the division class “content – body.”
<div class="content-body">
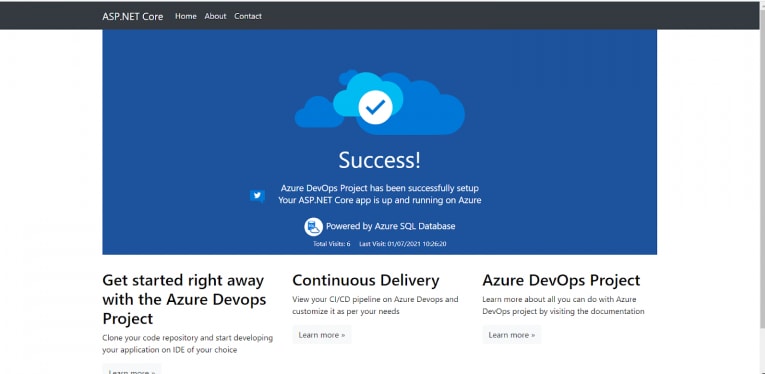
<div class="success-text">Success!</div>
<div class="description line-1"> Azure DevOps Project has been successfully setup</div>
<div class="description line-2"> Your ASP.NET Core app is up and running on Azure</div>
<div class="description line-3">This is a test message.</div>
<br />
- Right-click on the solution in the Solution Explorer and then click Commit.. to check-in code.
- Give a comment as a commit reason, and then click on Comment All.
- Click Sync to synchronize the code changes with the server.
- Click Push to push the changes to the remote repository from the local repository.
- In your browser, navigate to Pipelines > Builds. Now there would be a build in progress. This build is triggered automatically due to a code change.
- As soon as the build is completed, Release takes place.
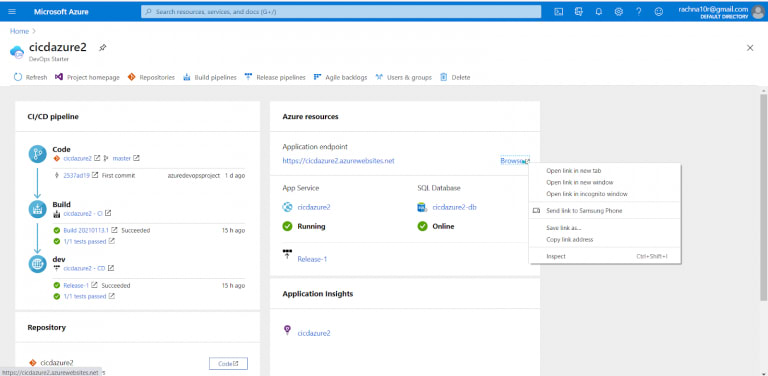
- Once the build and release are completed, hop on to the Azure DevOps Project Dashboard. On the right pane, click Browse to view the updated running application.

Want to check you browser compatibility? OffscreenCanvas is a canvas specification that allows canvas drawing to occur with no connection to the DOM and can be used inside workers.
Integrating Azure DevOps With LambdaTest Account for bug tracking
Getting acquainted with continuous integration and continuous deployment with Azure DevOps was our goal, but what’s the whole point of learning it? What’s the purpose of it? The Azure CI/CD Pipeline, when integrated with LambdaTest, provides easy real time browser testing. This real time browser testing is quite useful for tracking the issues from LambdaTest and listing it on the Azure DevOps CI/CD Dashboard of the Project. To start with, let’s integrate LambdaTest with Azure DevOps:
- Login to LambdaTest Account.
- Go to Integrations and select Azure DevOps to integrate Azure DevOps with your LambdaTest account.
- After LambdaTest Azure DevOps CI/CD integration, go to the Real Time Testing option.
- Place your Project URL in the required URL field; to find the URL of the project, go to the Project details, and in the right pane, you will find a browse button. Right-click and copy the link address, and paste it to the URL field on the LambdaTest portal.
- Select the VM (Virtual Machine) configuration; select the desired browser, browser version, OS, and resolution from the given options. For now, I am going with the default configuration.

- Click on Start to launch the VM. You can see the webpage with the option to report bugs in it. You can also take a screenshot of the bug via the Bug icon on the left side.

- After the screenshot gets captured, you can add any issue to the task or issue with an inbuilt image editor. After highlighting a bug, you can report it through the button, Mark as Bug.

- Once you click on Mark as Bug , you will get an option to provide all the details related to the bug.

- Click on Create Issue. Once you hit the button, you will get a prompt message at the top saying Bug Marked Successfully , and the bug will be pushed to the project.
- Go to the Azure DevOps project by logging in to your Azure Portal. Then, on the left pane under the Boards , head to the Work Items. You will see the issue there.
- Click on the title of the issue, and view all the data provided by LambdaTest. LambdaTest provides test environment details and screenshots in your work item on the respective project.
- This can be viewed with repro steps, System info, and all other details right on the Azure DevOps Portal.

- As you can view on the right side, you have Development and Deployment. Underneath Development, you can create a new branch or just send a pull request or commit the code after resolving the bug.

- Under Deployment, you can go to the release which has the associated bug and then view it.

Working on the Bug Reported by LambdaTest, by creating a new Branch
- On clicking on Create branch , under Development, give the branch’s name and select the bug reported from LambdaTest.
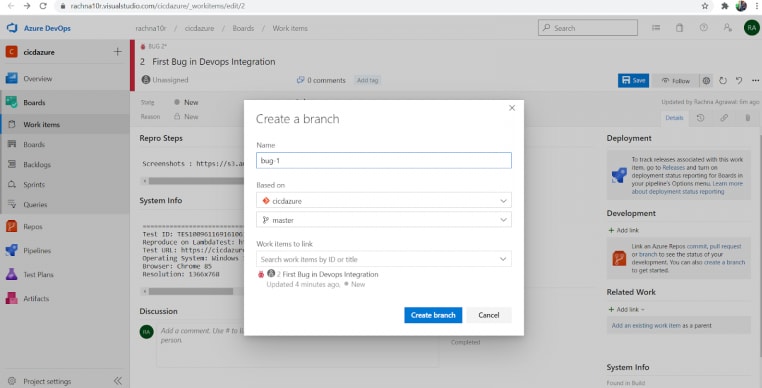
- You can now work on the bug by creating a new branch, and after resolving the bug, you can create a merge request.
Working on the Bug Reported by LambdaTest, by Commit/Pull Request
- When clicked on a commit/pull request , you have to specify the Link type, the Commit ID, and Comment.

- Enter the Commit ID , and you can link it to that particular commit easefully. You can change the link type to Pull request and provide its ID. Then a Pull request will be generated.
These are the ways through which you can work with a bug reported via LambdaTest and resolve it. Assigning this bug to a developer or a team can also be done. This helps developers work in agile methodology.
Check you browser compatibility! meter element is the method of indicating a current level of a gauge.
Conclusion
Kudos!! You have successfully integrated LambdaTest with Azure DevOps CI/CD Project and learned about configuring Pipeline with a sample ASP.NET Core Azure DevOps project.
Azure DevOps helps enterprises to plan smarter, collaborate faster, and ship better within the set of dev services. The automated Pipeline setup also provides the test, build, and deployment of the application in an easeful manner.
This is how you can actually use and configure the continuous integration and continuous deployment with Azure DevOps and Azure CI/CD Pipeline Architecture. This is a great tool to work with; Don’t worry; you will love to build Azure Projects or connect GIT to Azure DevOps.
Have a Happy Learning!!

Top comments (0)