
MSTest is the default test automation framework which comes bundled with Visual Studio. It started out as a command-line tool for executing tests and was referred as Visual Studio Unit Testing Framework; however the name MSTest is more synonymous with the developers.
In the previous MSTest tutorial, I had a look at setting up the MSTest framework in Visual Studio. In this MSTest tutorial for Selenium automation, I’ll help you run your first script for automated web testing with Selenium C# and MSTest.
If you’re new to Selenium and wondering what it is then we recommend checking out our guide — What is Selenium?
Test your native, hybrid, and web apps across all legacy and latest mobile operating systems on the most powerful Android emulator online: https://www.lambdatest.com/android-emulator-online
Requirements For Running Your First MSTest Script
In this MSTest tutorial, I’ll use Chrome browser to verify the functionalities in the code. So, you’ll need to install the Chrome WebDriver on the machine where you’ve installed the MSTest framework and Selenium WebDriver.
Different web browsers have their own corresponding Selenium WebDrivers. These WebDrivers are crucial to interact with the web elements on a page for automated web testing with Selenium C#. You can download the Selenium WebDriver for browsers such as Opera, Firefox, Chrome, Internet Explorer, Microsoft Edge, etc. using the following links:
| BROWSER | DOWNLOAD LOCATION |
| Opera | https://github.com/operasoftware/operachromiumdriver/releases |
| Firefox | https://github.com/mozilla/geckodriver/releases |
| Chrome | http://chromedriver.chromium.org/downloads |
| Internet Explorer | https://github.com/SeleniumHQ/selenium/wiki/InternetExplorerDriver |
| Microsoft Edge | https://blogs.windows.com/msedgedev/2015/07/23/bringing-automated-testing-to-microsoft-edge-through-webdriver/ |
Since I’ll be using Chrome, I’ll download the Selenium WebDriver for Chrome i.e. ChromeDriver. Though the downloaded ChromeDriver can be placed in any directory, it is a good practice to install the ChromeDriver in the location where Chrome browser (i.e. Chrome.exe) is present.

The advantage of following this practice is that you do not need to specify the path where the ChromeDriver is present while invoking the WebDriver.
How To Run MSTest Scripts With Selenium?
For demonstrating the usage of Selenium WebDriver with MSTest, I’ll use the following Selenium scenario for this MSTest tutorial:
Navigate to the URL https://lambdatest.github.io/sample-todo-app/
Select the first two checkboxes
Send ‘Adding item to the list’ to the textbox with id = sampletodotext
Click the Add Button and verify whether the text has been added or not
Take this certification to master the fundamentals of Selenium automation testing with C# and prove your credibility as a tester.
Here’s a short glimpse of the Selenium C# 101 certification from LambdaTest:
Get started with this complete Selenium automation testing tutorial. Learn what Selenium is, its architecture, advantages and more for automated cross browser testing.
Implementation Of The MSTest Script
#Run first MStest script for Selenium test automation
using Microsoft.VisualStudio.TestTools.UnitTesting;
using OpenQA.Selenium;
using OpenQA.Selenium.Chrome;
using System;

namespace MS_Test_Cross_Browser
{
    [TestClass]
    public class MS_Test_Cross_Browser_Test
    {
        String test_url = "https://lambdatest.github.io/sample-todo-app/";
        String itemName = "Yey, Let's add it to list";

        [TestMethod]
        public void NavigateToDoApp()
        {
            IWebDriver driver;

            // Local Selenium WebDriver
            driver = new ChromeDriver();
            driver.Manage().Window.Maximize();

            driver.Navigate().GoToUrl(test_url);

            driver.Manage().Window.Maximize();

            // Click on First Check box
            IWebElement firstCheckBox = driver.FindElement(By.Name("li1"));
            firstCheckBox.Click();

            // Click on Second Check box
            IWebElement secondCheckBox = driver.FindElement(By.Name("li2"));
            secondCheckBox.Click();

            // Enter Item name
            IWebElement textfield = driver.FindElement(By.Id("sampletodotext"));
            textfield.SendKeys(itemName);

            // Click on Add button
            IWebElement addButton = driver.FindElement(By.Id("addbutton"));
            addButton.Click();

            // Verified Added Item name
            IWebElement itemtext = driver.FindElement(By.XPath("/html/body/div/div/div/ul/li[6]/span"));
            String getText = itemtext.Text;
            Assert.IsTrue(itemName.Contains(getText));

            /* Perform wait to check the output in this MSTest tutorial for Selenium */
            //System.Threading.Thread.Sleep(4000);

            Console.WriteLine("LT_ToDo_Test Passed");

            driver.Quit();
        }
    }
}
Code WalkThrough
*Step 1 *— All the necessary packages are included in the beginning of the code. In this MSTest tutorial for Selenium; the following packages are included for automated web testing with Selenium C#:
MSTest framework (Microsoft.VisualStudio.TestTools.UnitTesting)
Selenium (OpenQA.Selenium)
-
Chrome WebDriver (OpenQA.Selenium.Chrome)
using Microsoft.VisualStudio.TestTools.UnitTesting;
using OpenQA.Selenium;
using OpenQA.Selenium.Chrome;
using System;
……………………………………………………………………………..
……………………………………………………………………………..
*Step 2 *— The [TestClass] attribute in MSTest represents the class containing the unit tests. In this example, MS_Test_Cross_Browser_Test() is the class containing all the tests.
namespace MS_Test_Cross_Browser
{
    [TestClass]
    public class MS_Test_Cross_Browser_Test
    {
*Step 3 *— The [TestMethod] attribute in MSTest indicates a method that contains the test method. In this example, the test method is NavigateToDoApp() and the same is under the [TestMethod] attribute.
[TestMethod]
public void NavigateToDoApp()
{
*Step 4 *— The IWebDriver interface is used for enabling the browser interactions. Hence, we create an instance of the IWebDriver interface in the code. A new instance of Chrome browser is initiated using the command driver = new ChromeDriver().
The URL is set to https://lambdatest.github.io/sample-todo-app/ and the browser window is maximized using the command driver.Manage().Window.Maximize() for this MSTest tutorial for automated web testing with Selenium C#.
public void NavigateToDoApp()
{
 IWebDriver driver;

 // Local Selenium WebDriver
 driver = new ChromeDriver();
 driver.Manage().Window.Maximize();

 driver.Navigate().GoToUrl(test_url);

 driver.Manage().Window.Maximize();
*Step 4 *— Once the Chrome browser is initiated and the target URL is loaded, we locate the required elements on the web page for automated web testing with Selenium C#. The details of the required Web Elements are obtained using the Inspect Tool in the Chrome Browser. As seen in the screenshot below for cross browser testing, the element with Name “li1” is located using the tool.

[TestMethod]
public void NavigateToDoApp()
{
 IWebDriver driver;

 ...............................................................
 ...............................................................
 ...............................................................

 // Click on First Check box
 IWebElement firstCheckBox = driver.FindElement(By.Name("li1"));
 firstCheckBox.Click();

 // Click on Second Check box
 IWebElement secondCheckBox = driver.FindElement(By.Name("li2"));
 secondCheckBox.Click();

 // Enter Item name
 IWebElement textfield = driver.FindElement(By.Id("sampletodotext"));
 textfield.SendKeys(itemName);
 ...............................................................
 ...............................................................
 ...............................................................
}
The same approach is followed for locating the other web elements having Name — li2, li3. The other elements are located using the Id of those elements.
The FindElement command in Selenium is used along with the appropriate web locators to identify the web element. Once the web element is identified (or located), appropriate action i.e. Click, SendKeys, etc. is performed on the web element.
// Click on Second Check box
IWebElement secondCheckBox = driver.FindElement(By.Name("li2"));
secondCheckBox.Click();

// Enter Item name
IWebElement textfield = driver.FindElement(By.Id("sampletodotext"));
textfield.SendKeys(itemName);
*Step 5 *— A new item (Yey, Let’s add it to list) is added to the list. An assert is raised if the text in the newly added element does not match with the expected text.
The Quit WebDriver command (driver.Quit) is called once the test is complete so that the WebDriver session is closed properly and resources used by the WebDriver are freed in this MSTest tutorial for Selenium automation.
// Click on Second Check box

IWebElement secondCheckBox = driver.FindElement(By.Name("li2"));

secondCheckBox.Click();

// Enter Item name

IWebElement textfield = driver.FindElement(By.Id("sampletodotext"));

textfield.SendKeys(itemName);
Executing The MSTest Script
To execute the newly created test (NavigateToDoApp), go to Test and press Run All Tests.

The execution progress can be seen in the Test Explorer window which can be seen by going to menu-item View -> Test Explorer.

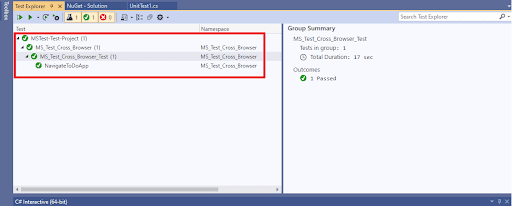
Shown below is an execution snapshot from Visual Studio. The Green tick mark indicates that the test execution completed successfully.
Shown below is the automated browser testing execution in action in the Chrome web browser:

This MSTest Tutorial for beginners and professionals will help you learn how to use MSTest framework with Selenium C# for performing Selenium automation testing.
A comprehensive end to end testing tutorial that covers what E2E Testing is, its importance, benefits, and how to perform it with real-time examples.
All In All
In this MSTest tutorial for Selenium, I took a deep-dive into automated web testing with Selenium C# using the MSTest framework to run your first MSTest Script for Selenium test automation. Interactions with the elements on the web-page were performed by using the relevant Selenium APIs. The code implementation used in this article can be scaled to execute complex Selenium test automation scenarios using Selenium C# with the MSTest framework.
This concludes this MSTest tutorial for Selenium to run your first MSTest script for Selenium test automation. I hope you found this article informative! We’ve also covered a whole series on Selenium C# tutorial, you can check it out to know more about automated browser testing using Selenium C#. Do share this article with your peers and colleagues looking to learn about Selenium test automation using MSTest. A retweet and share on LinkedIn is always welcome with open arms. That’s all for now. Happy Testing!!!

Top comments (0)