
Selenium is still the most sought-after framework when it comes to web automation testing. Though frameworks like Cypress, Puppeteer, PlayWright, etc., are playing the catch-up game, Selenium still rules the automation testing framework charts. As per my experience, every QA who wants to dabble with Selenium should have a good understanding of locators in Selenium WebDriver.
*Minify your XML code with our efficient and reliable online free tool XML minify for better website performance. Get faster page load times and better results today. Try Now! *
Playwright is an open-source, cross-browser automation framework that provides e2e testing without the need for any third-party tools. Learn what it is, how to install it, and how we can execute tests using Playwright.
Selenium locators can be considered as the building block of any type of Selenium automation test script. The reason is simple — locators in Selenium WebDriver help you in performing the requisite interactions with the elements in the DOM.
Choosing the best-suited locators in Selenium WebDriver is one of the keys to ensuring that the tests are less flaky (or brittle) — a factor that leads to the failure of Selenium automation tests. Picture this — there is a huge test suite, and choosing inappropriate locators in Selenium WebDriver can lead to a breakdown of the entire test suite!
Avoiding such a catastrophic situation when performing Selenium automation testing is essential, making it important to choose the right locator in Selenium WebDriver for interacting with the WebElements. In this Selenium testing tutorial, I deep dive into the multiple locators in Selenium WebDriver, along with demonstrating the usage of those locators. If you are a Selenium 4 user, make sure to check out the bonus section where I have covered relative locators in Selenium 4.
Starting your journey with Selenium WebDriver? Check out this step-by-step guide to perform Automation testing using Selenium WebDriver.
What are Locators in Selenium WebDriver?
For starters, Selenium is a test automation framework that lets you automate the interactions with the WebElements on the DOM. Interactions (or actions) can be a click, type, double click, etc. For example, the Action class in Selenium provides appropriate methods to perform keyboard and mouse actions on the elements in the DOM.
However, the first operation is to identify those WebElements on the document (or page) under test. This is where locators in Selenium WebDriver come into the picture.
Locators in Selenium WebDriver provide mechanisms for identifying HTML elements on the page. Selenium supports a number of different web locators, and you have to choose the one that meets your test requirements.
Let’s consider a simple example where you need to devise a test scenario using Selenium where the email address has to be automatically entered in the text box “Your email address”.
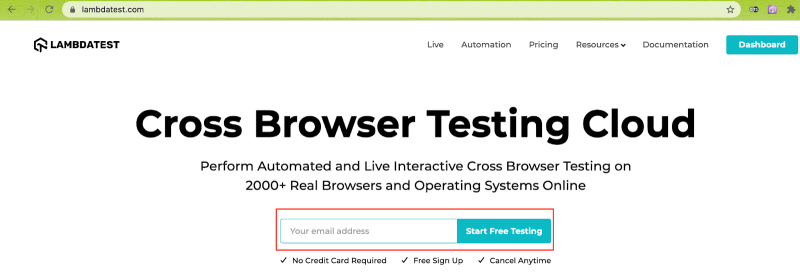
The first task in your Selenium automation script is to identify the text box WebElement and later use the sendKeys method in Selenium for entering the email address. The identification of the WebElement (or HTML element) is made using locators in Selenium WebDriver.
Tired of hard-to-read SQL code? Use our fast and reliable SQL Beautifier tool to format and beautify your SQL code, making it more structured and easy to read. Try Now!
Selenium WebDriver provides the findElement() and findElements() method to locate the WebElements using the appropriate web locator. Shown below is an example of how to use locators in conjunction with findElement() [or findElements()] method when using Selenium Java for web automation testing:

How to locate WebElements in DOM
Before any interaction can be performed on the WebElements in the DOM, the first task is to locate the elements in the DOM. Follow the below-mentioned steps to locate WebElements in the DOM (Document Object Model).
- Open the target application and click on F12 or right-click and select inspect.
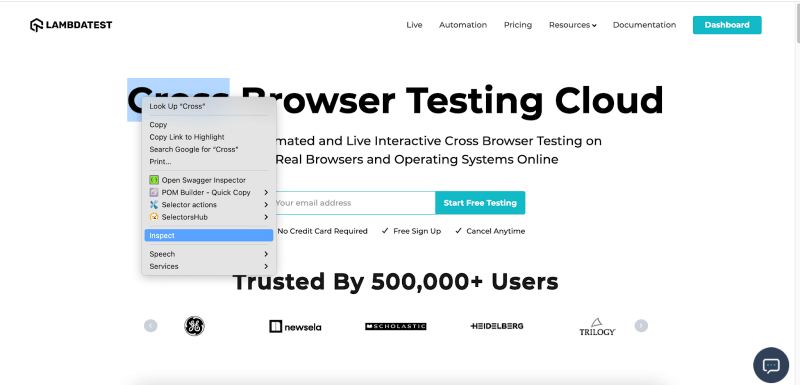
- A console window would open known Developer tools.

- There is a mouse icon on the left-most side of the ‘Inspect Element’ tool. Once you hover over it, a message titled ‘Select an element in the page to inspect it’ will appear.
Click on it and navigate to the element you wish to locate. Once you click on the element, the DOM would be highlighted for that element a shown below:

-
The selected row in the DOM is the context from where you want to fetch the values. For example, the highlighted DOM value is shown below:
Now you can choose the tagname, i.e., ‘a’ and link text, i.e., ‘Dashboard,’ to locate the desired element. The above technique will be used throughout my blog to demonstrate the usage of different locators in Selenium WebDriver.
*Struggling with messy Lua scripts? Our Lua Beautifier tool provides clean and structured formatting. Beautify your code and Improve readability today! Try Now! *
Different types of Locators in Selenium WebDriver
Below is the list of these locators of Selenium WebDriver:
ID
Name
ClassName
LinkText
Partial LinkText
TagName
CssSelector
XPath
As mentioned earlier, Selenium WebDriver provides different web locators for locating WebElements on the page. Here are the different locators in Selenium WebDriver that I will be covering in-depth in the latter part of the blog:

Using locators in Selenium 4 is a treat due to the introduction of relative locators in Selenium 4. The introduction of locators like above(), below(), toLeftOf(), toRightOf(), and near() makes it easy to locate WebElements in relation to a particular WebElement.
This Selenium WebDriver Tutorial for beginners and professionals will help you learn what’s new in Selenium 4 (Features and Improvements).
How to identify elements using Locators in Selenium WebDriver
Now that I have covered the essentials of Selenium locators (including the additions in Selenium 4), let me deep-dive into each locator in Selenium WebDriver in more detail.
Want to convert YAML to XML? Save time and effort by converting your YAML files to XML with our free online tool. Fast, easy, and efficient. No signups required. Try Now!
ID Locator In Selenium
ID locator in Selenium is the most preferred and fastest way to locate desired WebElements on the page. ID Selenium locators are unique for each element in the DOM.
Since IDs are unique for each element on the page, it is considered the fastest and safest method to locate elements. But unfortunately, developers may or may not follow this rule as browsers do allow bypassing this rule.
Specifically, in the case of a table or list, the IDs may populate incrementally or dynamically depending upon the data in the table. In such cases, testers use other locators in Selenium WebDriver to locate the desired element on the page.
One of the Selenium best practices is to leverage the capabilities offered by the ID locator in Selenium since it is the fastest locator of the entire lot. Therefore, choosing the ID locator over other locators in Selenium WebDriverwill go a long way to speed up Selenium test case execution.
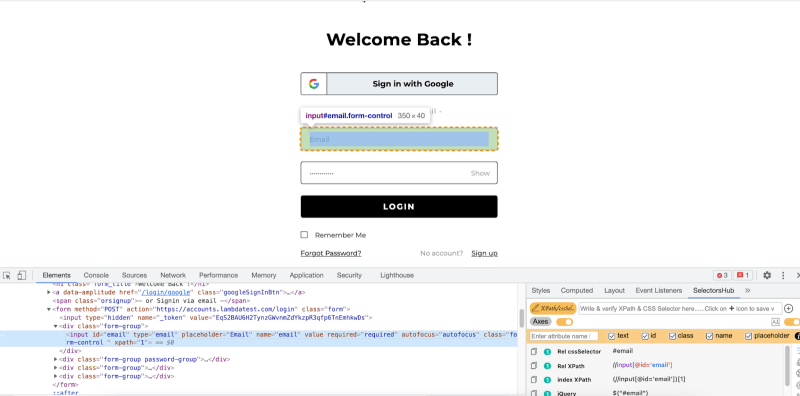
Below is an example of the LambdaTest Login page showcasing how the ‘login’ field is being located via ID:

I have used the SelectorsHub tool to locate the desired WebElement using the ID locator. Below is the DOM structure of the element:
<input id="email" type="email" placeholder="Email" name="email" value="" required="required"
autofocus="autofocus" class="form-control " xpath="1">
The below method is used for locating the desired element using the ID locator:
driver.findElement(By.id("email"))
If no element in the DOM matches with the required ID, NoSuchElementException is thrown. Therefore, it is important to have a good know-how of the common exceptions in Selenium to build a more robust Selenium test suite.
This certification is for anyone who wants to stay ahead among professionals who are growing their career in Selenium automation testing.
Here’s a short glimpse of the Selenium 101 certification from LambdaTest:
*Need to convert XML to CSV? Simplify your data conversion process with our XML to CSV Converter tool. Convert your XML files to CSV format quickly and easily in seconds! Try Now! *
Name Locator In Selenium
An element can be defined via multiple attributes, one such attribute is Name. Name locator in Selenium WebDriver can also be used to locate elements like an ID locator.
Unlike ID locators, which are unique for a page, the Name locator may or may not have a unique value. If there are WebElements with the same name, the locator selects the first element with that Name on the page.
In case no such name matches with the defined attribute value, NoSuchElementException is raised.
To demonstrate the usage of the Name locator in Selenium WebDriver, we identify the same WebELement that was earlier located using the ID locator.
<input id="email" type="email" placeholder="Email" name="email" value="" required="required" autofocus="autofocus" class="form-control " xpath="1">
Here is how the desired WebElement was located using the Name locator in Selenium:
driver.findElement(By.name("email"));
‘Link Text’ Locator In Selenium
Elements can be located via link text that is present in the hyperlinks. For example, the first link would be selected in a scenario where there are multiple links of the same text.
However, this Identifier strategy can only be used for elements that have an anchor(a) tag.
Below is an example of Lambdatest homepage showcasing the selection of the ‘Automation’ link that is available on the header. The DOM below shows the highlighted element:
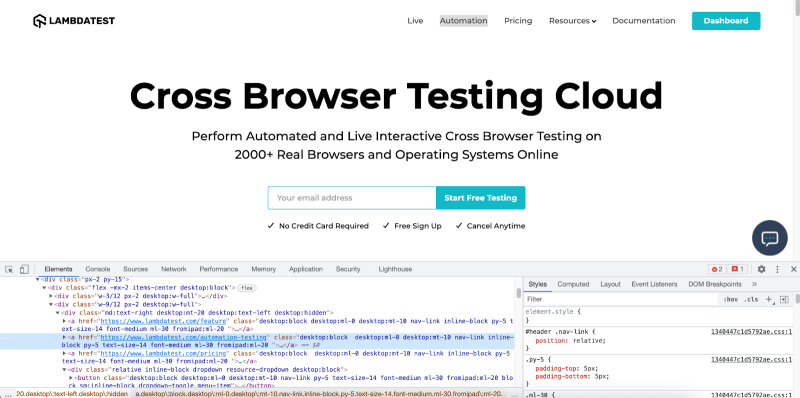
Below is the DOM structure of the same:
<a href="https://www.lambdatest.com/automation-testing" class="desktop:block desktop:ml-0 desktop:mt-10 nav-link inline-block py-5 text-size-14 font-medium ml-30 fromipad:ml-20 ">Automation</a>
Here is how the desired WebElement was located using the linkText locator in Selenium:
driver.findElement(By.linkText("Automation"));
*Effortlessly convert SQL data to HTML tables with our feature-rich SQL to HTML Converter. Streamline data representation and communicate insights effectively. Try Now! *
Partial Link Text Locator In Selenium
There is a provision to locate a WebELement using Partial Link Text akin to the normal Link Text locator in Selenium. Locating WebElements using partial link text is preferred when the link text is too long.
Here, the partial text helps identify a unique element and use it to perform further actions on it. Sometimes, using this can also be to locate multiple links on a page with a common partial text.
Below is a snapshot of the LambdaTest DOM highlighting the element with the link name as ‘Start testing.’ Instead of using the complete link text, I use the partial link text locator to locate the element using the ‘testing’ link text.

Here is the DOM structure of the element:
<a href="https://www.lambdatest.com/test-on-ios-devices">Test on iOS Simulator</a>
Here is how the desired WebElement was located using the partial link text locator in Selenium:
driver.findElement(By.name("email"));
The syntax for locating element by partial link text is:
driver.findElement(By.partialLinkText ("Simulator"));
TagName Link Text Locator In Selenium
As the name specifies, this CSS locator in Selenium WebDriver is used to identify elements using Tag names like div, table, h1, etc.
The TagName locator is commonly used to identify all the links on a page and identify broken links in Selenium.

Here is the syntax of locating all the links on the LambdaTest homepage:
driver.findElements(By.tagName("a"));
Get faster loading times and better user experience with our efficient JSON Stringify tool. Quickly compress your JSON data with ease and optimize your website now. Try Now!
Watch this video to learn what the Actions Class is in Selenium and how to use it.

ClassName Locator In Selenium
Class Name locator is used for locating WebElements that are defined using the class attribute. Shown below is the DOM snapshot of the LambdaTest login page.

For locating the ‘login’ element via the ClassName locator in Selenium, we use the class attribute in the following DOM structure:
<button id="login-button" data-amplitude="" type="submit" class="btn btn-dark submit-btn" css="1">Login</button>
Here is how the desired WebElement was located using the ClassName locator in Selenium:
driver.findElement(By.className("submit-btn"));
XPath Locator In Selenium
XPath locator in Selenium helps in locating elements on the web page using XML expressions. The basic syntax used for using XPath as a CSS locator in Selenium WebDriver is shown below:
XPath: //tagname[@attribute = 'value']
Here, TagName in Selenium signifies the tag in the DOM structure that you are targeting to locate the desired WebElement. TagName can be input tag, anchor tag, etc.
Attributes are defined via the prefix ‘@’ and their corresponding value. Thus, attributes like Name, ID, Class, etc., can be used along with TagName.
XPath in Selenium can be used in multiple ways, as shown below:
- Standard XPath
As the name indicates, this is the most basic (or standard) way of writing an XPath. To demonstrate the usage of a standard XPath locator in Selenium, let’s locate the email element on the LambdaTest homepage.

Below is the DOM structure of the element:
<input type="email" name="email" value="" placeholder="Email" required="required" autofocus="autofocus" class="form-control mt-3 form-control-lg">
The standard XPath of the desired WebElement is //input[@name= ’email’]. Here is how the XPath is used with the findElement() method to locate the element.
driver.findElement(By.xpath("//input[@name= ’email’]"));
- XPath Contains
XPath similarly contains works like CSS selector ‘contains.’ It is extensively used on WebElements whose value is changing dynamically.
Consider an example where the value of the login changes after appending the login text. Here, XPath contains will be super-helpful in locating the desired WebElement.
Syntax:
//tagname[contains(@attribute, ‘partial value of attribute’)]
Below is the DOM structure of the element:
<input type="text" placeholder="Full Name*" name="name" value="" class="form-control sign-up-input-2 ">
Here is how the desired WebElement was located using the ‘XPath contains’ locator in Selenium:
driver.findElement(By.xpath("//input[contains(@class, ‘form-control’)]"))
*Tired of manually creating JSON data? random JSON Generator, Generate data in seconds which is easy-to-use tool. Try it now and make your development process a breeze! Try Now! *
XPath using ‘AND’ & ‘OR’
The ‘AND’ & ‘OR’ operators in the XPath selector in Selenium are used when locating a WebElement based on certain condition sets. In the case of ‘AND,’ both the conditions should be True. On the other hand, either of the two conditions can be true for ‘OR’ in operator XPath.
Syntax of OR operator in XPath:
//input[@id='login_1' OR @name='login’]
Syntax of AND operator in XPath:
Let’s locate the email login element on the LambdaTest homepage using the ‘AND’ & ‘OR’ operators.

Below is the DOM structure of the element:
<input type="email" name="email" value="" placeholder="Email" required="required" autofocus="autofocus" class="form-control mt-3 form-control-lg">
Here is how we used the OR operator with XPath locator in Selenium:
driver.findElement(By.xpath("//input[@type='email' OR @name='email']"));
Here is how we used the AND operator with XPath locator in Selenium:
driver.findElement(By.xpath("//input[@type='email' AND @name='email']"
starts-with() method in XPath
The starts-with() method in XPath offers functionalities that are similar to the CSS Selector in Selenium. It helps in locating elements that start with a specified attribute value. The starts-with() method in XPath is majorly used for locating WebElements whose value changes on the refresh of a page.
Syntax:
//tagname[starts-with(@attribute,'starting name of the attribute value')]
Shown below is the DOM structure for locating the Password field on the LambdaTest signup page:
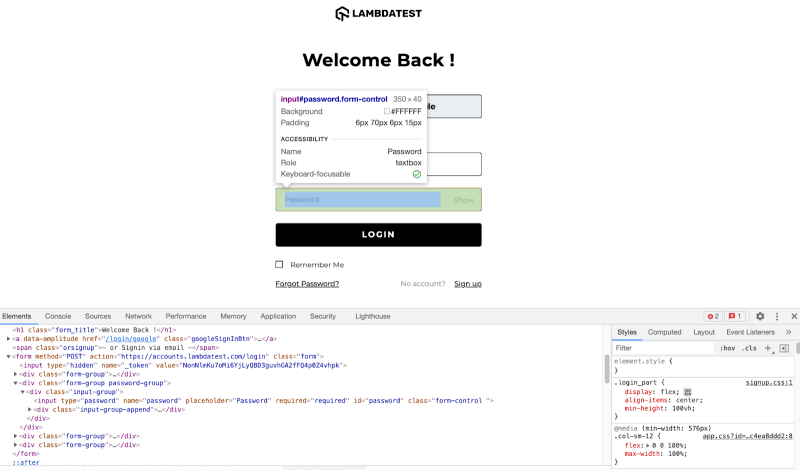
Below is the DOM structure of the element:
<input type="password" placeholder="Desired Password*" name="password" class="form-control sign-up-input-2 "
Here is how we locate the Password element using the starts-with() method with XPath in Selenium:
driver.findElement(By.xpath("//input[starts-with(@name,'pass')]"));
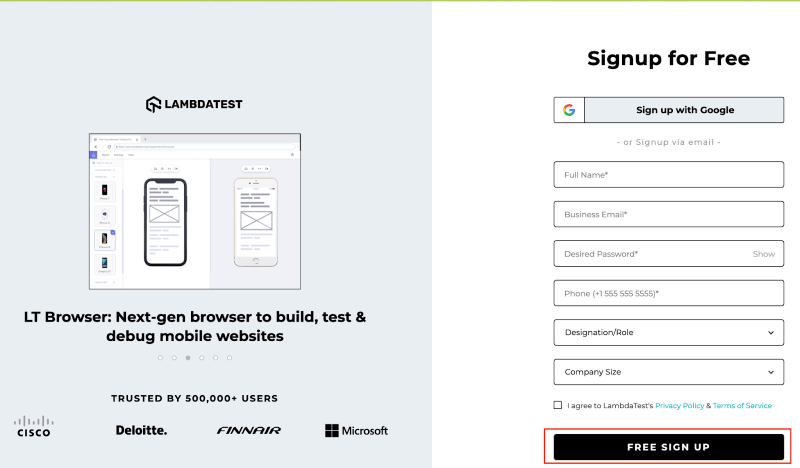
XPath Text
Text in the XPath locator in Selenium helps in locating WebElements via XPath using exact text match. It can be used when elements have to be located by looking into the tags containing certain text.
Syntax:
//div[text()='Logged In']
To demonstrate XPath text usage, we locate the ‘FREE SIGN UP’ button on the LambdaTest registration page.

Here is the DOM structure of the required WebElement:
<button class="btn btn-dark submit-btn g-recaptcha">Free Sign Up</button>
Here is how we locate the ‘FREE SIGN UP’ button element using the XPath text:
driver.findElement(By.xpath("//button[text()='Free Sign Up']"));
Both CSS Selector and XPath are useful when running complex Selenium test automation scenarios. Though I use XPath extensively, the choice between XPath and CSS Selector purely depends on the scenario complexity and your convenience in locating WebElements using the corresponding locator.
When choosing, always look into the maintainability aspects of the locators, as that can make your job easier! Been there, done that by choosing the relevant locators in Selenium WebDriver when strategizing the Selenium automation testing strategy 🙂
*Need a quick placeholder image for your project? Use our online placeholder image generator tool that helps you generate customizable images for your projects. Try Now! *
CSS Selector Locator In Selenium
CSS (Cascading Style Sheets) is used to style web pages. At the same time, CSS is also one of the widely-used ways to locate WebElements in the DOM.
CSS Selector in Selenium should be opted if you cannot locate an element using ID or Name locators. It can be chosen over the XPath locator.
Since multiple debates go around the corner for both of them, their usages for me depend on the complexity of the scenario. However, most people prefer using CSS selectors since those are faster than XPath.
Here are the different ways in which QA engineers can make use of CSS Selectors in Selenium:
Tag and ID in CSS Selector
To locate elements by Tag and ID, you have to use the following components:
Html tag: It provides the tag we wish to locate (e.g. input tag).
#: It is used to represent the ID attribute. Keep in mind that when you wish to locate an element via ID through a CSS selector, it must have a hash sign on the same. For other attributes, we need not use the hash sig
Value of the ID attribute: This represents the value of the ID we are using to locate the element.
Syntax
css=(Html tag )(#) (value of the ID attribute)
Example
Below is the DOM part indicating the login field of Makemytrip.com

<input type="password" name="password" placeholder="Desired Password*" required="required" id="userpassword" minlength="8" class="form-control " aria-autocomplete="list" xpath="1">
*Need to protect your data? Our SHA384 Hash Calculator creates secure, reliable, one-way hashes quickly and easily with just a few clicks. Try it out now! Try Now! *
Here is how you can locate the required WebElement using the CSS Selector:
driver.findElement(By.cssSelector("input#userpassword"))
Tag and Class in CSS Selector
Apart from the syntax (or format) difference, the said locator is pretty much identical to the ID locator. A dot (.) is used when denoting the class attribute value rather than hash (#) in the case of class.
Syntax
css=(HTML tag)(.)(Value of Class attribute)
Example
Here is the DOM snapshot and the corresponding command to access the required WebElement using CSS Selector in Selenium:

<input type="text" placeholder="Full Name*" name="name" value="" required="required" class="form-control " xpath="1">
This is how the Submit button is located using CSS Selector in Selenium
driver.findElement(By.cssSelector("button.submit-btn"))
Tag and Attribute
The element can be located via tag name, and the corresponding attribute is defined using its value. In case multiple elements have the same tag and attribute, the first one will be selected.
Syntax
css=(HTML Page)[Attribute=Value]
Example
Here is the DOM structure:
<input type="phone" placeholder="Phone*" name="phone" value="" class="form-control sign-up-input-2 ">
Here is how the WebElement — ‘phone’ can be located using the CSS Selector in Selenium:
driver.findElement(By.cssSelector("input[name=\"phone\"]"))
Tag, Class, and Attribute
This locator is used with the class name and other attribute values.
Syntax
css=(HTML tag>)(. )(Class attribute value)([attribute=Value of attribute])
Let’s locate the ‘Free Sign Up’ button on the LamdaTest Signup page:
Here is the DOM structure of the ‘FREE SIGN UP’ WebElement:
<button data-sitekey="6LceAqQaAAAAAO0LcIgLnXy3gH_M3X5aDrqUihHw" data-callback="onSubmit" data-amplitude="R_sig
Here is how you can locate the ‘FREE SIGN UP’ button the LambdaTest signup page:
driver.findElement(By.cssSelector("button.submit-btn[data-callback=\"onSubmit\"]"));
This combination can also be implied on ID. The only difference is to use a hash (#) rather than a dot (.) when using an ID attribute and defining its ID value in place of the Class value.
*Tired of manually replacing text? Use our online string find and replace string tool lets you quickly search for and replace text in any document. Try it now! Try Now! *
Wild (*, ^ and $) in CSS for classes
Selenium CSS selector in Selenium helps in matching multiple strings through the use of multiple patterns like ^, $, *. Wildcard selectors in CSS are used for selecting multiple elements simultaneously.
Here are the ways in which wild cards can be effectively used with the CSS Selector in Selenium:
a. Starts-With in CSS Selector
The Starts-With helps locate elements when we try to match elements with a string that starts with a designated value.
Syntax
css=(HTML tag)([attribute^=start of the string])
Example
Here is the DOM structure for locating the WebElement:
<input type="email" name="email" value="" placeholder="Email" required="required" autofocus="autofocus" class="form-control mt-3 form-control-lg">
Here how the CSS [attribute^=value] Selector is used for locating the desired WebElement:
driver.findElement(By.cssSelector("input[name^='em']"));
b. Ends-With in CSS Selector
This helps locate elements when we try to match elements with a string that ends with a designated value.
Syntax
css=(HTML tag)([attribute$=end of the string])
Example
Here is the DOM structure of the element:
<input type="email" name="email" value="" placeholder="Email" required="required" autofocus="autofocus" class="form-control mt-3 form-control-lg">
Here is how Ends-With in CSS Selector is used for locating the required WebElement:
driver.findElement(By.cssSelector("input[name$='ail']"));
c. Contains in CSS Selector
This helps locate elements when we try to match elements with a string containing a designated value.
Syntax
css=(HTML tag)([attribute*=partial string])
Example
Here is the DOM structure to locate the element:
<input type="email" name="email" value="" placeholder="Email" required="required" autofocus="autofocus" class="form-control mt-3 form-control-lg">
Here is how Contains in CSS Selector is used for locating the required WebElement:
driver.findElement(By.cssSelector("input[class*='control']"));
d. Child Elements in CSS Selector
With the use of child elements, we can locate elements inside other elements. Child Elements in CSS Selector is particularly useful when trying to access data from a table, list of details, and more.
Example
For demonstrating the usage of Child Elements in CSS Selector, we locate a Child Element with reference to a particular element. The URL under test is the LambdaTest Blog link in the menu on the LambdaTest home page.

Here is the DOM structure to locate the element:
<ul class="dropdown-menu resource-dropdown-menu >
       <a href="https://www.lambdatest.com/blog/" class="inline-block >Blog</a>
       <a href="https://www.lambdatest.com/certifications/" class="inline-block >Certifications</a>
       <a href="https://www.lambdatest.com/learning-hub/" class="inline-block >Learning Hub</a>
       <a href="https://www.lambdatest.com/webinar/" class="inline-block >Webinars</a>
        <a href="https://www.lambdatest.com/video/" class="inline-block >Videos</a>
         <a href="https://www.lambdatest.com/newsletter/" class="inline-block >Newsletter</a>
         <a href="https://community.lambdatest.com" class="inline-block>Community</a>
       <a href="https://www.lambdatest.com/customers/" class="inline-block>Case Studies</a>
       <a href="https://www.lambdatest.com/blog/category/lambdatest-updates/" class="inline-block >Product Updates</a>
      </ul>
In order to locate element, the following syntax would be used:
Css= tagname.class name li:nth-of-child(index of the referenced child which in our case is 3)
Here is how you can get the blog link from the page:
driver.findElement(By.cssSelector("ul.dropdown-menu a:nth-child(1)");
Similarly in order to access responsive we can use, last-child reference as below:
Css= ul.dropdown-menu a
driver.findElement(By.cssSelector("ul.dropdown-menu a:last-child");
Blog on CSS Selectors in Selenium Automation Scripts is a good resource to further drill down into the CSS Selectors in Selenium.
Relative Locators In Selenium WebDriver
One of the major features of Selenium 4 is the introduction of relative locators. Relative locators in Selenium 4 help you search for WebElements in relation to the other elements.
For example, using toLeftOf Selenium 4 relative locator, WebElements to the left of a certain element can be easily located. This results in a few findElement calls primarily used for locating elements on the page.
The difference between Selenium 3 and Selenium 4 is a good starting point to know the immense potential offered by the Selenium 4 framework. Here is a short gist of relative locators in Selenium 4:

Selenium 4 Learning Hub is the go-to resource to check what’s new in the Selenium 4 framework.
To demonstrate the usage of relative locators in Selenium 4, we locate the WebElements on the LambdaTest Certifications Page.

The first unique WebElement on the page is located using the following method:
WebElement FirstElement = driver.findElement(By.Id("idvalue"));
Here is how below relative locator in Selenium 4 is used to locate the element below the Element we searched earlier:
driver.findElement(with(By.tagName("tageName")).below(FirstElement));
The next set of WebElements on the page are identified using the above, below, toLeftOf, and toRightOf locators in Selenium 4:
Here is the code snippet that showcases the usage of relative locators in Selenium 4:
WebElement newCertification = driver.findElement(By.linkText("Cypress 101"));

WebElement findviaBelow = driver.findElement(with(By.tagName("h4")).below(newCertification));
System.out.println("fetched via Below : "+findviaBelow.getText());

WebElement fetchviaToTheRight = driver.findElement(with(By.tagName("h4")).toRightOf(findviaBelow));

System.out.println("fetch via ToTheRight :"+fetchviaToTheRight.getText());

WebElement fetchviaabove = driver.findElement(with(By.tagName("h4")).above(fetchviaToTheRight));
System.out.println("fetch via above : "+fetchviaabove.getText());

WebElement fetchviatoLeftOf=driver.findElement(with(By.tagName("h4")).toLeftOf(fetchviaabove));
System.out.println("fetched via toLeftOf :  "+fetchviatoLeftOf.getText());
Shown below is the console output:
fetched via Below: Selenium C# 101
fetch via ToTheRight: Selenium Java 101
fetch via above: Selenium Python 101
fetched via toLeftOf: Cypress 101
You can also use a combination of relative locators to locate the desired WebElement.
WebElement fetchwithmutipleRelative=driver.findElement(with(By.tagName("h4")).below(fetchviatoLeftOf).toRightOf(fetchviaabove));
This code identifies an element, which is below a given WebElement and to the right of the newly searched element.
*Say goodbye to manual coding errors with our HTML Escape tool to simplify HTML coding process. Escape special characters quickly — try it out today! Try Now! *
Best practices for using Locators in Selenium WebDriver
The main challenge in writing automation scripts lies in locating the right identifier for the target element. Following certain best practices will ensure that the team uses strategy efficiently to locate elements used in automation scripts.
Following are some of the best practices for using locators:
Use a unique ID for element identification
The first and main reason to use a unique ID is that it makes it simpler to identify a particular element. If you have two elements with the same ID, it becomes difficult to determine which element you want to use in your scripts. This may lead to issues such as selecting an incorrect element or a non-existent one. To avoid this, always assign a unique ID for each element you wish to utilize in your web application to avoid this.Avoid using Ids that change locations
Selenium WebDriver locators depend on IDs because they match the ID attribute assigned by browsers, which is used as identifiers for each HTML tag on your page. The value of these IDs remains static as long as the browser window remains open. However, if you close and reopen the browser, these values change their position due to the fact that they now identify different objects on the page.For example, if the locator is dependent on a single entity like class, name, id, etc., which, if changed, can be repaired but complex locators like By.XPath(“//div[@class=”class-form_6180″]/div[5]/h3”) may lead to frequent breakage if any of the div or the class name changes.
So, while using locators in Selenium WebDriver, do not locate elements that depend on auto-generated values. This is one of the key rules that one needs to keep in mind about locators in Selenium WebDriver for writing better automation code.
Keep your Locators short
Your locator should always identify the exact target element you want to click or locate and not other elements that are present on the same page. The benefit of this is that you’re reducing the chance of your script breaking because the number of elements on a page has changed (and thus, where they appear in the HTML code). Also, if your locator is short, it’s easier to see if it’s affecting more than one element.Secondly, if you are trying to look out for multiple matches (using ‘findElements’), ensure it matches all the desired elements you are looking out for.
Avoid elements that depend on auto-generated values
If you are using locators such as ID, CSS, and XPath, Selenium WebDriver provides a way to navigate to elements through the browser’s address bar. This is accomplished by using the locateElement() or locateElementBy*() methods. You can navigate to any element on the page by using the browser’s address bar and its locator parameters and values and this method. However, if you use IDs (e.g., “id=”tooltip””) as locators, it might not work quite as you expect. This is because IDs are auto-generated and do not always change when we expect them to.As a best practice, the first thing we should do is always use locators such as CSS and XPath instead of IDs as they never change their value. The second thing we should do is to watch those values after each run. So, if we want to locate an element with an ID of tooltip using the browser’s address bar, we should run and watch the values of those IDs to identify if they are auto-generated or not.
Don’t use XPath or CSS Selector provided by the Dev Tools
Choosing locators in Selenium is an important step, especially when you are new to it. There are many tips and tricks available on the web regarding this topic. But most of them suggest using XPath or CSS selectors provided by the browser’s dev tools.-
However, if you use XPath or CSS Selectors provided by the browser’s dev tools, your tests will not work if the source code is changed. To have stable tests, you should use locators that are independent of HTML structure.
Conclusion
With this, we come to the end of the tutorial on Selenium Locators. In this tutorial on locators in Selenium WebDriver, we first looked at different ways of locating WebElements in DOM. We also looked at different types of locators and relative locators used in Selenium and ways to locate elements using the id, name, class, and attribute selectors.
Selenium locators can be used as a handy resource when you are performing Selenium automation testing. When it comes to Selenium automation testing, Selenium like LambdaTest offer the broadest set of cloud-based testing capabilities. With a single Selenium Grid node, you can access 3000+ browsers and operating systems for cross browser testing, and more.
Now that you have learned how to use locators and relative locators in Selenium WebDriver, you should be able to work with locators effectively. I hope that this tutorial has helped you learn everything there is to know about using locators in the Selenium WebDriver.


Top comments (0)