Selenium is a popular automation testing framework that is primarily used for cross browser testing. It is an open-source framework that is primarily used for automating testing of web applications (and websites) across a range of browsers like Firefox, Chrome, Internet Explorer, Microsoft Edge, etc.
If you are a Selenium enthusiast, you would have definitely tried out Selenium 4 – the latest version of the Selenium framework. Selenium 4 has been in the works since the last three years and we have been toying around with Selenium 4 since the time it was in the Alpha stage.
Relative locators, renewed Selenium Grid implementation, W3C compliance and super-powerful newly architectured Selenium Grid are some of the talking points of Selenium 4.
In this Selenium WebDriver tutorial, we deep dive into the essential components of Selenium framework including Selenium WebDriver architecture, performing cross browser testing using Selenium, along with touching upon the most useful features of the Selenium 4 framework.
This Selenium WebDriver Tutorial for beginners and professionals will help you learn what’s new in Selenium 4 (Features and Improvements).
This Cypress automation testing tutorial will help you learn the benefits of Cypress automation, and how to install Cypress and execute Cypress automation testing over scores of browsers and operating systems online.
What is Cross Browser Testing ?
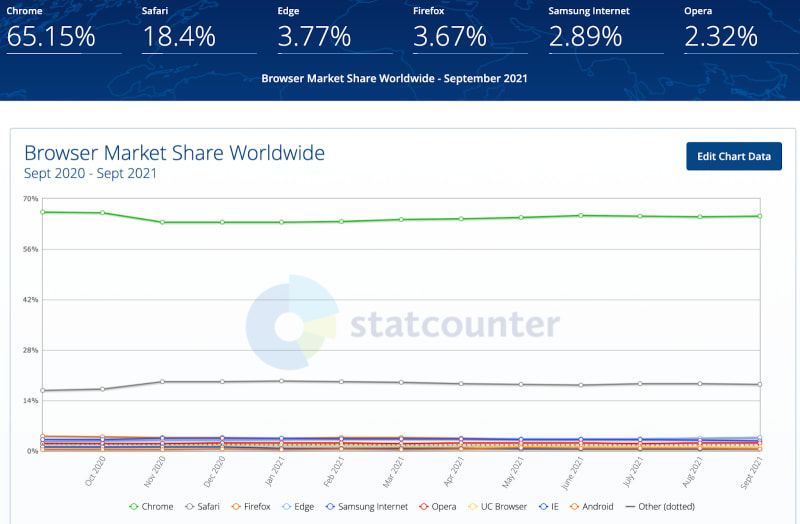
Cross browser testing is the process of testing a website or web application on different combinations of browsers and browser versions. The browser market share for desktops is a clear indicator about the fragmentation that exists in the desktop browser market.
Though Internet Explorer (IE) does not surface in the list of prominent browsers, the fact is that testing on Internet Explorer is still relevant as a certain percentage of users still use IE as their primary web browser. As every browser has its own rendering engine, there is a possibility that certain functionalities might not work (as expected) on those browsers and operating systems.
Cross browser compatibility testing is an approach through which you can test your website (or web application) on different browsers, browser versions, and operating systems. It is essential for ensuring that the product experience is uniform across browsers and platforms (or operating systems).
This Playwright automation tutorial will guide you through the setup of the Playwright framework, which will enable you to write end-to-end tests for your future projects
Why use Selenium for Cross Browser Testing ?
For starters, Selenium is a popular open-source framework that is used for cross browser testing or automation testing of websites (or web applications). The Selenium framework provides language bindings for popular programming languages like Python, Java, JavaScript, C#, Ruby, and PHP.
Shown below is the overall timeline (or version history) of the Selenium framework:
On the whole, Selenium is a powerful test automation framework that is not only instrumental in web automation testing but also helps in accelerating the overall software release via integration with popular CI/CD tools like Jenkins, TeamCity, GitLab CI, and more. The only downside about Selenium is that it cannot be used for automation desktop applications.
Selenium versions prior to Selenium 4 were using the JSON Wire Protocol for communicating between the client and server. However, JSON Wire protocol is retiring in Selenium 4, as WebDriver W3C protocol is used in the Selenium 4 framework. This essentially means that your cross browser tests would be more stable (or less flaky) when the tests are performed on the Selenium 4 Grid.
In case you are looking for the Selenium 4 upgrade guide, make sure to check out our blog that deep dives into how to upgrade from Selenium 3 to 4.
Selenium framework is designed in a manner that updates (or enhancements) in the browsers have minimal impact on the test scenarios. Interaction with the WebElements on the page that is rendered on the browser is facilitated via the browser drivers.
Now that we have covered the basic essentials of the Selenium framework, let’s look into the what and how of cross browser testing in Selenium.
Seamless User Experience
Every web product consists of the front end and back end. HTML, CSS, and JavaScript are some of the most widely-used web languages for front-end development. On the other hand, the back-end can be developed using popular programming PHP, Python, Java, amongst others.
Also, every web browser uses a different rendering engine and JavaScript engine that might result in differentiated experience across different web browsers. For example, Google Chrome uses Blink engine, Mozilla Firefox uses Gecko engine, Apple Safari uses WebKit engine, and so on.
Role of rendering engines in browsers has played a major role in the importance of cross browser testing of websites (and web applications). In a nutshell, cross browser testing is required to ensure that your website (or web app) visitors are presented with a uniform experience, irrespective of the browser, browser version, or OS being used for accessing the same.
Increased Browser Coverage
Browser coverage is an integral aspect of test coverage. The primary agenda of cross browser testing is to perform testing on different browsers and version combinations.
Using Selenium for cross browser testing helps in rigorous testing of the code across multiple browsers; thereby helping achieve better browser coverage. This in turn helps in improving the user experience across the target web browsers. Browser compatibility matrix can be instrumental in prioritizing the web browsers that are in use by the target audience.
Shorter Release Cycles
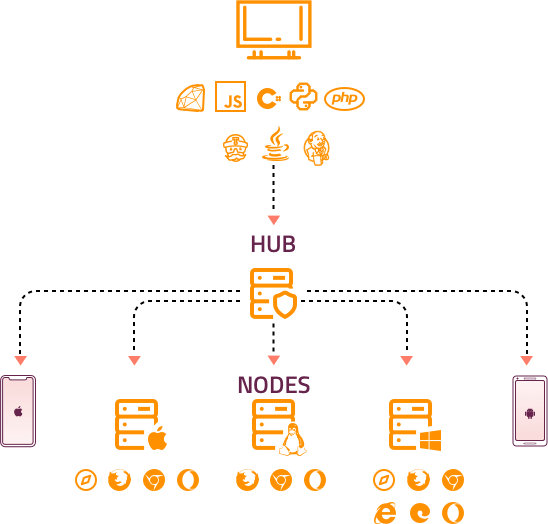
True potential of cross browser testing with Selenium can be exploited by running tests on a Selenium Grid. The Selenium Grid is a Hub-Node (or Client-Server) based architecture that lets you run cross browser tests in parallel on different browser and OS combinations.
Based on the test combination, Hub in Selenium Grid hands over the test execution to the best-suited Node.
The in-house Selenium Grid infrastructure can help in expediting test execution but at the expense of higher maintenance and lower reliability.
Major release bottlenecks like high test flakiness, high test execution time, low test reliability and mounting infrastructure costs can be fixed by migrating cross browser tests to a secure, reliable, and scalable cloud Grid like LambdaTest.
The combination of cloud grid, parallel cross browser testing using Selenium, and integration with the best CI/CD tools can be instrumental in achieving improved product quality and accelerated time to market.
It's crucial to debug websites for Safari before pushing them live. In this article, we look at how to debug websites using Developer tools for Safari
Selenium WebDriver Architecture
Before we get our hands dirty with cross browser testing using Selenium, let’s have a brief look at some of the integral components of the Selenium Suite. Apart from Selenium Grid, the Selenium IDE and Selenium Grid are the major components of the Selenium Suite.
Selenium RC (Remote Control) which was a part of Selenium suite until V2, was officially deprecated in Selenium v3. Selenium WebDriver can be considered as the soul of Selenium, as it helps in establishing the communication with the web browser through its corresponding browser driver.
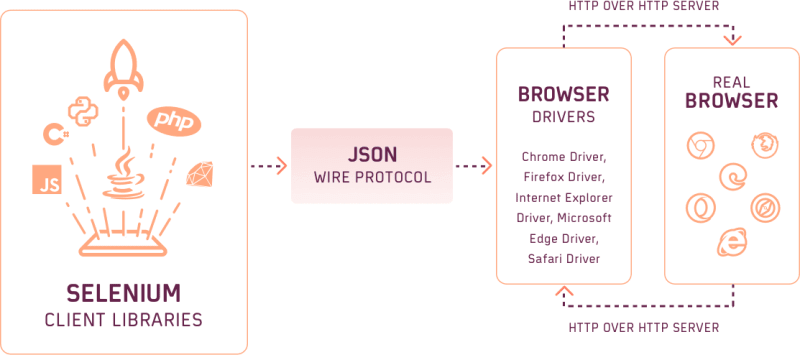
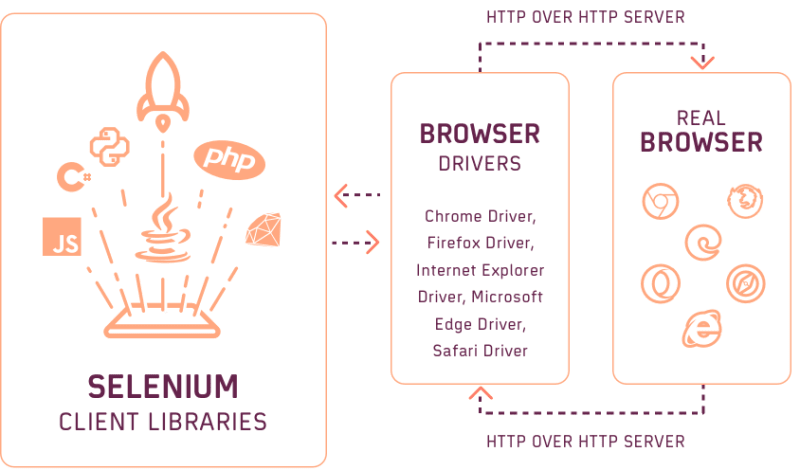
The JSON Wire protocol which was used for communication between the Selenium Client libraries and Browser Drivers is no longer a part of Selenium 4. The JSON Wire protocol in Selenium 3 is replaced with W3C WebDriver protocol in Selenium 4, there is no necessity of encoding and decoding of test requests. You can expect better test stability when using the Selenium 4 framework.
Shown below is the pictorial representation of the Selenium 3 WebDriver Architecture:
As Selenium 4 is compliant with the W3C WebDriver, there is no necessity of encoding and decoding the test requests. Shown below is the pictorial representation of the Selenium 4 WebDriver Architecture:
Demonstration: Cross Browser Testing using Selenium
Finally, let’s get our hands dirty with cross browser testing using Selenium. We would be running tests on LambdaTest Selenium grid. Website testing on cloud provides numerous benefits, the major ones are listed below:
- Reliable and accelerated test execution
- Massive reduction in test flakiness
- Shorter release cycles and faster TTM (Time to Market)
- Improved product user experience owing to cross browser compatibility tests being conducted on a range of browser, OS, and viewport combinations
Parameterized testing in Selenium and data driven testing in Selenium are two major options to realize cross browser testing using Selenium at a scale. Though the mechanism of reading test parameters differ in the two cases, the primary goal of performing cross browser tests across different test combinations is met.
Now that you are aware of the major advantages offered by a cloud Selenium Grid, let’s look at a simple demonstration of cross browser testing using Selenium.
Test Scenario
- Open MVC ToDo App
- Add 5 new items in the list
- Delete all the items till the ToDo list is empty
- Assert if the list is not empty
Cross Browser Test Combinations
| Browser | Browser Version | Platform |
|---|---|---|
| Chrome | latest | Windows 10 |
| Firefox | latest | Windows 10 |
| Microsoft Edge | latest | MacOS Catalina |
_Inspect web elements to help developers and testers to debug UI flaws or make modifications in HTML or CSS files. Learn how to inspect on MacBook.
_
Implementation
The demonstration of cross browser testing is done using the TestNG framework with Selenium. We have used the IntelliJ IDEA IDE, however you have the flexibility of using Eclipse IDE for development. TestNG Eclipse step-by-step guide is the ideal resource in case you are just getting started with TestNG with Selenium using the Eclipse IDE.
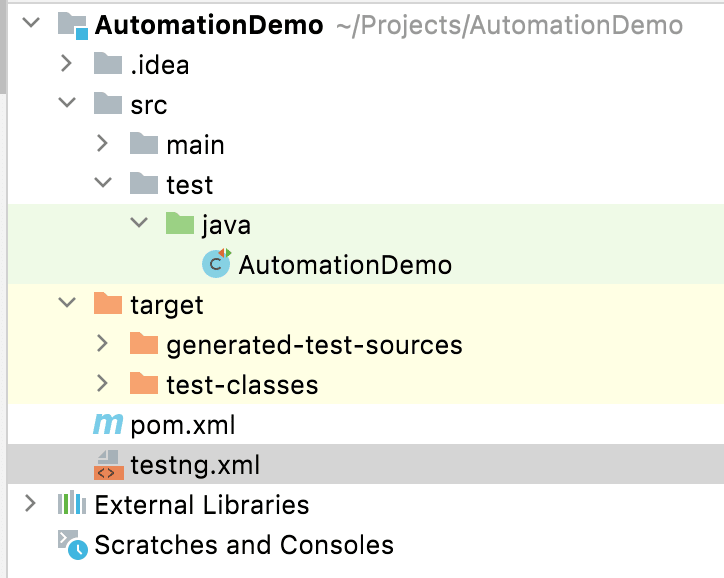
As seen in the project setup, we have created a class file named Test1 under src/test/java folder.
Since we would be passing the browser and OS combinations as parameters, the code will be
<?xml version="1.0" encoding="UTF-8"?>
<project xmlns="http://maven.apache.org/POM/4.0.0"
        xmlns:xsi="http://www.w3.org/2001/XMLSchema-instance"
        xsi:schemaLocation="http://maven.apache.org/POM/4.0.0 http://maven.apache.org/xsd/maven-4.0.0.xsd">
   <modelVersion>4.0.0</modelVersion>

   <groupId>org.example</groupId>
   <artifactId>AutomationDemo</artifactId>
   <version>1.0-SNAPSHOT</version>

   <properties>
       <maven.compiler.source>16</maven.compiler.source>
       <maven.compiler.target>16</maven.compiler.target>
   </properties>

   <dependencies>
       <dependency>
           <groupId>org.testng</groupId>
           <artifactId>testng</artifactId>
           <version>6.9.10</version>
           <scope>test</scope>
       </dependency>
       <dependency>
           <groupId>org.slf4j</groupId>
           <artifactId>slf4j-nop</artifactId>
           <version>1.7.28</version>
           <scope>test</scope>
       </dependency>
       <dependency>
           <groupId>org.seleniumhq.selenium</groupId>
           <artifactId>selenium-java</artifactId>
           <version>3.141.59</version>
       </dependency>
       <dependency>
           <groupId>org.seleniumhq.selenium</groupId>
           <artifactId>selenium-remote-driver</artifactId>
           <version>3.141.59</version>
       </dependency>
       <dependency>
           <groupId>org.seleniumhq.selenium</groupId>
           <artifactId>selenium-chrome-driver</artifactId>
           <version>3.141.59</version>
       </dependency>
       <dependency>
           <groupId>junit</groupId>
           <artifactId>junit</artifactId>
           <version>4.12</version>
           <scope>test</scope>
       </dependency>
       <dependency>
           <groupId>org.apache.httpcomponents</groupId>
           <artifactId>httpclient</artifactId>
           <version>4.5.13</version>
       </dependency>
   </dependencies>

   <build>
       <defaultGoal>install</defaultGoal>
       <plugins>
           <plugin>
               <artifactId>maven-compiler-plugin</artifactId>
               <version>3.0</version>
               <configuration>
                   <source>1.8</source>
                   <target>1.8</target>
               </configuration>
           </plugin>
           <plugin>
               <groupId>org.apache.maven.plugins</groupId>
               <artifactId>maven-surefire-plugin</artifactId>
               <version>2.12.4</version>
               <configuration>
                   <suiteXmlFiles>
                       <!-- TestNG suite XML files -->
                       <suiteXmlFile>testng.xml</suiteXmlFile>
                   </suiteXmlFiles>
               </configuration>
           </plugin>
           <plugin>
               <groupId>org.apache.maven.plugins</groupId>
               <artifactId>maven-surefire-report-plugin</artifactId>
               <version>3.0.0-M5</version>
           </plugin>
       </plugins>
   </build>
</project>
<?xml version="1.0" encoding="UTF-8"?>
<!DOCTYPE suite SYSTEM "http://testng.org/testng-1.0.dtd">
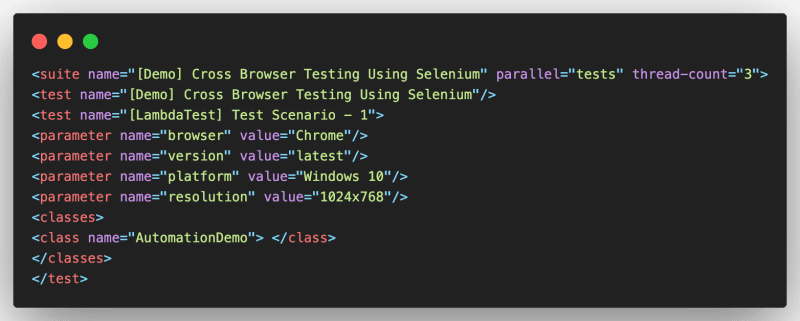
<suite name="[Demo] Cross Browser Testing Using Selenium" parallel="tests" thread-count="3">
   <test name="[Demo] Cross Browser Testing Using Selenium"/>
   <test name="[LambdaTest] Test Scenario - 1">
       <parameter name="browser" value="Chrome"/>
       <parameter name="version" value="latest"/>
       <parameter name="platform" value="Windows 10"/>
       <parameter name="resolution" value="1024x768"/>
       <classes>
           <class name="AutomationDemo"> </class>
       </classes>
   </test>
   <test name="[LambdaTest] Test Scenario - 2">
       <parameter name="browser" value="Firefox"/>
       <parameter name="version" value="latest"/>
       <parameter name="platform" value="Windows 10"/>
       <parameter name="resolution" value="1024x768"/>
       <classes>
           <class name="AutomationDemo"> </class>
       </classes>
   </test>
   <test name="[LambdaTest] Test Scenario - 3">
       <parameter name="browser" value="MicrosoftEdge"/>
       <parameter name="version" value="latest"/>
       <parameter name="platform" value="MacOS Catalina"/>
       <parameter name="resolution" value="1024x768"/>
       <classes>
           <class name="AutomationDemo"> </class>
       </classes>
   </test>
</suite>
import org.openqa.selenium.*;
import org.openqa.selenium.WebDriver;
import org.openqa.selenium.remote.DesiredCapabilities;
import org.openqa.selenium.remote.RemoteWebDriver;
import org.openqa.selenium.support.ui.WebDriverWait;
import org.testng.annotations.*;
import java.net.MalformedURLException;
import java.net.URL;
import java.time.Duration;

public class AutomationDemo
{
   WebDriver driver = null;
   public static String status = "passed";
   String username = "user_name";
   String access_key = "access_key";

   String testURL = "https://todomvc.com/examples/react/#/";
   String testURLTitle = "React • TodoMVC";

   @BeforeTest
   @Parameters(value={"browser","version","platform", "resolution"})
   public void testSetUp(String browser, String version, String platform, String resolution) throws Exception
   //public void testSetUp() throws Exception
   {
       DesiredCapabilities capabilities = new DesiredCapabilities();
       capabilities.setCapability("build", "[LambdaTest] Demonstration of Selenium Automation Testing");
       capabilities.setCapability("name", "[LambdaTest] Demonstration of Selenium Automation Testing");
       capabilities.setCapability("platform", platform);
       capabilities.setCapability("browserName", browser);
       capabilities.setCapability("version",version);
       capabilities.setCapability("resolution",resolution);
       capabilities.setCapability("tunnel",false);
       capabilities.setCapability("network",true);
       capabilities.setCapability("console",true);
       capabilities.setCapability("visual",true);

       try
       {
           driver = new RemoteWebDriver(new URL("https://" + username + ":" + access_key + "@hub.lambdatest.com/wd/hub"), capabilities);
       }
       catch (MalformedURLException e)
       {
           System.out.println("Invalid grid URL");
       }
       System.out.println("Started session");
   }

   @Test(description="To Do App on React App")
   public void test_element_addition() throws InterruptedException
   {
       driver.get(testURL);
       Thread.sleep(5000);

       /* Selenium Java 3.141.59 */
       WebDriverWait wait = new WebDriverWait(driver, 5);
       /* WebDriverWait wait = new WebDriverWait(driver, Duration.ofSeconds(10)); */

       /* Click on the Link */
       By elem_new_item_locator = By.xpath("//input[@class='new-todo']");
       WebElement elem_new_item = driver.findElement(elem_new_item_locator);

       /* Add 5 items in the list */
       Integer item_count = 5;

       for (int count = 1; count <= item_count; count++)
       {
           /* Enter the text box for entering the new item */
           elem_new_item.click();
           elem_new_item.sendKeys("Adding a new item " + count + Keys.ENTER);
           Thread.sleep(2000);
       }

       WebElement temp_element;

       /* Now that the items are added, we mark the top three items as completed */
       for (int count = 1; count <= item_count; count++)
       {
           Integer fixed_cta_count = 1;

           /* Enter the text box for entering the new item */
           /* Create a varying string to create a new XPath */
           String xpath_str = "//ul[@class='todo-list']/li[" + fixed_cta_count + "]" + "//input[@class='toggle']";
           temp_element = driver.findElement(By.xpath(xpath_str));

           temp_element.click();
           Thread.sleep(2000);
           /* Toggle button to destroy */
           driver.findElement(By.xpath("//li[@class='completed']//button[@class='destroy']")).click();
           Thread.sleep(1000);
       }

       /* Once you are outside this code, the list would be empty */
   }

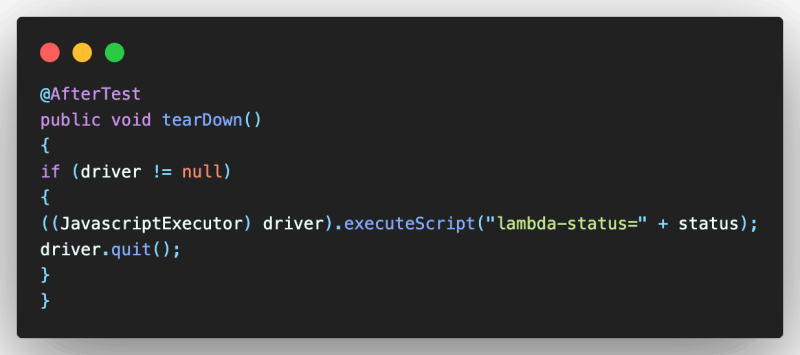
   @AfterTest
   public void tearDown()
   {
       if (driver != null)
       {
           ((JavascriptExecutor) driver).executeScript("lambda-status=" + status);
           driver.quit();
       }
   }
}
Inspecting web elements is a crucial step for developers and testers to identify and fix UI issues or modify HTML/CSS files. If you're a MacBook user, you might be wondering how to inspect elements on Mac.
Code Walkthrough
- Addition of Project Dependencies
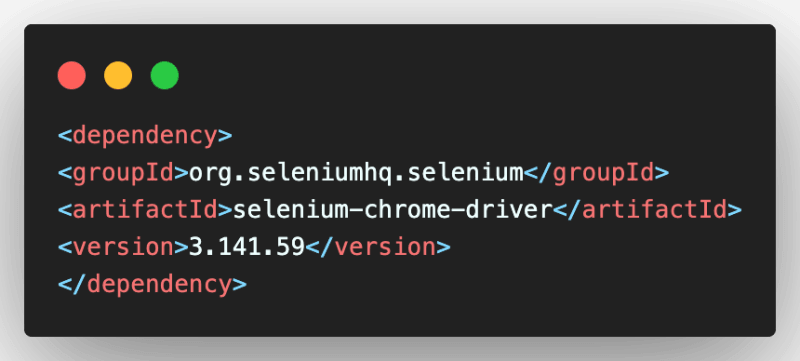
We have created a new Maven project in IntelliJ IDEA. Once the project is created, the necessary dependencies are added in pom.xml. The POM file contains all the project configurations and dependencies that are used by Maven for building the project.
For demonstrating cross browser testing with Selenium, we have used the Selenium 3.141.59 on LambdaTest.
The requisite test combinations would be passed in the form of parameters to the test method. Parameterized testing in TestNG is one of the ideal ways to provide test scenarios with different test combinations.
- Implementation of Test Method
We have only one test method in src\test\java\Automation.java. We import all the necessary packages at the start of the implementation. Since Selenium cross browser testing is performed on the cloud grid (i.e. LambdaTest), we import the methods in the RemoteWebDriver class.
Since we are using Selenium 3, we would be using the methods provided by the DesiredCapabilities class. It is important to note that DesiredCapabilities is deprecated in Selenium 4. Please refer to our What is Deprecated in Selenium 4 blog that deep dives into the additions and depreciation in the Selenium 4 release.
Different annotations in TestNG like @BeforeTest, @test, @Parameters, @AfterTest, etc. are used for creating more robust tests. The methods implemented under @BeforeTest & @AfterTest annotations are invoked respectively before & after the execution of the test methods.
The cleanup activity (or Teardown) is normally done as a part of the method implemented under the @AfterTest annotation.
The testSetUp method implemented under the @BeforeTest annotation is a parameterized method that takes the following input parameters:
- browser
- version
- platform
- resolution
These test combinations are passed from testng.xml. We will be discussing the same in the next section.
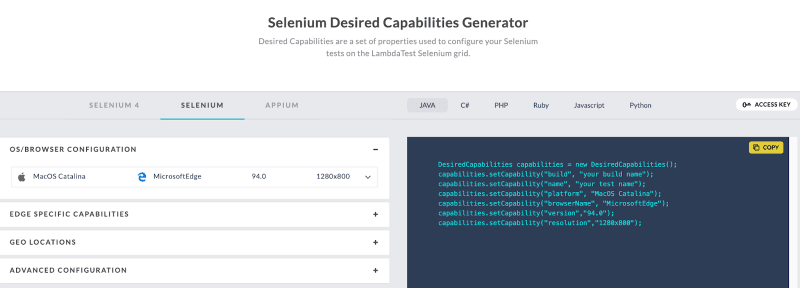
A new object named capabilities of the type DesiredCapabilities is created in the testSetUp method. The capabilities object sets the browser, browser version, platform, and other relevant properties that are necessary for performing cross browser testing using Selenium.
As the tests are run on the Selenium cloud grid on LambdaTest, the desired capabilities are generated using the Selenium Capabilities Generator on LambdaTest.
An instance of RemoteWebDriver in Selenium created in the testSetUp method. The following parameters are passed to the RemoteWebDriver method:
- username
- accesskey
- LambdaTest Hub URL [i.e. @hub.lambdatest.com/wd/hub]
- capabilities
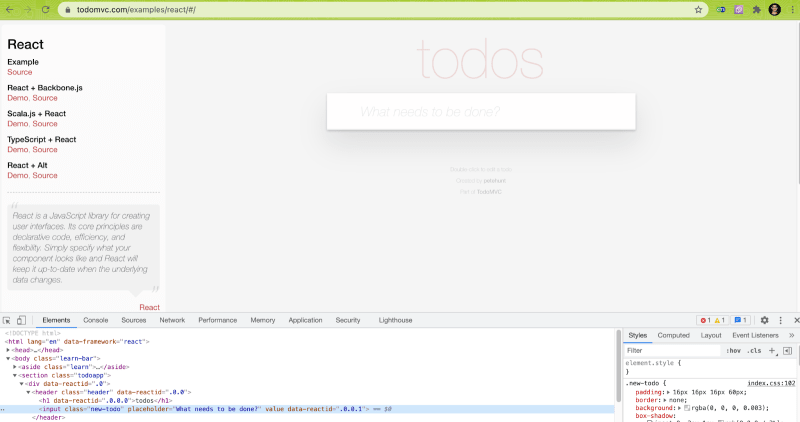
In the test method test_element_addition(), we first set the test URL using driver.get in Selenium. For adding a new item in the ToDo list, we first use the relevant locators in Selenium to find the desired WebElement in the DOM. In our case, we have used the XPath locator in Selenium to locate the required element.
findElement in Selenium WebDriver is used for accessing the element that was earlier located using the XPath locator. The XPath locators cheat sheet is the ideal resource in case you want to check the numerous ways of using the XPath locator.
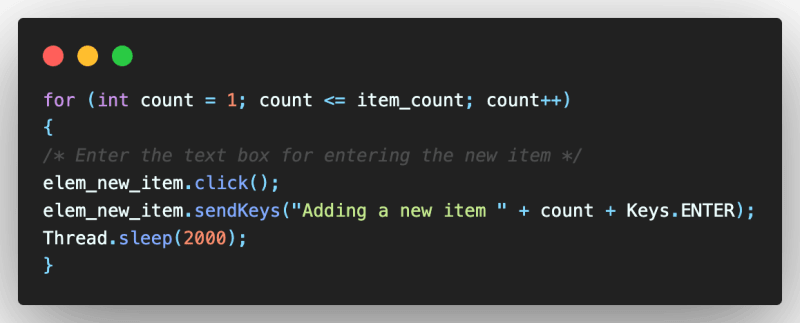
Since we want to add 5 elements in the ToDo list, we run a for loop of 1 to 5 where the required item is added to the list. Click method in Selenium is used for clicking inside the text box where the text for ToDo item needs to be inserted.
The send_keys method which is a part of the Action Class in Selenium is used for entering a new item to the list. Keys.ENTER simulates the Enter key, owing to which the desired item (or text) is added to the list.
You can read our detailed tutorial on keyboard actions in Selenium WebDriver to know more about handling keyboard actions with Selenium. A sleep of 2000 ms (i.e. 2 seconds) is added to ensure that the elements to be interacted with are available in the DOM. Waits in Selenium are used for handling dynamic elements on a web page.
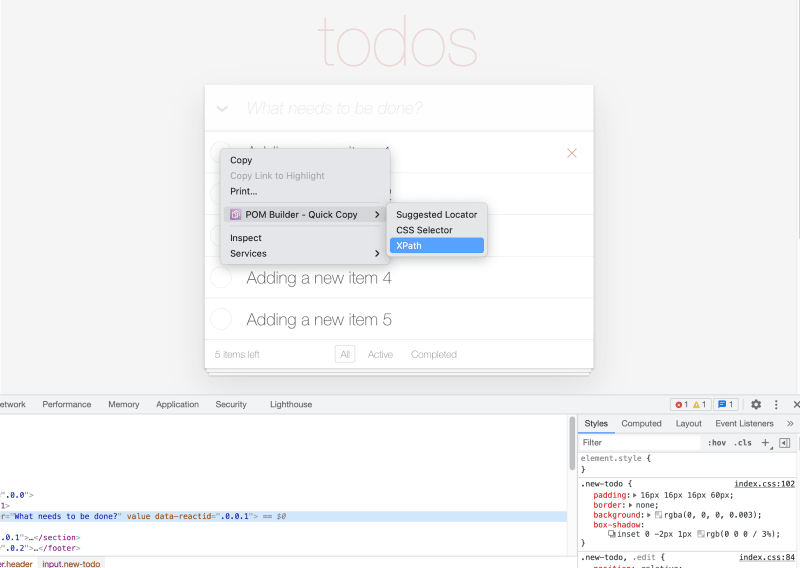
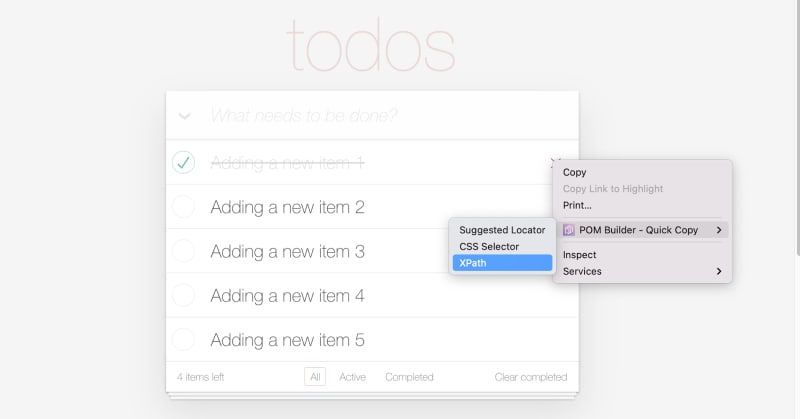
Once the 5 items are added to the ToDo list, we use a simple logic to locate each item using its XPath. In our case, we have used the POM Builder extension in Chrome that helps compute dynamic XPath with ease.
Now that the element is located, the click method in Selenium is used for clicking the element.
Thread sleep in Selenium Java is used for adding a few seconds of delay. Though we have used it for demonstrating cross browser testing using Selenium, thread sleep should not be used for large-scale test applications. The destroy (or ‘x’) icon is located using its XPath.
Once the click method is applied on the destroy icon, the respective item is removed from the ToDo list. The same steps are repeated until the entire list is empty.
In the method implemented under the @AfterTest annotation, JavaScriptExecutor in Selenium WebDriver is used for executing JavaScript code from WebDriver. The executeScript method executes JavaScript in the context of the currently selected window or frame in Selenium.
Finally, quit in Selenium WebDriver closes all the browser windows and releases all the resources used by the WebDriver instance by terminating all the instances of WebDriver.
- Passing Test Parameters from testng.xml
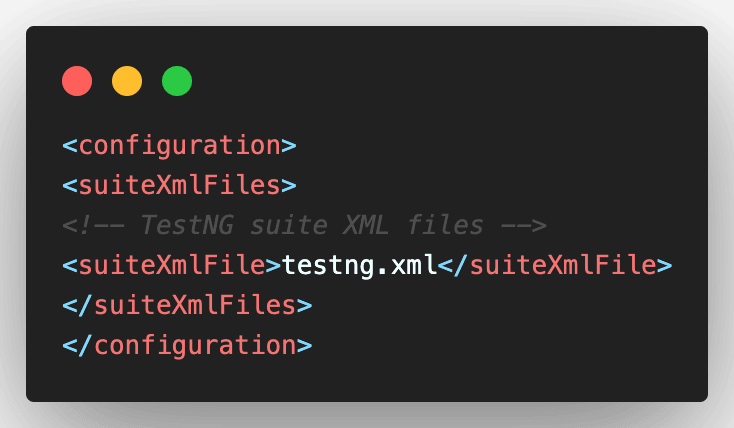
The test suite comprises a single test that is run against three different browser and OS combinations. Parallel execution with TestNG in Selenium is used for achieving parallelism at the “tests” level. This means that the test against 3 input combinations is run in parallel on the LambdaTest cloud grid.
The tag in TestNG lets you pass the parameter(s) to the tests. In this cross browser testing in Selenium demo, three test combinations are added in testng.xml.
Execution
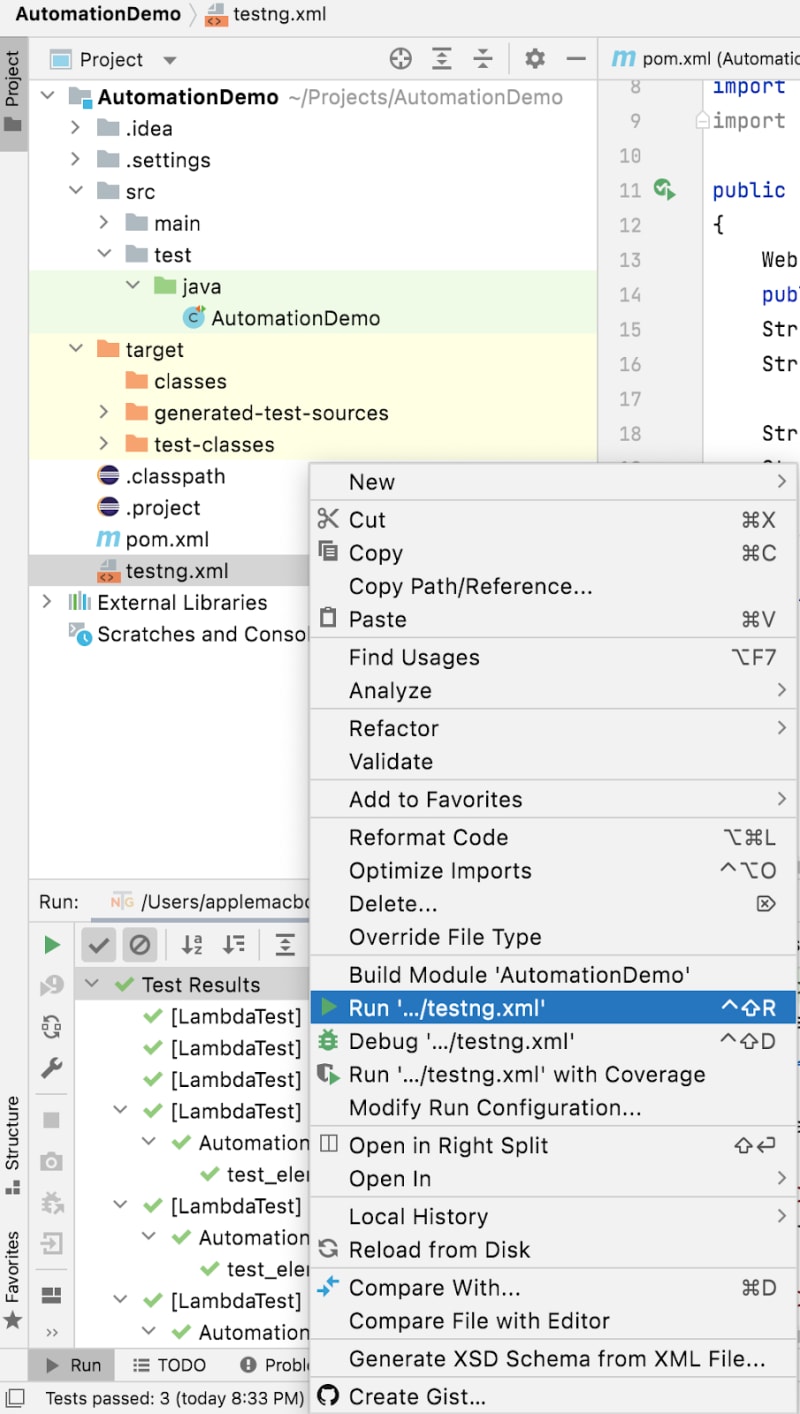
To run the tests, right click on testng.xml in the IDE and press Run.
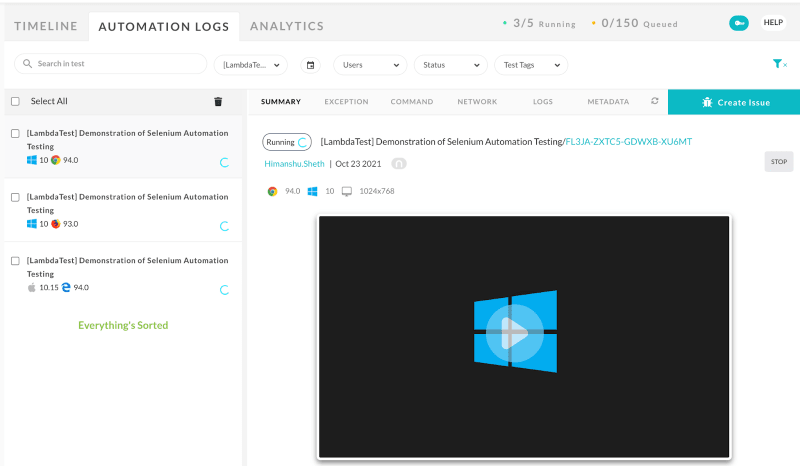
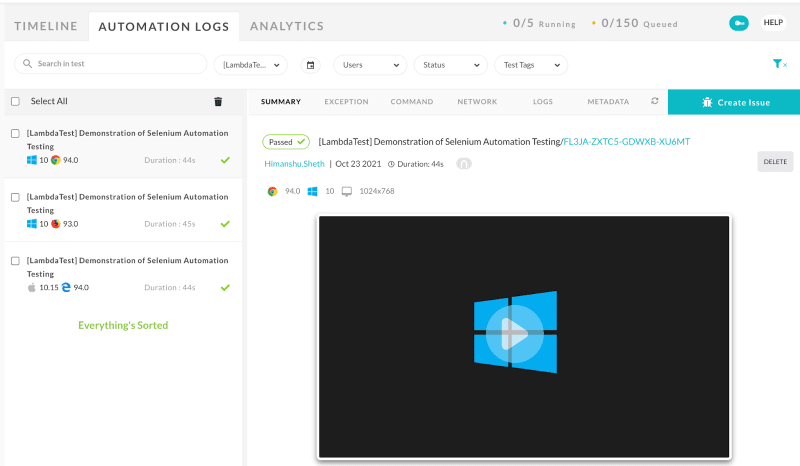
Hop on to Automation Dashboard on LambdaTest to check the status of the test execution. My plan on LambdaTest supports parallel execution upto five tests. As seen below, three tests are running in parallel on the LambdaTest cloud Selenium Grid.
You can click on videos, logs, and other available information to gain more insights on the test execution. As seen below, the demo on cross browser testing in Selenium was successful since all the three tests passed without any failures.
Here's an Aerokube alternative to run tests upto 70% faster than any cloud grid, start your free test today!!!
Perform manual or automated cross browser test on over 3000+ browsers online. Deploy and scale faster with the most powerful cross browser testing tool online
Conclusion
Cross browser testing is crucial when launching a website or web application. It ensures you reach your audience with a consistent and flexible approach to browsing online. However, the biggest concern of organizations is how to perform cross browser testing. The manual testing approach can be straining, time-consuming, and expensive for modern businesses.
Automated cross-browser testing using frameworks like Selenium is the best solution for businesses of all sizes. LambdaTest proves to be the best option for any business need with real-time cross browser testing using Selenium Grid.
In this Selenium WebDriver tutorial, we have discussed the key components of the Selenium WebDriver framework, such as its architecture and browser compatibility, and highlight the most useful features in Selenium 4.

![Cover image for Cross Browser Testing In Selenium [Tutorial]](https://media2.dev.to/dynamic/image/width=1000,height=420,fit=cover,gravity=auto,format=auto/https%3A%2F%2Fdev-to-uploads.s3.amazonaws.com%2Fuploads%2Farticles%2Fur20vd7ohu38yz3fblsi.png)









Top comments (0)