
The need for seamless collaboration has driven us closer to the best possible orchestration tools around, specifically Continuous Integration (CI) & Continuous Delivery (CD) tools. Amongst all the competition, Jenkins has emerged with a unanimous popular vote! In fact, it is so popular that it is the go-to DevOps automation tool for many software development teams.
If you want to get good results from this popular DevOps tool, you need to follow the best practices. With that in mind, we want to share some of Jenkins best practices.
Let’s get started.
1. Keep Jenkins Secure At All Times
Why Is It Important?
Jenkins does not perform any security checks within the default configuration. This implies that any user accessing the website can execute any random code on the Jenkins master besides simply configuring Jenkins, the jobs, and builds. It also enables the execution of any arbitrary code on all connected agents, including your passwords, certificates, and other private/reserved data. As Jenkins CI/CD best practices go, it is recommended to secure Jenkins and configure the ‘Configure Global Security’ option.
How To Put It To Practice?
1. Access Control:
This primary action comes with two facet configurations to secure Jenkins against authorized usage.
Security Realm: Commonly known as ‘Authentication’, it informs Jenkins environment how and where to pull user information from.
Authorization: Informs the Jenkins environment as to which users and/or groups can access which aspects of Jenkins, and to what extent.
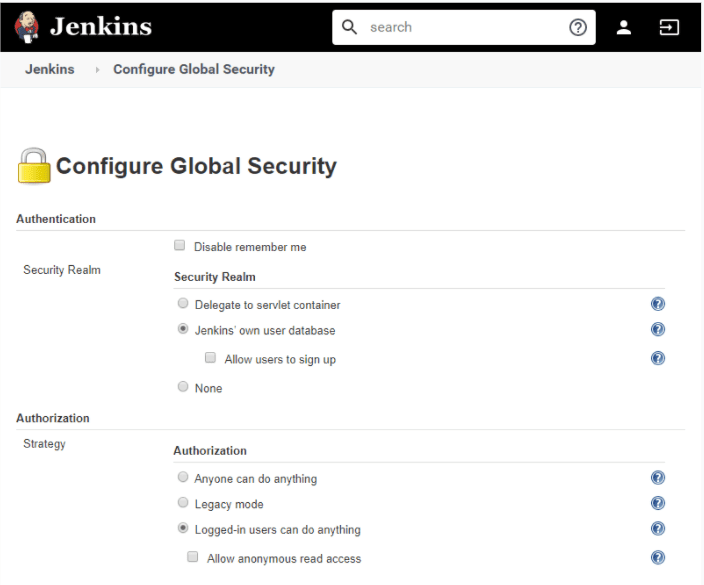
a. Security Realm
- Jenkins Own User Database: Simplest Authentication Scheme
Starting with Jenkins V2.214 and Jenkins LTS V2.222.1 ‘Jenkins own user database’ is used as the default security realm option.
For versions before Jenkins 2.214 and Jenkins LTS 2.222.1, the Enable Security checkbox should be checked to enable users to login with their credentials and avoid any trespassing.

- LDAP
This feature is more common for larger installations in organizations with an external identity provider such as LDAP. It is more likely that your Jenkins instance may not have LDAP already installed. To enable this, install the LDAP plugin. This delegates all authentication to a configured-on LDAP server, including both users and groups.
b. Authorization
- Anyone can do anything
Avoid using this setting for anything other than local testing Jenkins controllers. Why? Because, as the name suggests, everyone gets full control of Jenkins, including anonymous users.
- Legacy mode
As per the Jenkins best practices above, do not use this setting. Only users having an “admin” role will be granted full control over the system; otherwise, they will only have read access.
- Logged-in users can do anything
This mode forces every user to login before using Jenkins. Upon advanced options settings, anonymous users only get read access to Jenkins or no access at all. This ensures an audit trail of users’ actions.
- Matrix-based security
This authorization scheme controls which users and groups can perform which actions in the Jenkins environment.
- Project-based Matrix Authorization Strategy
‘Matrix-based’ security and ‘Project-based’ Matrix Authorization Strategy are provided by the ‘Matrix Authorization Strategy Plugin’ and require a separate installation on your Jenkins.
This authorization scheme is an extension to Matrix-based security that allows additional access control lists (ACLs) to be defined for each project separately in the Project configuration screen. This allows specific users or groups access to specified projects.
Matrix-based/Project-based matrix security provides the most security and flexibility for many Jenkins environments; therefore, it is recommended for production environments.
2. Protecting Jenkins Users From Other Threats:
These features are off by default and we must act on them as required. This makes an important part of Jenkins CI/CD best practices.
- Cross Site Request Forgery (CSRF) Protection: Prevent a remote attack against Jenkins running inside your firewall. CSRF protection has been enabled by default for versions since 2.0. By default, this feature is off to Jenkins 1.x and when upgraded to 2.x.
Path for CSRF settings: Manage Jenkins > Configure Global Security > Section: CSRF Protection.
https://www.jenkins.io/doc/book/managing/security/#cross-site-request-forgery
- Security implication of builds that run on master: Builds running on the master node can read or modify files in JENKINS_HOME, and this can impact the entire Jenkins installation, such as reading credentials, creating pipelines, jobs, installing plugins, etc.
Generally, configure the master to have no executors and run builds only on build agents where people who administer Jenkins are different from people who configure jobs or commit to projects. Alternatively, use Jobs Restrictions Plugin to filter which jobs can be run on the master node.
This Jenkins Tutorial for beginners and professionals will help you learn how to use Jenkins, one of the most popular CI/CD tools used in DevOps.
A comprehensive end to end Testing tutorial that covers what E2E Testing is, its importance, benefits, and how to perform it with real-time examples.
2. Always Backup The “JENKINS_HOME” Directory
Why Is It Important?
Jenkins home directory contains lots of data, including job configurations, build logs, plugin configs, etc. that we cannot afford to lose. This can be accomplished through plugins offered by Jenkins or configuring a job to take backup. Needles to say, this is one of the most essential Jenkins best practices.
How To Put It To Practice?
1. Backup Plugin: Using this plugin is NOT recommended as,
This requires you to manually start it to back up your data.
Jenkins has stopped any enhancements over it, and there are other better alternatives available over this.
2. Thin Backup Plugin: One of the handiest plugins of all that offers automated periodic backups.
Install the plugin through Manage Jenkins -> Manage Plugins ->Click ‘Available’ tab -> Search for ‘Thin Backup’.
Once installed, go to Manage Jenkins -> ThinBackup -> Settings.
Configuration options for the plugin are self-explanatory and for any ambiguity ‘?’ beside every setting is a boon!
Click ‘Backup now’ to test the backup.

3. Periodic Backup Plugin: This is an alternative to an existing ‘Backup Plugin’ that will work periodically once configured.

The plugin defines three extension points:
File Manager: Defines what files should be included in the backup and the files’ restored policy. E.g. : ConfigOnly — will choose only the configuration XML files.
Storage: Specifies the method of archiving and unarchiving backups. E.g., “ZipStorage” will compress backup files into a zip archive.
Location: Specifies the localization of the backups. E.g., “LocalDirectory” — will store the backup files inside the specified path.
Refer https://plugins.jenkins.io/periodicbackup/ to achieve this.
4. Configure a regular backup job
Choose ‘Freestyle project’ while creating a new Jenkins job.
Mark ‘None’ for SCM.
Select ‘Build periodically’ in Build Triggers and configure the frequency in Schedule. E.g. Giving ‘H 12 * * *’ will back up every day at 12.25.30 GMT
Add Execute Shell build step using this file as command and build job.
5. Backup Jenkins configuration to Google Cloud storage
- This is best used if you have a Jenkins server configuration deployed over Kubernetes cluster on Google Cloud. Use ‘Thin Backup plugin’ (as described above) with Google Cloud storage plugin (install) to connect to the cloud. This article provides an illustrative approach to achieve this.
Of all Jenkins best practices, it’s best to use Thin Plugin in conjunction with either creating a pipeline by configuring a job. Else, if you have your server deployed over cloud point ‘E’ (above) is the recommended approach.
3. Setup A Different Job/Project For Each Maintenance Or Development Branch Created
One of the advantages of exploiting Continuous Integration tools is detecting issues at an early stage in the development lifecycle. Jenkins offers to build parts of your pipeline in parallel, and this one is a critical practice for successful Jenkins pipeline implementation. It is also one of the pivotal Jenkins CI/CD best practices recommended over and over.
Why Is It Important?
Setting up different jobs/projects for each branch helps you support parallel development efforts and maximize the advantage of sleuthing issues, thereby reducing risk and allowing developers to be more productive.
How To Put It To Practice?
The latest Parallel Test Executor plugin helps us execute tests in parallel.
4. Prevent Resource Collisions In Jobs That Are Running In Parallel
Why Is It Important?
By executing Step 4, multiple jobs running simultaneously can cause collisions if they create a service or need exclusive access, which can bleed out your Jenkins pipeline. Accepting this as one of the Jenkins best practices is highly recommended by DevOps professionals.
How To Put It To Practice?
Allocating distinct ports for parallel project builds avoids build collisions. If a persistent resource needs to be locked, e.g., database, Throttle Concurrent Builds Plugin, is a perfect example.
The word throttle means to regulate/adjust/control. The plugin allows for regulating the number of concurrent builds of a project running per node or via global configuration.
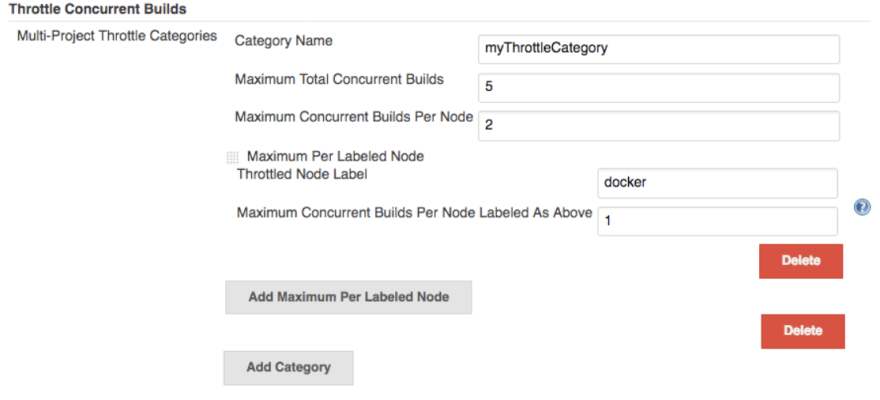
To set an unlimited value of concurrent builds, use 0.
5. Use “File Fingerprinting” To Manage Dependencies
Why Is It Important?
Creating interdependent projects on Jenkins often creates a muddle, keeping track of which version of it is used and by which version of it. “File fingerprinting,” supported by Jenkins, simplifies this, so make the best use of it.
How To Put It To Practice?
All relevant projects must be configured to record fingerprints of jar files, i.e., just record all fingerprints of the following:
jar files that your project produces
jar files that your project relies on
And to configure a job to record fingerprints, go to your Project 🡪 Configure 🡪 Post build actions🡪 Record fingerprints.
https://wiki.jenkins.io/display/JENKINS//Fingerprint
6. Avoid Complicated Groovy Codesode In Pipelines
Why Is It Important?
For a Jenkins Pipeline, Groovy code always executes on master involving exuberant usage of master resources (memory and CPU). Consequently, it becomes critically important to cut back the amount of Groovy code executed by Pipelines. The subsequent solutions are to the most common Groovy methods that can be avoided, leading up to the best Jenkins practices.
How To Put It To Practice?
1. JsonSlurper: This function (and a few other similar ones like XmlSlurper or readFile) can be used to read from a file on disk, parse the data from that file into a JSON object, and inject that object into a Pipeline using a command like JsonSlurper().parseText(readFile(“$LOCAL_FILE”)).
This command loads the local file into memory on the master twice and, if for instance the file is very large or the command is executed recurrently, it will require a lot of memory.
Solution: Instead of using JsonSlurper, use a shell step , and return the standard out. This shell would look something like this: def JsonReturn = sh label: ”, returnStdout: true, script: ‘echo “$LOCAL_FILE”| jq “$PARSING_QUERY”‘. This will use agent resources to read the file, and the $PARSING_QUERY will help parse down the file into a smaller size.
2.HttpRequest: Often this command is used to fetch data from an external source and store it in a variable. This practice isn’t ideal because:
In this case, the request comes directly from the master, which might result in inconsistent results for things like HTTPS requests — if the master does not have certificates loaded.
Also, the response to that request is stored twice, thus creating redundancy.
Solution: Use a shell step to perform the agent’s HTTP request, for example, using a tool like a curl or wget, as appropriate. If the result must be later in the Jenkins Pipeline, the result must be filtered out on an agent side as much as possible so that only the minimum required information can be transferred to the Jenkins master.
7. Build A Scalable Jenkins Pipeline
We perhaps live in a fortunate era; with every adaptation of CI/CD tools, our list of Jenkins best practices gets longer. Attaining a scalable Jenkins pipeline is one such boon firms have realized to have achieved using few tools. Here we describe the top tools you should use to create a Pipeline for your organization that is scalable without sacrificing our usability.
Why Is It Important?
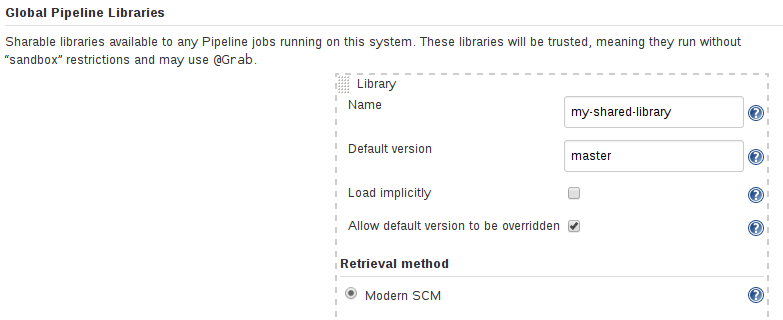
Shared Libraries are perhaps the single most talked about tool to pop up across enterprises and are the pinnacle of applying DRY principles (Don’t Repeat Yourself) to DevOps. Shared Libraries offer a version-controlled Pipeline code that can be stored and accessed from your source control management (SCM) compared to a common programming library.
How To Put It To Practice?
You need a source file with a consistent structure stored in your SCM and then use your SCM’s plugin to connect the library to your Jenkins instance and:
Either enable Global Shared Libraries under Manage Jenkins -> Configure System -> Global Pipeline Libraries or
At the folder-level through managing that specific folder.
‘@Library’ using the library name within the Jenkinsfile will allow a pipeline to access that shared library.
Once you’ve built your first basic shared libraries, be sure to look at the Jenkins community Pipeline Best Practices to ensure what you are building will scale well in the future.
8. Manage Declarative Syntax/Declarative Pipelines
This is the last yet vital piece of the puzzle when it comes to enterprise-level adoption of your Jenkins implementation, pipeline resources, and Jenkins best practices. It is a huge step towards the accessibility of enterprise shared practices for anyone looking to take advantage of Pipelines.
Declarative Pipeline configuration tells a system what to do, shifting the complexity of ‘how to do’ to the system.
Pipelines are perhaps the easiest tool to get started within Jenkins and are accessible by creating a new Pipeline “Item” in the Blue Ocean or classic Jenkins UI, or by writing your Jenkinsfile and committing it to your project’s SCM repo. You can refer to the common declarative steps to create a greenfield Pipeline, or use the Snippet Generator to convert existing build steps to Pipeline syntax.
Additionally, the community offers a great Getting Started with Pipeline guide as well as Pipeline Examples if you are looking for some inspiration.
Here’s a comprehensive e2e Testing tutorial that covers what E2E Testing is, its importance, benefits, and how to perform it with real-time examples.
9. Maintain Higher Test Code Coverage & Run Unit Tests As Part Of Your Pipeline
Why Is It Important?
Maintaining 90% of code coverage ensures better ROI by reducing UAT and product defects. Although higher coverage alone does not guarantee code quality, surfacing code coverage numbers help ensure your developers and QA defect prevention at an early stage of the life cycle.
How To Put It To Practice?
- Jenkins Cobertura plugin allows you to capture code coverage reports from Cobertura.
Steps to configure Cobertura Plugin-
Install the Cobertura plugin (via Manage Jenkins -> Manage Plugins).
Configure your project’s build script to generate Cobertura XML reports.
Enable the “Publish Cobertura Coverage Report” publisher.
Specify the directory where the coverage.xml report is generated.
(Optional) Configure the coverage metric targets to reflect your goals.
Configuration for a single project/project hierarchies/Maven is detailed here.
- Code coverage API plugin is a unified API plugin that supports other plugins like Cobertura and does most of the repeated work for these plugins.
This API plugin will mainly perform:
Finding coverage reports according to the user configurations.
Use adapters to convert reports into a standard format.
Aggregate parsed standard format reports and demonstrate parsed results in a chart.
So, implementing code coverage simply relies on writing an adapter that would accomplish only one thing — Conversion of a coverage report into the standard format.
- LambdaTest Selenium grid cloud offers you a wide library of 2000+ browsers and browser versions so you can achieve higher test coverage while performing automation testing using the Selenium test suite.
By installing the LambdaTest Jenkins plugin, automating Selenium test automation scripts by connecting your Jenkins CI instance to the LambdaTest grid will be as easy as pie.
LambdaTest Jenkins plugin will help you to:
Configure your LambdaTest credentials for your Jenkins job.
Set up the Lambda Tunnel & tear down the binary file to get started with automated cross browser testing on your locally hosted web apps.
Embed all the test results including video logs, network logs, and screenshots of the steps performed through LambdaTest with your Jenkins job results.
Detailed step by step procedure is articulated in this support doc for Jenkins integration.
In this Appium tutorial, learn about Appium Automation and its benefits for mobile automation testing. Take a look at how Appium works and see how to perform Appium testing of your mobile applications.
10. Monitor Your CI/CD Pipeline
Why Is It Important?
Having a broken CI/CD pipeline can potentially stall your development team. Also, external dependencies like cloud services, network, testing services might affect your CI/CD pipeline, and you need to know when these occasional failures become significant enough to warrant action.
How To Put It To Practice?
Here is a pluginthat highlights overall build health throughout the development cycle — use it.
The Jenkins Slack plugin sends error notifications to channels monitored by on-call engineers.
Use this pluginfor monitoring the health of our jobs over time. This enables us to recognize potential areas of the build that might require improvement. It offers us to build dashboards like build pass rate, average build time, and count of specific stage errors identifying build inefficiencies timely.
Wrapping Up!
In my opinion, the Jenkins best practices that you can leverage at any stage of development would be to let Jenkins run its own user database and perform access control based on the permission/user matrix. Encourage application teams to upgrade to the Shell step to avoid complex groovy scripts and take ownership of shared libraries and Jenkinsfiles.
Monitor your pipeline by using an autostatus plugin and always define a declarative pipeline. Backing up should be an essential activity configured to run automatically! Lastly, a robust product or software is always a byproduct of brilliant code coverage tests. It must be a critical part of your Jenkins pipeline strategy. One could also say it is one of the highly-recommended Jenkins CI/CD best practices.
Ensure to integrate code coverage API along with the LambdaTest selenium grid for defect-free deliveries!
Happy Testing!

Top comments (0)