![Cover image for A Detailed Guide On Selenium With Java [Tutorial]](https://media2.dev.to/dynamic/image/width=1000,height=420,fit=cover,gravity=auto,format=auto/https%3A%2F%2Fdev-to-uploads.s3.amazonaws.com%2Fuploads%2Farticles%2Fpdtcgcqb9em21kxdo30o.jpg)
While getting started with automation testing, two questions pop up in a tester’s mind.
Which framework should be used for automation testing?
Which programming language should be preferred?
When it comes to the automation testing framework, Selenium is often the first option that comes to our mind. Being open-source with large community support, Selenium has established itself as the favorite choice of automation testers over the last decade with significant traction.
| GitHub Stars | 23.8k |
| Forks | 7k |
| Downloads | 240k |
When it comes to selecting the right programming language for writing tests, many factors have to be considered. This includes the language in which the Application Under Test (AUT) is being developed, community support, available test automation frameworks, IDE support, usability, simplicity, and the learning curve for the tester writing the test case.
Test scenarios in Selenium can be implemented in popular programming languages like C#, Java, JavaScript, Python, PHP, and Ruby. In this Selenium Java tutorial, let us explore the most popular combination in automation testing — Selenium with Java. By the end of this detailed guide, you will be in a position to kick start your journey in Selenium automation testing with Java. I have covered a range of topics like installation and project setup for writing your first test case. I will also cover some of the Selenium best practices for automation testing using Selenium with Java.
We have a lot to cover 🙂 So, let’s get started!
Getting Started: Selenium Automation Testing with Java
If you’re new to automation or moved from manual to automation testing, then Selenium WebDriver is the best place to start. It has everything that you need to kickstart your Selenium automation journey.
In this section of this article on Selenium with Java, I will take you through the prerequisites and everything you need to know about Selenium to get started with Selenium automation testing with Java.
What is Selenium?
Selenium is a widely used automation testing framework used for browser automation of web applications. According to a recent test automation survey, 81% of the respondents used Selenium as their automating testing tool.
*](https://res.cloudinary.com/practicaldev/image/fetch/s--8b1Ecn9j--/c_limit%2Cf_auto%2Cfl_progressive%2Cq_auto%2Cw_880/https://cdn-images-1.medium.com/max/2028/0%2ALfDGw5__WXAMuydq.png)
A few features of Selenium that contributed to its popularity are
Open-source with a large community.
Supports automation across multiple platforms like Windows, Macintosh, Linux, etc.,
Supports multiple browsers including Chrome, Firefox, IE, Safari, etc.
Supports multiple programming languages like Java, Python, Ruby, C#, etc.
Supports multiple frameworks like JUnit, TestNG, etc.
Easy to integrate with CI tools like Jenkins, Docker, etc.
Easy report generation

Selenium is available in four different flavors, with the Selenium WebDriver being the most popular. Selenium WebDriver is an object-oriented API used for automating interactions with web browsers (e.g., Chrome, Firefox, Edge, etc.) using corresponding browser drivers.
We also have the Selenium Grid, which helps run tests in parallel across different browser and platform combinations. Selenium Grid follows a hub-node concept where we can run the WebDriver scripts on a single machine (hub), but the execution will be done by multiple remote machines (nodes) via routing commands.
LambdaTest provides you with a cloud-based online Selenium Grid that helps you run your test cases over an online browser farm of 3000+ browsers and browser versions, securing faster execution with maximum test coverage via minimum configurations.

The latest version, Selenium 4, comes with numerous major revamps, including enhanced architecture and advanced features. You can go through this Selenium 4 tutorial to learn what is new in Selenium 4.
Do you know CSS Logical Properties and Values make it possible to control layout through logical, rather than physical, direction and dimension mappings. They are the writing-mode equivalent of their corresponding physical equivalents.
How does Selenium WebDriver work?
The Selenium WebDriver works with a Client-Server architecture model.
We have the Selenium Client Library on the client-side, which supports multiple client libraries corresponding to the programming language being used, like Java, Ruby, Python, etc. The language binding feature of Selenium allows it to support various programming languages. Based on the programming language of the test scripts, we need to choose the client library. For example, you need to use the Java language bindings to use Selenium with Java. You can download your respective language bindings from here.
We have the Browser Driver on the server-side, which accepts the HTTP requests coming from the client-side via the communication protocol. The browser driver then interacts with the Real browser and drives it to execute the actions defined in the automation scripts. Every browser has a browser driver specific to it. For example, to automate the Chrome browser, you need to use the Chrome driver. Shown below are the locations from where you can download the respective browser driver.
| BROWSER | DOWNLOAD LOCATION |
|---|---|
| Opera | https://github.com/operasoftware/operachromiumdriver/releases |
| Firefox | https://github.com/mozilla/geckodriver/releases |
| Chrome | http://chromedriver.chromium.org/downloads |
| Internet Explorer | https://github.com/SeleniumHQ/selenium/wiki/InternetExplorerDriver |
| Microsoft Edge | https://blogs.windows.com/msedgedev/2015/07/23/bringing-automated-testing-to-microsoft-edge-through-webdriver/ |
The client-side and server-side interact with each other via a communication protocol.
For versions earlier than Selenium 4, the JSON wire protocol was used for communicating between the client and the server. It consists of the REST API that sends requests from the client to the server (browser’s native API) via HTTP. But here, since the Selenium Client Libraries (client) uses JSON protocol and the Web browser (server) users W3C protocol, encoding, and decoding of the API requests were required for communication between test scripts and browsers.

From Selenium 4, the JSON wire protocol is replaced by the WebDriver W3C protocol enabling direct communication between the Selenium Client libraries and the target browser. As the WebDriver and Web Browser use the same protocol, encoding and decoding of the API requests are no longer required making the test cases more stable than ever.

Why choose Selenium with Java?
According to the Stack Overflow Developer Survey, Java is one of the most popular programming languages, preferred by more than 35% of the respondents.

Choosing to write your Selenium automation tests using Java has multiple benefits. A few of them are listed below.
As Selenium supports Java, detailed documentation is available, making it easy to write test cases.
Compared to other languages like Python, programs written in Java are faster.
Accessibility to various operating systems like UNIX, Linux, Windows, Mac OS, etc.
Java comes with multiple complete automation frameworks like TestNG, JUnit, etc., that can be leveraged with Selenium for better coding, reporting, and maintenance.
Installation and Setup: How to use Selenium with Java?
To start your Selenium automation testing journey, the first step is to install and configure Selenium onto your system. In this section of this article on Selenium with Java, I will guide you through the installation process step by step. You will also be learning how to create a basic Selenium with Java project setup.
Installation
The installation process consists of the following steps.
Install JDK.
Install Eclipse IDE.
Install Selenium WebDriver and Language Bindings.
Install Browser Drivers (Optional).
Install JDK
Let us start with the Java Development Kit (JDK) installation. The JDK includes JRE (Java Runtime Environment) used to write and run Java code. You can download JDK from any of the below options.
Once the installation is complete, set the environment variables. The steps are as below:
Right-click on Computer.
Click on ‘Properties’.
Click on ‘Advanced system settings’.
On System Properties, select the ‘Advanced’ Tab.
Click on ‘Environment Variables.’
Copy the path where the JDK is installed. (E.g.: C:\Program Files\Java\jdk1.6.0\bin )
In the opened Environment Variables window, select ‘New‘ under ‘System variables’.
Set the path. If ‘Path’ is already existing, then edit it.

9- We also need to set the CLASSPATH. Create a new environment variable and copy the same JDK path as the value. If ‘CLASSPATH’ is already existing, then edit it.

The environment variable setup is now complete.
Open the command prompt and run the following command to verify that Java has been successfully installed in your system.
java -version

Install Eclipse IDE
Next, we need to install an IDE (Integrated Development Environment). An IDE is a platform where developers can write the code and run it. I will be using the Eclipse IDE for Java Developers for this demo. You can download the latest version from here.
Once the installer file is downloaded, complete the installation process. Alternatively, you can also use any other popular IDE like Jetbrains Webstorm, IntelliJ IDEA, etc.
Install Selenium WebDriver and Language Bindings
Download the Selenium Client Library for Java from here. The download comes as a ZIP file. Extract the contents (JAR files) and store them in a directory.

We are downloading client drivers for Selenium 4. Please check out ” Previous Releases ” for working with Selenium 3 or older versions.

Install Browser Drivers (Optional)
Finally, if you are running your test scripts on your local system, it is mandatory to have its respective browser driver for automating a browser. You can download the drivers for the browsers of your choice from here.
However, if you are utilizing a cloud Selenium Grid like LambdaTest, you can skip this step.

With the installation process complete, let us move on to the project setup.
Watch this video to know more about test result analysis and reporting in Selenium 4. Also, learn about different selenium reporting tools based on ease of setup, pricing, supported report formats, and more.
How to create a Selenium Java project in Eclipse?
We need to have a project set up for writing and storing our test cases. You can follow the below-mentioned steps to create a new Selenium with Java project in Eclipse.
Step 1: Launch Eclipse
Step 2: Create a workspace.
A workspace will be a place where you will be storing all your projects. You can create as many workspaces as required.

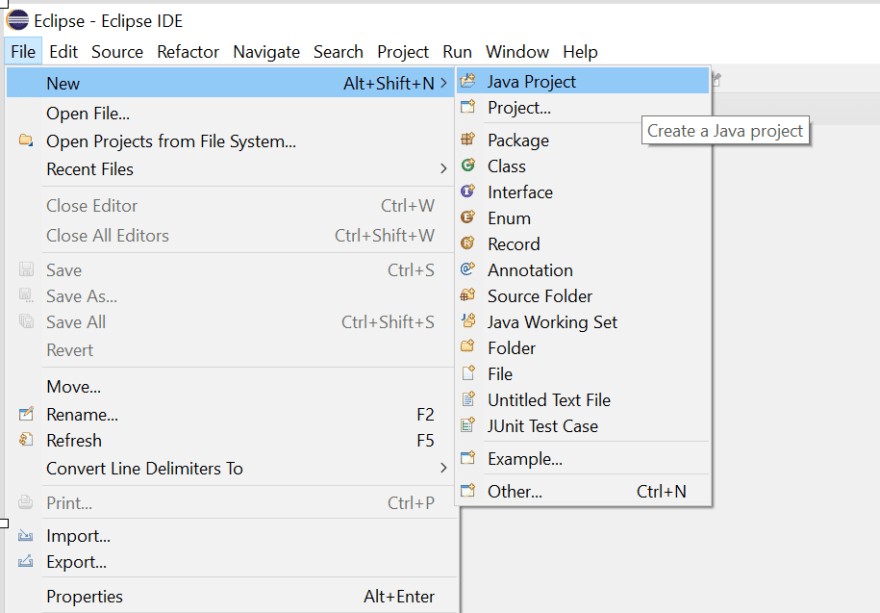
Step 3: Create a new Java project.
Go to File > New > Java Project. Name the project.
A new pop-up window will appear. Enter the following details:
Project name
Location to save the project
Execution JRE
Once done, click ‘Finish’.

The project is now created.
Step 4: Add Selenium API JAR files to the Java project by following the below-mentioned steps:
Right-click on the project and select Properties.
Select Java Build Path.
Under the libraries section, click on Add External JARs, which gets enabled upon opting for Classpath.

4- Add the Selenium Java Client JARS. Navigate to the folder location where you have downloaded and extracted the JAR files.

5- Once all the JAR files are added, click “Apply and Close”

With our project configured with Selenium and Java, we are ready to write and run our first test script in Selenium.
If you’re a developer or a tester and want to take your Selenium with Java skills to the next level, this Selenium Java 101 certification from LambdaTest can help you reach that goal.
Here’s a short glimpse of the Selenium Java 101 certification from LambdaTest:
Check this out CSS Masks: you can mask part of an element using another element (or image)
[Demo] Writing the first test case using Selenium and Java
It is time to hit practicals! In this section of this article on Selenium with Java, you will be learning to write your very first test case using Selenium with Java.
Test Scenario
First, let us understand the test scenario for which we will be writing a test script. We will be automating a simple form submission where the steps are as follows.
Launch the website.
Enter the value for ‘a’.
Enter the value for ‘b’.
Click on the ‘Get Total’ button to display the sum of two numbers, ‘a’ and ‘b’.
Verify the result.

Case 1: Running our test case on a local machine
In this section of this article on Selenium with Java, let us learn how to write the automated test case and run it on our local machine. The steps are detailed below.
Step 1: Create a class file inside your Java Project.
Right-click on the src folder inside your Project. Select New > Class.

I am naming it TestOne.java. The test gets created inside the default package.

Step 2: Write our test case code using Selenium with Java.
First of all, let us make the required Selenium imports on the top of our test class file. I will be running the test on the Chrome browser for this demo.
import org.openqa.selenium.By;
import org.openqa.selenium.WebDriver;
import org.openqa.selenium.chrome.ChromeDriver;
Inside the main() method, let us set properties to define the path of the browser driver, which we have downloaded during the installation steps.
System.setProperty(“webdriver.chrome.driver”, “C:/location_of_chromedriver.exe”);
After this, define a new Webdriver instance.
WebDriver driver= new ChromeDriver();
A glance of all possible methods WebDriver API provides us for browser automation is shown in the below snapshot.

Now, let us write the code for our test scenario.
//Maximize window
        driver.manage().window().maximize();

        //Launch the Site.
        driver.get("[https://www.lambdatest.com/selenium-playground/simple-form-demo](https://www.lambdatest.com/selenium-playground/simple-form-demo)");

        //Enter values into form and submit
        driver.findElement(By.id("sum1")).sendKeys("2");
        driver.findElement(By.id("sum2")).sendKeys("5");
        driver.findElement(By.xpath("//*[[@id](http://twitter.com/id)='gettotal']/button")).click();

        //Verify the result
        String result = driver.findElement(By.xpath("//*[[@id](http://twitter.com/id)=\'addmessage\']")).getText();

        if( Integer.parseInt(result) == 7) {
             System.out.println("Test Success");
        } else {
             System.out.println("Test Failed");
        }

        //Close the browser
        driver.quit();
I would like to briefly explain the WebDriver commands I have used in the test script.
- get(String arg): void
The get() method takes a string URL as a parameter and opens the specified URL in the current browser window. This method returns nothing.
- findElement(By by): WebElement
The findElement() method in Selenium is a WebElement command used to find a WebElement in the DOM for performing an action like clicking, typing, etc. It accepts an input parameter of the type By for locating the element using various locator strategies like id, classname, XPath, etc.
The findElement() returns a WebElement if the element is found, else throws a runtime exception — NoSuchElementException. To learn more about exception handling, you can go through this blog on common Selenium exceptions.
- quit(): void
The quit() method is used to close all browser windows opened by the Webdriver. It accepts no parameter and returns nothing.
The WebElement methods used in the test script are:
| WEBELEMENT METHOD | METHOD USAGE |
|---|---|
| click(): void | To click the element |
| sendKeys(): void | To simulate typing into an element, which may set its value. It takes a character sequence as input. |
| getText(): String | To get the visible (i.e. not hidden by CSS) text of the element, including sub-elements. |
To know more about the WebElement methods, please find the official documentation here.
For locating the elements I made use of the browser Developer Tools.

Our final code looks like this!
import org.openqa.selenium.By;
import org.openqa.selenium.WebDriver;
import org.openqa.selenium.chrome.ChromeDriver;

public class TestOne {

    public static void main(String[] args) {

        System.setProperty("webdriver.chrome.driver", "E:/Selenium/chromedriver.exe");

        WebDriver driver= new ChromeDriver();

        //Maximize window
        driver.manage().window().maximize();

        //Launch the Site.
        driver.get("https://www.lambdatest.com/selenium-playground/simple-form-demo");

        //Enter values into form and submit
        driver.findElement(By.id("sum1")).sendKeys("2");
        driver.findElement(By.id("sum2")).sendKeys("5");
        driver.findElement(By.xpath("//*[[@id](http://twitter.com/id)='gettotal']/button")).click();

        //Verify the result
        String result = driver.findElement(By.xpath("//*[[@id](http://twitter.com/id)=\'addmessage\']")).getText();

        if( Integer.parseInt(result) == 7) {
             System.out.println("Test Success");
        } else {
             System.out.println("Test Failed");
        }
               //Close the browser
        driver.quit();
    }
}
Source: *GitHub*
Step 3: Run the test.
Finally, it is time to run our test. Right-click on the test class file and select.
Run As > Java Application

The browser gets launched, and the test gets executed successfully on your local machine!

You can also check the console for logs.

Case 2: Running our test case on an online Selenium Grid
In the previous section of this article on Selenium with Java, we have seen how to run our test case on a local machine. Here, let us explore how to run our test case in a remote cloud-based Selenium Grid.
Running our test cases in an online Selenium Grid helps us tackle the below-mentioned problems that occur during local execution when the project size and test coverage requirement increase.
Scalability
Better browser coverage
Infrastructure limitations for cross browser testing etc.
LambdaTest is a cross browser testing platform that provides an online browser farm of 3000+ browser and OS combinations and an online Selenium Grid that you can integrate with your current test project via minimum code changes. Follow along to learn how!
Here’s a glimpse of LambdaTest cloud Selenium Grid:
You can also Subscribe to the LambdaTest YouTube Channel and stay updated with the latest tutorials around Selenium testing, Cypress E2E testing, CI/CD, and more.
Step 1: Create a free account on LambdaTest and secure your unique username and access key.
Step 2: Inside the test class, define all the required variables for connecting with the Remote Grid. In addition, you can also define your unique username and access key.
static String username = "YOUR_USERNAME";
   static String accesskey = "YOUR_ACCESS_KEY";
   static RemoteWebDriver driver = null;
   static String gridURL = "[@hub](http://twitter.com/hub).lambdatest.com/wd/hub";
   static boolean status = false;
Step 3: Pass the browser capabilities. You can generate your custom desired capabilities using LambdaTest Capabilities Generator.
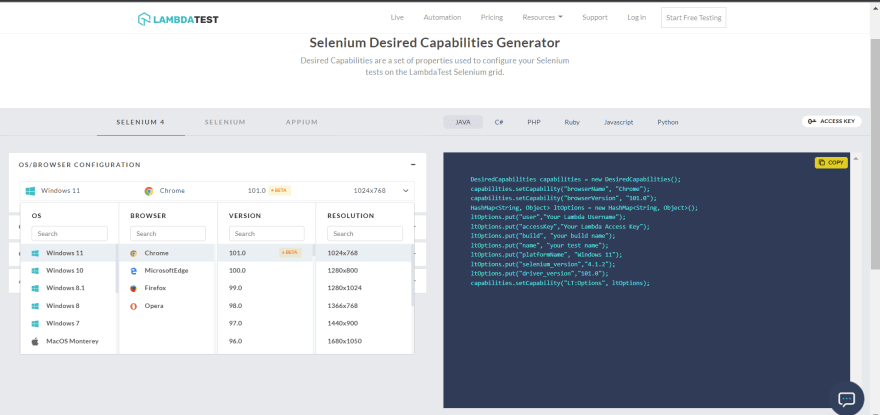
DesiredCapabilities capabilities = new DesiredCapabilities();
     capabilities.setCapability("browserName", "Chrome");
     capabilities.setCapability("browserVersion", "101.0");
     HashMap<String, Object> ltOptions = new HashMap<String, Object>();
     ltOptions.put("user",username);
     ltOptions.put("accessKey",accesskey);
     ltOptions.put("build", "Selenium Java Test");
     ltOptions.put("name", "TestOne");
     ltOptions.put("platformName", "Windows 11");
     ltOptions.put("selenium_version","4.1.2");
     ltOptions.put("driver_version","101.0");
     capabilities.setCapability("LT:Options", ltOptions);
Step 4: Define a new instance of RemoteWebDriver()
Remote WebDriver is an interface which is used to execute the browser automation on a remote computing device or in a distributed environment. It can control the browser in the grid by configuring the node and the hub.
Note that you no longer need to pass the browser driver.
try {
            driver = new RemoteWebDriver(new URL("https://" + username + ":" + accesskey + gridURL), capabilities);
        }
        catch (MalformedURLException e) {
            System.out.println("Invalid grid URL");
        }
        catch (Exception e) {
            System.out.println(e.getMessage());
        }
Step 5: Our final code now looks like this!
import java.net.MalformedURLException;
import java.net.URL;
import java.util.HashMap;

import org.openqa.selenium.By;
import org.openqa.selenium.JavascriptExecutor;
import org.openqa.selenium.WebElement;
import org.openqa.selenium.remote.DesiredCapabilities;
import org.openqa.selenium.remote.RemoteWebDriver;

public class TestOneWithRemoteGrid {

    static String username = "YOUR_USERNAME";
    static String accesskey = "YOUR_ACCESS_KEY";
    static RemoteWebDriver driver = null;
    static String gridURL = "[@hub](http://twitter.com/hub).lambdatest.com/wd/hub";
    static boolean status = false;

    public static void main(String[] args) {

        DesiredCapabilities capabilities = new DesiredCapabilities();
        capabilities.setCapability("browserName", "Chrome");
        capabilities.setCapability("browserVersion", "101.0");
        HashMap<String, Object> ltOptions = new HashMap<String, Object>();
        ltOptions.put("user",username);
        ltOptions.put("accessKey",accesskey);
        ltOptions.put("build", "Selenium Java Test");
        ltOptions.put("name", "TestOne");
        ltOptions.put("platformName", "Windows 11");
        ltOptions.put("selenium_version","4.1.2");
        ltOptions.put("driver_version","101.0");
        capabilities.setCapability("LT:Options", ltOptions);

        try {
            driver = new RemoteWebDriver(new URL("https://" + username + ":" + accesskey + gridURL), capabilities);
        } catch (MalformedURLException e) {
            System.out.println("Invalid grid URL");
        } catch (Exception e) {
            System.out.println(e.getMessage());
        }


        //Maximize window
        driver.manage().window().maximize();

        //Launch the Site.
        driver.get("[https://www.lambdatest.com/selenium-playground/simple-form-demo](https://www.lambdatest.com/selenium-playground/simple-form-demo)");

        //Enter values into form and submit
        driver.findElement(By.id("sum1")).sendKeys("2");
        driver.findElement(By.id("sum2")).sendKeys("5");
        driver.findElement(By.xpath("//*[[@id](http://twitter.com/id)='gettotal']/button")).click();

        //Verify the result
        String result = driver.findElement(By.xpath("//*[[@id](http://twitter.com/id)=\'addmessage\']")).getText();

        if( Integer.parseInt(result) == 7) {
             System.out.println("Test Success");
        } else {
             System.out.println("Test Failed - " + result);
        }

        //Close browser
        driver.quit();
    }
}
Source: *GitHub*
Step 6: Run the test.
The test starts running. Go to the LambdaTest Dashboard to observe the live running status.

Our test got executed successfully. You can analyze the detailed report containing video and logs.

Moreover, you can navigate to the LambdaTest Analytics Dashboard to see test performance metrics. You can see the total number of tests passed or failed from the Test Summary section. You can also see the snapshot of consistent tests from the Test Overview section.

Do you know CSS math functions min(), max() and clamp() is a polyfill that provides more advanced mathematical expressions in addition to ‘calc()’
Using TestNG framework for parallel test execution
If you are working on an actual project, you will need to write, run and maintain hundreds of test cases. Each testing cycle will demand you to execute your test cases on multiple platforms and devices to ensure that the application behaves as expected under various conditions to assure the product quality before going live. It becomes highly desirable to reduce the overall test execution time, and one way to achieve it is through parallel testing.
Parallel testing is a favored test execution strategy where the tests are run in parallel to reduce overall test execution time. Parallel testing was introduced to replace the traditional approach of sequential testing. As the name suggests, tests are executed sequentially, which is more time-consuming.

You have learned how to write and run a test case sequentially using Selenium with Java in the previous section. Now, I will walk you through how to run tests in parallel on a cloud-based Selenium Grid using the TestNG framework.
Introduction to TestNG framework
TestNG is a prominent open-source test automation framework for Java, where NG stands for ‘Next Generation.’ TestNG is widely adopted by Selenium users because of its features and feasibility. Running Selenium tests alone comes with numerous limitations. However, TestNG introduces an entire set of new features making it powerful and beneficial.
A few critical features of TestNG are listed below:
Easy report generation in desirable formats. Now it is easier to analyze how many test cases passed and how many failed during each test run.
Supports parallel testing. Multiple test cases can be run simultaneously, reducing the overall test execution time.
Possible to group test cases in TestNG effortlessly.
TestNG annotations like @test, @BeforeTest,@AfterTest, etc., are supported.
Easy to integrate with tools like Maven, Jenkins, etc.
Parallel test execution in TestNG using TestNG XML file
As pointed out, one of the key advantages of adopting the TestNG automation framework is that it supports parallel test execution. TestNG test automation framework allows you to run tests in parallel or multithreaded mode by utilizing the Multi-Threading concept of Java.
Multi-Threading is the process of executing multiple threads simultaneously, without any dependence on each other. This means that the threads are executed in isolation, and therefore, exceptions occurring on one thread won’t affect the others. Multi-Threading helps in the efficient utilization of the CPU by greatly reducing idle time. In TestNG, we enable parallel testing by making required changes in the configuration file — TestNG XML file.
TestNG XML is the test suite configuration file in TestNG, which helps customize the execution of tests. It also allows you to run a single test file over numerous combinations of parameters and values specified. A simple TestNG XML file looks like this.

To trigger parallel execution, we need to set the parallel attribute. This attribute accepts four values:
classes — to run all test cases present inside classes in the XML in parallel mode.
methods — to run all methods with @test annotation in parallel mode.
tests — to run all test cases present inside tag in the XML in parallel mode.
instances — to run all test cases in the same instance in parallel mode.
We can also set the number of threads we wish to allocate during the execution using the thread-count attribute. The default value of thread count in TestNG is 5.
<suite name=”Regression Test Suite” parallel=”methods” thread-count=”2">
Moving forward, let us install and set up TestNG in our Eclipse. Also, let us learn how to rewrite our demo test case as a TestNG test and run it parallelly in three different browsers by leveraging the online Selenium Grid.
Installation and Setup
Installing TestNG in Eclipse is a simple process. Go to Eclipse Marketplace and install TestNG.
Help > Eclipse Marketplace.
Once installed, you can locate it under the Installed section.

With the installation completed, let us move on to a basic project setup next.
Creating a TestNG Project
To create a new Java TestNG project in Eclipse, follow the below-mentioned steps.
Step 1: Launch Eclipse and create a new Java project.
Go to File > New > Java Project.

Step 2: Name your project and click Next.

Step 3: Add libraries.
Right-click on the project folder and select Properties.
Choose Java Build Path.
Go to Libraries, select Classpath, and click Add Library.

Step 4: Select TestNG and click Next.

You will see that TestNG has been added to the project library.

Step 5: Add the Selenium API JAR files to the TestNG project and click Apply and Close.

We have successfully created a TestNG project and are ready to write and run our first TestNG test case.
How to run test cases in parallel with Selenium in TestNG on Cloud Grid?
In this section of this article on Selenium with Java, we will learn how to achieve parallel test execution in TestNG. For the demo, we will be re-writing our previous test case into a TestNG test and executing it parallelly on five different browsers (Chrome, Safari, Firefox, Opera, and Edge) using the Online Selenium Grid provided by LambdaTest.
The steps are detailed below.
Step 1: Go to the TestNG project we created in the previous step.
Step 2: Create a TestNG class file by following the below-mentioned steps:
Right-click on project src and find TestNG towards the bottom of the list.
Select Create TestNG Class.

3- Name the class, choose the required annotations, provide the XML file name and click Finish. Here, I have named the class as ParallelTest.

The TestNG class file is created containing the skeleton code structure.

Let us quickly go through the TestNG annotations used:
@test — Implies that the method is a test case. Therefore, all tests should be marked with this annotation.
@BeforeMethod and @AfterMethod — These annotations run once before and after each @test method in a class.
Step 3: Write our test case using TestNG and Selenium.
I have re-written our previous test scenario as a TestNG test case. Some notable changes are:
Inside the method marked by @BeforeMethod annotation, I have placed all the setup steps since they need to be executed first before the test. Also, the method name has been renamed setUp(). Additionally, a try-catch block has been implemented for exception handling.
Also, I have added @Parameters annotation on top of the method for receiving the browser, version, and platform values from our TestNG XML file.
 [@BeforeMethod](http://twitter.com/BeforeMethod)
    [@Parameters](http://twitter.com/Parameters)(value={"browser","version","platform"})
    public void setUp(String browser, String version, String platform) throws Exception {
            DesiredCapabilities capabilities = new DesiredCapabilities();
            capabilities.setCapability("browserName", browser);
            capabilities.setCapability("browserVersion",version);
            HashMap<String, Object> ltOptions = new HashMap<String, Object>();
            ltOptions.put("user",username);
            ltOptions.put("accessKey",accesskey);
            ltOptions.put("build", "TestNG Parallel Test");
            ltOptions.put("name", "TestOne");
            ltOptions.put("platformName", platform);

            ltOptions.put("selenium_version","4.1.2");
            ltOptions.put("driver_version","101.0");
            capabilities.setCapability("LT:Options", ltOptions);

         try {
             driver = new RemoteWebDriver(new URL("https://" + username + ":" + accesskey + gridURL), capabilities);
         } catch (MalformedURLException e) {
             System.out.println("Invalid grid URL");
         } catch (Exception e) {
             System.out.println(e.getMessage());
         }
     }
- Inside the method marked by @AfterMethod annotation, I have placed the tear-down steps since they need to be executed last after every test. Also the method name has been renamed as tearDown().
[@AfterMethod](http://twitter.com/AfterMethod)
        public void tearDown() throws Exception {
           if (driver != null) {
                driver.quit();
            }
        }
    }
- We will be writing our actual code for test steps inside the method marked by @test annotation. Since we are automating an additional scenario, I have renamed the method to addValues().
[@Test](http://twitter.com/Test)
    public void addValues() {
            //Maximize window
            driver.manage().window().maximize();

            //Launch the Site.        driver.get("[https://www.lambdatest.com/selenium-playground/simple-form-demo](https://www.lambdatest.com/selenium-playground/simple-form-demo)");

            //Enter values into form and submit
            driver.findElement(By.id("sum1")).sendKeys("2");
            driver.findElement(By.id("sum2")).sendKeys("5");
            driver.findElement(By.xpath("//*[[@id](http://twitter.com/id)='gettotal']/button")).click();

            //Verify the result
            String result = driver.findElement(By.xpath("//*[[@id](http://twitter.com/id)=\'addmessage\']")).getText();

            if( Integer.parseInt(result) == 7) {
                 System.out.println("Test Success");
            } else {
                 System.out.println("Test Failed - " + result);
            }
The final code looks like this.
g;

    import java.net.MalformedURLException;
    import java.net.URL;

    import org.openqa.selenium.By;
    import org.openqa.selenium.remote.DesiredCapabilities;
    import org.openqa.selenium.remote.RemoteWebDriver;
    import org.testng.annotations.AfterMethod;
    import org.testng.annotations.BeforeMethod;
    import org.testng.annotations.Parameters;
    import org.testng.annotations.Test;

    public class ParallelTest {

    public String username = "YOUR_USERNAME";
    public String accesskey = "YOUR_ACCESSKEY";
    public RemoteWebDriver driver = null;
    public String gridURL = "[@hub](http://twitter.com/hub).lambdatest.com/wd/hub";
    boolean status = false;

    [@BeforeMethod](http://twitter.com/BeforeMethod)
    [@Parameters](http://twitter.com/Parameters)(value={"browser","version","platform"})
    public void setUp(String browser, String version, String platform) throws Exception {
            DesiredCapabilities capabilities = new DesiredCapabilities();
                    capabilities.setCapability("browserName", browser);
            capabilities.setCapability("browserVersion",version);
            HashMap<String, Object> ltOptions = new HashMap<String, Object>();
            ltOptions.put("user",username);
            ltOptions.put("accessKey",accesskey);
            ltOptions.put("build", "TestNG Parallel Test");
            ltOptions.put("name", "TestOne");
            ltOptions.put("platformName", platform);
            ltOptions.put("selenium_version","4.1.2");
            ltOptions.put("driver_version","101.0");
            capabilities.setCapability("LT:Options", ltOptions);

         try {
             driver = new RemoteWebDriver(new URL("https://" + username + ":" + accesskey + gridURL), capabilities);
         } catch (MalformedURLException e) {
             System.out.println("Invalid grid URL");
         } catch (Exception e) {
             System.out.println(e.getMessage());
         }
     }
    [@Test](http://twitter.com/Test)
    public void addValues() {
            //Maximize window
            driver.manage().window().maximize();

            //Launch the Site.        driver.get("[https://www.lambdatest.com/selenium-playground/simple-form-demo](https://www.lambdatest.com/selenium-playground/simple-form-demo)");

            //Enter values into form and submit
            driver.findElement(By.id("sum1")).sendKeys("2");
            driver.findElement(By.id("sum2")).sendKeys("5");
            driver.findElement(By.xpath("//*[[@id](http://twitter.com/id)='gettotal']/button")).click();

            //Verify the result
            String result = driver.findElement(By.xpath("//*[[@id](http://twitter.com/id)=\'addmessage\']")).getText();

            if( Integer.parseInt(result) == 7) {
                 System.out.println("Test Success");
            } else {
                 System.out.println("Test Failed - " + result);
            }

    [@AfterMethod](http://twitter.com/AfterMethod)
        public void tearDown() throws Exception {
           if (driver != null) {
                driver.quit();
**Step 4: **Configure the TestNG XML file to run in parallel mode. The steps are as below:
Open the testng.xml file. If not already created, you may create it by adding a new file to the project and naming it as testng.xml.
Edit the boilerplate. You can name the test suite and test name as per your liking. But the class name should be exact as that of our TestNG class.
<?xml version="1.0" encoding="UTF-8"?>
    <!DOCTYPE suite SYSTEM "[https://testng.org/testng-1.0.dtd](https://testng.org/testng-1.0.dtd)">
    <suite name="Parallel Test Suite">
        <test name="Test">
            <classes>
                <class name="testng.ParallelTest" />
            </classes>
        </test> <!-- Test -->
    </suite> <!-- Suite -->
3- To trigger parallel test execution in TestNG, provide the parallel attribute to . For parallel execution of test methods, set the attribute value as “tests.”
<suite name="Parallel Test Suite" parallel="tests" thread-count="5">
4- Add parameters for configuring the tests to run in a specific browser, browser version, and OS. For example, below is the code for setting up the test case to run in Chrome Browser version 101.0 in Windows 11. Similarly, you can provide as many combinations as you like.
<test name="Chrome Test">
            <parameter name="browser" value="Chrome" />
            <parameter name="version" value="101.0" />

            <parameter name="platform" value="WIN11" />

            <classes>
                <class name="testng.ParallelTest" />
            </classes>
        </test>
The final code for testng.xml looks like this.
<?xml version="1.0" encoding="UTF-8"?>
    <suite name="Suite" parallel="tests" thread-count="5">

        <test name="Chrome Test">
            <parameter name="browser" value="Chrome" />
            <parameter name="version" value="101.0" />
            <parameter name="platform" value="WIN11" />
            <classes>
                <class name="testng.ParallelTest" />
            </classes>
        </test>

        <test name="Firefox Test">
            <parameter name="browser" value="Firefox" />
            <parameter name="version" value="100.0" />
            <parameter name="platform" value="WIN8" />
            <classes>
                <class name="testng.ParallelTest" />
            </classes>
        </test>

        <test name="Safari Test">
            <parameter name="browser" value="safari" />
            <parameter name="version" value="11.0" />
            <parameter name="platform" value="macos 10.13" />
            <classes>
                <class name="testng.ParallelTest" />
            </classes>
        </test>

        <test name="MS Edge Test">
            <parameter name="browser" value="Edge" />
            <parameter name="version" value="101.0" />
            <parameter name="platform" value="WIN10" />
            <classes>
                <class name="testng.ParallelTest" />
            </classes>
        </test>

        <test name="Opera Test">
            <parameter name="browser" value="Opera" />
            <parameter name="version" value="85.0" />
            <parameter name="platform" value="WIN10" />
            <classes>
                <class name="testng.ParallelTest" />
            </classes>
        </test> <!-- Test -->
    </suite> <!-- Suite -->
We have a total of 5 different tags, and each of these will run on different threads.
5- Finally, it is time to run our test case. Right-click on our testng.xml file and navigate to Run As > TestNG Test Suite.

Our test starts getting executed. Go to your LambdaTest Automation Dashboard to see the live running status.

The test is executed parallelly in the 5 browsers, and reports and logs are generated successfully.

Best Practices for Selenium automation testing
Through automation testing, we aim to reduce the labor of manual testing, speed up the execution, detect maximum bugs early, achieve better coverage and accelerate time to market. However, writing a stable and reliant test case can be challenging due to various factors like test flakiness, incorrect testing approach, etc. This is where HyperExecute comes into the picture, which eliminates these factors and cuts down on test execution times. This allows businesses to test code and fix issues much quicker and hence achieve an accelerated time to market.
In this section of this article on Selenium with Java, let us discuss some of the well-encouraged guidelines and design patterns recommended by the Selenium community to help you create well-architectured test suites. Remember, there is no “One Size Fits all” situation when it comes to test automation. Thoughtfully decide what will work the best for your particular environment.
- Planning and Designing Test Cases beforehand
Before getting started with writing any automation tests, it is recommended that the QA teams invest time in creating a proper test plan. Surveys show that 80% of the projects dive straight into automation without having a tangible strategy.
However, to assure fool-proof testing of the application, QAs should come up with all possible logical scenarios and create maximum test cases based on the end-user perspective.
2. Implementing Page Object Model
When a UI change occurs, the Selenium locators may also change, and we are required to update the modified locators in all the test scripts consuming it. But, as the application complexity increases and UI changes become more frequent, creating and maintaining test cases becomes tiresome. The Page Object Model (POM) is a popular design pattern in Selenium automation testing, which helps in enhancing test maintenance and reducing code duplication.
3. Choosing the Best-suited Locators
While writing automation test scripts, a large chunk of the time is spent locating the web elements. Selenium offers us multiple strategies to locate a web element such as ID, Name, Link Text, XPath, CSS Selector, DOM Locator, etc.
However, some web locators are more brittle than others. As the UI implementation is prone to frequent changes, we must be cautious in choosing the right web locators, which will minimize the impact of UI code changes in the automation tests. If available, opt for unique locators like ID and Name, which are easy to find and more reliable as they are less prone to change.
4. Implement Logging and Reporting
As the test suite becomes extensive, locating the failed test case and debugging becomes challenging. In these cases, reporting and logging practices can act as huge saviors.
The test report is a document that contains all the information about a particular test run, including the number of test cases passed, the number of test cases failed, total time taken, error with a snapshot, etc. Even though default Selenium does not come with reporting, you can implement it by leveraging test automation frameworks like TestNG.
Logging helps us to understand our code better and hence makes debugging easier. Examining logs is the quickest way to analyze why your code faces a problem. Some of the popular log levels are debug, info, warning, error, and critical. Good logging saves time. However, if overdone, it can slow down test execution.
5. Incorporating Wait Commands
The web browsers take some time to load the web page contents. The time taken for page load depends on many external factors like network speed, server issues, machine capabilities, etc. To tackle this, testers need to add some delay into the code so that the web element will be loaded and available before performing any action on it.
In Java, testers often achieve this delay using Thread.sleep(). However, this is not the recommended practice. As the name implies, when the Thread.sleep() method is called, the thread goes to sleep for the specified amount of time and does absolutely nothing to pause the automation script. After the time is over, it moves on to executing the next line of code.
In real-time, we won’t be able to predict the exact time it would take for the page load as it is dependent on many external factors. Sometimes the page may load quickly, lowering the test execution speed due to the remaining unnecessary delay caused by sleep(). And sometimes, it may take longer than the specified time, causing the test to fail as the element was not fully loaded. As a better and more efficient alternative, use the Implicit wait and Explicit wait commands provided by Selenium instead of the sleep method.
Conclusion
Selenium with Java is the most widely adopted test automation combination among QAs. In this tutorial, we explored how to get started with Selenium Automation Testing with Java and wrote our very first test case. On top of that, we also learned how to optimize test execution by leveraging parallel testing and other best practices to establish a reliable testing cycle. I hope this tutorial turns out to be beneficial. There’s much more to explore!
Happy Testing!

Top comments (0)