
Webpage automation has been growing extensively, and most of us have worked on it. It is something on which we work almost regularly, automating several scenarios and navigating through many web pages.
But do you ever wonder what goes behind the scenes when the webpage is loaded in Selenium WebDriver? We know of a few WebDriver functions used to navigate to a webpage, like a get() *and *navigate(), but do they define how a page is loaded, or is there some other functionality at play in the backend of things?
The answer to this is YES! It is defined by something called the Page Load Strategy in Selenium WebDriver. The WebDriver uses Page Load Strategy to determine how the webpage will be loaded before you proceed with further interactions; to execute the next actions.
In this blog on Selenium Page Load Strategy, we will take a deeper look at this strategy and try to understand its different types and how they can be implemented in automation code.
So let us get started!
What is Page Load Strategy?
Page Load Strategy defines when the page would be considered loaded for the current session whenever the automation code launches a browser and uses get() or navigate().to() method. By default, Selenium WebDriver uses the standard Page Load Strategy, which is NORMAL. It means waiting until the entire webpage and its components, like CSS, images, frames, etc., are loaded.
If the page takes longer to load due to the components mentioned above (or throttling network conditions) and is not important to your script, you can change it to EAGER or NONE to speed up the execution. This value applies to the entire session, so wisely choose it for your project else it might lead to test flakiness.
The usage of Page Load Strategy has been introduced as a part of Selenium 4 features. Unlike past versions, it removes the dependency on using default page load timeouts.
Need a great solution for Safari for Windows? Forget about emulators or simulators — use real online browsers. Try LambdaTest for free.
How does Page Load Strategy work?
To determine whether the Page load is completed or not, Selenium makes use of the document.readyState property. The document.readyState describes the loading state of the document. A document here refers to any webpage that is loaded in the browser.
The Ready State method of Document is supported by all browsers, making it a reliable option for use with Selenium’s PageLoadStrategy.
Just like we have default PageLoadStrategy, default document.readyState for which Selenium WebDriver waits is Complete.
The readyState property of a browser’s document object represents the current state of the page loading process. The property can have one of the following values:
loading — The page is still loading.
interactive — The page has finished loading, but sub-resources such as images, stylesheets, and frames may still be loading.
complete — The page and all sub-resources have finished loading.
You can use the readyState property to determine when a page has fully loaded and is ready to be manipulated by JavaScript or other means. For example, in Selenium, you can use the readyState property to determine when a page has loaded, and the elements on the page can be interacted with using Selenium commands.

Before moving forward, let’s understand a bit more about the readyState of the document with a short exercise.
Navigate to https://ecommerce-playground.lambdatest.io/.
Once the site is loaded, right-click -> click on Inspect -> open the console and execute the command document.readyState.
As a result of this command, you would see the output as complete, which is the document’s current state. This means that the entire page is loaded with the necessary resources (i.e. images, CSS, etc.).
Next, refresh the page and hit enter again on the above command. You will be able to see the loading state of the document at this moment, like below.

If you cannot see the loading state after 4–5 refreshes, try throttling the Internet conditions by setting Network to slower options. You can learn more about it through this blog on testing websites on different network conditions. We will be making use of the same approach in the demonstration as well.

So this shows how document.readyState works in practice. You can also check the website’s performance under varying network conditions using LT Browser, a mobile-friendly tester tool. LT Browser is a complementary tool offered by LambdaTest, which allows you to test your website’s responsiveness on over 50 different devices, including smartphones, tablets, and laptops. It also offers the ability to create custom resolutions, simulate different network conditions, and generate performance reports using Google Lighthouse.
Let’s move forward to understand these values and how they are mapped with PageLoadStrategy values.
PageLoadStrategy <> document.readyState Mapping
The readyState of the document can be one of the following:
loading: Document load is under progress.
interactive: Document has been loaded and parsed, but the sub-resource like scripts, images, CSS, and frames are still loading. At this point, the DOMContentLoaded event is fired.
complete: Document and all sub-resources have finished loading. This indicates the firing of the load event.
Each PageLoadStrategy is mapped to a particular document.readyState value based on which the WebDriver will complete the navigation method and continue executing the next steps.
| PageLoadStrategy | document.readyState | Description |
|---|---|---|
| Normal | complete | Used by default by browser and Selenium WebDriver. Waits for all the resources to be downloaded. |
| Eager | interactive | Resources like images and CSS might still be loading, but DOM is accessible and ready to interact. |
| None | any | WebDriver is not blocked at all. Execution continues without any wait as soon as the initial page is loaded. |
Types of Page Load Strategies in Selenium
There are typically three types of Selenium Page Load Strategies that can be used in web automation.
NORMAL (Default, if not specified)
This Selenium Page Load Strategy makes the WebDriver wait until the page load is complete, i.e., the load event is fired.
The load event is fired when the page has loaded, including the dependent resources such as CSS, JavaScript, iFrames, and images.

It waits for the HTML content to be downloaded and parsed along with all the subresources.
EAGER
With this Selenium Page Load Strategy, the WebDriver only waits until the initial page is loaded and the DOMContentLoaded event is fired.
Unlike the load event, the DOMContentLoaded event is fired as soon as the DOM has been loaded without waiting for additional resources like CSS, JavaScript, iFrames, and images to be loaded.

It waits only for the HTML content to be downloaded and parsed.
NONE
In this Selenium Page Load Strategy, the WebDriver is not blocked and continues with the test execution.
It waits only for the HTML content to be downloaded.

You can learn more about waits through this blog on Waits in Selenium.
Do you use a Mac and want to run the test in Internet Explorer? This article explores how to test Internet Explorer on Mac.
Demonstration: WebDriver setup with different Selenium Page Load Strategies
Now that we have developed a basic understanding of different Selenium Page Load Strategies, let’s look at code examples to understand how it is implemented.
To do the same, we will be writing an automation testing script for the following scenario.
Create an instance of RemoteWebDriver using cloud-based Selenium Grid. For the same, we will be using the LambdaTest platform.
Set WebDriver capabilities to specific PageLoadStrategy.
Next, use the driver to launch the browser and navigate to https://ecommerce-playground.lambdatest.io/.
For this, we will note the time duration in which page load is completed to see how it varies for different Selenium Page Load Strategies under the same conditions. Differences in page load time will help get more clarity on all strategies.
Project Setup
For this Selenium Page Load Strategy blog, the Maven project using Java in Eclipse IDE will be used. If you are not a fan of Eclipse, use any IDE of your choice and perform the same steps. It will use Selenium WebDriver and TestNG dependencies to automate interaction with the page elements and test case execution. It is highly recommended to use the latest stable versions for better results.
Let’s get started now.
Launch Eclipse or the IDE of your choice.
Create a new Maven project and name it PageLoadStrategy.
Inside the src folder, add a test package and inside it a Test class and name it as TestPageLoadStrategy. This class will hold the entire code for this demonstration.

- Update the pom.xml file to have the latest dependencies for using TestNG in Selenium, as shown below, before writing the actual test case.
 <project xmlns="http://maven.apache.org/POM/4.0.0" xmlns:xsi= "http://www.w3.org/2001/XMLSchema-instance" xsi:schemaLocation=" http://maven.apache.org/POM/4.0.0 https://maven.apache.org/xsd/maven-4.0.0.xsd">
     <modelVersion>4.0.0</modelVersion>
     <groupId>PageLoadStrategy</groupId>
     <artifactId>PageLoadStrategy</artifactId>
     <version>0.0.1-SNAPSHOT</version>
     <build>
       <sourceDirectory>src</sourceDirectory>
       <plugins>
         <plugin>
           <artifactId>maven-compiler-plugin</artifactId>
           <version>3.8.1</version>
           <configuration>
             <release>16</release>
           </configuration>
         </plugin>
       </plugins>
     </build>
     <dependencies>
       <dependency>
           <groupId>org.seleniumhq.selenium</groupId>
           <artifactId>selenium-java</artifactId>
           <version>4.6.0</version>
       </dependency>
       <dependency>
           <groupId>org.testng</groupId>
           <artifactId>testng</artifactId>
           <version>7.7.0</version>
           <scope>test</scope>
       </dependency>
     </dependencies>
    </project>
Automate Cypress testing and perform browser automation testing with LambdaTest. Our cloud infrastructure has 3000+ desktop & mobile environments. Try for free.
- Once the pom.xml is updated, add the following code to the test case file, TestPageLoadStrategy.java. This file will contain three tests demonstrating the usage of all three types of Selenium Page Load Strategies.
package test;
import java.net.MalformedURLException;
import java.net.URL;
import java.time.*;
import java.util.HashMap;
import org.openqa.selenium.PageLoadStrategy;
import org.openqa.selenium.chrome.ChromeOptions;
import org.openqa.selenium.remote.RemoteWebDriver;
import org.testng.annotations.Test;
public class TestPageLoadStrategy {
public RemoteWebDriver driver = null;
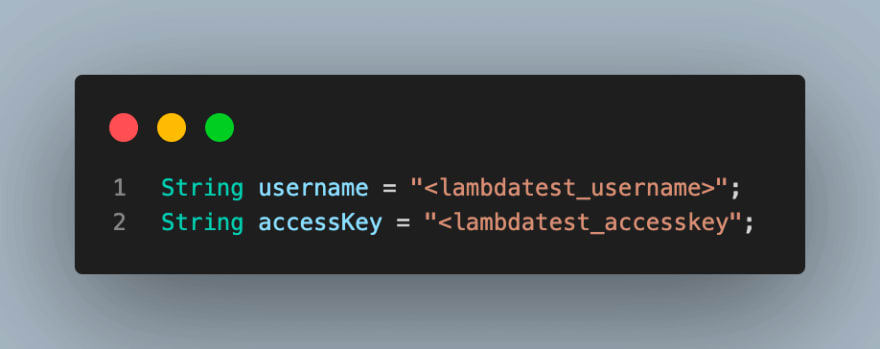
String username = "<lambdtest_username>";
String accessKey = "<lambdtest_accesskey>";
ChromeOptions chromeOptions = new ChromeOptions();
HashMap<String, Object> ltOptions = new HashMap<String, Object>();
private void setup(String buildName) {
chromeOptions.setPlatformName("Windows 10");
chromeOptions.setBrowserVersion("108.0");
ltOptions.put("project", "Page Load Strategy");
ltOptions.put("selenium_version", "4.0.0");
ltOptions.put("w3c", true);
ltOptions.put("networkThrottling", "Regular 2G");
ltOptions.put("build", buildName);
}
private void checkPageLoad() {
try {
driver = new RemoteWebDriver(
new URL("https://" + username + ":" + accessKey + "@hub.lambdatest.com/wd/hub"), chromeOptions);
Instant startTime = Instant.now();
System.out.println("Page load started at : " + startTime.toString());
System.out.println("Navigating to the URL");
driver.get("https://ecommerce-playground.lambdatest.io/");
Instant endTime = Instant.now();
System.out.println("Page load ended at : " + endTime.toString());
Duration duration = Duration.between(startTime, endTime);
System.out.println("Total PageLoad time : " + duration.toMillis() + " milli seconds");
} catch (MalformedURLException e) {
System.out.println("Invalid grid URL");
} finally {
driver.quit();
}
}
@Test
public void testNormalStrategy() {
// To set PageLoadStrategy = Normal
setup("Page Load Strategy - Normal");
chromeOptions.setPageLoadStrategy(PageLoadStrategy.NORMAL);
chromeOptions.setCapability("LT:Options", ltOptions);
checkPageLoad();
}
@Test
public void testEagerStrategy() {
// To set PageLoadStrategy = Eager
setup("Page Load Strategy - Eager");
chromeOptions.setPageLoadStrategy(PageLoadStrategy.EAGER);
chromeOptions.setCapability("LT:Options", ltOptions);
checkPageLoad();
}
@Test
public void testNoneStrategy() {
// To set PageLoadStrategy = None
setup("Page Load Strategy - None");
chromeOptions.setPageLoadStrategy(PageLoadStrategy.NONE);
chromeOptions.setCapability("LT:Options", ltOptions);
checkPageLoad();
}
}
Code Walkthrough: TestPageLoadStrategy.java
This Java file is the main test class for demonstrating the implementation of all strategies using different functions.
Let’s understand each step in detail.
Step 1. The first step would be to create an instance of RemoteWebDriver. This is required to be able to support execution on cloud Selenium Grid.

Using cloud Selenium Grid provides increased scalability and speed for Java automation testing and allows users to perform extensive parallel and cross browser testing across several OS and browser combinations.
For this blog demonstration, we are using the LambdaTest Cloud Grid. LambdaTest is a highly scalable, reliable, and easy-to-use platform that provides support of over 3000+ browsers and OS to support execution on Selenium Cloud Grid.
Subscribe to the LambdaTest YouTube Channel and stay updated with the latest tutorials around Selenium testing, Cypress testing, and more.
Also, Online Selenium Grid to run your browser automation testing scripts on cloud infrastructure containing 3000+ desktop and mobile browser environments. Perform Selenium Testing on a cloud automation testing grid that scales along with your tests.
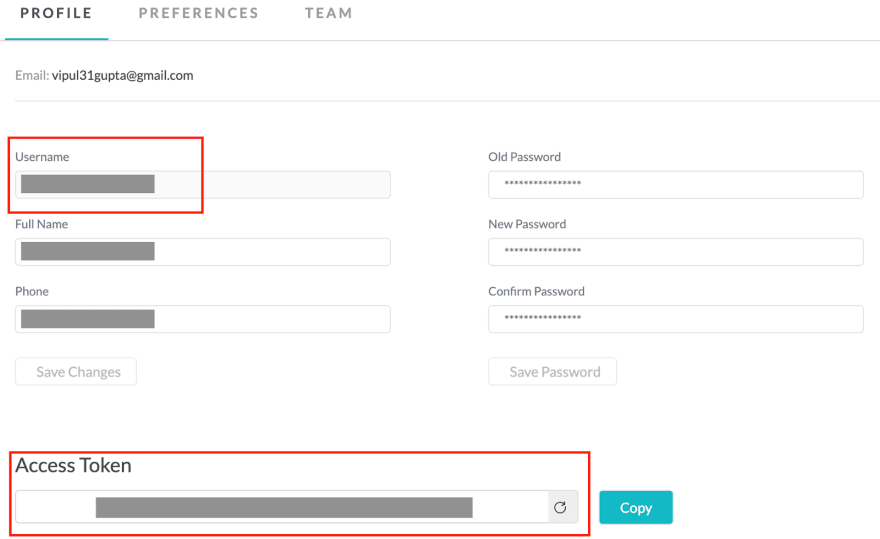
Step 2. As mentioned in the previous step, since we are using the LambdaTest platform, we need to provide the username and access key for our user to connect with the cloud hub. You can find these details under LambdaTest Profile Section after your account is created.
Step 3. Create an object of the ChromeOptions class. This class is used to manipulate various properties of the Chrome driver, which we will use for execution. This chromeOptions object will be used in each test case to set the PageLoadStrategy and then passed to WebDriver.

Step 4. Create a HashMap variable and name it as ltOptions. This will set various properties for the LambdaTest cloud grid execution.

Step 5. Next is the setup() method, used to set a few basic properties in chromeOptions and ltOptions. These are the common properties of all three PageLoadStrategy cases.
Also, note that we are using the networkThrottling property of LambdaTest to set the network to Regular 2G with 250 Kbps download speed and 50 Kbps upload speed. This will help demonstrate the load time better in all scenarios, as discussed in the previous section.
Using the LambdaTest platform provides this advantage where you can directly select the browser and version details, and your capabilities are automatically generated using LambdaTest Capabilities Generator. You just need to add them to the code.

This method takes one parameter, buildName. This parameter is used to display the build name on the LambdaTest Dashboard.

Step 6. Add a new function, checkPageLoad(). In the try block, we write the code to connect with RemoteWebDriver on the LambdaTest platform using the properties defined in chromeOptions.
After the connection is established, an object of the Instant class of java.time package is created to store and log the start time when we are about to launch the browser and start to navigate. This is followed by a driver called to the browser and the launch of the test website.
As soon as the website is considered loaded depending upon the set PageLoadStrategy, the driver passes the control to the next command, which is again an object of Instant class, to get the current time again, the end time.
By now, the page is loaded as per our requested strategy, and we have the start and end times. The time taken to load a webpage in milliseconds can be determined by finding the difference between two points. The Duration class, which is part of the same package, is used to accomplish this.
You will notice that this load time differs in all our test cases for different strategies.

A catch block is added next for the try block to handle the exception if it occurs. MalformedURLException is to catch the exception in case our RemoteWebDriver URL has invalid syntax. Once everything is done, we finally close the driver instance. To learn more about it, you can go through this blog on the most common exceptions in Selenium.
testNormalStrategy()
This is the test case to demonstrate the Normal strategy.
Firstly, the setup() method defines basic properties for the browser and LambdaTest platform. Next, the value for PageLoadStrategy is set as NORMAL here in the chromeOptions, followed by setting other capabilities.
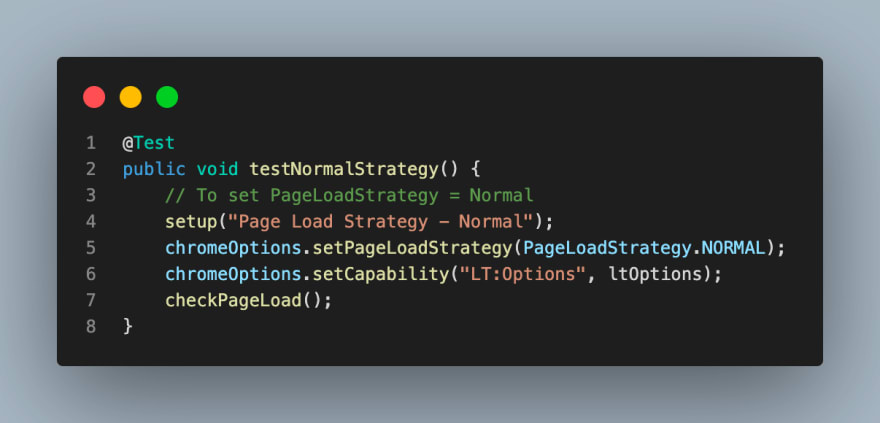
Finally, the checkPageLoad() method is called to load the webpage and to log the load time, which we will compare for each strategy in the execution section.
testEagerStrategy()
This is the test case to demonstrate the Eager strategy.

All the steps, in this case, are similar to the previous one. The only difference being the value for PageLoadStrategy is set as EAGER here in the chromeOptions, followed by calling of the checkPageLoad() method.
testNoneStrategy()
This is the test case to demonstrate the None strategy.

Value for PageLoadStrategy is set as NONE here in the chromeOptions, and the rest of the steps are similar to previously discussed test cases.
Run your Selenium Automation Testing scripts on the LambdaTest cloud grid. Test on 3000+ desktop & mobile environments. Try it for free!
Test Execution
Having understood the working and implementation of all the PageLoadStrategy, let us now execute the code and see the results of execution locally and on the LambdaTest Dashboard.
The test case would be executed using TestNG. To execute, follow the below mentioned steps:
Right-click the test case name in Eclipse IDE.
Go to Run Test, and select TestNG Test to begin the execution.
Let us, execute the cases one by one and see the load time varies for each strategy
NORMAL Strategy

You can notice the TotalPageLoad time, in this case, is 70852 milliseconds as we are using a network with Regular 2G speed. It has been established that the highest value should be among the three cases. As established so far, it should be the highest among all three. We can verify this by running the cases for Eager and None and comparing them.
EAGER Strategy
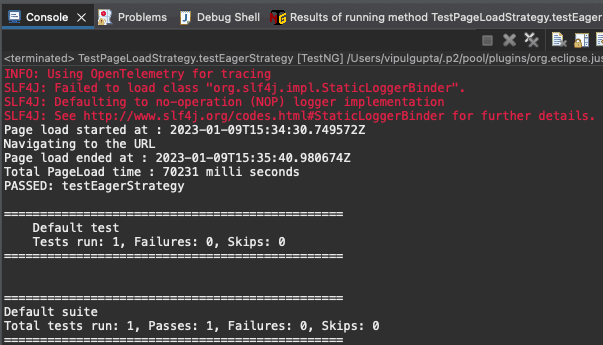
As expected, the PageLoadTime, i.e., 70231 milliseconds, for the Eager strategy in the same scenario is comparatively less than Normal.
NONE Strategy

You can note here that the PageLoadTime for None strategy is significantly less than the other two as it does not wait for any resources to be downloaded.
Here is a quick summary of the page load times in different strategies
| PageLoadStrategy | PageLoadTime (in milliseconds) |
|---|---|
| Normal | 70852 |
| Eager | 70231 |
| None | 28908 |
You can also view the execution results by navigating to the LambdaTest Dashboard as shown below for each PageLoadStrategy:

You can navigate to the Builds section under Automation to view details of your automation build.
Build details for PageLoadStrategy.NORMAL:

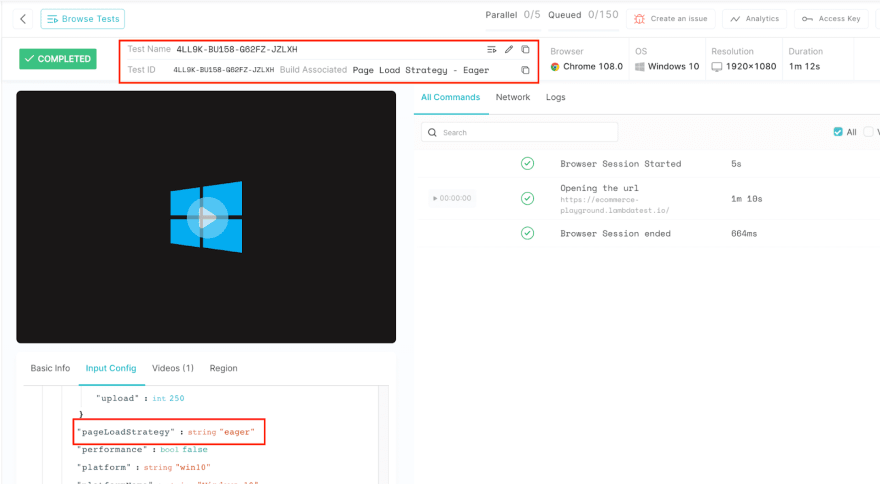
Build details for PageLoadStrategy.EAGER:
Build details for PageLoadStrategy.NONE:

If you are proficient in the TestNG framework and want to showcase your expertise as a test automation expert, you can obtain the TestNG certification from LambdaTest at no cost.
Now, run your Selenium Automation Testing scripts on the LambdaTest cloud grid. Test on 3000+ desktop & mobile environments. Try it for free.
Conclusion
With this, we have reached the end of this Selenium TestNG tutorial on different Page Load Strategies in Selenium WebDriver. In this, we have learned about further usage and working of these Selenium Page Load Strategies and how we can integrate them in automation script and execute on Selenium Cloud Grid.
I hope now you can implement these in your use cases more efficiently.
Happy Loading!!


Top comments (0)