Here I am trying to cover celery in python we need to understand before the use of celery.
What is celery?
Celery is one package or module or program, which is written in python and it helps to divide the program in the peace of task and it will run asynchronous programming or multi-threaded.
Why should we use celery?
whenever a user is trying to book a hotel or a cab, meanwhile he does not get a response for some time from the website, at that time server have been doing his work to get request and process of it then Return back response to the user,
when processing time might be increased due to sending confirm hotel, or cab is available then finally confirm it then sending ensuring your cab or hotel book via emails or SMS and bla.. ,bla
we know user stuck, that why we have to define process into multiple task or thread or sub-process and celery help us to do this.
What is a worker in celery?
The worker is like a labor, employee who done his job as per instruction who given by his manager or leader here in celery worker is seem one sub-process that would be done task by assign a message queue.
What is a message queue or broker in Celery?
the broker is the third-person facilitator between a buyer and a seller. In celery. The broker is Redis, rabbitmq etc who conveying the message in between a client and celery.
The message queue is one of the managers or leaders. who receive some instruction from the client and pass instruction on the worker as per his skill so message queue work in celery using a broker like(rabbitmq, Redis, amazon SQS, etc ) is getting instruction from the client means our project and convey this message to the worker to do those task by assign in our project.
let's get started our practical
We need to do first install our requirements:
- Broker or Server
- Python
- Celery
Note :- Here I have used Linux as of now if you have used another platform you should read docs for installation purpose
Install Broker
here I am installing rabbitmq. you could install another broker like redis etc
sudo apt-get update
sudo apt-get upgrade
sudo apt-get install rabbitmq-server
restart server and check status of server
#restart
sudo service rabbitmq-server check status
#status
sudo rabbitmqctl status
Install Python
Linux provides python in default. if you have using another platform then you must be install python
Install Celery
install in our system level. I have not used virtual-env.
even you make separate virtual-env install it.
pip3 install celery
Now we create file name as tasks.py
from celery import Celery

APP_NAME = 'tasks'
BROKER_NAME = '"amqp://guest:guest@localhost:5672//"'
BACKEND = 'db+postgresql://postgres:postgres@localhost/celerydemo'

app = Celery(APP_NAME,broker=BROKER_NAME, backend=BACKEND)

@app.task
def reverse(string):
    return string[::-1]
Here first we must import Celey class from celery and then we define constant
-
APP_NAMEis assigned for unique identify our app might have multiple apps in single projects. -
BROKER_NAMEas we had seen what is a broker we need to specify which path use for broker we have used it will provide default when the user is guest if you have created separate user at broker server it will change base on the broker if we execute our task using thisBROKER_NAMEthought we communicate with our worker. you could see configure celery -
BACKENDis an optional parameter when had passed if we need to store celery task status in the database we have to pass the different path as per database see path backend in celery
Now we open two terminal first for our broker server I have rabbitmq to interact with celery and give a status of the task and second is python interactive terminal
- pass following command in the first terminal
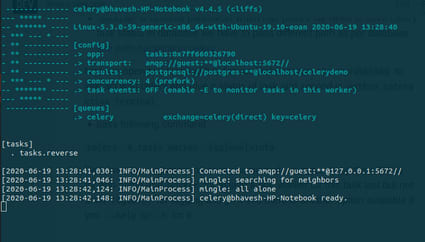
celery -A tasks worker -loglevel=info
Here we pass argument in celery command -A means app then tasks is the app(same as our file name) we specify and worker for assign a worker for this task last but not least loglevel for logging assign it info there is another option available if you --help or -h for it
- open terminal where is your
tasks.pyfirst store and run python here we start python interactive terminal and importreverse from tasks
>>> from tasks import reverse
>>> reverse
<@task: tasks.reverse of tasks at 0x7f49adca06d0>
>>> reverse('hi there we have used celery')
'yrelec desu evah ew ereht ih'
>>> reverse.delay('hi there we have used celery')
<AsyncResult: d0f264d0-ec13-4c60-9b38-064171a51a10>
>>>
at that time you will get a task at the first terminal where we have running celery so it will display a log like this

we will do a periodic task like every 10-second run task in the next tutorial
hopefully, this tutorial is helpful to you


Top comments (0)