
Hi There, Devs! 😇
We have come across various tutorials to either setup Conan or CMake with IDEs like Visual Studio or on the Terminal. These tutorials are great but for me personally I am not a big fan of Visual Studio but a very big fan of Visual Studio Code (as it is very lightweight and very much easy going for my PC).

I mean Microsoft did a great job on retaining people like me from using other editors and still using their product.
Now for the main topic as to why we are still here...
This is a barebones tutorial for setting up Conan and CMake on Visual Studio Code, with no packages and nothing. Just a structure which I personally follow and I believe you should follow too as I've had success with it till now and only very few errors.
🛠️Requirements
-
Visual Studio Code
- C/C++ - Must Have
- c/c++ definition generator - Recommended
- CMake - Must Have
- CMake Tools - Must Have
- Todo Tree - Recommended
- Python - 3.7 or greater
- pip
- CMake - 3.20.0 or greater
- Python Dependencies
- virtualenv
- conan in virtualenv
🔧Virtual Environment Setup for Conan Installation
- Download and Install | Python (skip if already installed)
- Download and Install | pip (skip if already installed)
- Make a directory for you Project, for example co-cpp-setup
mkdir co-cpp-setup
cd co-cpp-setup
code .
- Make a directory for the virtualenv, for example venv
mkdir venv
- Initialize a virtualenv in venv folder
python -m venv venv
- Activate the virtualenv (For Windows)
.\venv\bin\activate
- Install Conan Package Manager
pip install conan
To Deactivate the virtualenv
deactivate
🔩CMakeProject on VSCode
- Download and Install | CMake (skip if already installed)
- Make sure to have CMake and CMake Tools installed in your local VSCode Copy.
- Create the files required such that the folder structure for
co-cpp-setupDirectory is as shown.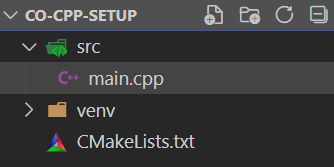
- Add barebone minimum code
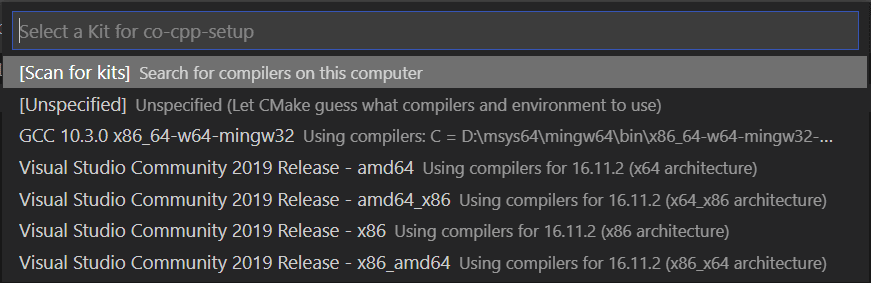
int main()to main.cpp and Reload the VSCode Window. - With CMake Tools installed it automatically detects the project now as a CMake Project and asks you to select a Kit.
- Then Configure the project for the first time.
Ctrl + Shift + P

- If you have followed everything correctly till here, a new directory name build will appear in your folder structure, after a successful Configuration of an empty
CMakeLists.txtfile.
⚙️Conan on VSCode
- We already have installed
conanusingpipin a virtualenv. - Now, we create a new txt file,
conanfile.txt, for getting packages from conancenter. 3. Now the Getting Started section from conan documentation can be followed to go ahead with your projects, or you can go ahead with your packages for your projects.
What's Next ❓
➡️ This is Part 1 of Conan and CMake for CPP Development. In the next part we will see how to use this bare bone template for setting up a barebone OpenGL Project with GLEW, GLFW and ImGUI.
➡️ Get this barebone setup on GitHub to be uploaded along with the Part2 tutorial.
🔜 Very soon I'll upload a video on how to setup (Part 1) and how to use (Part 2) on YouTube and upload the links in this article.
Thanks for your time and love from 🇮🇳 ! ✌️

Top comments (0)